
Popular categories
Looking for a yarn?


Comments / Questions (30)
![]() E-L Karlsson-Bäcker wrote:
E-L Karlsson-Bäcker wrote:
Hej! Jag stickar storlek L. Har ökat en maska på bakstycket å då stämmer diagrammet. Men hur börjar jag framstycket ? Lika som bakstycket med de 5 sista i diagrammet? Tacksam för svar. Mvh, Eva-Lotta
04.04.2026 - 12:50DROPS Design answered:
Hej, framstycket stickas som bakstycket :)
09.04.2026 - 13:58
![]() Sally Ann wrote:
Sally Ann wrote:
Der er angivet for lidt garn i opskriften, har købt til største og strikket s/m jeg mangler ca 100g mørkt..
02.02.2026 - 09:03
![]() Sally Ann wrote:
Sally Ann wrote:
Højre og venstre hjerte i mønsteret er ikke ens, i højre side 4 mørke masker og i venstre 5 mørke i række 11..
28.01.2026 - 11:28
![]() Lemesle Rachel wrote:
Lemesle Rachel wrote:
Combien de pelote pour taille L je n' ai pas vue dans les explications merci
29.10.2025 - 12:01DROPS Design answered:
Bonjour Mme Lemesle, retrouvez les quantités nécessaires pour chaque taille en haut de page, soit en taille femme M/L (1ère taille) ou en taille M/L homme (2ème taille dans les parenthèses); divisez la quantité indiquée pour chaque couleur par 50 pour avoir le nombre de pelotes de chaque couleur. Bon tricot!
30.10.2025 - 18:36
![]() Emma wrote:
Emma wrote:
For the sleeves, it says to increase 2 stitches mid under arm on every 3rd row. Should these 2 new stitches be placed near each other? Near the beginning and end of the row? Or should they be spaced apart?
02.06.2025 - 05:03DROPS Design answered:
Hi Emma, The sleeves are worked in the round (not in rows back and forth) and you increase before and after the first stitch at the beginning of the round, so all the increases stay mid-under the sleeve. Regards, Drops team.
02.06.2025 - 06:31
![]() Rachel Frizzell Henige wrote:
Rachel Frizzell Henige wrote:
On the bottom of the 2nd page of the instructions under "Front Piece" it says "bind off to shape the neckline at the beginning of every row from mid front: 1 st 2 times." Can you explain more about where I should be binding off? Is it from the medial side of each shoulder? Or the lateral side of each shoulder? What does 1st 2 times mean?
19.05.2025 - 05:41DROPS Design answered:
Hi Rachel, You bind off mid-front (or medially as you say). You work the first row and bind off 1 stitch for the neckline, turn and work back, then bind off 1 stitch when you work the 3rd row = 1 stitch x 2. Hope this helps. Regards, Drops Team.
19.05.2025 - 06:54
![]() Pola wrote:
Pola wrote:
Are there any mire comprehensive instructions for knitting the sleeves? The instructions are not clear to me.
12.04.2025 - 18:48DROPS Design answered:
Dear Pola, for the sleeves, start in black and work 8 cm in rib with the 3mm needles. Change to 5.5mm needles and work in stocking stitch. In the first row in stocking stitch increase 12 (10-10) sts evenly. Then start increasing in the mid-under sleeve as stated for your size: either *1 increase round, 1 normal round, 1 increase round, 2 normal rounds*, that is, every 2nd and 3rd round alternately, or just every 3rd round (1 increase round, 2 normal rounds). As you increase the number of times necessary for your garment, when the piece measures 35 (43-41) cm, work 1 round in off white, work the full colourwork pattern and 1 round in off white. Happy knitting!
14.04.2025 - 00:28
![]() Rachel wrote:
Rachel wrote:
I have 208 stitches cast on for the M/L sweater. After I divide my work and inc 1 stitch each side I'll have 210 stitches total. 210 is not divisible by the 24 stitches needed for the pattern repeat. How do I evenly distribute the 24 stitch pattern on 210 stitches? Even if I leave out the 1 stitch increase I'll have 208 stitches which is still not divisible by 24.
21.02.2025 - 07:09DROPS Design answered:
Dear Rachel, you have 208 sts before dividing piece, then you divide in 2 = 104 sts for each piece and increase 1 stitch on the right side (not on both sides, a correction will come) so that you get 105 sts and both front piece and back piece will be then same. Happy knitting!
21.02.2025 - 13:48
![]() Rachel wrote:
Rachel wrote:
Hi! I have 2 questions about "Body Piece". 1: It says "K until project measures 33 cm, then start snowflake pattern. K until project measures 35 cm then divide work", does it mean that I start knitting the pattern, then divide my project into a front and back panel when I'm only halfway through knitting the pattern?
21.02.2025 - 07:07DROPS Design answered:
Dear Rachel, 1. you first work stocking stitch (= knit every round) until piece measures 33 cm from cast-on edge. then start working the pattern: work diagram starting from the star / circle (see diagram text) and work the half of piece/stitches then repeat over the 2nd half of piece, pattern will not match on the side but front and back pieces should be the same. When piece measures 38 cm, divide piece in 2 to finish back piece and front piece separately. Happy knitting!
21.02.2025 - 13:47
![]() Ann-Mary wrote:
Ann-Mary wrote:
Traveler nDROPS trøje i Alaska med nordisk stjernebort midt på ryg-n nJeg vil gerne strikke denne, men min mand ønsker kun mønsteret i hvidt, resten skal være sort, har i en ide om hvordan garn fordelingen så skal være i den største str Venlig hilsen Ann-Mary Henriksen
13.03.2024 - 17:41
|
|||||||||||||
Traveler |
|||||||||||||
 |
 |
||||||||||||
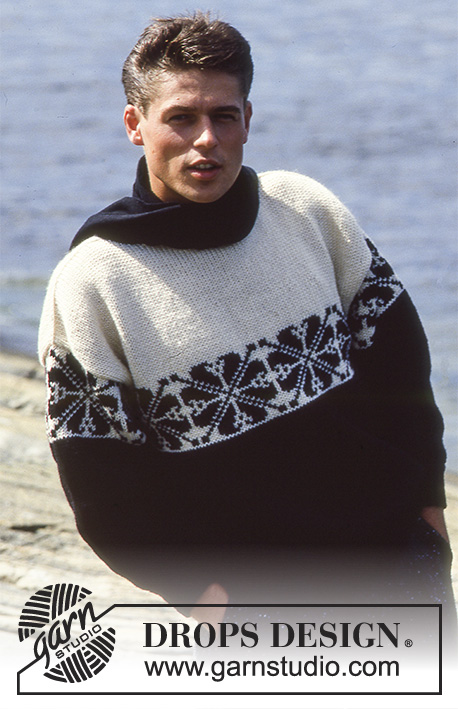
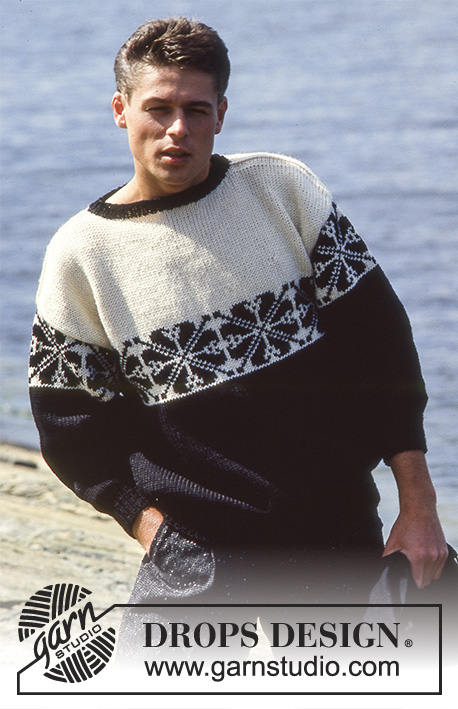
DROPS jumper in Alaska with star pattern border. Ladies and men ’s sizes S-L.
DROPS 8-12 |
|||||||||||||
|
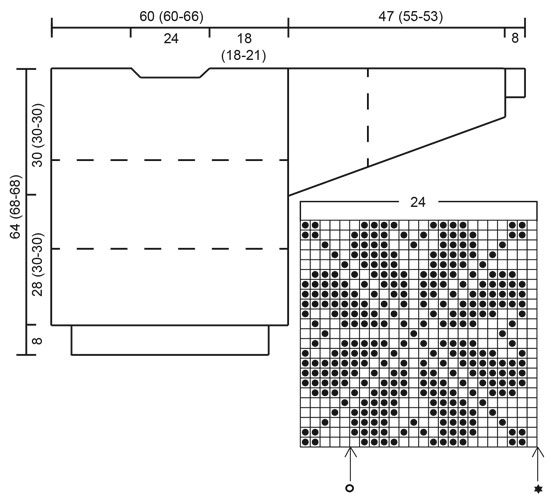
Rib: * K1, P1 *, repeat from *-*. Pattern: See diagram. The diagram shows the pattern from the RS and the entire pattern is worked in stockinette st. 1 repeat = 24 sts. Herre = men’s size Dame = Ladies size Body piece: Worked in the round on circular needle. Cast on 160 (170-176) sts on circular needle size 3 mm / US 2.5 with black and work 8 cm / 3⅛" rib. Change to circular needle size 5.5 mm / US 9 and continue in stockinette st, at the same time inc 32 (22-32) sts evenly on first round = 192 (192-208) sts. When piece measures 31 (33-33) cm work 1 round off-white and then 1 pattern repeat – work pattern on front piece and mirror the pattern on back piece. At the same time when piece measures 34 (38-38) cm divide the piece in two and complete front and back pieces separately. Back piece: Inc 1 st on the right side to make pattern identical each side = 97 (97-105) sts. Continue in pattern. After pattern complete piece in off-white. When piece measures 62 (66-66) cm slip the middle 35 sts on stitch holder for neck and complete each side separately. Bind off 1 st on neckline on next row. Bind off remaining 30 (30-34) sts on shoulder when piece measures 64 (68-68) cm. Front piece: Continue as described for back piece, but slip the middle 33 sts on stitch holder for neck when piece measures 60 (64-64) cm. Bind off to shape the neckline at the beg of every row from mid front: 1 st 2 times. Bind off remaining 30 (30-34) sts on shoulder when piece measures 64 (68-68) cm. Sleeve: Worked in the round on double pointed needles. Cast on 36 (38-40) sts on needle size 3 mm / US 2.5 with black and work 8 cm / 3⅛" rib. Change to needle size 5.5 mm / US 9 and continue in stockinette st, at the same time inc 12 (10-10) sts evenly on first row = 48 (48-50) sts. Now inc 2 sts mid under arm on every other and 3rd round alternately 24 times for ladies size and on every 3rd round 24-23 times for men’s sizes = 96 (96-96) sts - AT the same time when piece measures 35 (43-41) cm work 1 round off-white and then 1 pattern repeat and 1 round off-white. Bind off when piece measures approx: 47(55-53) cm. Assembly: Sew shoulder seams. Pick up approx 80 sts (includes sts on stitch holders) round neckline on needle size 3 mm / US 2.5 with black and work 3 cm / 1" rib, bind off. Set in sleeves. |
|||||||||||||
Diagram explanations |
|||||||||||||
|
|||||||||||||
 |
|||||||||||||
Have you finished this pattern?Tag your pictures with #dropspattern or submit them to the #dropsfan gallery. Do you need help with this pattern?You'll find 26 tutorial videos, a Comments/Questions area and more by visiting the pattern on garnstudio.com. © 1982-2026 DROPS Design A/S. We reserve all rights. This document, including all its sub-sections, has copyrights. Read more about what you can do with our patterns at the bottom of each pattern on our site. |
|||||||||||||


With over 40 years in knitting and crochet design, DROPS Design offers one of the most extensive collections of free patterns on the internet - translated to 17 languages. As of today we count 324 catalogs and 12290 patterns - 12280 of which are translated into English (US/in).
We work hard to bring you the best knitting and crochet have to offer, inspiration and advice as well as great quality yarns at incredible prices! Would you like to use our patterns for other than personal use? You can read what you are allowed to do in the Copyright text at the bottom of all our patterns. Happy crafting!
Post a comment to pattern DROPS 8-12
We would love to hear what you have to say about this pattern!
If you want to leave a question, please make sure you select the correct category in the form below, to speed up the answering process. Required fields are marked *.