
Popular categories
Looking for a yarn?


Comments / Questions (5)
![]() Tina wrote:
Tina wrote:
Bonjour, je voulais savoir comment fermer le bas, je ne le trouve pas dans la description, merci
21.04.2026 - 00:37DROPS Design answered:
Bonjour Tina, assemblez simplement les mailles du montage entre elles, comme on le fait par ex ici. Bon tricot!
21.04.2026 - 09:40
![]() Corrie wrote:
Corrie wrote:
Oei, ik zie nu dat ik een rekenfout heb gemaakt: 40 - 16 = 24. Dan scheelt het maar 1 steek meer. Sorry, my name is Corrie.
03.12.2024 - 17:47
![]() Corrie wrote:
Corrie wrote:
Ik brei de grootste maat. Na de splitsing van de panden staat dat ik bij een hoigte van 73 cm. 1x8, 2x2en2×1 steken moet afkanten voor de hals = (16 in totaal) en daarna verder breien over de overige 23 steken. Maar als ik 40 steken heb en van er in totaal 16 afkant voor de hals, hou ik er 32 over. Wat doe ik verkeerd?
03.12.2024 - 17:38DROPS Design answered:
Dag Corrie,
Je hebt 40 steken. Je kant 1 keer 10 steken (niet 8, maar 10, want je breit de grootste maat) af, dan 4 steken (2 x 2), dan 2 steken (2 x 1). In totaal dus 16 steken. 40-16 = 24 steken. De aangegeven 23 steken klopt niet, maar het zijn 24 steken, net als op het achterpand.
04.12.2024 - 20:12
![]() Heidi Flamsholt wrote:
Heidi Flamsholt wrote:
Hej. Jeg er ved at strikke denne, men kunne godt tænke mig en lille video på, hvordan de røde spots på køreposen strikkes. Jeres video på hvordan man strikker fair isle er såmænd fin nok, men viser ikke hvordan i lader mønsterfarven følge dominansfarven, hverken på retsiden eller vrangsiden. Kan i hjælpe med det? Vh. Heidi
28.11.2020 - 19:51DROPS Design answered:
Hei Heidi. De røde"spots" strikkes som vanlig rett , i diagrammet er det 2 rett rød overnfor hverandre. For å få fargen mer dominant, kan du la den røde tråden ligge nærmest strikketøyet. Da kommer fargen (rød) tydeligst frem når du strikker. mvh DROPS design
30.11.2020 - 13:10Joy Howell wrote:
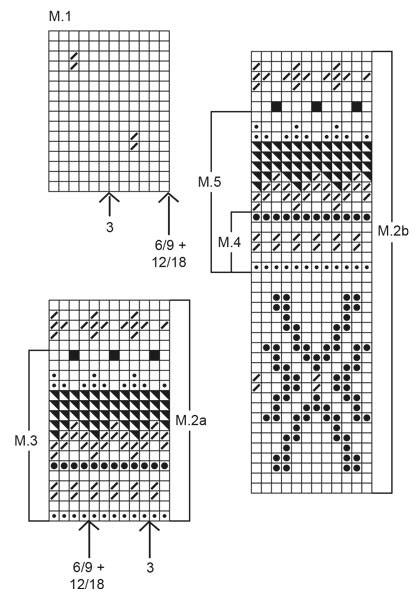
I would like some clarification in the pattern: 1. In the body it's says to work 24 rows in M1, then M2. M1 has only 18 rows do I then do 6 rows of M2. Or do M1 and then repeat 6 rows of M1 and do 24 rows of M2. 2. The chart s are not translated. The Colors are easy to figure out but to start the 3 month size M1 is it started at the centre front also? 3. What does (se opsk) translate to? ALso hette?
29.07.2016 - 00:59DROPS Design answered:
Dear Mrs Howell, To work 24 rows in M.1, work the first the 16 rows in M.1 (= 1 time M.1 in height), then work the first 8 rows in M.1 = 24 rows. You will find translations to diagrams just above them: se opsk = see explanation. In size 3 months start M.1 at arrow ("hette 3"). Happy knitting!
29.07.2016 - 08:28
|
|||||||||||||||||||
Lilliput#lilliputbuntingbag |
|||||||||||||||||||
 |
 |
||||||||||||||||||
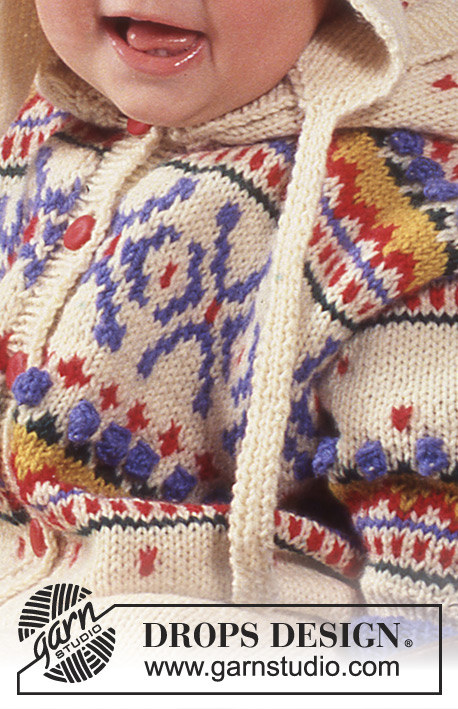
DROPS Bunting bag with optional hood in Karisma.
DROPS Baby 1-3 |
|||||||||||||||||||
|
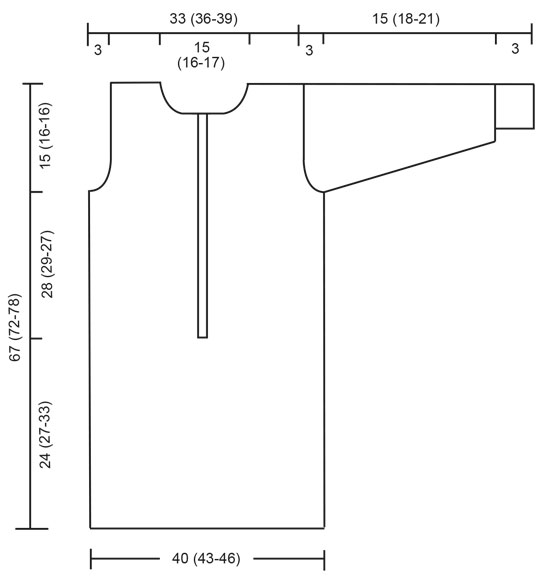
Knitting gauge: 21sts x 28 rows on needles size 3.5 mm / US 4 in pattern = 10x10cm. Rib: *K1, P1*. Repeat from * - *. Bobble: Inc 3 sts in 1 st. Work 3 rows stockinette st. 4th row: K3tog to leave 1 st. Pattern: See diagram (1 diagram = 1 repeat). Pattern is seen from RS and worked in stockinette st. Body: Cast on 168(180-192) sts on circ needles size 3.5 mm / US 4 with off white. Wok 1 round stockinette st, then M.4, then continue in off white. At the same time when piece measures 24 (27-33) cm, bind off 4 sts in the middle at front for slit = 164 (176-188) sts. Continue knitting back and forth on needle until piece measures 33 (38-44) cm. Work 24 rows in M.1 (start at arrow), then M.2 (start at arrow). At the same time when piece measures 52 (56-62) cm dec for armhole as follows: work 34 (37-40) sts across front, bind off 12 sts, work 72 (78-84) sts across back, bind off 12 sts for armhole, work 34 (37-40) sts across front. Finish fronts and back separately. Back: = 72 (78-84) sts. Continue in pattern until piece measures 65 (70-76) cm. Put the middle 30 (32-34) sts on a holder for neck. Next row: dec 1 st each side on for neck. Continue until piece measures 67 (72-78) cm. Bind off remaining 20 (22-24) sts for shoulder. Left front: = 34 (37-40) sts. Continue in pattern until piece measures 62 (67-73) cm. Dec for neck on every other row as follows: 8 (9-10) sts once, 2 sts twice, 1 st twice. Continue until piece measures 67 (72-78) cm. Bind off remaining 19 (21-23) sts for shoulder. Right front: Work as left front. Sleeve: Cast on 34 (36-38) sts on double pointed needles size 2.5 mm / US 1.5 with off white. Work 3 cm / 1" rib. Change to needles size 3.5 mm / US 4, work 1 round stockinette st at the same time inc 0 (2-4) sts evenly on round = 34 (38-42) sts. Work M.3 – put one repeat centered on top of sleeve- at the same time inc sts under sleeve each side of in the middle st as follows: 1 st 15 (15-13) times for 3months: alternatively on every and every other round, for 6/9 months: every other round, for 12/18 months: every 3rd round = 64 (68-68) sts. Complete M.3. Work M.1 until piece measures 12 (15-18) cm (adjust to pattern repeat). Work M.4 until piece measures 15 (18-21) cm. Bind off. Assembly: Hood or neckband: Sew shoulder seams. Pick up approx 70 sts on needle size 2.5 mm / US 1.5 with off white and work 2cm in rib. (bind off now if hood is not required). Hood: Change to needle size 3.5 mm / US 4 and work M.1 and at the same time inc sts evenly on row to 72 (84-84) sts. Continue until hood measures 24 (26-26) cm. Bind off. Sew hood together using an invisible stitch. Left button band: Pick up approx 90 sts on needle size 2.5 mm / US 1.5 with off white along left front (pick sts up with RS facing) and work 2 cm / ¾" rib. Bind off. Right button band: Work as left band but after 1 cm / ⅜" make 7 button holes evenly spaced – 1 button hole = bind off 2 sts – cast on 2 sts on next row over bind off sts. Hood facing: Pick up approx 120 (130-132) along edge of hood ( pick up sts with WS facing). Work 6 cm / 2⅜" in rib. Bind off. Sew button bands to rib on hood. Fasten button bands by slit. Sew sleeves to body in edge st to avoid seams being too bulky. Sew in buttons. Make tassel and sew to top of hood. Mittens with optional thumbs: Size: 3 – 6/9 (12/18 -24) months DROPS circular needle: 2.5mm and 3.5mm / US 1.5 and 4. Mitten: Thumb can be omitted for the two smaller sizes. Cast on 34-36 (36-38) sts on double pointed needles size 2.5 mm / US 1.5 and work 4 cm / 1½" rib. Change to double pointed needles size 3.5 mm / US 4 and work stockinette st until mitten measures 5-6 (6.5-7) cm. Put 5 sts on a holder for thumb. Inc 5 sts over these sts on next round. Continue until mitten measures 11-13 (13-14) cm. Work alternatively *1 round K2 tog and 1 round stockinette st*. Repeat from * - * 3 times. Pull double strands through remaining sts and fasten. Thumb: Pick up the 5 dec sts and the 5 sts from holder. Inc 1 sts each side between the dec sts and the sts on holder = 12 sts. Work approx 3.5 cm. K2tog on next 2 rounds = 3 sts. Pull yarn through remaining sts and fasten. |
|||||||||||||||||||
Diagram explanations |
|||||||||||||||||||
|
|||||||||||||||||||
 |
|||||||||||||||||||
 |
|||||||||||||||||||
Have you finished this pattern?Tag your pictures with #dropspattern #lilliputbuntingbag or submit them to the #dropsfan gallery. Do you need help with this pattern?You'll find 29 tutorial videos, a Comments/Questions area and more by visiting the pattern on garnstudio.com. © 1982-2026 DROPS Design A/S. We reserve all rights. This document, including all its sub-sections, has copyrights. Read more about what you can do with our patterns at the bottom of each pattern on our site. |
|||||||||||||||||||


With over 40 years in knitting and crochet design, DROPS Design offers one of the most extensive collections of free patterns on the internet - translated to 17 languages. As of today we count 324 catalogs and 12290 patterns - 12280 of which are translated into English (US/in).
We work hard to bring you the best knitting and crochet have to offer, inspiration and advice as well as great quality yarns at incredible prices! Would you like to use our patterns for other than personal use? You can read what you are allowed to do in the Copyright text at the bottom of all our patterns. Happy crafting!
Post a comment to pattern DROPS Baby 1-3
We would love to hear what you have to say about this pattern!
If you want to leave a question, please make sure you select the correct category in the form below, to speed up the answering process. Required fields are marked *.