
Popular categories
Looking for a yarn?


Comments / Questions (60)
![]() Anette wrote:
Anette wrote:
Hej Jeg strikker en mandemodel. Under indtagning i ærme, står der at der tages ind ca på hver 7.-4.-3.-21/2.-2.2. cm totalt 13 gange.. men skal jeg finde xl størewlsen som jeg strikker, det er hver 3. Cm. Eller er det hver 7. 4.3.21/2.2 .2 cm eller er det hver kun hver 3. Cm.??
12.04.2026 - 13:09DROPS Design answered:
Hei Anette. Herre modellen er DROPS nr 233-22 og i str. XL tar man inn på ca hver 2,5. cm totalt 13 ganger = 47 masker. mvh DROPS Design
13.04.2026 - 14:30
![]() Anna wrote:
Anna wrote:
Heutzutage ist das leichteste, ein Text zu übersetzen, warum haben Sie so wenig Sprachen zur Auswahl? Man muss alles kopieren, übersetzen, was die ältere Menschen auf dem Handy wahrscheinlich nicht schaffen. Sie haben eine riesige russischsprachige Community von drops-fans, keine Sprache zur Auswahl aber. Schade...
26.01.2026 - 14:58
![]() Fabienne wrote:
Fabienne wrote:
Bonjour, pour l’encolure du pull Meet the captain, taille M, j’ai fait les 5 rangs raccourcis juste après le col, mais il me manque 15 mailles et les rangs racourcis se trouvent au niveau d’une manche, pas au dos. J’ai Recommencé 2 fois! Avez vous un Tuto pour ces 5 rangs ? Merci
24.01.2026 - 11:06DROPS Design answered:
Bonjour Fabienne, dans cette vidéo, nous montrons comment tricoter ce type de rangs raccourcis, attention toutefois à bien augmenter comme dans les explications, autrement dit, sur l'envers également, dans la vidéo, on augmente uniquement sur l'endroit. Bon tricot!
26.01.2026 - 08:07
![]() Paula wrote:
Paula wrote:
On Neckline I have done row 1 with yarn overs on markers 1 and 2. Now I turn to purl and need to increase at these same markers . I have a yarnover on each side of marker which needs to be made into a proper stitch. How do I therefore make another increase. I don't think I make an increase in the yarn over ?
20.12.2025 - 11:04DROPS Design answered:
Hi Paula, You always increase just before and after the marker-stitch. When working back on row 2, you work the yarn over before the marker stitch (from the previous row) as described under Raglan, then make 1 new yarn over, work the marker-stitch, make 1 yarn over and work the yarn over from the previous row as described under Raglan. Hope this helps. Merry Christmas! Regards, Drops Team.
22.12.2025 - 07:42
![]() Ute wrote:
Ute wrote:
In the sketch the short rows (after 4 cm neckband) are 6 cm long. So the neckline can't consist of 5 rows, but of 10. Is that correct? It would make more sense, because otherwise after turning you would have to knit the 2 yarn overs from the previous row and 2 new yarn overs at each marker which seems chaotic to me. As Laia wrote, there are more contradictions: Raglan-description = sleeve-increases only on right side. Neckline-descr. = every row which must be right to get 128 stitches size M
22.04.2025 - 11:52DROPS Design answered:
Dear Ute, the 6 cm in the chart are for shoulders, not for the short rows. There are only 5 rows for the short rows/neck elevation on back piece. On first row you increase only on first half = back piece + sleeve + beg of front piece, on last row you will increase only at the end of front piece + on left sleeve + beg of back piece so that you have increased the same number of stitches when all short rows are done = 96+4+8+8+8+4=128. Happy knitting!
22.04.2025 - 17:20
![]() Ute wrote:
Ute wrote:
Hi Patrycja, you wrote: "Increase for the sleeves after markers 1 and 3 and before markers 2 and 4 (always worked from the right side on the sleeves). " "ROW 2 (wrong side): Purl and increase to raglan on each side of all markers (8 stitches increased), turn when you have purled 3 stitches past the last marker." It should be added increases only for front and back, so 4 stiches increases. " But then you won't get the full number of stitches mentioned. There must be something wrong.
22.04.2025 - 00:32
![]() Ute wrote:
Ute wrote:
Ich habe den doppelten Kragen fertig (aber er ist instabil, wenn man nur jede 4. Masche zusammenzustrickt, okay, das kann man später nähen) und ich habe aufgrund der Kommentare auch verstanden, dass die 4 Markierungsmaschen extra gezählt werden (di deutsche Anleitung ist nicht verständlich). Aber ich verstehe trotz Video nicht, wie man hier die verkürzten Reihen strickt. Kann ich den Raglan nicht einfach ohne verkürzte Reihen stricken? Oder sieht das schlechter aus und sitzt nicht richtig?
20.04.2025 - 18:51DROPS Design answered:
Liebe Ute, die Markierer sind hier ja je in einer Masche (und nicht zwischen Maschen), dh wie beschrieben. Die verkürzten Reihen beginnen hier in der hinteren Mitte: bei jeder Reihe wird man zunehmen; bei der 1. Reihe nur an den 2 ersten Markierer, bei der 2. bis 4. Reihe bei jeder der 4. Markierer und bei der 5. Reihe nur an den 2 letzten Markierer = so sind es jeweils 4 Mal an jedem Markierer zugenommen. Viel Spaß beim Stricken!
22.04.2025 - 15:22
![]() Laure wrote:
Laure wrote:
Bonjour, Pour le début du raglan, je ne suis pas sure de comprendre : en partant du demi-dos, le rang 1 se fait jusqu’au marqueur 2 plus 3 mailles avant de retourner l’ouvrage. Ensuite on tricote à l’envers pour le rang sans précision des marqueurs. Doit t’on faire tout le tour? Ou s’arreter au demi-dos? Merci pour votre aide.
17.04.2025 - 18:08DROPS Design answered:
Bonjour Laure, lorsque l'on tricote les rangs raccourcis, au 1er rang, on augmente aux marqueurs 2 et 3, puis on tourne, on tricote le rang sur l'envers en augmentant aux 4 marqueurs, on tourne, on tricote encore 2 rangs ainsi en augmentant aux 4 marqueurs, et, au dernier rang = sur l'endroit, on augmente seulement aux marqueurs 3 et 4 = jusqu'au milieu dos, ainsi, on a augmenté 4 fois à chacun des 4 marqueurs. Puis on continue en rond, toujours à partir du milieu dos (cf taille). Bon tricot!
22.04.2025 - 11:08
![]() Patrycja wrote:
Patrycja wrote:
"Increase for the sleeves after markers 1 and 3 and before markers 2 and 4 (always worked from the right side on the sleeves). " "ROW 2 (wrong side): Purl and increase to raglan on each side of all markers (8 stitches increased), turn when you have purled 3 stitches past the last marker." It should be added increases only for front and back, so 4 stiches increases.
28.03.2025 - 05:30
![]() Sara wrote:
Sara wrote:
Glenis and Anastasia from the UK both asked a question and I dont belive you answered correctly. For the medium size you start with 92 stiches and then you increase for =96. Makes sense. But if you place the markers as described in the pattern you have 12+21+23+21+11 =88 and then increase 4 =92. So then you have 4 extra stiches on the back pice. Should the backpice be a little bit larger or should I place the markers so the back and front pice are the same size/same amount of stiches?
02.03.2025 - 12:13DROPS Design answered:
Dear Sara, the markers are inserted in stitches, so you have: 12 stitches (half back piece) + 1 stitch with marker + 21 stitches (sleeve) + 1 stitch with marker + 23 stitches (front piece) + 1 stitch with marker + 21 stitches (sleeve) + 1 stitch with marker + 11 stitches (half back piece) = 92 stitches. Plus the 4 increases = 96 stitches. The stitches with markers are in the transitions between sleeves and front/back pieces and don't count as either part of them at the start of the neckline and raglan. Happy knitting!
02.03.2025 - 18:26
|
|
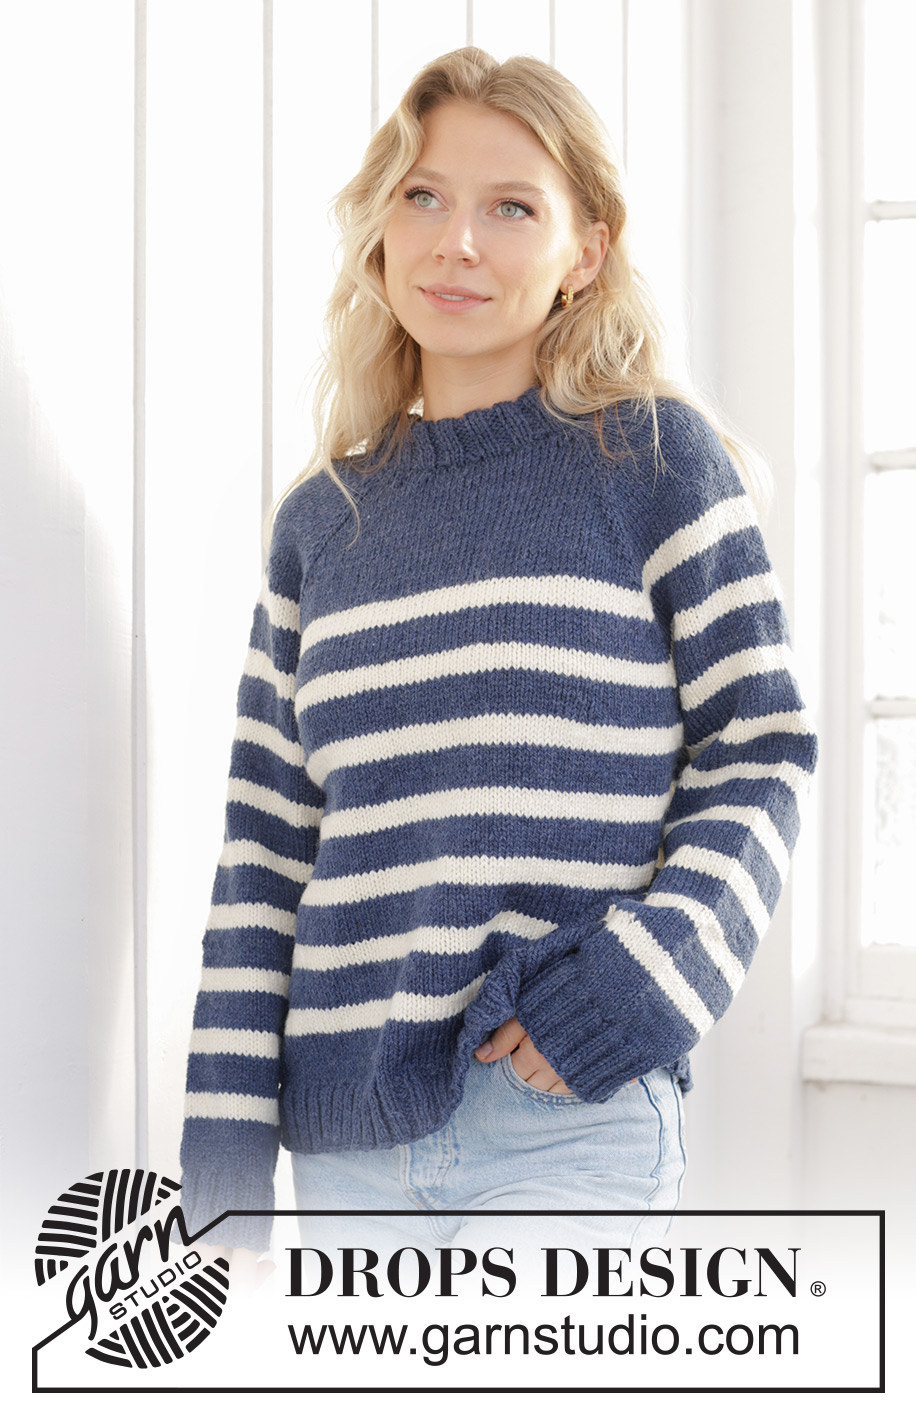
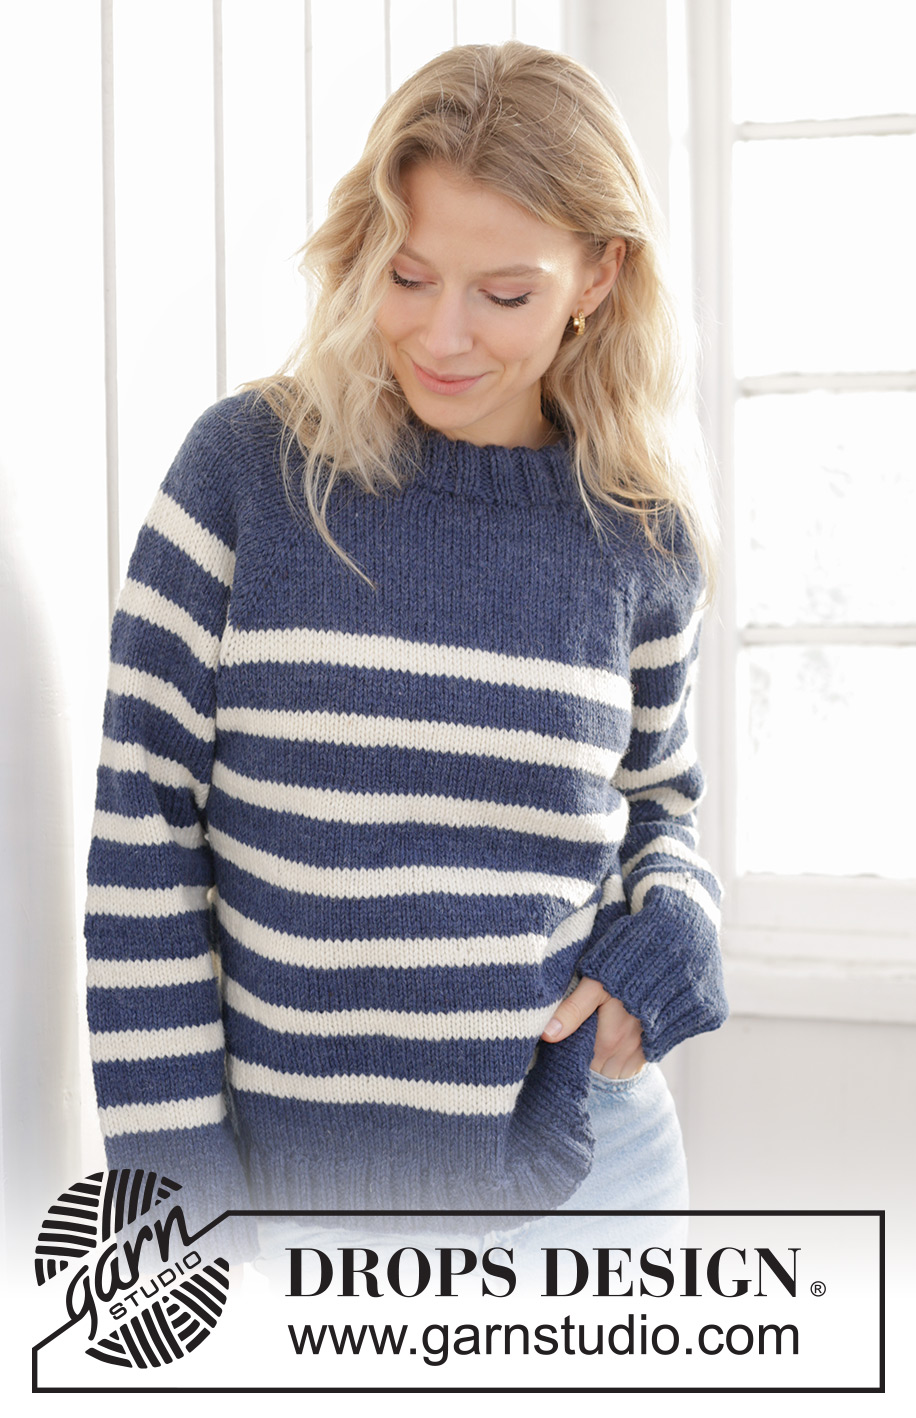
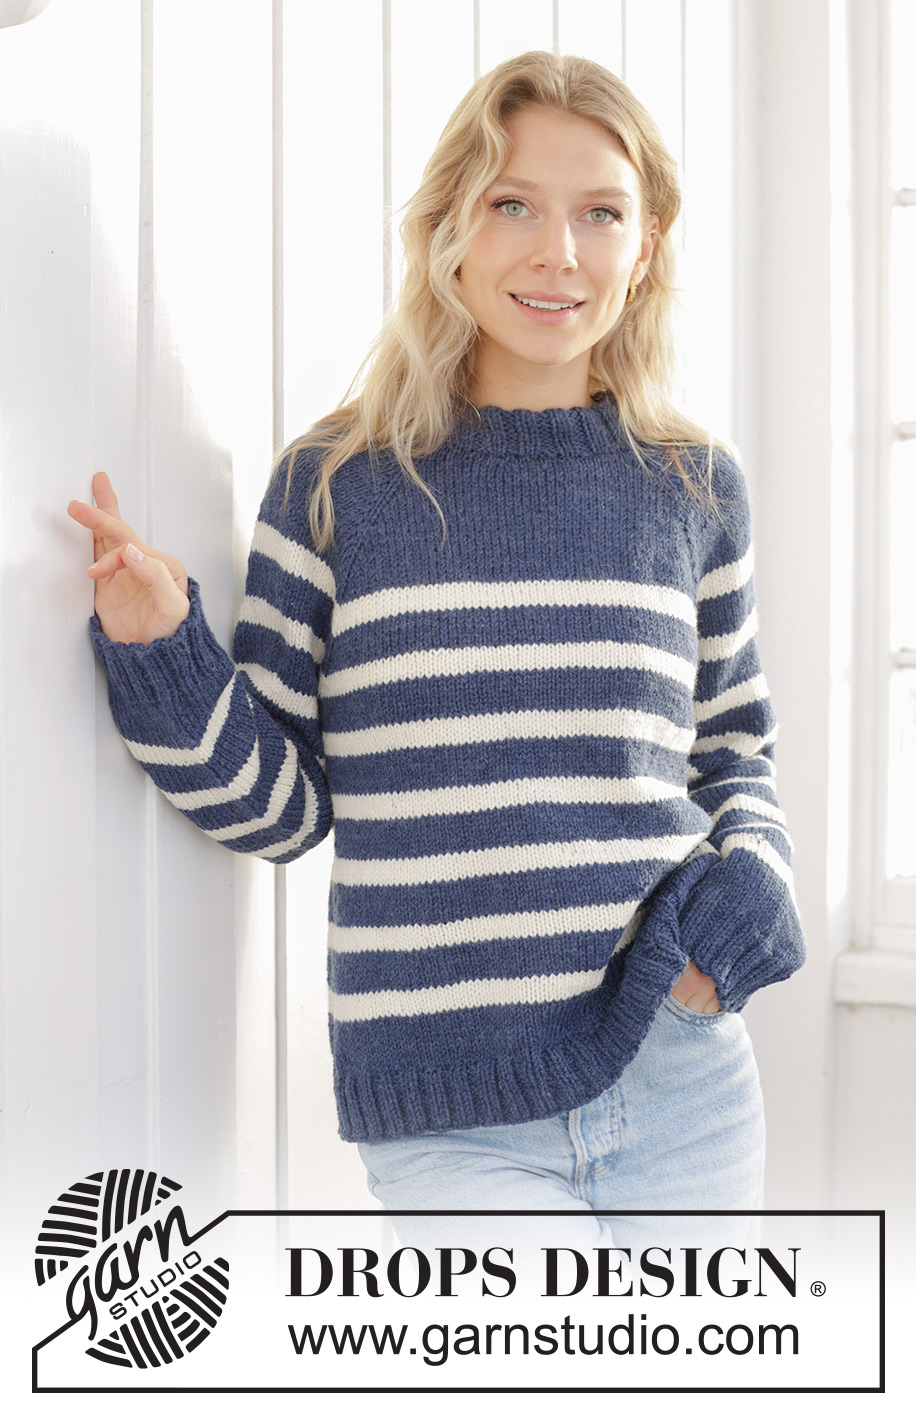
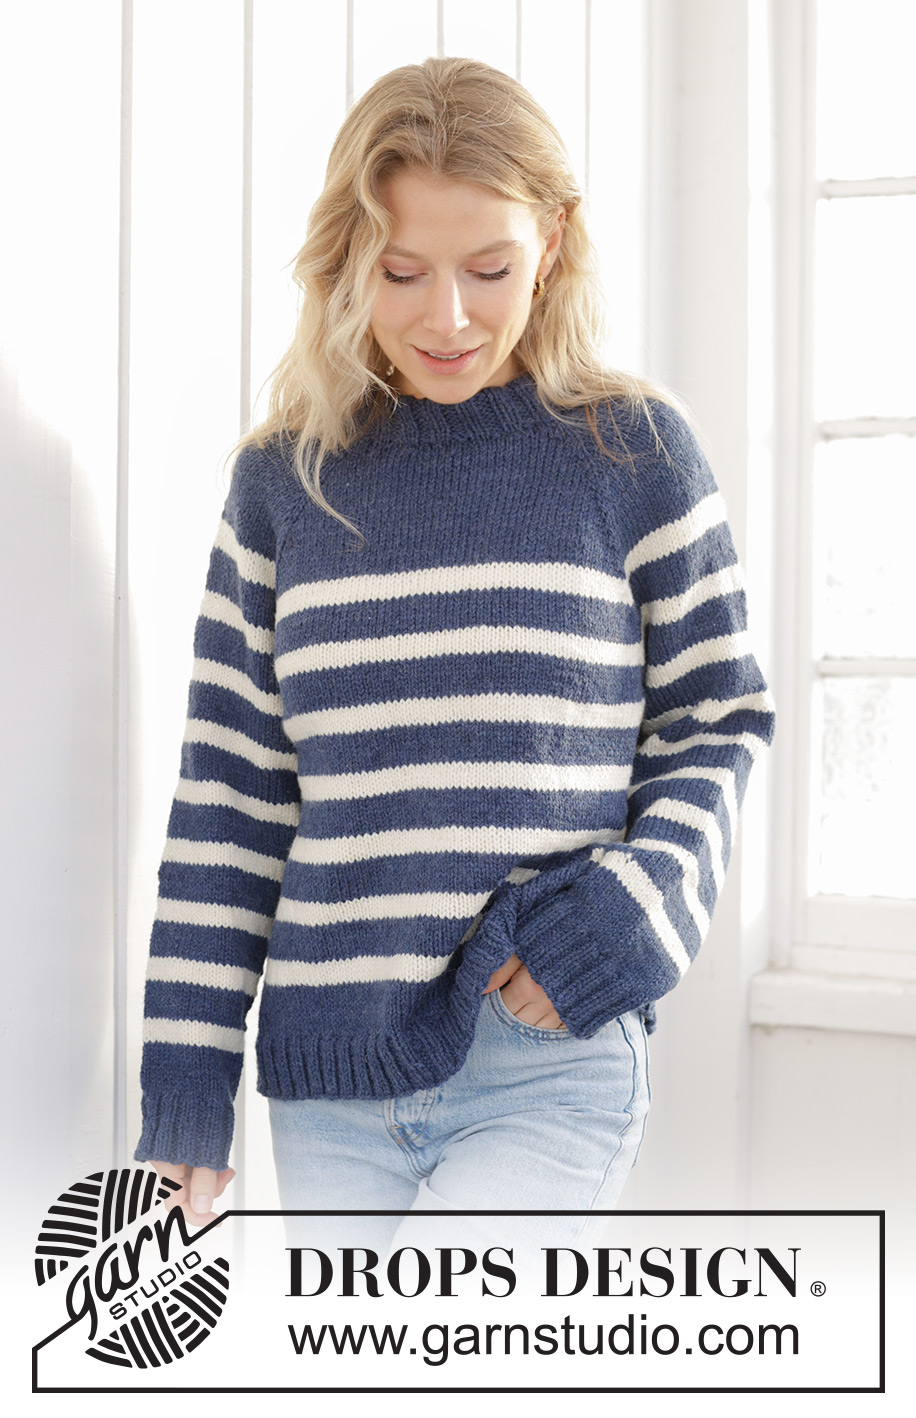
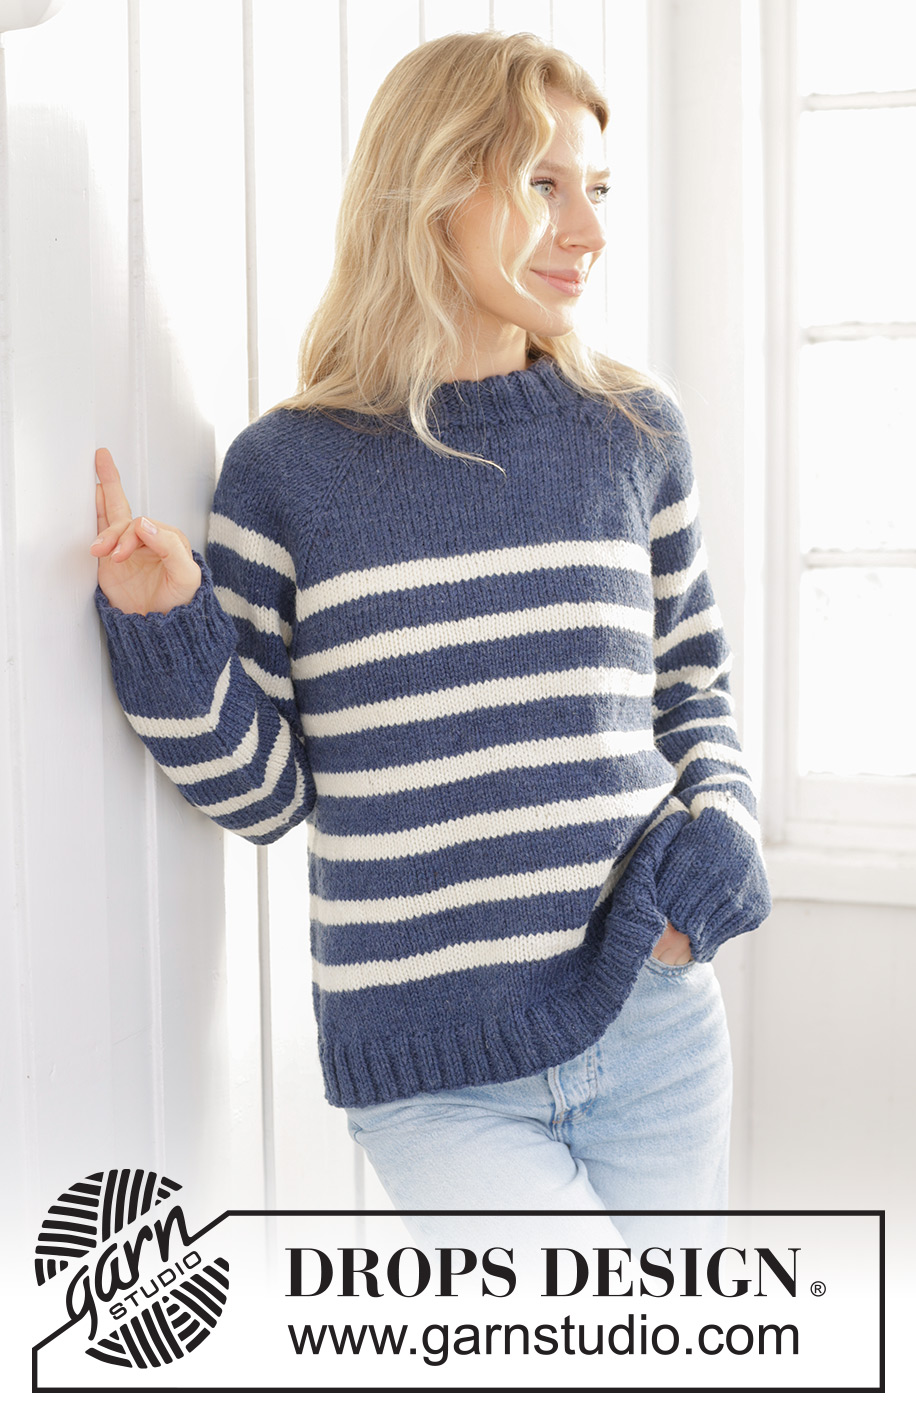
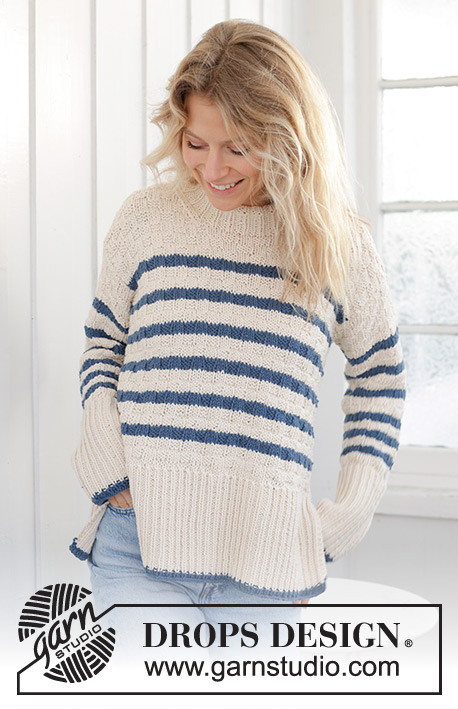
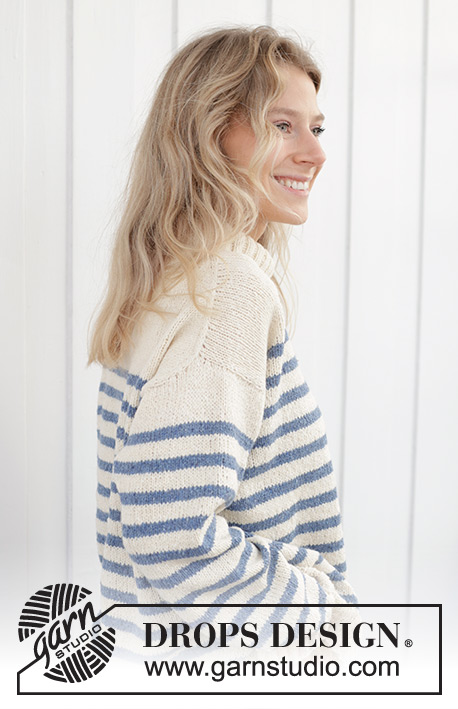
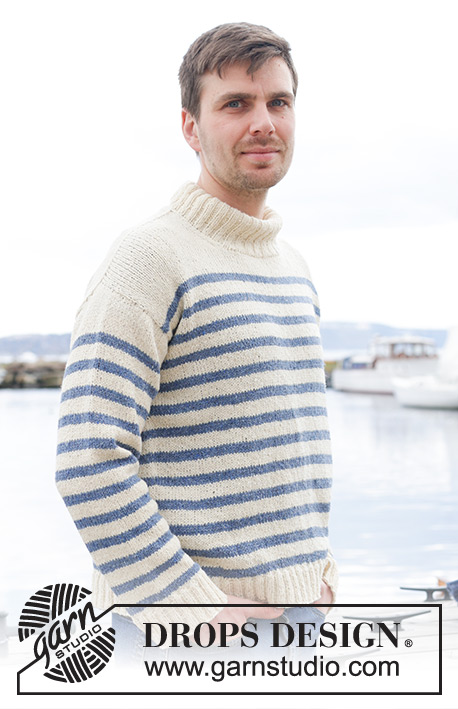
Meet the Captain#meetthecaptainsweater |
|
 |
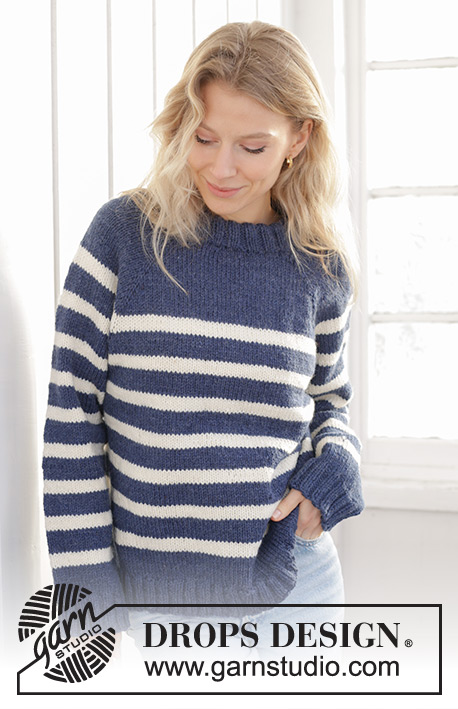 |
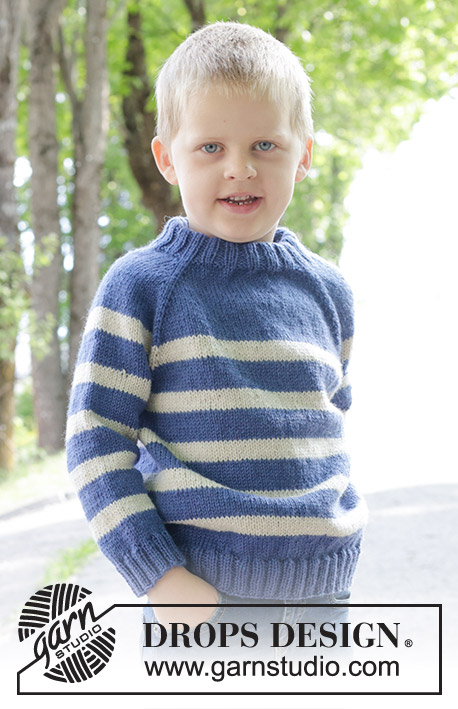
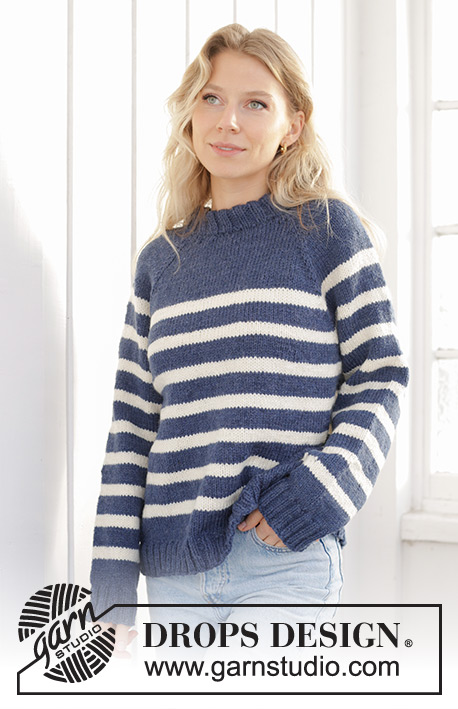
Knitted sweater in DROPS Alaska. The piece is worked top down with stockinette stitch, stripes, double neck and raglan. Sizes S - XXXL.
DROPS 239-38 |
|
|
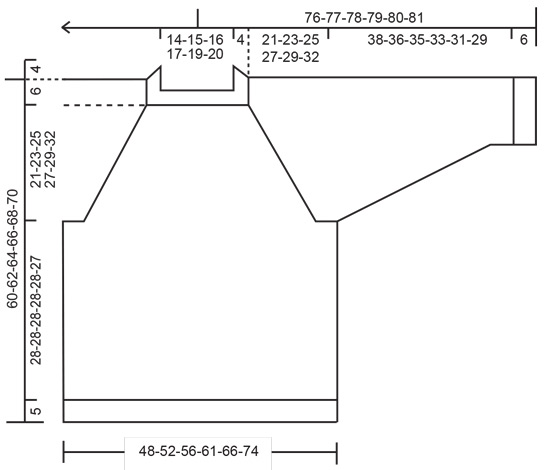
------------------------------------------------------- EXPLANATIONS FOR THE PATTERN: ------------------------------------------------------- RAGLAN: All increases are worked before/after 1 stockinette stitch (marker-stitch). Increase for the body before markers 1 and 3 and after markers 2 and 4 when working from the right side; after markers 1 and 3 and before markers 2 and 4 when working from the wrong side. Increase for the sleeves after markers 1 and 3 and before markers 2 and 4 when working from the right side / after markers 2 and 4 and before markers 1 and 3 when working from wrong side Increase 1 stitch by making 1 yarn over. Yarn overs are worked as follows from the wrong side: BEFORE MARKER: Purl in back loop avoiding a hole. AFTER MARKER: Slip yarn over off the left needle and place it back the other way round (insert the left needle from the back when replacing it). Purl in front loop avoiding a hole. Yarn overs are worked as follows from the right side: BEFORE MARKER: Slip yarn over off the left needle and place it back the other way round (insert the left needle from the back when replacing it). Knit in front loop avoiding a hole (stitch leans to the right). AFTER MARKER: Knit in back loop (stitch leans to the left) to avoid a hole. STRIPES: Start at marker-1 (so the change of colors is not visible on the back piece) and work as follows: * 5 rounds of color off white (approx. 2 cm = ¾"), 8 rounds of color dark blue (approx. 3.5 cm = 1¼") *, repeat from *-*. DECREASE TIP (for sleeves): Start 3 stitches before the marker-thread, knit 2 together, knit 2 (marker-thread sits between these 2 stitches), slip 1 stitch as if to knit, knit 1 and pass the slipped stitch over the knitted stitch. ------------------------------------------------------- START THE PIECE HERE: ------------------------------------------------------- SWEATER – SHORT OVERVIEW OF THE PIECE: The neck and yoke are worked in the round with circular needle, from mid back and top down. The yoke is divided for body and sleeves and the body is continued in the round with circular needle. The sleeves are worked with short circular needle/double pointed needles. DOUBLE NECK: Cast on 88-92-96-100-104-108 stitches with color dark blue DROPS Alaska, using short circular needles size 5 and 4 MM = US 8 and 6 held together. Remove the needle size 5 MM = US 8 (this gives you an elastic cast-on edge) keeping stitches on needle size 4 MM = US 6. Work rib in the round (knit 2, purl 2) for 8 cm = 3⅛". Fold the neck double to the inside and work 1 more round of rib, working every 4th stitch together with its corresponding stitch on the cast-on edge. You now have a double neck. The yoke is measured from here. Insert 4 markers at the same time as you increase 4 stitches on the next round as follows: Knit 10-12-12-14-14-16 and increase 1 stitch (half back piece), insert marker-1 in the next stitch, knit 21 (sleeve), insert marker-2 in the next stitch, knit 21-23-25-27-29-31 and increase 2 stitches evenly spaced (front piece), insert marker-3 in the next stitch, knit 21 (sleeve), insert marker-4 in the next stitch, knit the last 11-11-13-13-15-15 stitches and increase 1 stitch (half back piece) = 92-96-100-104-108-112 stitches. NECKLINE: Change to circular needle size 5 MM = US 8 and work short rows at the back of the neck, starting mid-back: ROW 1 (right side): Knit and increase for RAGLAN – read description above, on each side of the first 2 markers (4 stitches increased), turn when you have knitted 3 stitches past marker-2. ROW 2 (wrong side): Purl and increase to raglan on each side of all markers (8 stitches increased), turn when you have purled 3 stitches past the last marker. ROW 3: Knit and increase to raglan on each side of all markers (8 stitches increased), turn when you have knitted 2 stitches after the previous turn. ROW 4: Purl and increase to raglan on each side of all markers (8 stitches increased), turn when you have purled 2 stitches after the previous turn. ROW 5: Knit and increase for raglan on each side of the first 2 markers (4 stitches increased), work to mid-back. The short rows are finished and you have increased 4 times for raglan at each marker = 124-128-132-136-140-144 stitches. YOKE: Work now yoke in the round over all stitches as explained below. SIZES S, M, L and XL: Start mid-back, work stockinette stitch and increase for raglan on the body and sleeves (i.e. on each side of all 4 marker-stitches) every 2nd round 2-8-10-11 times = 140-192-212-224 stitches. AT THE SAME TIME when the yoke measures 13 cm = 5⅛" from the neck, work STRIPES - read description above. Continue working and increasing for raglan but every 2nd increase is only on the body (4 stitches increased; i.e. increase for the body every 2nd round, for the sleeves every 4th round). Increase 18-15-14-16 times on the body (9-7-7-8 times on the sleeves). A total of 24-27-28-31 times on the body and 15-19-21-23 times on the sleeves. There are 248-280-296-320 stitches. Go to ALL SIZES. SIZES XXL and XXXL: Start mid-back, work stockinette stitch and increase for raglan every round on the body 2-6 times and every 2nd round on the sleeves 1-3 times = 152-180 stitches. AT THE SAME TIME when the yoke measures 13 cm = 5⅛" from the neck, work STRIPES - read description above. Now increase for the body and sleeves (on each side of all 4 marker-stitches) every 2nd round 10-7 times = 232-236 stitches. Continue working and increasing for raglan, but every 2nd increase is only on the body (4 stitches increased; i.e. increase for the body every 2nd round, for the sleeves every 4th round). Increase 18-22 times on the body (9-11 times on the sleeves). A total of 34-39 times on the body and 24-25 times on the sleeves. There are 340-368 stitches. Go to ALL SIZES. ALL SIZES: = 248-280-296-320-340-368 stitches. Continue with stockinette stitch and stripes but without further increases until the yoke measures 21-23-25-27-29-32 cm = 8¼"-9"-9¾"-10⅝"-11⅜"-12½" measured from the neck mid-front. On the next round divide for the body and sleeves as follows: Work the first 37-42-43-48-51-58 stitches (half back piece), place the next 49-57-61-65-67-69 stitches on a thread for the sleeve, cast on 6-6-8-8-10-10 stitches (in side under sleeve), work 75-83-87-95-103-115 stitches (front piece), place the next 49-57-61-65-67-69 stitches on a thread for the sleeve, cast on 6-6-8-8-10-10 stitches (in side under sleeve), work the last 38-41-44-47-52-57 stitches (half back piece). BODY: = 162-178-190-206-226-250 stitches. Continue in the round with stockinette stitch and stripes for a further 28-28-28-28-28-27 cm = 11"-11"-11"-11"-11"-10⅝", finishing after a round of color dark blue (there is 5 cm = 2" left to finished length and finish with color dark blue). Knit 1 round and increase 18-22-22-26-26-34 stitches evenly spaced = 180-200-212-232-252-284 stitches. Change to circular needle size 4 MM = US 6. Work rib (knit 2, purl 2) for 5 cm = 2". Bind off a little loosely with knit over knit and purl over purl. The sweater measures approx. 60-62-64-66-68-70 cm = 23⅝"-24⅜"-25¼"-26"-26¾"-27½" from the shoulder. SLEEVES: Place the 49-57-61-65-67-69 stitches from the thread on the one side of the piece on short circular needle/double pointed needles size 5 MM = US 8 and knit up 1 stitch in each of the new stitches cast on under the sleeve = 55-63-69-73-77-79 stitches. Insert a marker-thread in the middle of the new stitches under the sleeve; allow it to follow your work onwards, it is used when decreasing under the sleeve. Continue in the round with stockinette stitch and stripes. When the sleeve measures 4 cm = 1½" decrease 2 stitches on each side of the marker-thread – read DECREASE TIP. Decrease like this every 8-4½-3-2½-2-2 cm = 3⅛"-1⅝"-1⅛"-1"-¾"-¾" a total of 5-8-10-11-12-12 times = 45-47-49-51-53-55 stitches. Continue working until the sleeve measures 38-36-35-33-31-29 cm = 15"-14¼"-13¾"-13"-12¼"-11⅜" from the division, finishing after a round of color dark blue (there is approx. 6 cm = 2⅜" left and the rest of the sleeve is worked with color dark blue). Change to double pointed needles size 4 MM = US 6. Knit 1 round and increase 7-5-7-5-7-5 stitches evenly spaced = 52-52-56-56-60-60 stitches. Work rib (knit 2, purl 2) for 6 cm = 2⅜". Loosely bind off with knit over knit and purl over purl. The sleeve measures approx. 44-42-41-39-37-35 cm = 17¼"-16½"-16⅛"-15¼"-14½"-13¾" from the division. Work the other sleeve in the same way. |
|
 |
|
Have you finished this pattern?Tag your pictures with #dropspattern #meetthecaptainsweater or submit them to the #dropsfan gallery. Do you need help with this pattern?You'll find 31 tutorial videos, a Comments/Questions area and more by visiting the pattern on garnstudio.com. © 1982-2026 DROPS Design A/S. We reserve all rights. This document, including all its sub-sections, has copyrights. Read more about what you can do with our patterns at the bottom of each pattern on our site. |
|


With over 40 years in knitting and crochet design, DROPS Design offers one of the most extensive collections of free patterns on the internet - translated to 17 languages. As of today we count 324 catalogs and 12290 patterns - 12280 of which are translated into English (US/in).
We work hard to bring you the best knitting and crochet have to offer, inspiration and advice as well as great quality yarns at incredible prices! Would you like to use our patterns for other than personal use? You can read what you are allowed to do in the Copyright text at the bottom of all our patterns. Happy crafting!
Post a comment to pattern DROPS 239-38
We would love to hear what you have to say about this pattern!
If you want to leave a question, please make sure you select the correct category in the form below, to speed up the answering process. Required fields are marked *.