
Looking for a yarn?


Comments / Questions (9)
![]() Clara wrote:
Clara wrote:
Hallo, ich mache Größe S und habe eine Frage zu den Abnahmen bei den Armausschnitten. Ich habe beidseitig 3 Maschen abgenommen, der nächste Schritt ist 2 Maschen je 0x beidseitig. Muss ich jetzt 2 Reihen ohne Abnahmen stricken oder diesen Schritt überspringen und direkt 1 Masche je 2x abnehmen (also in 4 Reihen jeweils die 1. Masche abketten)?
13.09.2024 - 23:17DROPS Design answered:
Liebe Clara, in S sollen. Sie einfach nur 1 Masche 2 Mal beidseitig abnehmen, so sind es 83-(2x1)x2 = 79 Maschen übrig. Viel Spaß beim Stricken!
16.09.2024 - 08:04
![]() Eileen Reuben wrote:
Eileen Reuben wrote:
For this pattern in a small it does not say how many skins you would need of drops Paris
26.03.2024 - 23:13DROPS Design answered:
Dear Ellen, DROPS Paris comes in 50 grams skeins, so since the pattern says for size small you need 550 gramms of off-white and 150 gramms of petrol, you will need 11 skeins of off white and 3 skeins of petrol. I hope this helps. Happy Knitting!
27.03.2024 - 10:01
![]() Susanne wrote:
Susanne wrote:
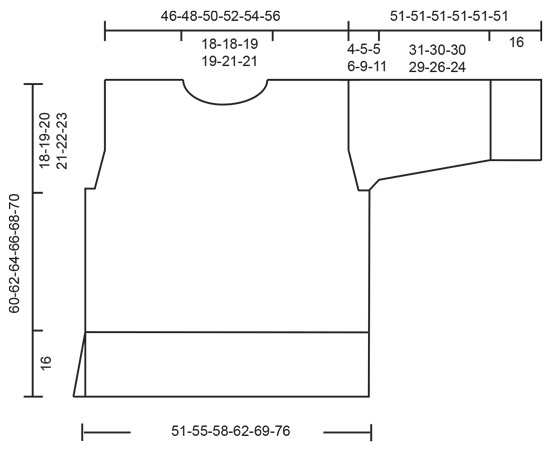
Ich weiß nicht, was ich falsch gemacht habe, aber der Pullover fällt VIEL zu groß aus. Ich habe die Größe xl ( 62cm in der Breite, Rück-Vorderteil, Anschlag 155 Maschen) gewählt, da ich Größe 44/46 trage. Ausserdem habe ich eine dickere Nadel gewählt, wie vorgeschlagen, da meine Maschenprobe statt 17 Maschen 20 Maschen ergab. Nachdem ich das Rückenteil gemessen habe ( im A1 Bereich, nach Abnahme von 50 M.) , waren es 72 cm in der Breite. Also viel zu groß.
10.01.2024 - 17:18DROPS Design answered:
Liebe Susanne, die 155 Maschen werden mit Bündchen gestrickt, danach nehmen Sie ab, so daß 105 M übrig sind, dann mit 17 M = 10 cm sind diese 105 Maschen ca 62 cm. Viel Spaß beim stricken!
11.01.2024 - 08:52
![]() Helle wrote:
Helle wrote:
Hej Jeg kan ikke få striberne så fine som på billede, det bliver meget markant når vrang masken strikkes, hvordan undgår i det
27.08.2023 - 11:11DROPS Design answered:
Hei Helle. Når man strikker striper og skal strikke vrang, blir vrangmaskene litt markant, men sånn er det også på genseren på bildet. mvh DROPS Design
11.09.2023 - 07:24
![]() Juliana wrote:
Juliana wrote:
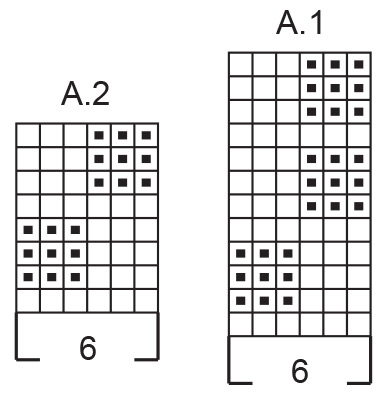
Guten Tag, ich wollte nachfragen, in welchem Muster sollte die Ärmel (Teil mit Streifen) wirklich gestrickt werden. Direkt im Anleitung für Ärmel ist A.1 angegeben, jedoch vorne in Hinweisen zur Anleitung - Streifen Ärmel ist A.2 geschrieben. Für eine Rückmeldung bedanken ich mich voraus.
24.06.2023 - 22:20DROPS Design answered:
Liebe Juliana, Es scheint ein Tippfehler im Muster zu sein. Wir werden uns bei der Designabteilung erkundigen. Grundsätzlich sollte man der Struktur wie am Körper folgen (A.1 für die Streifen und dann A.2 mit natur). Viele Spass zum stricken!
26.07.2023 - 16:41
![]() Janine Grela wrote:
Janine Grela wrote:
Bonjour, concernant le modèle Know the Ropes, je souhaiterais savoir pourquoi le diagramme est différent pour les manches et les dos devant ? Exemple : devant les rayures sont tricotées dans le même sens que les 4 rangs d'en-dessous et pour les manches les 4 mailles sont intercaleées. Merci pour votre réponse.
23.05.2023 - 08:35
![]() Maria wrote:
Maria wrote:
Dzień dobry, czy ściągacz rękawa, prawa strona, ma się kończyć oczkiem prawym, trzema oczkami lewymi i oczkiem brzegowym, czy też jest błąd i zamiast 66 oczek należy nabrać 65( rozmiar S)?
26.04.2023 - 11:37DROPS Design answered:
Witaj Mario, zgadza się, w pozostałych rozmiarach też jest błąd. W twoim rozmiarze powinno być 65 oczek. To oczywiście wpłynie na pozostałe liczby w części RĘKAWY. Korekta już została zgłoszona. Pozdrawiamy!
27.04.2023 - 08:18
![]() MURIEL wrote:
MURIEL wrote:
Rebonjour merci de m avoir répondue Je suis désolée je ne comprends pas pourquoi il faut tricoter les trois mailles du rang envers et reprendre a la quatrième mailles. Je pensais que dans tous les diagrammes en aller retour on tricoter tout le rang endroit de gauche a droite et l envers de droite a gauche Cordialement
17.04.2023 - 20:28DROPS Design answered:
Bonjour Muriel, vous terminez le rang sur l'endroit par les 3 premières mailles du diagramme, donc, sur l'envers, vous devez tricotez d'abord ces 3 mailles, soit vu sur l'envers la 4ème, la 5ème et la 6èm maille de A.1 (= vu sur l'endroit, la 1ère, la 2ème et la 3ème maille de A.1). Bon tricot!
18.04.2023 - 10:04
![]() Muriel wrote:
Muriel wrote:
Bonjour Je suis en train de tricoter le modèle know the ropes et j ai une question Comme il se tricote en aller retour on tricote les rangs pairs de droite à gauche et les rangs impairs de gauche à droite. Seulement pour obtenir le dessin correspondant au tricot il faut tricoter tous les rangs de droite à gauche comment ça se fait svp? Merci
16.04.2023 - 14:27DROPS Design answered:
Bonjour Muriel, quand on lit les diagrammes en allers et retours, on lit les rangs sur l'endroit de droite à gauche et les rangs sur l'envers de gauche à droite. Vous allez tricoter 14-15-16-17-19-21 fois les 6 mailles de A.1 + les 3 premières mailles (le motif est ainsi symétrique), autrement dit, sur l'envers, vous commencez à lire par la 4ème maille à partir de la gauche (pour tricoter les 3 dernières mailles, vu sur l'envers), puis répétez A.1 en lisant les 6 m de gauche à droite. Bon tricot!
17.04.2023 - 09:40
|
|||||||
Know the Ropes#knowtheropessweater |
|||||||
 |
 |
||||||
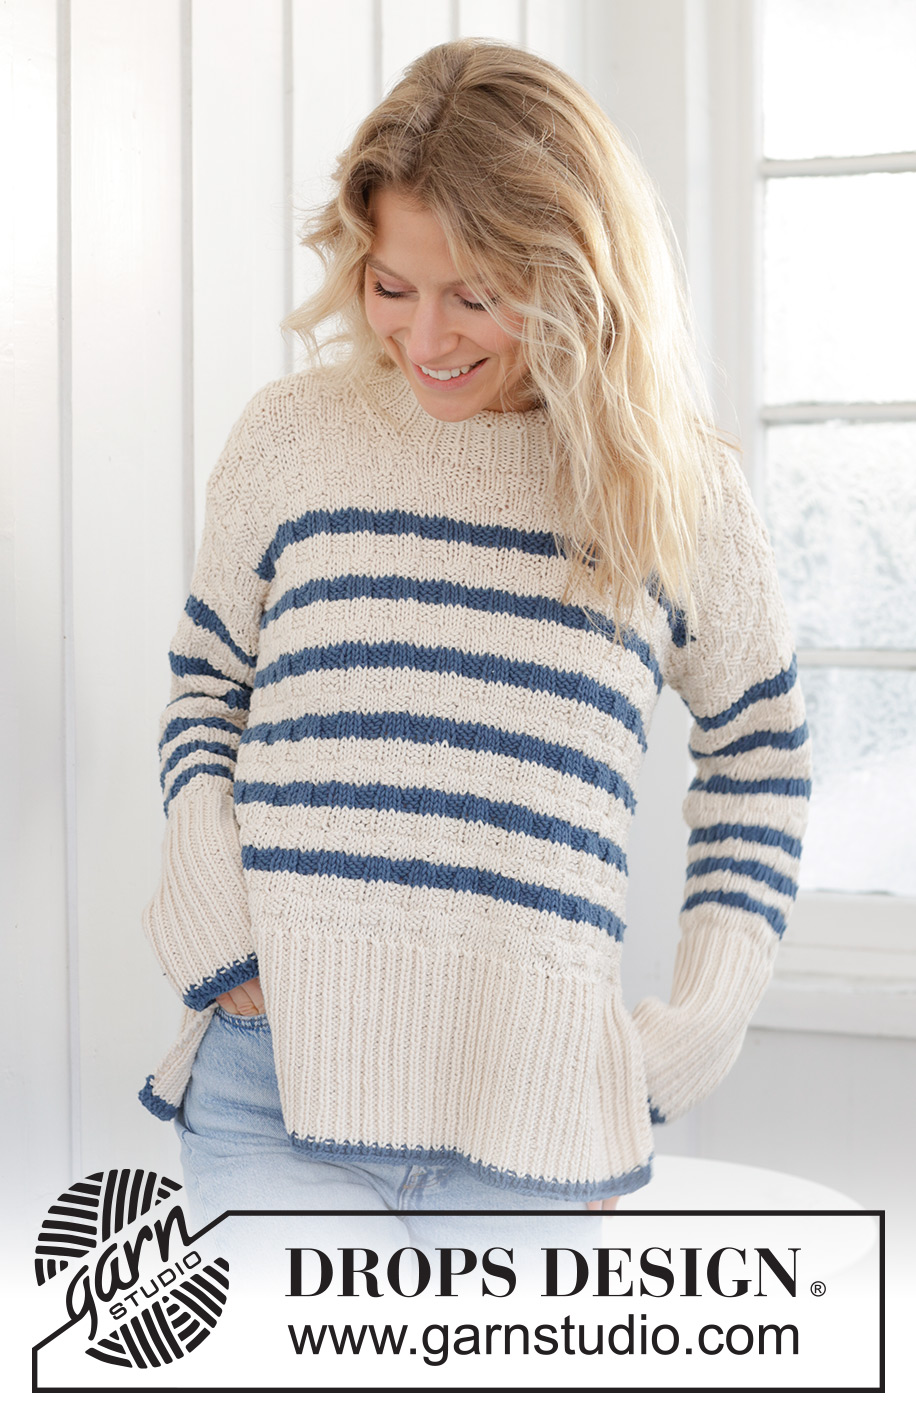
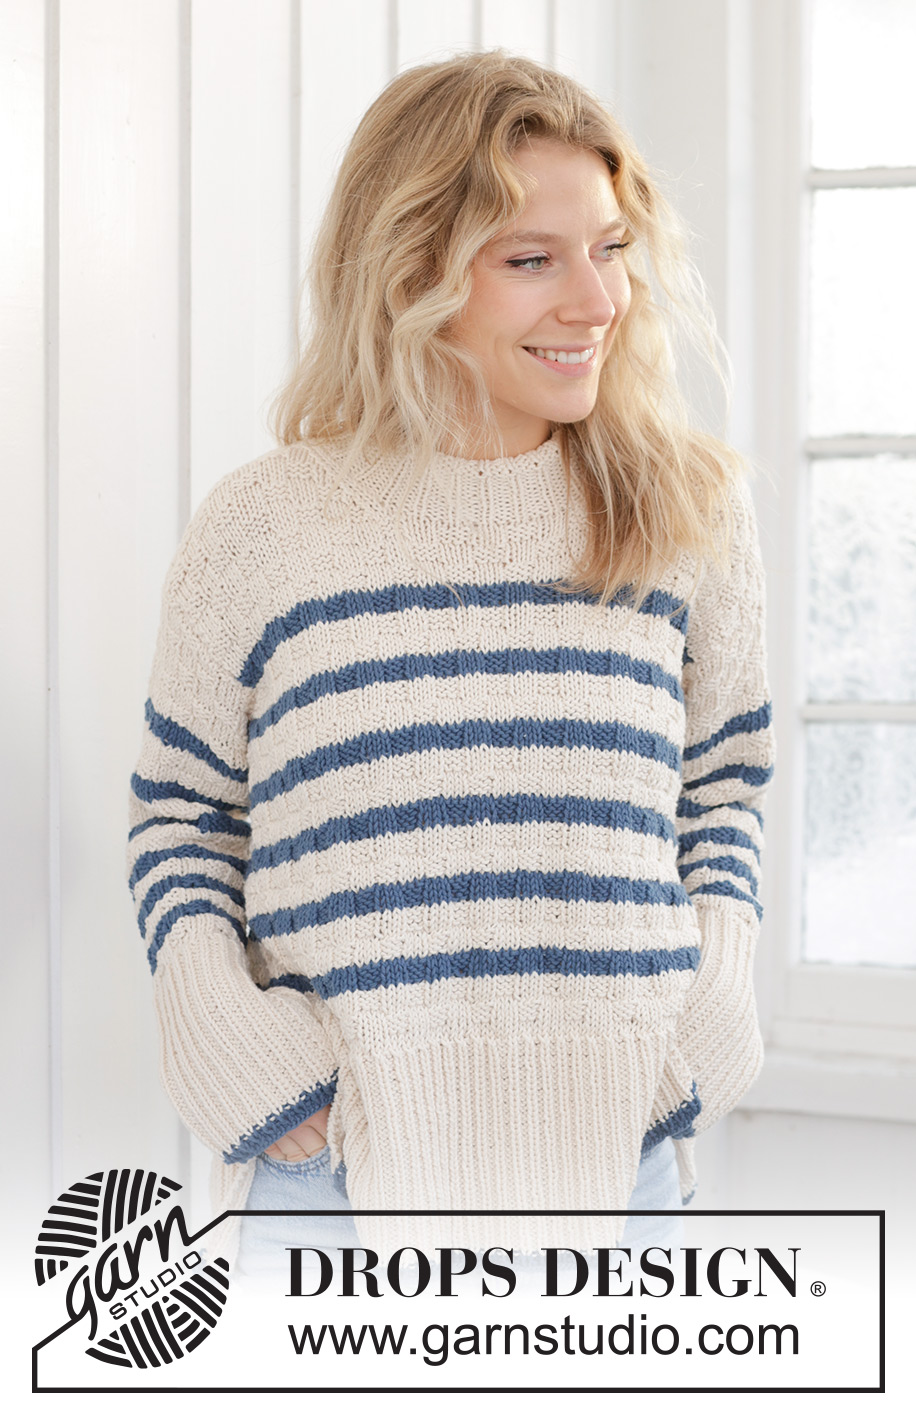
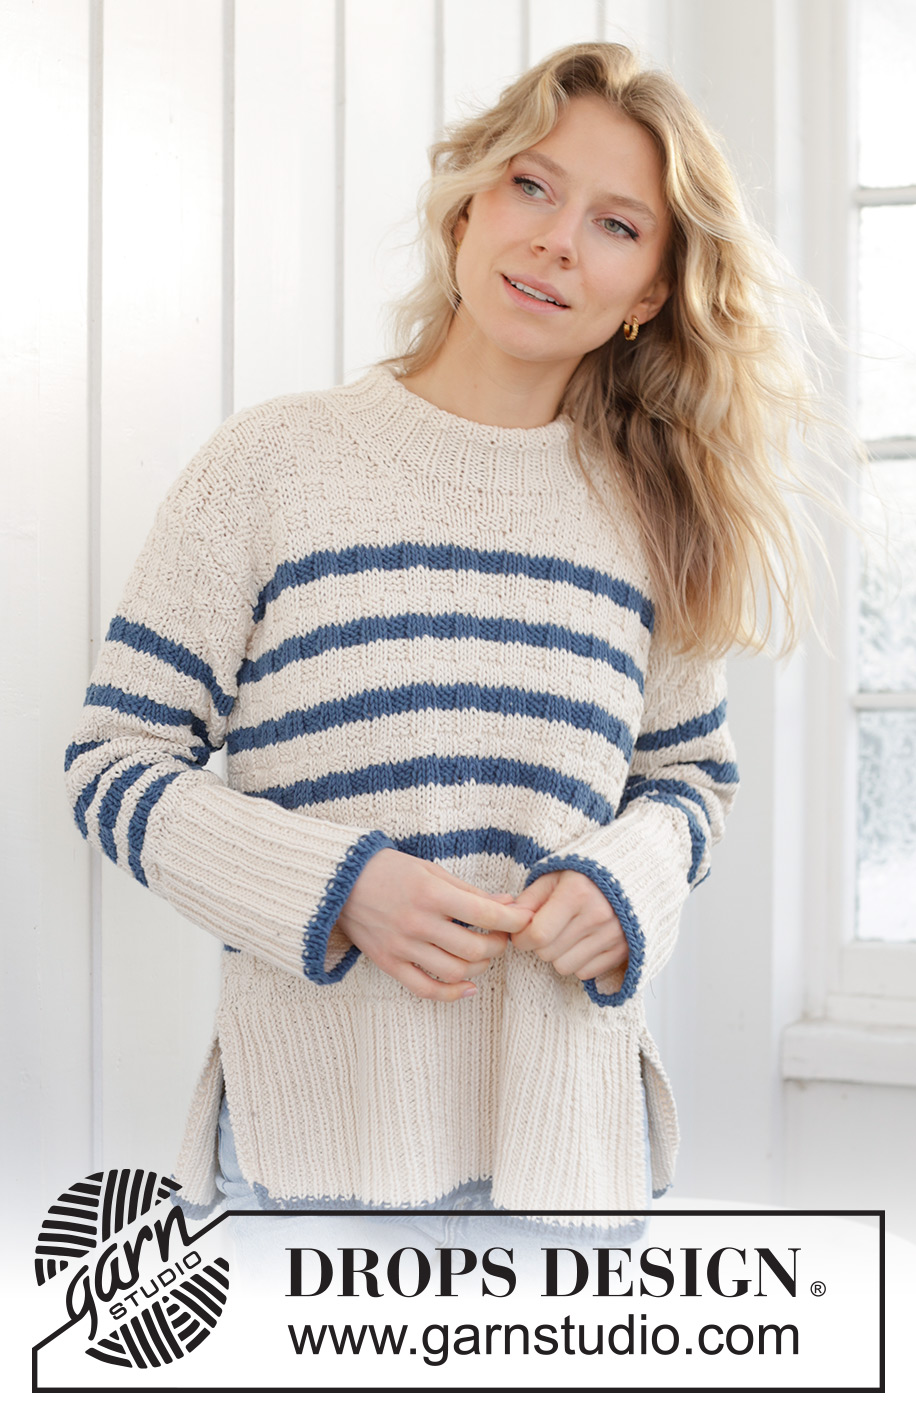
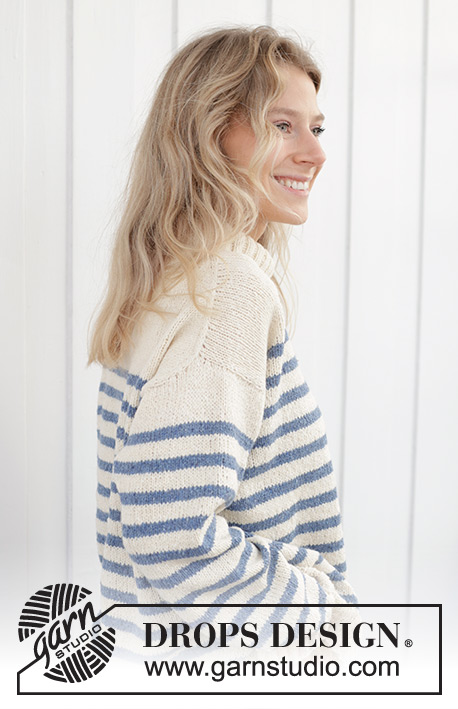
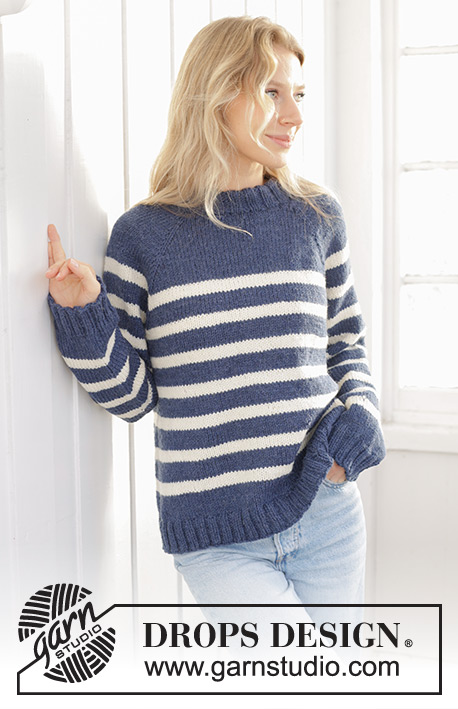
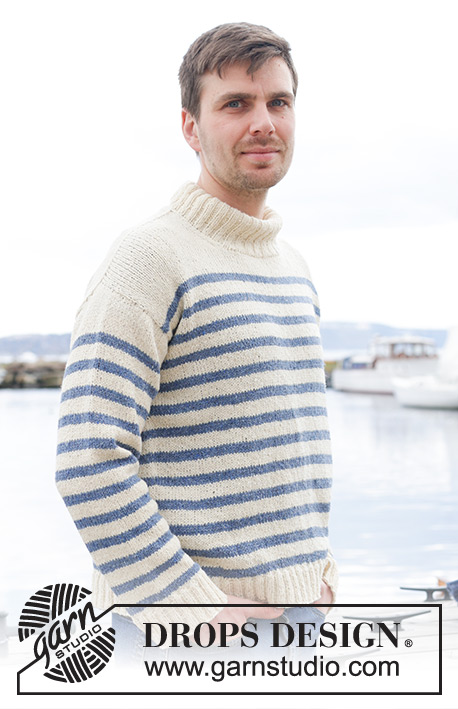
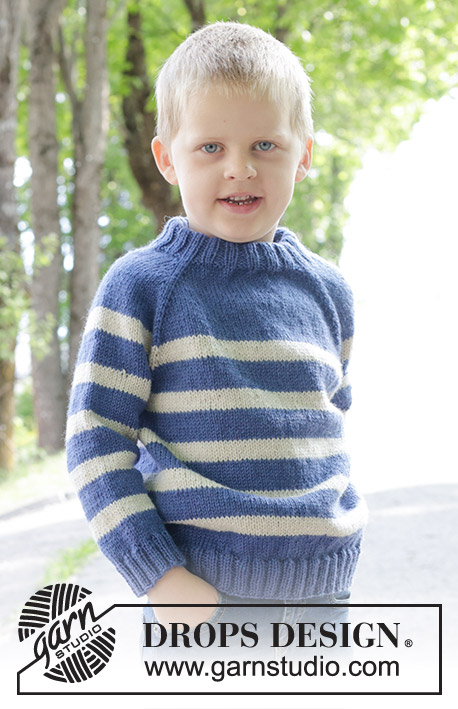
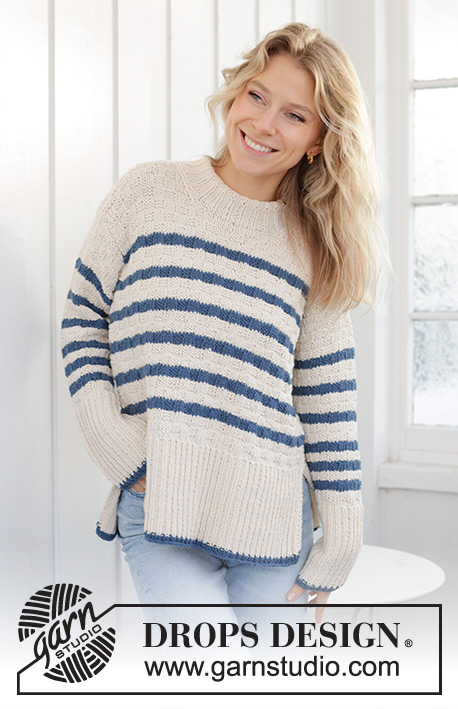
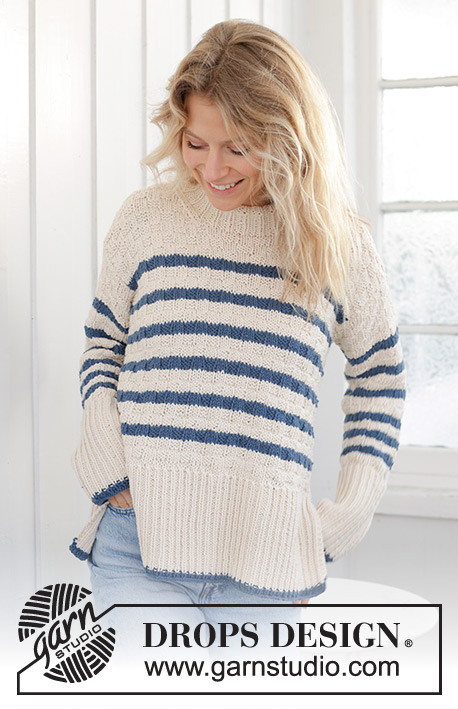
Knitted sweater in DROPS Paris. The piece is worked bottom up with stripes, relief-pattern, sewn-in sleeves and round neck. Sizes S - XXXL.
DROPS 239-40 |
|||||||
|
------------------------------------------------------- EXPLANATIONS FOR THE PATTERN: ------------------------------------------------------- RIDGE/GARTER STITCH (worked back and forth): Knit all rows. 1 ridge = knit 2 rows. PATTERN: See diagrams A.1 and A.2. The diagrams show all rows in the pattern from the right side. STRIPES BODY: Work stripes and pattern as follows: Work the first 8 rows in A.1 with color off white, work the last 4 rows in A.1 with color petrol. Continue like this until you have worked 6 stripes in color petrol. Continue with diagram A.2 and color off white. STRIPES SLEEVES: Work diagram A.2 with stripes as follows: * 4 rows with color off white, 4 rows with color petrol *, work from *-* 3 times, then * 8 rows with color off white, 4 rows with color petrol *, work from *-* 3 times. Finish the sleeve with diagram A.2 and color off white. INCREASE TIP (sleeves): Increase 1 stitch by making 1 yarn over after/before the 1 edge stitch on each side. On the next row work the yarn overs twisted to avoid holes, then work the new stitches into A.1/A.2. ------------------------------------------------------- START THE PIECE HERE: ------------------------------------------------------- SWEATER – SHORT OVERVIEW OF THE PIECE: The front/back pieces and sleeves are worked separately, back and forth. The neck is worked to finish. BACK PIECE: Cast on 125-134-143-155-170-185 stitches with circular needle size 4 MM = US 6 and DROPS Paris color petrol. Purl 1 row from the wrong side. Work the next row as follows from the right side: 2 edge stitches in GARTER STITCH – read description above, * knit 1, purl 2 *, work from *-* until there are 3 stitches left, knit 1 and 2 edge stitches in garter stitch. Change to color off white and work garter stitch over garter stitch, knit over knit and purl over purl until the rib measures 16 cm = 6¼" from cast on edge and the next row is from the right side. Change to circular needle size 5 MM = US 8. Knit 1 row and decrease 38-41-44-50-53-56 stitches evenly spaced = 87-93-99-105-117-129 stitches. Purl 1 row from the wrong side and cast on 1 edge stitch on each side = 89-95-101-107-119-131 stitches. Continue with A.1 and 1 edge stitch in stockinette stitch on each side - read STRIPES BODY. REMEMBER THE KNITTING GAUGE! When A.1 is finished, continue with color off white and A.2 to finished length. When the piece measures 42-43-44-45-46-47 cm = 16½"-17"-17¼"-17¾"-18"-18½" from the cast-on edge, bind off 3 stitches at the beginning of the next 2 rows for the armholes = 83-89-95-101-113-125 stitches. Continue binding off at the beginning of each row on each side as follows: 2 stitches 0-1-1-1-3-4 times, 1 stitch 2-2-3-4-5-7 times = 79-81-85-89-91-95 stitches. Work until the piece measures 58-60-62-64-66-68 cm = 22¾"-23⅝"-24⅜"-25¼"-26"-26¾". Bind off the middle 29-29-31-31-33-33 stitches for the neck and finish each shoulder separately. On the next row from the neck bind off 1 stitch. There are 24-25-26-28-28-30 stitches on the shoulder. Bind off when the piece measures 60-62-64-66-68-70 cm = 23⅝"-24⅜"-25¼"-26"-26¾"-27½". Work the other shoulder in the same way. FRONT PIECE: Cast on and work in the same way as the back, until the front piece measures 51-53-54-56-57-59 cm = 20"-21"-21¼"-22"-22½"-23¼" = 79-81-85-89-91-95 stitches. Place the middle 19 stitches on a thread for the neck and finish each shoulder separately: LEFT SHOULDER: = 30-31-33-35-36-38 stitches. On the first row from the right side begin to decrease for the neck: Work pattern as before until there are 4 stitches left by the neck, knit 2 together (1 stitch decreased) and 2 stitches in stockinette stitch. You now have 3 stitches in stockinette stitch by the neck. Repeat the decrease every row from the side a total of 6-6-7-7-8-8 times = 24-25-26-28-28-30 stitches. Bind off when the piece measures 60-62-64-66-68-70 cm = 23⅝"-24⅜"-25¼"-26"-26¾"-27½". RIGHT SHOULDER: = 30-31-33-35-36-38 stitches. On the first row from the right side begin to decrease for the neck: 2 stitches in stockinette stitch, slip 1 stitch as if to knit, knit 1 and pass the slipped stitch over the knitted stitch (1 stitch decreased), work as before to the end of the row. You now have 3 stitches in stockinette stitch by the neck. Repeat the decrease every row from the neck a total of 6-6-7-7-8-8 times = 24-25-26-28-28-30 stitches. Bind off when the piece measures 60-62-64-66-68-70 cm = 23⅝"-24⅜"-25¼"-26"-26¾"-27½". SLEEVES: Cast on 65-68-71-74-77-77 stitches with circular needle size 4 MM = US 6 and color petrol. Purl 1 row from the wrong side. Work the next row as follows from the right side: 1 edge stitch in garter stitch, * knit 1, purl 2 *, work from *-* until there is 1 stitch left, and work 1 edge stitch in garter stitch. Change to color off white and work garter stitch over garter stitch, knit over knit and purl over purl until the rib measures 16 cm = 6¼" from cast on edge and the next row is from the right side. Change to circular needle size 5 MM = US 8. Knit 1 row and decrease 18-21-18-21-18-18 stitches evenly spaced = 47-47-53-53-59-59 stitches. Purl 1 row from the wrong side with 1 edge stitch in garter stitch on each side. Work A.2 with 1 edge stitch in garter stitch on each side - read STRIPES SLEEVES. Read the next section before continuing! When the sleeve measures 20 cm = 8", increase 1 stitch on each side - read INCREASE TIP. Repeat the increase every 4½-3-3½-2½-3½-2 cm = 1⅝"-1⅛"-1¼"-1"-1¼"-¾" a total of 6-8-7-9-6-8 times on each side = 59-63-67-71-71-75 stitches. Work until the sleeve measures 47-46-46-45-42-40 cm = 18½"-18"-18"-17¾"-16½"-15¾" (approx. 4-5-5-6-9-11 cm = 1½"-2"-2"-2⅜"-3½"-4⅜" left). Bind off for the sleeve cap at the beginning of each row on each side as follows: 3 stitches 1 time, 2 stitches 2 times, 1 stitch 0-2-2-3-6-8 times, 2 stitches 1 time, 3 stitches 1 time. Bind off the remaining stitches. The sleeve measures approx. 51 cm = 20" in all sizes. Work the other sleeve in the same way. ASSEMBLY: Sew the shoulder seams. Sew in the sleeves and sew the sleeve seams inside the 1 edge stitch. Sew the side seams, inside 1 edge in stockinette stitch, leaving a 16 cm = 6¼" split at the bottom. NECK: Use circular needle size 4 MM = US 6 and color off white. Start from the right side on one shoulder and knit up 84-99 stitches around the neckline (including the stitches from the thread in front) – knit up inside the 1 knitted stitch along the sides of the neck in front, leaving 2 visible knitted stitches. Work rib in the round (knit 1, purl 2) for 4 cm = 1½". Purl 1 round. Continue the rib until the neck measures 9 cm = 3½". Bind off with knit over knit and purl over purl. If you wish, you can fold the neck double to the inside and sew down with a few stitches. |
|||||||
Diagram explanations |
|||||||
|
|||||||
|
|||||||
|
|||||||
Have you finished this pattern?Tag your pictures with #dropspattern #knowtheropessweater or submit them to the #dropsfan gallery. Do you need help with this pattern?You'll find 28 tutorial videos, a Comments/Questions area and more by visiting the pattern on garnstudio.com. © 1982-2025 DROPS Design A/S. We reserve all rights. This document, including all its sub-sections, has copyrights. Read more about what you can do with our patterns at the bottom of each pattern on our site. |
|||||||


With over 40 years in knitting and crochet design, DROPS Design offers one of the most extensive collections of free patterns on the internet - translated to 17 languages. As of today we count 314 catalogs and 11822 patterns - 11812 of which are translated into English (US/in).
We work hard to bring you the best knitting and crochet have to offer, inspiration and advice as well as great quality yarns at incredible prices! Would you like to use our patterns for other than personal use? You can read what you are allowed to do in the Copyright text at the bottom of all our patterns. Happy crafting!
Post a comment to pattern DROPS 239-40
We would love to hear what you have to say about this pattern!
If you want to leave a question, please make sure you select the correct category in the form below, to speed up the answering process. Required fields are marked *.