
Popular categories
Looking for a yarn?


Comments / Questions (17)
![]() Ingela wrote:
Ingela wrote:
Om jag vill byta 5 nystan á 50 gram av Drops Air till Drops Big Merino, hur många nystan behöver jag då?
23.02.2026 - 09:01DROPS Design answered:
Hei Ingela. 1 nøste / 50 gram DROPS Air har en løpelengde på 150 meter x 5 nøster = 750 meter. DROPS Big Merino har en løpelengde på 75 meter pr 50 gram. Ta da løpelengden til Air (på 5 nøster) = 750 meter og dele det på Big Merinos løpelengde = 750m / 75m = 10. Du trenger da 10 nøster a 50 gram av Big Merino for å få samme løpelengde som 5 nøster Air. mvh DROPS Design
23.02.2026 - 09:29
![]() Floriana wrote:
Floriana wrote:
Hello, I started knitting this jumper but I already did the sleeve twice first with 40 stitches then 34 but it looks massive, then I realized that I use 40 stitches for my jumpers but here I am knitting for a 9 years old, how can it be possible? Drops Air and needle 5. Can you help?
29.12.2025 - 17:02
![]() Natalia wrote:
Natalia wrote:
Bardzo fajny wzor. Jestem na etapie dekoltu. Robię rozmiar 152. Według opisu mam nabrać 74 oczka, ale na samych nickach pozostało 60 oczek. Zostaje tylko 14 oczek na boki dekoltu, podczas gdy tworzy je około 14 rzędów, zatem oczek do nabrania będzie w sumie 88. A może powinnam nabrać 74 oczka, ale nie patrząc na to co mam, tylko optycznie zwaężając dekoltu?
12.12.2025 - 21:28DROPS Design answered:
Witaj Natalio, na nitkach powinnaś mieć 28 o. (na tyle) i 22 o. (na przodzie) = 50 o. Zostaje 24 oczka do nabrania. Pozdrawiamy!
13.12.2025 - 12:23
![]() Ilda Bessa wrote:
Ilda Bessa wrote:
Boa Tarde. Por favor podem me explicar se no inicio trabalham 148 pontos em círculo? Esses 148 pontos são frente e costas juntos?
31.10.2025 - 16:15DROPS Design answered:
Bom dia, Sim, esses 148 pontos se tricotam em circular e constituem o corpo do pulôver, ou seja, costas e frente juntas. Bons tricôs!
05.11.2025 - 10:41
![]() Ana Ramirez wrote:
Ana Ramirez wrote:
Jeg strikker størrelse 134, det står at ermet skal strikkes til 39 cm. Men i diagrammet man kan beregne 35 cm. Hvordan måler man?
08.06.2025 - 20:48DROPS Design answered:
Hei Ana, I din størrelse skal ermet måle 46 cm når det er strikket ferdig. Du strikker rundt til ermet måler 39 cm (med vrangbord inkludert), deretter strikker ermetopp frem og tilbake som beskrevet i teksten til ferdig mål. Hilsen Drops team.
09.06.2025 - 06:17
![]() Ana Ramirez wrote:
Ana Ramirez wrote:
Jeg strikker størrelse 134, det står at ermet skal strikkes til 39 cm. Men i diagrammet man kan beregne 35 cm. Hvordan måler man?
08.06.2025 - 20:27DROPS Design answered:
Hej Ana, du strikker ærmet til det måler 39 cm, så strikker du ærmekuppel til det måler 45 cm og til strikker du yderligere 2 pinde og lukker af når ærmet måler 46 cm. Det er det samme som står i måleskitsen :)
12.06.2025 - 08:45
![]() Julie MCALEER wrote:
Julie MCALEER wrote:
Bonjour, pour les manches "Rabattre ensuite 2 mailles de chaque côté jusqu'à ce que la manche mesure ..." : cela veut-il dire qu'on doit rabattre 2 mailles de chaque côté à chaque rang jusqu'à la longueur voulue? Ou bien, on rabat 2 mailles de chaque côté une fois et puis on continue avec toutes les mailles restantes jusqu'à la dernière diminution (3 mailles 1 fois de chaque côté)? Dans l'image et le diagramme on a l'impression que c'est la deuxième interprétation...
05.06.2025 - 15:44DROPS Design answered:
Bonjour Mme Mcaleer, on va rabattre 2 mailles au début de chaque rang de chaque côté = aussi bien en début de rang sur l'endroit qu'au début du rang suivant sur l'envers et ainsi jusqu'à la hauteur indiquée, veillez juste à bien avoir rabattu le même nombre de fois 2 mailles sur l'endroit et sur l'envers pour que la manche soit symétrique, puis rabattez 3 mailles au début des 2 rangs suivants. Bon tricot!
05.06.2025 - 16:03
![]() Gretel wrote:
Gretel wrote:
Cast off for the armholes at the beginning of each row: 2 stitches 1 time and 1 stitch 1 time on each side” I don’t understand that part and I’m a beginner and I’m hesitant i might not be able to do it
06.04.2025 - 02:46DROPS Design answered:
Dear Gretel, in the back piece you cast off for both armholes, one is at the beginning of the row and one is at the end of the row. The first time you cast off 2 stitches at the beginning of one row (for the first armhole), continue working the row and get to the end of the row. Now, turn the piece, cast off the first 2 stitches (for the 2nd armhole) and work until the end of the row. Turn the piece, cast off 1 stitch (1st armhole) and continue until the end of the row. Turn the piece, cast off 1 stitch (2nd armhole) and work until the end of the row. You should have cast off on each side (for each armhole) 2 stitches 1 time and 1 stitch 1 time. Happy knitting!
06.04.2025 - 22:23
![]() Camille Bertet wrote:
Camille Bertet wrote:
Bonjour, je n'ai pas bien compris les explications pour faire le col. Je vous remercie d'avance pour votre réponse.
22.08.2024 - 00:18DROPS Design answered:
Bonjour Mme Bertet, relevez les mailles du col en commençant soit au milieu dos soit à la couture de l'une des épaules et relevez les mailles tout autour de l'encolure y compris les mailles en attente au milieu devant, et tricotez en rond, en côtes 1 m end, 1 m env pendant 8 cm. Rabattez les mailles, pliez le col en double sur l'envers et cousez-le pour le maintenir (f vidéo). Bon tricot!
22.08.2024 - 08:39
![]() Isabelle Poinsot wrote:
Isabelle Poinsot wrote:
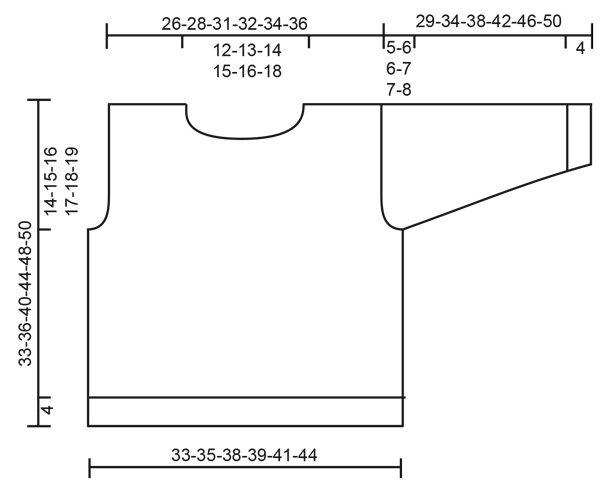
Le diagramme me semble de taille adulte car les mensurations ne correspondent pas à celles indiquées dans le texte.
08.02.2024 - 22:54DROPS Design answered:
Bonjour Mme Poinsot, les mesures sont les mêmes dans les explications et dans le schéma, vous avez bien 4 cm de côtes au début, 19-21-24-27-30-31 cm avant les emmanchures et 33-36-40-44-48-50 cm de hauteur totale, soit 14-15-16-17-18-19 cm de hauteur d'emmanchures. Bon tricot!
20.02.2024 - 09:35
|
|
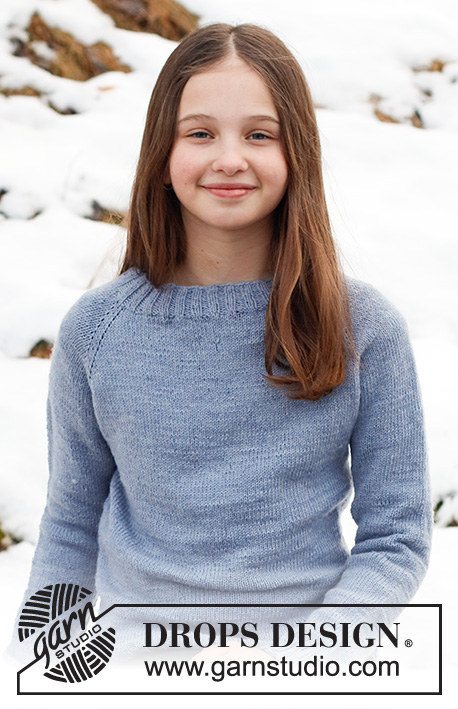
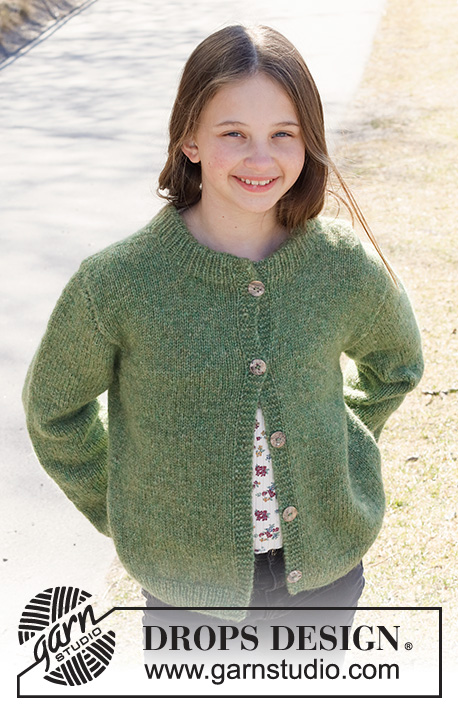
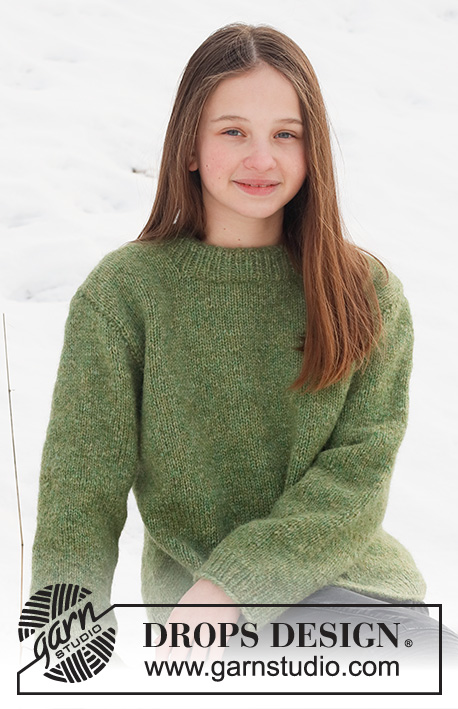
Fresh Lime#freshlimesweater |
|
 |
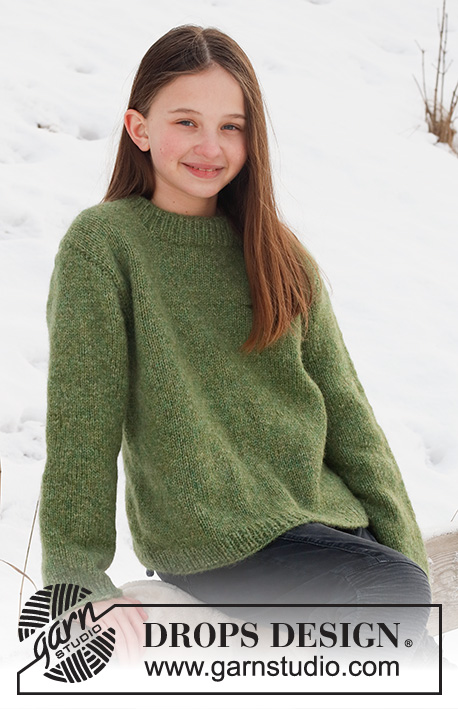 |
Knitted sweater in DROPS Air. The piece is worked with double neck. Sizes 2 – 12 years.
DROPS Children 41-12 |
|
|
------------------------------------------------------- EXPLANATIONS FOR THE PATTERN: ------------------------------------------------------- INCREASE TIP: Work until there are 2 stitches left before the marker thread, make 1 yarn over, knit 4 (marker thread sits in the middle of these 4 stitches), 1 yarn over. On the next round knit the yarn overs twisted to avoid holes (= 2 stitches increased). BINDING-OFF TIP: To avoid the bind-off edge being tight you can bind off with a larger size needle. If the edge is still tight, make 1 yarn over after approx. each 4th stitch at the same time as binding off; the yarn overs are bind off as normal stitches. ------------------------------------------------------- START THE PIECE HERE: ------------------------------------------------------- SWEATER – SHORT OVERVIEW OF THE PIECE: The piece is worked in the round, bottom up as far as the armholes, then the front and back pieces are finished separately. The sleeves are worked in the round with double pointed needles, bottom up as far as the sleeve cap, then back and forth. The neck is worked to finish. BODY: Cast on 112-120-128-132-140-148 stitches with short circular needle size 4 MM = US 6 and DROPS Air. Knit 1 round. Then work rib (knit 1, purl 1) for 4 cm = 1½". Change to circular needle size 5 MM = US 8. Work stockinette stitch. REMEMBER THE KNITTING GAUGE! When the piece measures 19-21-24-27-30-31 cm = 7½"-8¼"-9½"-10⅝"-11¾"-12¼", bind off for the armholes on the next round as follows: Bind off the first 6 stitches, knit 50-54-58-60-64-68 (= front piece), bind off 6 stitches and knit the last 50-54-58-60-64-68 stitches (= back piece). The front and back pieces are finished separately: BACK PIECE: Continue with stockinette stitch, AT THE SAME TIME bind off for the armholes at the beginning of each row: 2 stitches 1 time and 1 stitch 1 time on each side = 44-48-52-54-58-62 stitches. When the piece measures 31-34-38-42-46-48 cm = 12¼"-13⅜"-15"-16½"-18"-19", bind off the middle 18-20-22-24-26-28 stitches for the neck and finish each shoulder separately (= 13-14-15-15-16-17 stitches on each shoulder). Bind off 1 stitch on the next row from the neck = 12-13-14-14-15-16 stitches. Continue with stockinette stitch until the piece measures 33-36-40-44-48-50 cm = 13"-14¼"-15¾"-17¼"-19"-19¾" (= 14-15-16-17-18-19 cm = 5½"-6"-6¼"-6¾"-7"-7½" from the bottom of the armhole), bind off. Work the other shoulder in the same way. FRONT PIECE: Work in the same way as the back piece until the piece measures 29-31-35-38-42-43 cm = 11⅜"-12¼"-13¾"-15"-16½"-17" 44-48-52-54-58-62 stitches. Place the middle 14-16-18-18-20-22 stitches on a thread for the neck and finish each shoulder separately (= 15-16-17-18-19-20 stitches on each shoulder). Bind off on each row from the neck as follows: 2 stitches 1 time and 1 stitch 1-1-1-2-2-2 times = 12-13-14-14-15-16 stitches. Continue working until the piece measures 33-36-40-44-48-50 cm = 13"-14¼"-15¾"-17¼"-19"-19¾" (= 14-15-16-17-18-19 cm = 5½"-6"-6¼"-6¾"-7"-7½" from the bottom of the armhole), bind off. Work the other shoulder in the same way. SLEEVES: Cast on 32-34-36-38-40-42 stitches with double pointed needles size 4 MM = US 6 and DROPS Air. Knit 1 round then work rib (knit 1, purl 1) for 4 cm = 1½". Change to double pointed needles size 5 MM = US 8 and work stockinette stitch. Insert a marker thread at the beginning of the round = mid-under the sleeve. When the sleeve measures 8 cm = 3⅛", increase 1 stitch on each side of the marker thread – read INCREASE TIP. Increase like this every 2-3-3½-4-4-4½ cm = ¾"-1⅛"-1¼"-1½"-1½"-1⅝" a total of 7-7-7-7-8-8 times = 46-48-50-52-56-58 stitches. When the sleeve measures 24-28-32-35-39-42 cm = 9½"-11"-12½"-13¾"-15¼"-16½", bind off 3 stitches on each side of the marker thread and work the sleeve cap back and forth Bind off at the beginning of each row as follows: 2 stitches 2 times and 1 stitch 1-1-2-2-2-2 times on each side. Then bind off 2 stitches on each side until the sleeve measures 28-33-37-41-45-49 cm = 11"-13"-14½"-16⅛"-17¾"-19¼", 3 stitches 1 time on each side, then bind off the remaining stitches. The sleeve measures approx. 29-34-38-42-46-50 cm = 11⅜"-13⅜"-15"-16½"-18"-19¾". Work the other sleeve in the same way. ASSEMBLY: Sew the shoulder seams. Sew in the sleeves. NECK: Start at one shoulder seam and knit up 48 to 74 stitches (including the stitches on the thread and stitch-number divisible by 2) around the neck with circular needle size 4 MM = US 6. Work rib in the round (knit 1, purl 1) for 8 cm = 3⅛". Bind off with knit over knit and purl over purl – read BINDING-OFF TIP. ASSEMBLY: Fold the neck double to the inside and sew down. To avoid the neck being tight and rolling outwards, it is important that the seam is elastic. |
|
 |
|
Have you finished this pattern?Tag your pictures with #dropspattern #freshlimesweater or submit them to the #dropsfan gallery. Do you need help with this pattern?You'll find 28 tutorial videos, a Comments/Questions area and more by visiting the pattern on garnstudio.com. © 1982-2026 DROPS Design A/S. We reserve all rights. This document, including all its sub-sections, has copyrights. Read more about what you can do with our patterns at the bottom of each pattern on our site. |
|


With over 40 years in knitting and crochet design, DROPS Design offers one of the most extensive collections of free patterns on the internet - translated to 17 languages. As of today we count 324 catalogs and 12290 patterns - 12280 of which are translated into English (US/in).
We work hard to bring you the best knitting and crochet have to offer, inspiration and advice as well as great quality yarns at incredible prices! Would you like to use our patterns for other than personal use? You can read what you are allowed to do in the Copyright text at the bottom of all our patterns. Happy crafting!
Post a comment to pattern DROPS Children 41-12
We would love to hear what you have to say about this pattern!
If you want to leave a question, please make sure you select the correct category in the form below, to speed up the answering process. Required fields are marked *.