
Popular categories
Looking for a yarn?


Comments / Questions (96)
![]() Bosco Marie France wrote:
Bosco Marie France wrote:
Bonjour, je fais le modèle Lucky Wish et je ne vois pas la différence qu'il y a entre la correction ajoutée le9/9/2022 et l'explication du pull. Pouvez-vous m'expliquer. Je vous remercie . Cordialement.
29.04.2026 - 08:35DROPS Design answered:
Bonjour Mme Bosco, il n'y en a pas car cette correction ne s'applique que si vous aviez imprimé les explications avant cette date, sinon la correction a déjà été faite. Bon tricot!
29.04.2026 - 09:43
![]() Chantal Weizel wrote:
Chantal Weizel wrote:
Hi! Erstmal danke für das coole pattern :) ich habe jetzt den Schritt erreicht, wo ich das Passe aufteile in Ärmel und Body. Wenn ich den body gestrickt habe und dann zu den Ärmeln übergehe, nehme ich dann wieder 8 Maschen auf und vernähe es im Anschluss oder steche ich quasi in die bereits aufgenommenen 8 Maschen des Körpers? Im Video war da ein gigantisches Loch, deswegen bin ich verwirrt..
08.04.2026 - 08:53DROPS Design answered:
Liebe Frau Weizel, es gibt dann für jede Ärmel so ein Loch = die stillgelegten Maschen + die 8 neue Maschen die man dann später für den Ärmel strickt - siehe Video time code 07:00 für die Aufteilung und ca 09:35 für den 1. Ärmel - oder kann Ihnen vielleicht diese Lektion helfen? Wir zeigen auch die Aufteilung, das Rumfpteil und die Ärmel. Hoffentlich kann das Ihnen helfen.
09.04.2026 - 09:57
![]() Daniela wrote:
Daniela wrote:
Hi :) I'm knitting this in size M. At the end of the neck, I have 84 stitches. Here it says to increase evenly 18 stitches in the first round of the yoke. In the increase tip you say to divide the current number of stitches (84) by the number of increased (18), but that's not a round number. What should I do? Is this a typo? Thanks!
16.03.2026 - 01:30DROPS Design answered:
Hi Daniela, The Increase Tip will not give a round number all the time. 84/18 = 4.7. You increase after every 5th stitch x 2 , then after the next 4 stitches, then every 5th stitch x 2, after the 4th stitch, etc. This should give you 18 increased stitches on the round but can be adjusted if necessary, making an extra increase or skipping an increase, at the end of the round. Regards, Drops Team.
16.03.2026 - 06:48
![]() Ip wrote:
Ip wrote:
Jeg kan læse i en kommentar at man skulle have startet nederst i diagram A1 og ikke i toppen ved de 16 rette masker, jeg er startet i toppen, er jeg så nødt til at starte forfra fra mærket eller kan jeg fortsætte som jeg har gjort nu, altså i den forkerte retning
02.03.2026 - 21:37DROPS Design answered:
Hei Ip. For at oppskriften skal stemme, må man begynne nederst til høyre i diagrammet. Da vil man øke og få den riktige rundfellingsformen på genseren. mvh DROPS Design
03.03.2026 - 12:47
![]() Hache wrote:
Hache wrote:
J ai fait mon echantillon avec des 5 et je suis exactement comme vous mais je trouve celui trop aéré pour un pull d homme et trop souple j ai fait un echantillon en 4 plus dense mais plus du tout élastique j adore le modèle mais je suis inquiète car en 5 peur que ke pull se deforme il reste le 4.5 je suis un peu perdue avec cette laine qui est ceci dit magnifique
02.03.2026 - 01:20DROPS Design answered:
Bonjour Mme Hache, si vous n'avez pas le bon échantillon, les mesures finales seront automatiquement différentes, il est donc recommandé de bien suivre la taille des aiguilles qui vous permettra d'obtenir la bonne tension (plus d'infos ici); si vous préférez tricoter avec une tension plus serrée, sélectionnez le nombre de mailles souhaitées dans la recherche. Bon tricot!
02.03.2026 - 11:24
![]() Yara wrote:
Yara wrote:
Bonjour, J’aimerais faire ce pull en couleur unie, combien de laine dois je donc en prendre ? Et je suis débutante, quand vous dites 2 fils, c’est que vous prenez 2 fils de 2 pelotes différentes ? Merci beaucoup
01.03.2026 - 12:40DROPS Design answered:
Bonjour Yara, doublez simplement la quantité indiquée pour chaque couleur, autrement dit, additionnez la quantité de chaque couleur et tricotez ensuite avec 2 fils soit effectivement 1 fil de 2 pelotes en même temps. Bon tricot!
02.03.2026 - 10:13
![]() Elisabeth wrote:
Elisabeth wrote:
A1 diagram: hvad menes der med rapporter Eks for str XL skal jeg strikke 20 rapporter a 6 masker ? Hvor på omgangen skal jeg lave omslag mellem de 2 masker ?
05.02.2026 - 22:23DROPS Design answered:
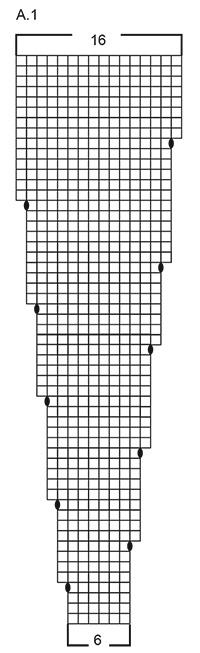
Hej Elisabeth, du starter nederst i diagrammet, på 4.omgang strikker du 6 masker, slå om, 6 masker, slå om osv. så strikker du 3 omgange den at tage ud, på næste omgang strikker du slå om, 7 makser, slå om, 7 masker osv.... Du kan sætte 1 mærke imellem hver rapport, altså for hver gang du starter forfra i diagrammet :)
06.02.2026 - 08:30
![]() Catherine BREDA wrote:
Catherine BREDA wrote:
Bonjour, je souhaiterais faire ce modèle, mais avec la laine FLORA. il se tricote avec 2 laines différentes, faut-il que je choisisse également 2 laines différentes? pour un modèle en taille XL, si j'ai bien compris, il faudrait que je prévois 800g de laine ? Merci d'avance pour votre aide Cordialement C. BREDA
27.01.2026 - 10:26DROPS Design answered:
Bonjour Mme Breda, on tricote ici effectivement avec 2 fils Alpaca de couleur différente, vous pouvez ainsi utiliser le convertisseur pour faire calculer la quantité nécessaire pour chaque couleur en DROPS Flora. Bon tricot!
28.01.2026 - 08:27
![]() Darin wrote:
Darin wrote:
Hi team, I'm a new knitter to sweater patterns. My question is, when doing the double neck and you get to the decrease where you are purling 2 together, would that be the 1st 2 purl stitches (of 3x) so you eventually get 2x2 ribbing?
13.01.2026 - 18:45DROPS Design answered:
Hi Darin, Yes, that is correct. You purl 2 together (and it doesn't matter which 2) in each section of purl-3 so the new rib will be knit 2, purl 2. Regards, Drops Team.
14.01.2026 - 07:33
![]() Lexan wrote:
Lexan wrote:
Hur hittar man storleken man ska ha?
09.01.2026 - 20:29
|
|||||||
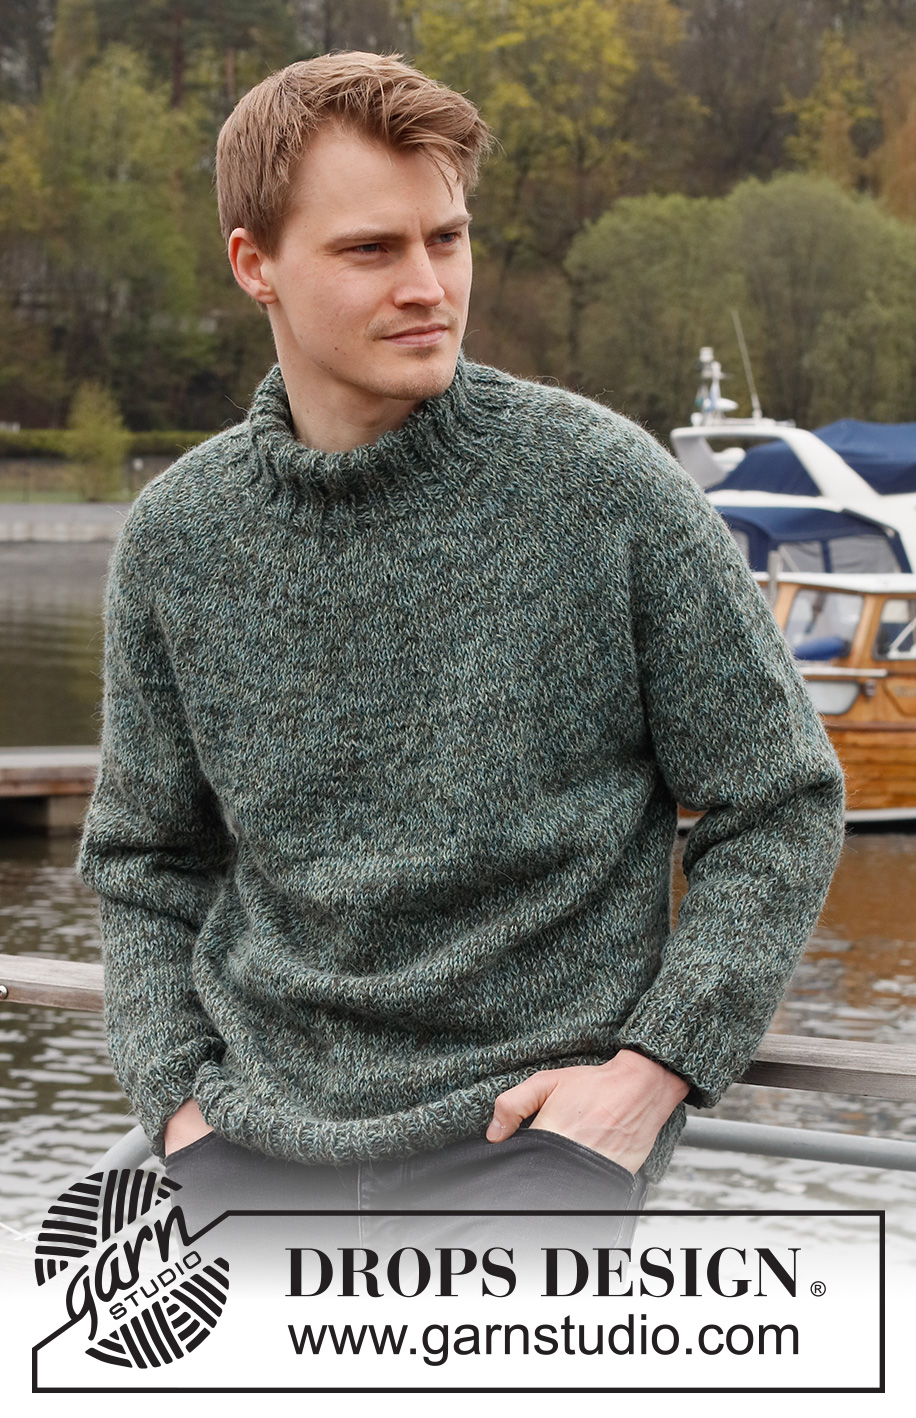
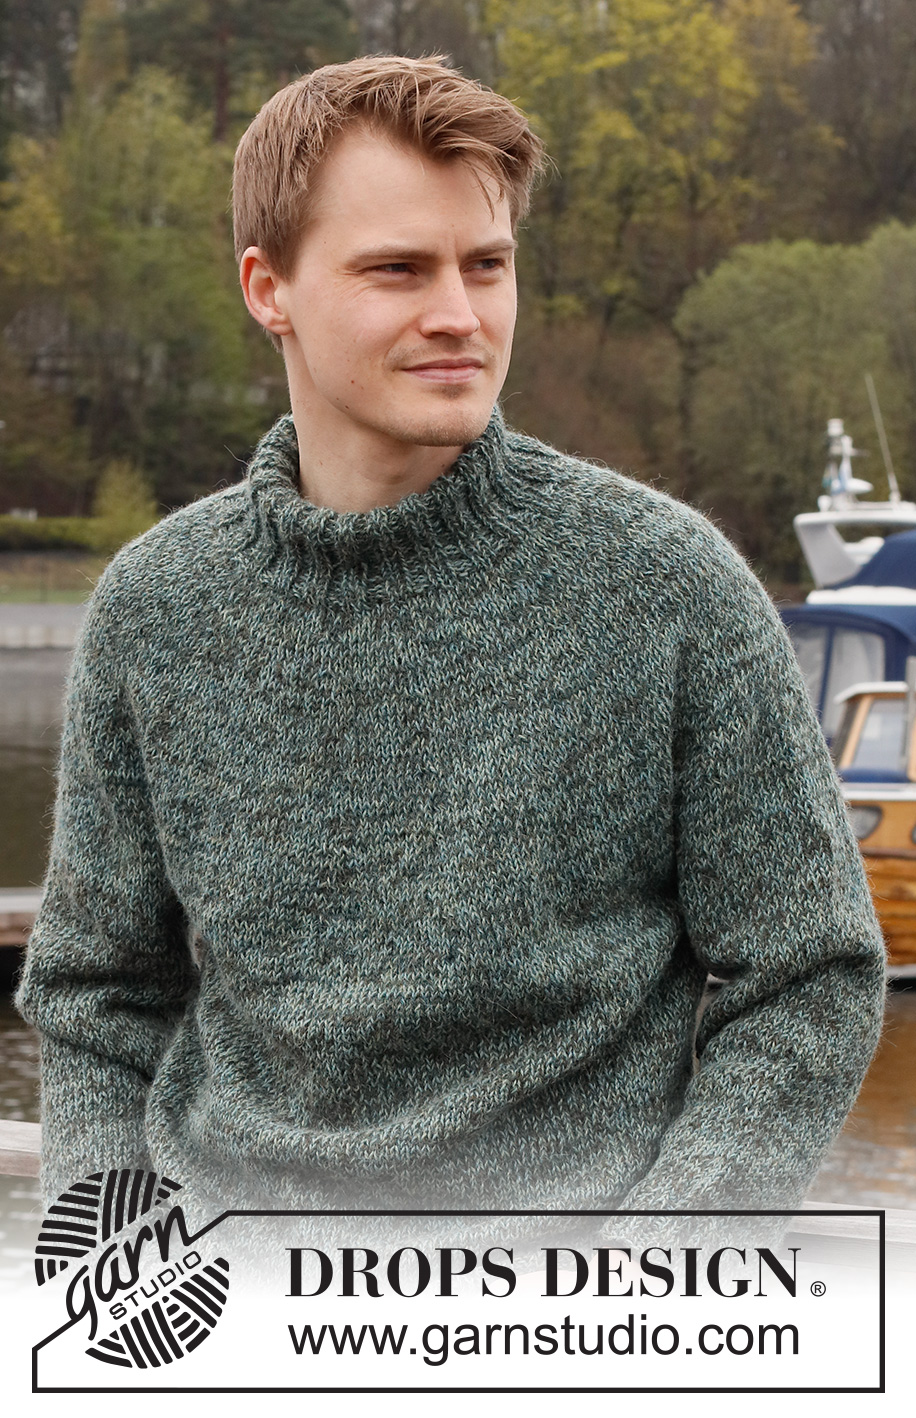
Lucky Wish#luckywishsweater |
|||||||
 |
 |
||||||
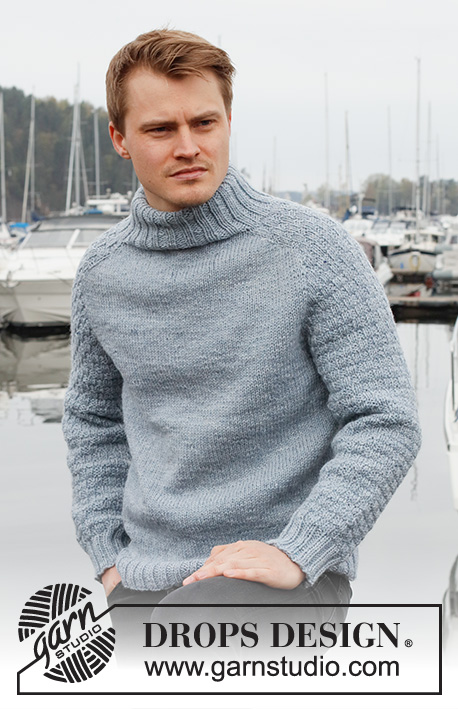
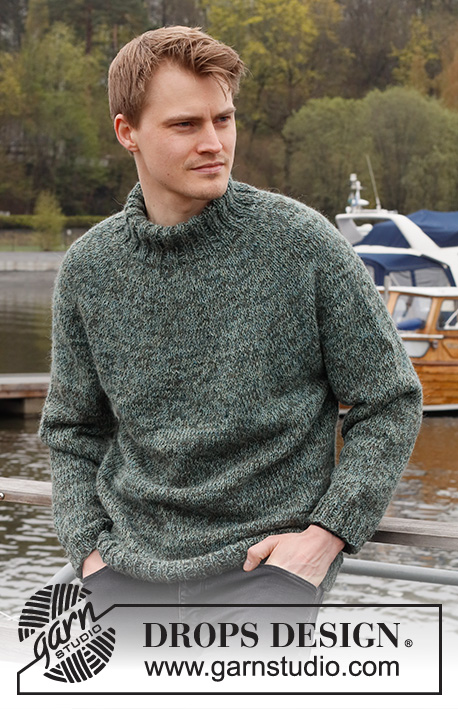
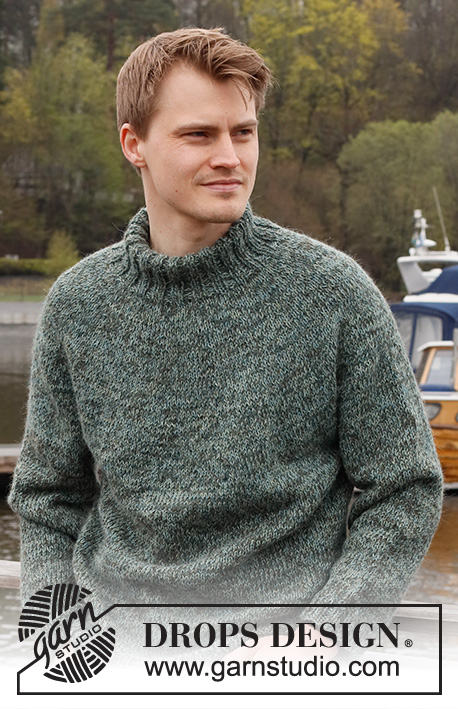
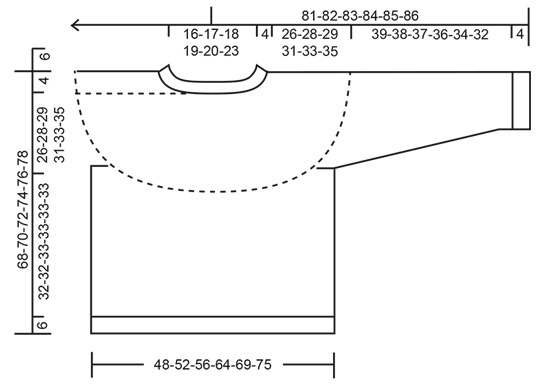
Knitted sweater for men in 2 strands DROPS Alpaca. The piece is worked top down with double neck and round yoke. Sizes S - XXXL.
DROPS 224-21 |
|||||||
|
------------------------------------------------------- EXPLANATIONS FOR THE PATTERN: ------------------------------------------------------- INCREASE TIP (evenly spaced): To work out how to increase evenly, count the total number of stitches on the needle (e.g. 80 stitches) and divide by the number of increases to be made (e.g. 16) = 5. In this example, increase by making 1 yarn over after each 5th stitch. On the next round knit the yarn overs twisted to avoid holes. PATTERN: See diagram A.1. The whole pattern is worked in stockinette stitch. DECREASE TIP (for sleeves): Decrease 1 stitch on either side of the marker thread as follows: Work until there are 3 stitches left before the marker thread, knit 2 together, knit 2 (marker thread sits between these 2 stitches), slip 1 stitch as if to knit, knit 1 and pass the slipped stitch over the knitted stitch (2 stitches decreased). BINDING-OFF TIP: To avoid the bind-off edge being tight you can bind off with a larger size needle. If the edge is still tight, make 1 yarn over after approx. each 4th stitch at the same time as binding off; the yarn overs are bind off as normal stitches. ------------------------------------------------------- START THE PIECE HERE: ------------------------------------------------------- SWEATER – SHORT OVERVIEW OF THE PIECE: The neck and yoke are worked in the round with circular needle, from mid back and top down. The yoke is divided for body and sleeves and the body is continued in the round with circular needle. The sleeves are worked with double pointed needles, top down. DOUBLE NECK: Cast on 100-105-110-115-120-130 stitches with short circular needle size 4 MM = US 6 and 1 strand of each color DROPS Alpaca (= 2 strands). Knit 1 round. Work rib (knit 2, purl 3) for 4 cm = 1½". Now decrease 1 stitch in all the purled sections by purling 2 together = 80-84-88-92-96-104 stitches. Continue the new rib until the neck measures 12 cm = 4¾". Change to circular needle size 5 MM = US 8. YOKE: Insert 1 marker at the beginning of the round mid-back; the yoke is measured from this marker! Knit 1 round where you increase 16-18-26-28-30-34 stitches evenly spaced – read INCREASE TIP = 96-102-114-120-126-138 stitches. Work A.1 over all stitches (= 16-17-19-20-21-23 repeats of 6 stitches). REMEMBER THE KNITTING GAUGE! When A.1 has been completed in height there are 256-272-304-320-336-368 stitches on the round. Knit 1 round where you increase 0-0-0-4-8-0 stitches evenly spaced = 256-272-304-324-344-368 stitches. Continue working until the yoke measures 26-28-29-31-33-35 cm = 10¼"-11"-11⅜"-12¼"-13"-13¾" from the marker. The yoke is now divided for the body and sleeves as follows: Knit 38-40-44-49-53-58 (= half back piece), place the next 52-56-64-64-66-68 stitches on 1 thread for the sleeve, cast on 6-8-8-10-12-12 stitches (= in side under sleeve), knit 76-80-88-98-106-116 (= front piece), place the next 52-56-64-64-66-68 stitches on 1 thread for the sleeve, cast on 6-8-8-10-12-12 stitches (= in side under sleeve), knit 38-40-44-49-53-58 (= half back piece). The body and sleeves are finished separately. THE PIECE IS NOW MEASURED FROM HERE! BODY: There are now 164-176-192-216-236-256 stitches on the round. Continue with stockinette stitch in the round for 32-32-33-33-33-33 cm = 12½"-12½"-13"-13"-13"-13" (or to desired length; there is approx. 6 cm = 2⅜" left). Change to circular needle size 4 MM = US 6 and work rib (knit 2, purl 2) for 6 cm = 2⅜". Loosely bind off with knit over knit and purl over purl – read BINDING-OFF TIP. The sweater measures approx. 68-70-72-74-76-78 cm = 26¾"-27½"-28⅜"-29⅛"-29½"-30¾" from the shoulder down. SLEEVES: Place the 52-56-64-64-66-68 stitches from the thread on the one side of the piece on double pointed needles/short circular needle size 5 MM = US 8 and knit up 1 stitch in each of the 6-8-8-10-12-12 stitches cast on under the sleeve = 58-64-72-74-78-80 stitches. Insert a marker thread in the middle of the 6-8-8-10-12-12 stitches under the sleeve. Allow the thread to follow your work onwards; it will be used when decreasing under the sleeve. Start at the marker thread and work stockinette stitch in the round for 3 cm = 1⅛". Now decrease 2 stitches under the sleeve – read DECREASE TIP. Decrease like this every 6-4-3-2½-2½-2½ cm = 2⅜"-1½"-1⅛"-1"-1"-1" a total of 6-8-11-11-12-12 times = 46-48-50-52-54-56 stitches. Continue without further decreases until the sleeve measures 39-38-37-36-34-32 cm = 15¼"-15"-14½"-14¼"-13⅜"-12½" from the division (there is approx. 4 cm = 1½" left; try the sweater on and work to desired length). Shorter measurements in larger sizes due to wider neck and longer yoke. Knit 1 round where you increase 2-4-2-4-2-4 stitches evenly spaced = 48-52-52-56-56-60 stitches. Change to double pointed needles size 4 MM = US 6 and work rib (knit 2, purl 2) for 4 cm = 1½". Bind off with knit over knit and purl over purl – remember BINDING-OFF TIP! The sleeve measures approx. 43-42-41-40-38-36 cm = 17"-16½"-16⅛"-15¾"-15"-14¼". Work the other sleeve in the same way. ASSEMBLY: Fold the neck double to the inside and sew down. To avoid the neck being tight and rolling outwards, it is important that the seam is elastic. |
|||||||
Diagram explanations |
|||||||
|
|||||||
 |
|||||||
 |
|||||||
Have you finished this pattern?Tag your pictures with #dropspattern #luckywishsweater or submit them to the #dropsfan gallery. Do you need help with this pattern?You'll find 26 tutorial videos, a Comments/Questions area and more by visiting the pattern on garnstudio.com. © 1982-2026 DROPS Design A/S. We reserve all rights. This document, including all its sub-sections, has copyrights. Read more about what you can do with our patterns at the bottom of each pattern on our site. |
|||||||


With over 40 years in knitting and crochet design, DROPS Design offers one of the most extensive collections of free patterns on the internet - translated to 17 languages. As of today we count 325 catalogs and 12298 patterns - 12288 of which are translated into English (US/in).
We work hard to bring you the best knitting and crochet have to offer, inspiration and advice as well as great quality yarns at incredible prices! Would you like to use our patterns for other than personal use? You can read what you are allowed to do in the Copyright text at the bottom of all our patterns. Happy crafting!
Post a comment to pattern DROPS 224-21
We would love to hear what you have to say about this pattern!
If you want to leave a question, please make sure you select the correct category in the form below, to speed up the answering process. Required fields are marked *.