
Popular categories
Looking for a yarn?


|
|||||||
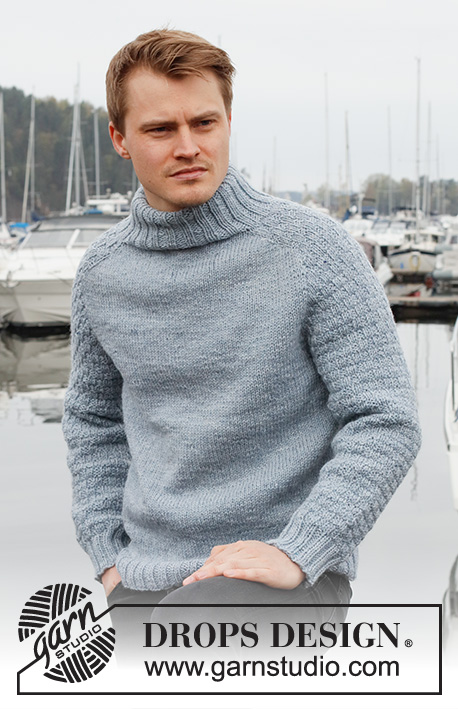
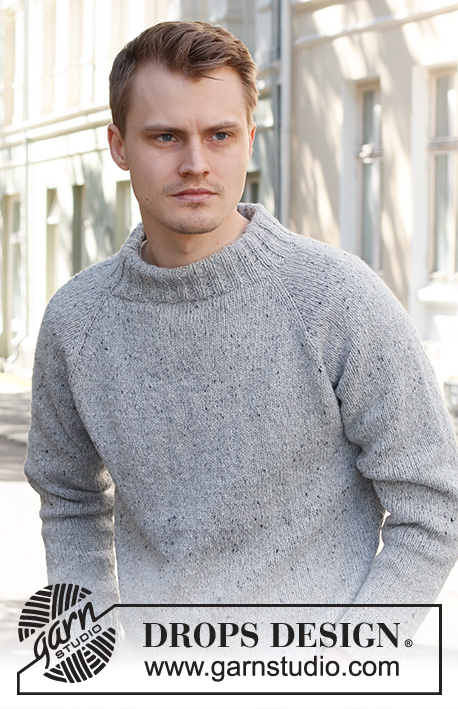
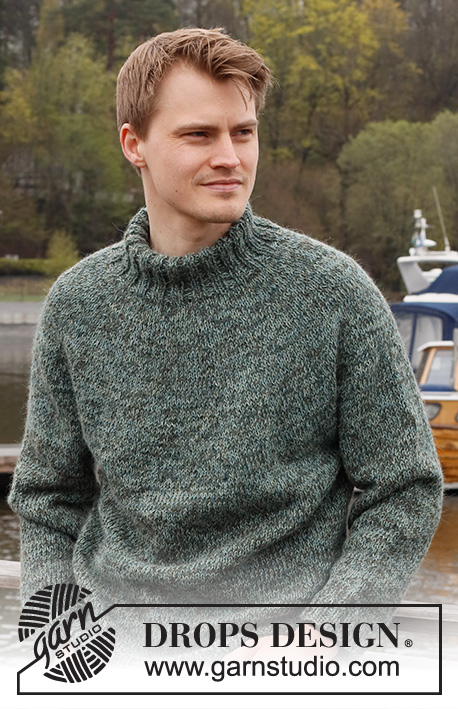
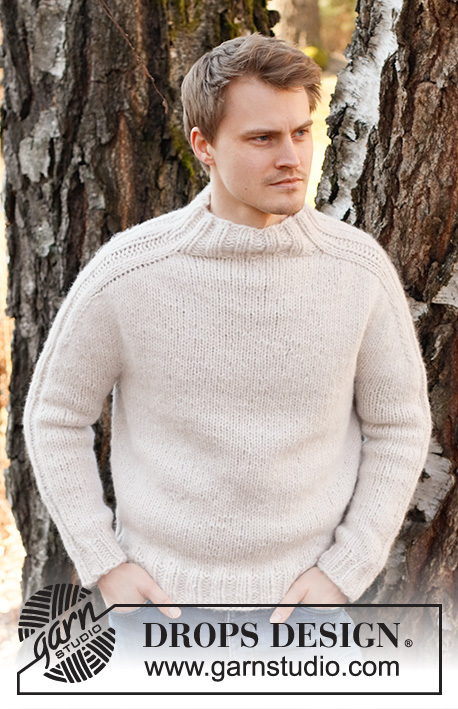
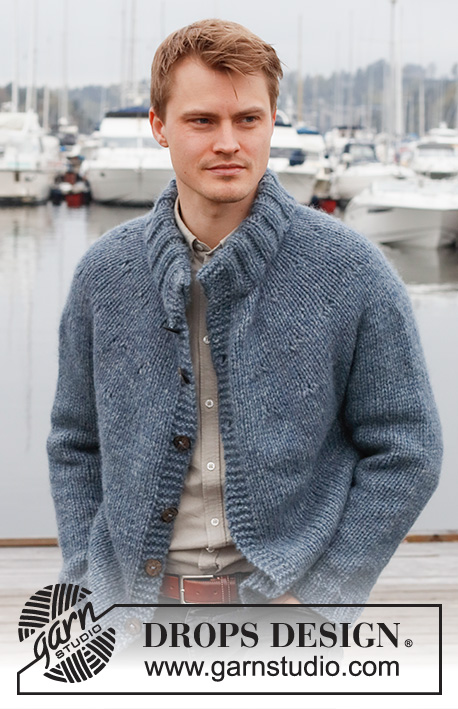
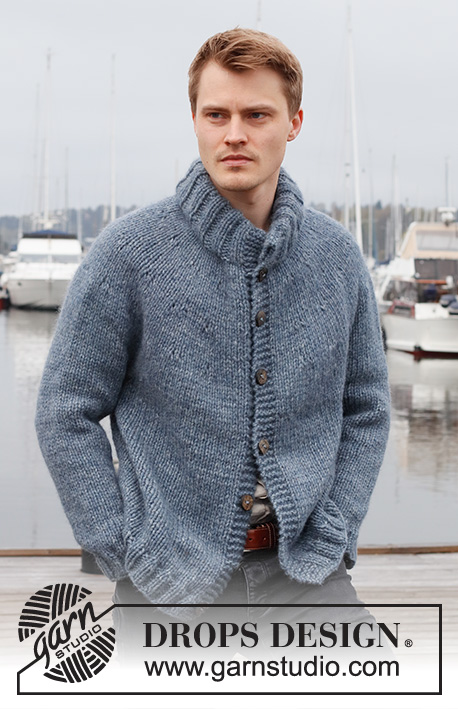
Sailor Blues |
|||||||
 |
 |
||||||
Knitted jacket for men in DROPS Wish. The piece is worked top down, with round yoke and double neck. Sizes S - XXXL.
DROPS 224-8 |
|||||||
|
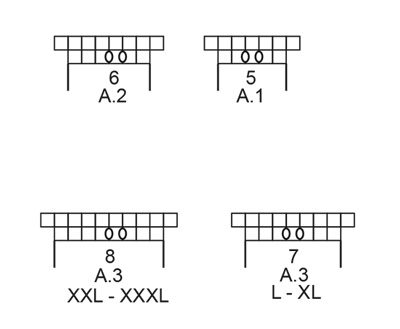
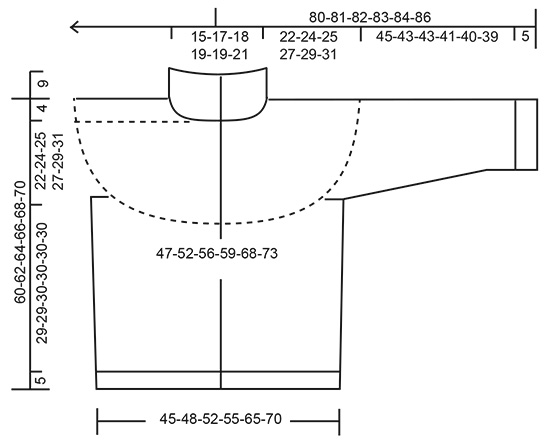
------------------------------------------------------- EXPLANATIONS FOR THE PATTERN: ------------------------------------------------------- RIDGE/GARTER STITCH (worked back and forth): Knit all rows. 1 ridge = knit 2 rows. PATTERN: See diagrams A.1 to A.3. Choose diagram for your size (applies to A.3 in sizes L, XL, XXL and XXXL). The diagrams show all rows in the pattern from the right side. INCREASE TIP (evenly spaced): To work out how to increase evenly, count the total number of stitches on the needle (e.g. 64 stitches) minus bands (e.g. 10 stitches) and divide the remaining stitches by the number of increases to be made (e.g. 13) = 4.1. In this example, increase by making 1 yarn over after approx. each 4th stitch. Do not increase over the bands. On the next row work the yarn overs twisted to avoid holes. DECREASE TIP (for body and sleeves): Decrease 1 stitch on either side of the marker thread as follows: Work until there are 3 stitches left before the marker thread, knit 2 together, knit 2 (marker thread sits between these 2 stitches), slip 1 stitch as if to knit, knit 1 and pass the slipped stitch over the knitted stitch (2 stitches decreased). BUTTONHOLES: Work buttonholes on the left band (when the garment is worn). Work from the right side at the beginning of the row as follows: Knit 1, knit 2 together, make 1 yarn over. On the next row (wrong side), knit the yarn over to leave a hole. The first buttonhole is worked after the rib on the neck is finished. Then work the other 6-6-6-7-7-7 buttonholes with approx. 8½-8½-9-8-8½-8½ cm = 3¼"-3¼"-3½"-3⅛"-3¼"-3¼" between each one. BINDING-OFF TIP: To avoid the bind-off edge being tight you can bind off with a larger size needle. If the edge is still tight, make 1 yarn over after approx. each 6th stitch at the same time as binding off; the yarn overs are bind off as normal stitches. ------------------------------------------------------- START THE PIECE HERE: ------------------------------------------------------- JACKET – SHORT OVERVIEW OF THE PIECE. The neck and yoke are worked back and forth with circular needle, from mid front and top down. The yoke is divided for body and sleeves and the body continued back and forth with circular needle. The sleeves are worked in the round with double pointed needles/short circular needle, top down. DOUBLE NECK: Cast on 77-82-87-92-92-97 (including 5 band stitches on each side towards mid-front) with circular needle size 6 MM = US 10 and DROPS Wish. Purl 1 row (= wrong side). The next row is worked as follows from the right side: 5 band stitches in GARTER STITCH – read description above, * knit 2, purl 3 *, work from *-* until there are 7 stitches left, knit 2 and 5 band stitches in garter stitch. When the rib measures 4 cm = 1½", decrease all purl-3 to purl-2 = 64-68-72-76-76-80 stitches. Continue the new rib until the neck measures 18 cm = 7". When the rib is finished, knit 1 row where you increase 15-16-17-18-28-29 stitches evenly spaced – read INCREASE TIP = 79-84-89-94-104-109 stitches. Remember the BUTTONHOLES on the left band – read description above. Purl 1 row from the wrong side (yarn overs purled twisted and bands knitted). Insert 1 marker after the band at the beginning of the row; the yoke is measured from here! YOKE: Change to circular needle size 8 MM = US 11. Work stockinette stitch with 5 band stitches in garter stitch on each side. REMEMBER THE KNITTING GAUGE! When the piece measures 4 cm = 1½" from the marker, work increases as follows: INCREASE 1: 5 band stitches in garter stitch, 2 stitches in stockinette stitch, A.1 until there are 7 stitches left (= 13-14-15-16-18-19 repeats of 5 stitches), 2 stitches in stockinette stitch, 5 band stitches in garter stitch. When A.1 has been worked in height you have increased 26-28-30-32-36-38 stitches = 105-112-119-126-140-147 stitches. Continue with stockinette stitch and 5 band stitches in garter stitch on each side until the piece measures 10-11-11-12-13-14 cm = 4"-4⅜"-4⅜"-4¾"-5⅛"-5½" from the marker. INCREASE 2: 5 band stitches in garter stitch, 3-3-4-4-5-3 stitches in stockinette stitch, A.2 until there are 7-8-8-9-10-7 stitches left (= 15-16-17-18-20-22 repeats of 6 stitches), 2-3-3-4-5-2 stitches in stockinette stitch, 5 band stitches in garter stitch. When A.2 has been worked in height you have increased 30-32-34-36-40-44 stitches = 135-144-153-162-180-191 stitches. Continue with stockinette stitch and 5 band stitches in garter stitch on each side until the piece measures 16-18-19-21-22-24 cm = 6¼"-7"-7½"-8¼"-8¾"-9½" from the marker. Now continue the different sizes as follows: SIZES S AND M: 5 band stitches in garter stitch, 3-4 stitches in stockinette stitch, A.2 until there are 7-9 stitches left (= 20-21 repeats of 6-6 stitches), 2-4 stitches in stockinette stitch, 5 band stitches in garter stitch. When A.2 has been worked in height you have increased 40-42 stitches = 175-186 stitches. SIZES L AND XL: 5 band stitches in garter stitch, 2-3 stitches in stockinette stitch, A.3 – choose diagram for your size, until there are 6-7 stitches left (= 20-21 repeats of 7 stitches), 1-2 stitches in stockinette stitch, 5 band stitches in garter stitch. When A.3 has been worked in height you have increased 40-42 stitches = 193-204 stitches. SIZES XXL AND XXXL: 5 band stitches in garter stitch, 5-3 stitches in stockinette stitch, A.3 – choose diagram for your size, until there are 10-7 stitches left (= 20-22 repeats of 8 stitches), 5-2 stitches in stockinette stitch, 5 band stitches in garter stitch. When A.3 has been worked in height you have increased 40-44 stitches = 220-235 stitches ALL SIZES: Continue with stockinette stitch and 5 band stitches in garter stitch on each side until the piece measures 22-24-25-27-29-31 cm = 8¾"-9½"-9¾"-10⅝"-11⅜"-12¼" from the marker – adjust so the next row is from the wrong side. Now divide for the body and sleeves as follows: Work 29-30-32-33-37-40 stitches as before (= right front piece), place the next 35-37-38-40-40-42 stitches on 1 thread for the sleeve, cast on 4-6-8-8-10-10 stitches (= in side under sleeve), work 47-52-53-58-66-71 stitches (= back piece), place the next 35-37-38-40-40-42 stitches on 1 thread for the sleeve, cast on 4-6-8-8-10-10 stitches (= in side under sleeve), work the remaining 29-30-32-33-37-40 stitches (= left front piece). The body and sleeves are finished separately. THE PIECE IS NOW MEASURED FROM HERE! BODY: = 113-124-133-140-160-171 stitches. Insert a marker thread in the middle of the new stitches under each sleeve. Allow the threads to follow your work onwards; they are used when decreasing later. Continue with stockinette stitch and 5 band stitches in garter stitch on each side for 4 cm = 1½". Now decrease 1 stitch on each side of both marker threads – read DECREASE TIP. The decreases are now finished in size S. Repeat the decrease in sizes M, L, XL, XXL and XXXL when the piece measures 15 cm = 6" from the division = 109-116-125-132-152-163 stitches. Continue with stockinette stitch and 5 band stitches in garter stitch on each side until the piece measures 29-29-30-30-30-30 cm = 11⅜"-11⅜"-11¾"-11¾"-11¾"-11¾" from the division; try the jacket on and work to desired length (5 cm = 2" left to finished length). Increase 23-24-27-28-32-33 stitches evenly spaced = 132-140-152-160-184-196 stitches. Change to circular needle size 6 MM = US 10 and work rib from the right side as follows: 5 band stitches in garter stitch, * knit 2, purl 2 *, work from *-* until there are 7 stitches left, knit 2 and 5 band stitches in garter stitch. Continue this rib for 5 cm = 2". Bind off with knit over knit and purl over purl – read BINDING-OFF TIP. The jacket measures approx. 60-62-64-66-68-70 cm = 23⅝"-24⅜"-25¼"-26"-26¾"-27½" from the shoulder down. SLEEVES: Place the 35-37-38-40-40-42 stitches from the thread on the one side of the piece on double pointed needles/short circular needle size 8 MM = US 11 and knit up 1 stitch in each of the 4-6-8-8-10-10 stitches cast on under the sleeve = 39-43-46-48-50-52 stitches. Insert a marker thread in the middle of the new stitches under the sleeve. Allow the thread to follow your work onwards; it is used when decreasing later Start at the marker thread and work stockinette stitch in the round for 4 cm = 1½". Then decrease 1 stitch on each side of the marker thread – read DECREASE TIP. Decrease like this every 7½-6-5-4-4-3½ cm = 2⅞"-2⅜"-2"-1½"-1½"-1¼" a total of 6-7-8-9-9-10 times = 27-29-30-30-32-32 stitches. Continue working until the sleeve measures 45-44-43-41-40-39 cm = 17¾"-17¼"-17"-16⅛"-15¾"-15¼" from the division (shorter measurements in larger sizes due to wider neck and longer yoke). Try the jacket on and work to desired length (approx. 5 cm = 2" left to finished length). Increase 5-7-6-10-8-8 stitches evenly spaced = 32-36-36-40-40-40 stitches. Change to double pointed needles size 6 MM = US 10 and work rib (knit 2, purl 2) for 5 cm = 2". Bind off with knit over knit and purl over purl – remember BINDING-OFF TIP. The sleeve measures approx. 50-49-48-46-45-44 cm = 19¾"-19¼"-19"-18"-17¾"-17¼" from the division. Work the other sleeve in the same way. ASSEMBLY: Fold the neck double to the inside and sew down. To avoid the neck being tight and rolling outwards, it is important that the seam is elastic. Sew together the openings at each end of the neck with small stitches. Sew the buttons onto the right band. |
|||||||
Diagram explanations |
|||||||
|
|||||||
|
|||||||
|
|||||||
|
Have you made this or any other of our designs? Tag your pictures in social media with #dropsdesign so we can see them! Do you need help with this pattern?You'll find tutorial videos, a Comments/Questions area and more by visiting the pattern on garnstudio.com. © 1982-2024 DROPS Design A/S. We reserve all rights. This document, including all its sub-sections, has copyrights. Read more about what you can do with our patterns at the bottom of each pattern on our site. |
|||||||


With over 40 years in knitting and crochet design, DROPS Design offers one of the most extensive collections of free patterns on the internet - translated to 17 languages. As of today we count 304 catalogs and 11422 patterns - 11417 of which are translated into English (US/in).
We work hard to bring you the best knitting and crochet have to offer, inspiration and advice as well as great quality yarns at incredible prices! Would you like to use our patterns for other than personal use? You can read what you are allowed to do in the Copyright text at the bottom of all our patterns. Happy crafting!
Comments / Questions (11)
1 maglia diritto dal diritto del lavoro, 1 maglia rovescio dal rovescio del lavoro..come si esegue?Modello Sailor Blues DROPS 224-8
22.09.2023 - 00:32DROPS Design answered:
Buonasera Massimo, deve lavorare a diritto sul diritto del lavoro e a rovescio sul rovescio del lavoro. Buon lavoro!
22.09.2023 - 23:34IN QUESTO MODELLO , PER UNA TAGLIA XL, MI DICONO CHE POSSO USARE ANCHE IL FILATO C+C , SE ACQUISTO IL FILATO C = DROPS ALASKA, QUANTO FILATO DEVO ACQUISTARE? GRAZIE CORDIALI SALUTI
05.07.2023 - 23:00DROPS Design answered:
Buonasera Orietta, può utilizzare il nostro convertitore di filati per il calcolo: le serviranno 1400 g di Alaska lavorata a 2 fili. Si ricordi di scrivere in minuscolo la prossima volta. Buon lavoro!
06.07.2023 - 16:55Ich würde diese Jacke gerne im Raglan Stil stricken. Könnten Sie mir bitte diese Möglichkeit ab der Passe kurz erklären? Oder funktioniert dies aufgrund der Wollstärke nicht? Ich verrechne mich jedes Mal bei der Aufteilung der Vorderteile, der Ärmel und dem Rückenteil. Das wär so toll! Herzlich, Nathalie
20.10.2022 - 18:37DROPS Design answered:
Liebe Nathalie, leider können wir nicht jede Anleitung nach jeder Anfrage anpassen, gerne können Sie Ihr DROPS Händler mal (auch per Telefon oder per E-Mail) nach Hilfe fragen, und/oder sich von einem ähnlichen Modell mit der gewünschten Schnitt inspirieren lassen. Danke für Ihr Verständnis.
21.10.2022 - 08:28Hallo, nach der doppelten Halsbänder soll man die Umschläge in der Rückreise links verschränkt Abstrichen. Aber dabei entstehen doch Löcher. Mach ich was falsch?
11.10.2022 - 18:14DROPS Design answered:
Liebe Michaela, versuchen Sie die Umschläge nicht zu locker zu stricken damit das Loch kleiner wird (siehe Video; sonnst können Sie auch Ihr Lieblingstechnikk zum Zunehmen benutzen: auf dem Querfaden, aus der Masche der Vorreihe, usw... Viel Spaß beim stricken!
12.10.2022 - 08:39Hallo liebes Team, bei 11M auf 10cm und der Kragenin L hat 36cm. Wie kommt es mit 87 [77] M das hin? Ist das nicht viel zu viel? Danke für eure Hilfe
23.09.2022 - 19:11DROPS Design answered:
Liebe Manuela, in L stricken Sie die 87 Maschen so: 5 Blenden-Maschen, (2 M re, 3 M li) x 15, 2 M re, 5 Blenden-Maschen; dann nehmen Sie nach 4 cm 1 M in jedem li-Partie ab = 15 Maschen insgesamt und so stricken Sie: 5 BlendenMaschen, 2 M re, 2 M li) x 15, 2 M re, 5 Blenden-Maschen (= 5+ (4x15)+2+5= 72 Maschen. So stricken Sie bis der Kragen 18 cm misst von der Anschlagskante (nicht 36 cm). Viel Spaß beim stricken!
26.09.2022 - 08:58Me gusta La chaqueta la veo sencilla, espero poder enviarla al mail de mi esposo que tiene i presora
16.05.2022 - 06:35Guten Tag.Mein Sohn hat sich diese Anleitung ausgesucht und Mama soll sie stricken. Können Sie mir das Diagramm bitte erklären,ich habe damit noch nie gearbeitet? Ich muss XXL -XXXL stricken, bzw anwenden. Mit freundlichen Grüßen Steffi Schröder
17.02.2022 - 20:59DROPS Design answered:
Liebe Frau Schröder, hier lesen Sie mehr über Diagramme - A.1 bis A.3 stricken Sie für die Rundpasse, damit die Maschenanzahl zunimmt - 1 weisse Kästchen = 1 Masche glatt rechts - in A.1 z.B. strickt man: 2 M re, 1 Umschlag, 1 M re, 1 Umschlag, 2 M re = Sie haben 2 M zugenommen. A.1 wiederholen wie in der Anleitung beschrieben ist. Bei der Rückreihe stricken Sie die Umschläge links verschränkt. Viel Spaß beim stricken!
18.02.2022 - 08:02Dobrý deň, chcem manželovi upliesť tento sveter a neviem sa rozhodnúť, či veľkosť L alebo XL. Máte niekde porovnanie tohto typu veľkosti s veľkosťami typu 48, 50, 52? Alebo v centimetroch? Vopred ďakujem za odpoveď. Simona Šottníková
14.01.2022 - 14:22DROPS Design answered:
Dobrý den Simono, u každého modelu máme nákres s rozměry oděvu. Myslím, že bude nejjistější, pokud vezmete ze šatníku oblíbený kousek oděvu Vašeho manžela, přeměříte jej a rozměry porovnáte s nákresem u našeho návodu. Bližší popis naleznete také zde. Mnoho zdaru!
15.01.2022 - 12:33Como sugerencia quería indicar que, sería bueno diferenciar los nombres de los diagramas A3 ya que son distintos para las tallas podrían llamarse A3 y A4. A la hora de tejer a mi me ha confundido y he tenido que deshacer lo que ya tejí.
12.01.2022 - 08:51Guten Tag, gerne möchte ich diese Jacke nachstricken mit SUPERWASH-wolle, z.B. Big Merino blautöne. können Sie mir dazu die geänderte Anleitung zur Verfügung stellen bitte? Besten Dank für Ihre Unterstützung mit freundlichen Grüßen Barbara Hess
14.11.2021 - 16:13DROPS Design answered:
Liebe Frau Hess, wenn Sie 2 Fäden Big Merino (Garngruppe C) stricken, dann können Sie 1 Faden Wish (Garngruppe E) ersetzen - Hier lesen Sie mehr. Viel Spaß beim stricken!
15.11.2021 - 08:16