
Popular categories
Looking for a yarn?


Comments / Questions (83)
![]() Le Goupil wrote:
Le Goupil wrote:
Je ne comprends pas vos explications
12.04.2025 - 18:00DROPS Design answered:
Bonjour Mme Le Goupil, vous trouverez une réponse ci-dessous, n'hésitez pas à nous donner plus d'indications sur ce que vous ne comprenez pas si ce n'est toujours pas clair, nous essaierons de reformuler différemment - pensez à indiquer votre taille car les diminutions sont différentes en fonction de la taille. Merci pour votre compréhension.
22.04.2025 - 08:18
![]() Marie-noelle wrote:
Marie-noelle wrote:
Bonsoir Pour les diminutions de l’encolure pour la taille L 9 fois 1 maille tous les 4 rgs sur l’endroit Est-ce sur l’envers ont fait un jeté Merci
11.04.2025 - 18:29DROPS Design answered:
Bonjour Marie-Noelle, pour diminuer 9 x 1 m tous les 4 rangs en taille L, vous allez diminuer comme indiqué dans les diagrammes A.3/A.4 (devant droit/gauche) sur l'endroit = au 1er rang des diagrammes et faire le jeté au 2ème rang des diagrammes = sur l'endroit, ainsi, vous diminuez 2 m sur l'endroit et augmentez 1 m sur l'envers = vous diminuez ainsi 1 maille seulement. Terminez les diagrammes = 4 rangs, puis reprenez les au 1er rang jusqu'à ce que vous les ayez tricoté 9 fois au total en hauteur (36 rangs). Bon tricot!
22.04.2025 - 08:06
![]() Le Goupil wrote:
Le Goupil wrote:
Je ne comprends pas les explications concernant le dos au niveau des diminutions 2 et A2
11.04.2025 - 17:03DROPS Design answered:
Bonjour Mme Le Goupil, pour le dos, vous allez diminuer pour les emmanchures soit d'abord 2 mailles de chaque côté (dans les 3 grandes tailles seulement) en suivant le diagramme A.2 à 3 mailles des bords de chaque côté, puis ou bien dans les 3 petites tailles 1 seule maille de chaque côté en suivant les diagrammes A.3 (début de rang sur l'endroit) et A.4 (fin de rang sur l'endroit). Bon tricot!
22.04.2025 - 07:57
![]() Laurence wrote:
Laurence wrote:
Bonjour Lorsque l’on commence l’ouvrage sur l’aiguille circulaire en aller retour, à la fin on devra coudre le devant et le dos ensemble sur un côté ? Merci Cordialement L Le Goupil
03.04.2025 - 17:54DROPS Design answered:
Bonjour Laurence, tout à fait, ici on utilise des aiguilles circulaires pour tricoter le dos et le devant en allers et retours séparément; on fera ensuite la couture des côtés. Bon tricot!
04.04.2025 - 08:28
![]() Marie Noelle wrote:
Marie Noelle wrote:
Bonsoir Concernant les diminutions pour l’encolure elles se font toujours à 3 mailles du bord comme pour les emmanchures taille L? Merci
25.03.2025 - 18:07DROPS Design answered:
Bonjour Marie Noelle, les diminutions de l'encolure se font, en taille L mais aussi dans toutes les tailles, après les 3 premières mailles (1 m point mousse, 2 m jersey) pour le côté droit et avant les 3 dernières mailles (2 m jersey, 1 m point mousse) pour le côté gauche (quand on porte le pull), autrement dit comme indiqué sous DIMINUTIONS-2 (emmanchures et encolure V):, que vous deviez diminuer 2 mailles ou 1 seule maille. Bon tricot!
26.03.2025 - 07:58
![]() Roselyne wrote:
Roselyne wrote:
Bonjour merci beaucoup pour ces précisions. Je n'avais pas vu qu'il fallait tricoter 2 mailles entre la maille lisière et les 3 m ensemble à l'envers .
24.02.2025 - 14:30
![]() Roselyne wrote:
Roselyne wrote:
Bonjour. Concernant les diminutions A3/A4 au 1er rang sur l'endroit est ce qu'on tricote tout de suite les 3 m end à l'envers après la maille lisière ? Et idem à la fin on termine ce rang par 3 m ensemble envers , 1 maille lisière ? Et au 2eme rang on est sur l'envers on tricote 1 maille lisière 2 jersey envers 1 jeté tout le rang en jersey envers jusqu'à ce qu'il reste 4 mailles et on tricote 1 jersey envers,1 jeté, 2 jersey envers, 1 maille lisière ? Merci
24.02.2025 - 01:00DROPS Design answered:
Bonjour Roselyne, tricotez A.3 en début de rang après 1 m lis + 2 m jersey (après les 3 premières mailles) et tricotez A.4 avant les 2 mailles jersey + 1 m lis (avant les 3 dernières mailles du rang). Lisez bien les diagrammes de droite à gauche sur l'endroit et de gauche à droite sur l'envers. On tricote ainsi 3 m ens à l'envers à 3 mailles des bords et on fait 1 jeté à 3 m des bords au rang suivant. Bon tricot!
24.02.2025 - 09:31
![]() Marie-noelle wrote:
Marie-noelle wrote:
Bonjour Que veut dire diminution tous les 4 rgs Merci Bonne journée
07.02.2025 - 14:23DROPS Design answered:
Bonjour Marie-Noëlle, tricotez ainsi: *1 rang avec diminutions, 3 rangs sans diminuer*, répétez de *à* le nombre de fois indiqué. Bon tricot!
07.02.2025 - 15:34
![]() Bożena wrote:
Bożena wrote:
Odpowiedź DROPS Design : Bożeno, który rozmiar wykonujesz? 31.01.2025 - 08:10 Robię roz.S ,biorę pierwsze liczby to wiem.Nie rozumiem w dwóch pierwszych rzędach zamknąć 5 oczek....
31.01.2025 - 09:42DROPS Design answered:
Witaj, na początku rzędu na prawej stronie robótki zamykasz 5 oczek tak jakbyś zakańczała robótkę, patrz TUTAJ. Na lewej stronie zamykasz 5 oczek NASTĘPUJĄCO. Następnie zamykasz 8 razy 1 oczko co 4 rzędy zgodnie ze schematem A.3/A.4 (= 8 zamkniętych oczek z każdej strony) = zostaje 71 oczek. Pozdrawiamy!
31.01.2025 - 10:45
![]() Bożena wrote:
Bożena wrote:
Witam. Proszę o wyjaśnienie tego,czytałam objaśnienie,ale nie rozumiem. Dziękuję.Na początku 2 kolejnych rzędów zamknąć 5-5-7-7-8-8 oczek na podkroje rękawów. Dalej zamykać z każdej strony następująco – patrz ZAMYKANIE OCZEK-2. Zamykać w sumie 0-0-0-2-4-7 razy 2 oczka co 4 rzędy zgodnie ze schematem A.2, następnie zamykać 8-10-10-9-8-6 razy 1 oczko co 4 rzędy zgodnie ze schematem A.3/A.4 (= 8-10-10-13-16-20 zamkniętych oczek z każdej strony) = 71-75-79-83-87-91 oczek.
30.01.2025 - 23:43DROPS Design answered:
Bożeno, który rozmiar wykonujesz?
31.01.2025 - 08:10
|
||||||||||||||||||||||
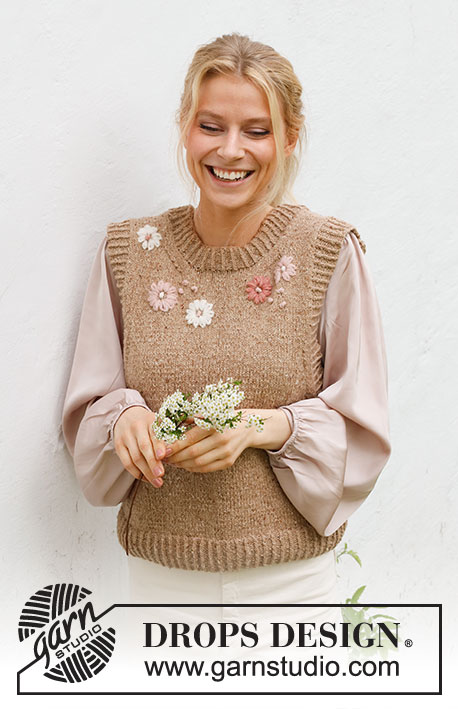
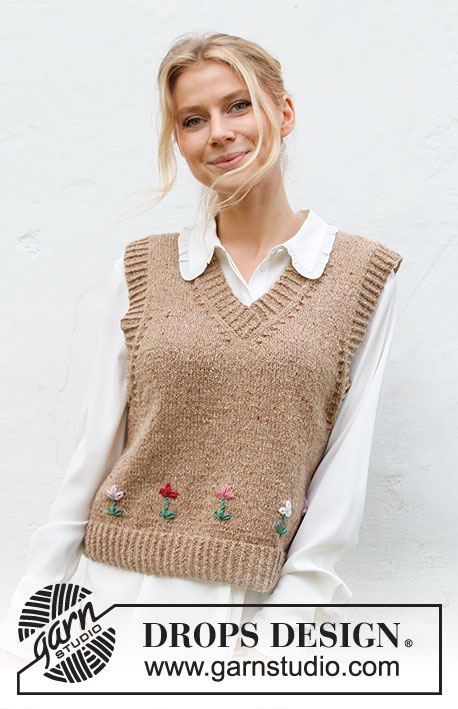
May Flowers Vest#mayflowersvest |
||||||||||||||||||||||
 |
 |
|||||||||||||||||||||
Knitted vest in DROPS Soft Tweed. The piece is worked with V-neck, ribbed edges and embroidered flowers. Sizes S - XXXL. Theme: Embroidery.
DROPS 222-42 |
||||||||||||||||||||||
|
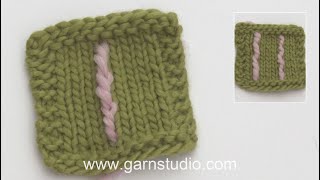
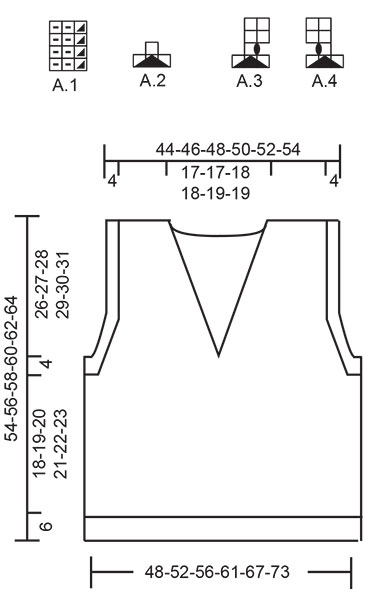
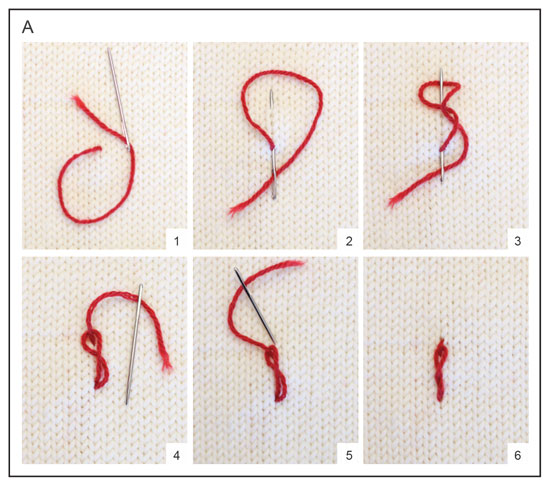
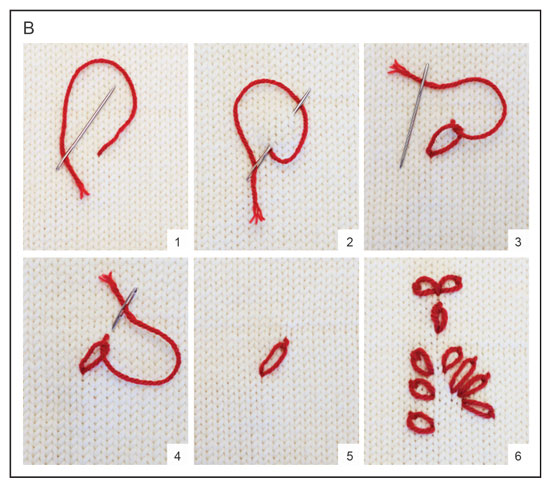
------------------------------------------------------- EXPLANATIONS FOR THE PATTERN ------------------------------------------------------- RIDGE/GARTER STITCH (worked back and forth): Knit all rows. 1 ridge = knit 2 rows. PATTERN: See diagrams A.1 to A.4. The diagrams show all rows in the pattern from the right side. DECREASE TIP-1 (evenly spaced): To work out how to decrease evenly, count the total number of stitches on needle (e.g. 111 stitches) minus the edge stitches (e.g. 2 stitches) and divide the remaining stitches by the number of decreases to be made (e.g. 14) = 7.7. In this example decrease by knitting together alternately each 6th and 7th stitch and each 7th and 8th stitch (approx.). DECREASE TIP-2 (for armholes and V-neck): All decreases are worked from the right side! Decrease 2 stitches at the beginning of the row as follows: Work 1 edge stitch in garter stitch, 2 stitches in stockinette stitch, A.2 over the next 3 stitches (= 2 stitches decreased). Decrease 2 stitches at the end of the row as follows: Work until there are 6 stitches left, work A.2 over the next 3 stitches (= 2 stitches decreased), 2 stitches in stockinette stitch, 1 edge stitch in garter stitch Decrease 1 stitch at the beginning of the row as follows: Work 1 edge stitch in garter stitch, 2 stitches in stockinette stitch, A.3 over the next 3 stitches (2 stitches decreased on the first row and 1 stitch increased on the second row in A.3 = 1 stitch decreased). Decrease 1 stitch at the end of the row as follows: Work until there are 6 stitches left, A.4 over the next 3 stitches (2 stitches decreased on the first row and 1 stitch increased on the second row in A.4 = 1 stitch decreased), 2 stitches in stockinette stitch, 1 edge stitch in garter stitch. ------------------------------------------------------- START THE PIECE HERE: ------------------------------------------------------- VEST – SHORT OVERVIEW OF THE PIECE: The front and back pieces are worked back and forth on circular needles. The pieces is then sewn together. Edges are worked in the round on circular needles around the armholes, and the neck edge is worked back and forth on circular needle. When the whole vest is finished flowers are embroidered on the front piece. BACK PIECE: Cast on 111-120-129-141-153-168 stitches with circular needle size 3.5 MM = US 4 and DROPS Soft Tweed. Work rib back and forth as follows: 1 edge stitch in GARTER STITCH – read description above, A.1 until there are 2 stitches left, work the first stitch in A.1 and 1 edge stitch in garter stitch. Continue this rib for 6 cm = 2⅜". Knit 1 row from the right side where you decrease 14-15-16-18-18-21 stitches evenly spaced – read DECREASE TIP-1 = 97-105-113-123-135-147 stitches. Change to circular needle size 4.5 MM = US 7. Purl 1 row from the wrong side (edge stitches are knitted). Continue with stockinette stitch back and forth with 1 edge stitch in garter stitch on each side until the piece measures 24-25-26-27-28-29 cm = 9½"-9¾"-10¼"-10⅝"-11"-11⅜". REMEMBER THE KNITTING GAUGE! At the beginning of the next 2 rows bind off 5-5-7-7-8-8 stitches for the armholes. Then decrease on each side as follows – read DECREASE TIP-2. Decrease 2 stitches as shown in A.2 every 4th row a total of 0-0-0-2-4-7 times, then decrease 1 stitch as shown in A.3/A.4 every 4th row 8-10-10-9-8-6 times (= 8-10-10-13-16-20 stitches decreased on each side) = 71-75-79-83-87-91 stitches. Continue with stockinette stitch and 1 edge stitch in garter stitch on each side. When the piece measures 52-54-56-58-60-62 cm = 20½"-21¼"-22"-22¾"-23⅝"-24⅜", bind off the middle 31-31-33-33-35-35 stitches for the neck and each shoulder is finished separately. On the next row from the neck bind off 1 stitch = 19-21-22-24-25-27 stitches on the shoulder. Continue with stockinette stitch and 1 edge stitch in garter stitch on each side until the piece measures 30-31-32-33-34-35 cm = 11¾"-12¼"-12½"-13"-13⅜"-13¾" from the bottom of the armhole. Bind off with knit (make sure the bind-off edge is not tight). The piece measures 54-56-58-60-62-64 cm = 21¼"-22"-22¾"-23⅝"-24⅜"-25¼" from the shoulder down. Work the other shoulder in the same way. FRONT PIECE: Cast on 111-120-129-141-153-168 stitches with circular needle size 3.5 MM = US 4 and DROPS Soft Tweed. Work rib back and forth as follows: 1 edge stitch in garter stitch, A.1 until there are 2 stitches left, work the first stitch in A.1, 1 edge stitch in garter stitch. Continue this rib for 6 cm = 2⅜". Knit 1 row from the right side where you decrease 14-15-16-18-18-21 stitches evenly spaced – read DECREASE TIP-1 = 97-105-113-123-135-147 stitches. Change to circular needle size 4.5 MM = US 7. Purl 1 row from the wrong side (edge stitches are knitted). Continue with stockinette stitch back and forth with 1 edge stitch in garter stitch on each side until the piece measures 24-25-26-27-28-29 cm = 9½"-9¾"-10¼"-10⅝"-11"-11⅜". OVERVIEW OF THE NEXT SECTION: You now decrease for the armholes and V-neck at the same time – read the next section before continuing. ARMHOLES: At the beginning of the next 2 rows bind off 5-5-7-7-8-8 stitches for the armholes. Then decrease stitches on each side as follows – remember DECREASE TIP-2. Decrease 2 stitches as shown in A.2 every 4th row 0-0-0-2-4-7 times, then decrease 1 stitch as shown in A.3/A.4 every 4th row 8-10-10-9-8-6 times = 8-10-10-13-16-20 stitches decreased on each side. V-NECK: When the piece measures 31-32-33-34-35-36 cm = 12¼"-12½"-13"-13⅜"-13¾"-14¼", bind off the middle stitch on the row and each shoulder is finished separately. Right shoulder: Continue back and forth and decrease for the neck at the beginning of each row from the right side (from the neck) – remember DECREASE TIP-2. Decrease 2 stitches as shown in A.2 every 4th row 4-4-4-4-4-4 times, then decrease 1 stitch as shown in A.3 every 4th row 8-8-9-9-10-10 times = 16-16-17-17-18-18 stitches decreased for the neck. When all the decreases for the neck and armhole are finished there are 19-21-22-24-25-27 stitches on the shoulder. Continue with stockinette stitch and 1 edge stitch in garter stitch on each side until the piece measures 30-31-32-33-34-35 cm = 11¾"-12¼"-12½"-13"-13⅜"-13¾" from the bottom of the armhole. Bind off with knit (make sure the bind-off edge is not tight). The piece measures 54-56-58-60-62-64 cm = 21¼"-22"-22¾"-23⅝"-24⅜"-25¼" from the shoulder down. Left shoulder: Continue back and forth and decrease for the neck at the end of each row from the right side (towards the neck) – remember DECREASE TIP-2. Decrease 2 stitches as shown in A.2 every 4th row 4-4-4-4-4-4 times, then decrease 1 stitch as shown in A.4 every 4th row 8-8-9-9-10-10 times = 16-16-17-17-18-18 stitches decreased for the neck. When all the decreases for the neck and armhole are finished there are 19-21-22-24-25-27 stitches on the shoulder. Continue with stockinette stitch and 1 edge stitch in garter stitch on each side until the piece measures 30-31-32-33-34-35 cm = 11¾"-12¼"-12½"-13"-13⅜"-13¾" from the bottom of the armhole. Bind off with knit (make sure the bind-off edge is not tight). The piece measures 54-56-58-60-62-64 cm = 21¼"-22"-22¾"-23⅝"-24⅜"-25¼" from the shoulder down. ASSEMBLY: Sew the shoulder seams with grafting stitches. Sew the side seams from the armholes down, inside the 1 edge stitch. NECK: Start from the bottom of the V-neck, use circular needle size 3,5 MM = US 4 and DROPS Soft Tweed. Knit up from the right side 159 to 192 stitches inside the 1 edge stitch around the neck. The number of stitches should be divisible by 3. Work pattern A.1 back and forth with 1 edge stitch in garter stitch on each side – make sure the pattern starts and finishes with the first stitch in A.1 inside the edge stitches, so the pattern is symmetrical on both sides. Continue back and forth like this for 4 cm = 1½". Bind off with knit over knit and purl over purl. Lay the right side of the neck on top of the left side mid-front. Sew the edge stitch neatly to the neck line. Repeat on the inside so the left side is sewn to the right side. SLEEVE EDGES: Start at the side seam under the sleeve with circular needle size 3.5 MM = US 4 and DROPS Soft Tweed. Knit up from the right side 144 to 168 stitches inside the 1 edge stitch around the armhole. The number of stitches should be divisible by 3. Work A.1 in the round for 3½ to 4 cm = 1¼" to 1½". Work 1 more round but in the first 5-5-6-6-7-7 repetitions and the last 6-6-7-7-8-8 repetitions of A.1 under the sleeve, decrease all purl-2 to purl-1 by purling the 2 stitches together. This gives a neater finish to the bottom of the sleeve edge. Bind off with knit over knit and purl over purl. Work the other sleeve edge in the same way. EMBROIDERING: Flowers are embroidered at the bottom of the front piece. Place the flowers in a row approx. 2 cm = ¾" above the rib and 8.5 – 9 cm = 3¼" – 3½" between each one. FLOWER – SHORT OVERVIEW OF THE PIECE: The flower measures approx. 4,5 – 5 cm = 1⅝" – 2" in height and approx. 2,5 cm = 1" in width. The flower consists of 2 leaves at the bottom, 1 stem and 1 flower. First embroider the leaves, then make the stem and finish with the flower itself. The hole flower is worked with twisted chain stitches and chain stitches. LEAVES: The leaves are embroidered with 1 strand color forest green and consist of 2 chain stitches starting from the same hole at the bottom of the flower. Start as follows: STITCH 1: Work 1 chain stitch of approx. 2 cm = ¾" in length, slightly diagonally up and to the right – see diagram B and diagram explanation. STITCH 2: Work the second chain stitch from the same hole, slightly diagonally up and to the left. The leaves are finished. STEM: The stem is embroidered with 1 strand of color forest green and consists of 2 twisted chain stitches in height. Start from the same hole as the leaves started from and work 1 twisted chain stitch of approx. 1.5 cm = ½" straight up between the 2 leaves - see diagram A and the diagram explanation. Work 1 more stitch in height. The stem is finished. Cut and fasten the strand. FLOWER: Each flower is worked with 2 strands and chain stitch, each with a different color: powder pink, dark rose, rose, off white and light pink. They consist of 3 chain stitches, all starting from the same hole where the stem finished. Start as follows: STITCH 1: Work a chain stitch of approx. 1.5 cm = ½", slightly diagonally up to the right – see diagram B and diagram explanation. STITCH 2: Work the second chain stitch from the same hole, slightly diagonally up to the left. STITCH 3: Work the third chain stitch from the same hole but straight up between the other 2 stitches. The flower is finished. Cut and fasten the strand. Work as many flowers as you wish, placing them as you feel is best. |
||||||||||||||||||||||
Diagram explanations |
||||||||||||||||||||||
|
||||||||||||||||||||||
 |
||||||||||||||||||||||
 |
||||||||||||||||||||||
 |
||||||||||||||||||||||
Have you finished this pattern?Tag your pictures with #dropspattern #mayflowersvest or submit them to the #dropsfan gallery. Do you need help with this pattern?You'll find 31 tutorial videos, a Comments/Questions area and more by visiting the pattern on garnstudio.com. © 1982-2026 DROPS Design A/S. We reserve all rights. This document, including all its sub-sections, has copyrights. Read more about what you can do with our patterns at the bottom of each pattern on our site. |
||||||||||||||||||||||


With over 40 years in knitting and crochet design, DROPS Design offers one of the most extensive collections of free patterns on the internet - translated to 17 languages. As of today we count 324 catalogs and 12290 patterns - 12280 of which are translated into English (US/in).
We work hard to bring you the best knitting and crochet have to offer, inspiration and advice as well as great quality yarns at incredible prices! Would you like to use our patterns for other than personal use? You can read what you are allowed to do in the Copyright text at the bottom of all our patterns. Happy crafting!
Post a comment to pattern DROPS 222-42
We would love to hear what you have to say about this pattern!
If you want to leave a question, please make sure you select the correct category in the form below, to speed up the answering process. Required fields are marked *.