
Popular categories
Looking for a yarn?


Comments / Questions (174)
![]() Martin Violaine wrote:
Martin Violaine wrote:
Bonjour, d\'après moi il y a une erreur de calcul à l\'empiècement. Il faut monter 88 mailles pour la TS et augmenter de 6 et vous arrivez à 100...
22.11.2025 - 06:54DROPS Design answered:
Bonjour Mme Martin, au 1er tour après les côtes, et après avoir placé les marqueurs, on va augmenter 6 mailes à intervalles réguliers dans les 20 mailles des manches, vous aurez ainsi: 88+6+6=100 mailles au total et26 mailles pour chaque manche. Ces augmentations permettent de compenser la largeur des torsades. Bon tricot!
24.11.2025 - 10:28
![]() Sara wrote:
Sara wrote:
Hej, går det att sticka enbart i drops alpacka? Hur behöver jag ändra mönstret eller är det bara att resultatet inte blir lika fylligt?
18.11.2025 - 09:55DROPS Design answered:
Hej Sara. Om du stickar med bara DROPS Alpaca så kommer du inte få rätt stickfasthet till detta mönster (och därmed inte rätt mått). Du behöver sticka med ett garn som ger den stickfasthet som uppges i mönstret (t.ex 2 trådar av ett garn i garngrupp A, eller 1 tråd av ett garn i garngrupp C). Mvh DROPS Design
19.11.2025 - 10:35
![]() Valérie wrote:
Valérie wrote:
Bonjour, Pouvez-vous me dire le tour de poitrine pour les différentes tailles svp car je ne vois rien d'u=indiquer et dans votre réponse tenez vous compte de l'aisance positive? Merci
23.10.2025 - 08:10DROPS Design answered:
Bonjour Valérie, mesurez un pull similaire que vous avez et dont vous aimez la forme et comparez ces mesures à celles du schéma en bas de page, vous trouverez ainsi la taille adéquate; retrouvez plus d'infos ici. Bon tricot!
28.10.2025 - 19:08
![]() Yvonne wrote:
Yvonne wrote:
Fijn dat jullie hebben gereageerd op mijn vraag, maar inmiddels heb ik het zelf opgelost. Vriendelijkheid kost niks toch!
14.10.2025 - 21:18
![]() Yvonne wrote:
Yvonne wrote:
Ik heb de andere berichten gelezen, en daar zijn er nog meer die dat probleem hebben en nee ik heb ze niet tussen 2 steken gestoken ik heb de markering in de steek gestoken.
10.10.2025 - 14:54
![]() Yvonne wrote:
Yvonne wrote:
Ik wil jullie laten weten dat de steken verhouding van maat xl niet klopt. Als je de markeringen moet plaatsen klopt het aantal niet ik hou 4 steken over. Als ik de steken bij elkaar op tel dan kom ik op 96 steken en niet op 100 dus hoe pad ik het nu aan?
10.10.2025 - 14:14
![]() Laurence wrote:
Laurence wrote:
Le modèle décrit ne semble pas correspondre à la photo : les torsades commencent dès la fin de l'encolure sur la photo. Dans l'explication du pull, les torsades commencent après la séparation des manches... N'y a-t-il pas un oubli dans l'explication ? Merci pour votre réponse, Laurence
04.10.2025 - 14:24DROPS Design answered:
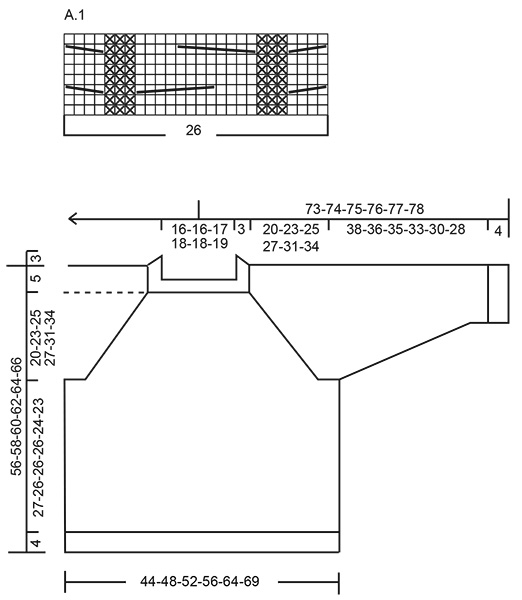
Bonjour Laurence, on tricote les torsades (= le diagramme A.1) dès la fin du col, lorsque l'on a augmenté 6 mailles au-dessus des 2 manches = on obtient 26 mailles pour les manches que l'on tricote en suivant le diagramme a.1, et, en même temps au 1er tour suivant (le 1er de A.1), on commence à augmenter pour le raglan Bon tricot!
06.10.2025 - 07:21
![]() Michaela wrote:
Michaela wrote:
Good morning, I have yarn from the yarn group C. To knit this pattern and reach the size described, do I need to devide all the numbers of stitches by two ? Thank you!
01.10.2025 - 07:32DROPS Design answered:
Dear Michaela, this pattern can be worked exactly as indicated with 2 thread of Group A yarns or 1 thread of a Group C yarn. If you work with 1 thread of a Group C yarn you don't need to modify anything, as long as the gauge matches the one indicated in the materials section. Happy knitting!
05.10.2025 - 20:07
![]() Chris wrote:
Chris wrote:
Bonjour, Ce modèle est très beau. Mais j'ai une question : les quantités indiquées sont-elles exactes ? Par exemple, pour XL il faut 300 g Alpaca, soit 6 pelotes x 167 m = 1002 m et 150 g de Kid-Silk c'est-à-dire 6 pelotes également x 210 m = 1260 m. Or les 2 fils se tricotent ensemble ; le métrage ne devrait-il pas être identique pour les 2 qualités ?
30.09.2025 - 21:42DROPS Design answered:
Bonjour Chris, avec 5 pelotes Kid-Silk, on n'aurait que 1050 m et donc pas suffisamment pour les 1002 m Alpaca, raison pour laquelle il faut 150 g / 6 pelotes Kid-Silk. Bon tricot!
01.10.2025 - 16:31
![]() Eimantė wrote:
Eimantė wrote:
Hi, before the sleeve ribbing the pattern requires to decrease 12 st over A.1. does it mean that I should take the 26 st of the a.1 and decrease the 12, or should I decrease 12 st over the stitches leaving the a.1 untouched?
30.09.2025 - 21:11DROPS Design answered:
Hi Elmante, You decrease the 12 stitches evenly across all the stitches in A.1. Regards, Drops Team.
01.10.2025 - 06:57
|
|||||||||||||||||||
Deep Woods Sweater#deepwoodssweater |
|||||||||||||||||||
 |
 |
||||||||||||||||||
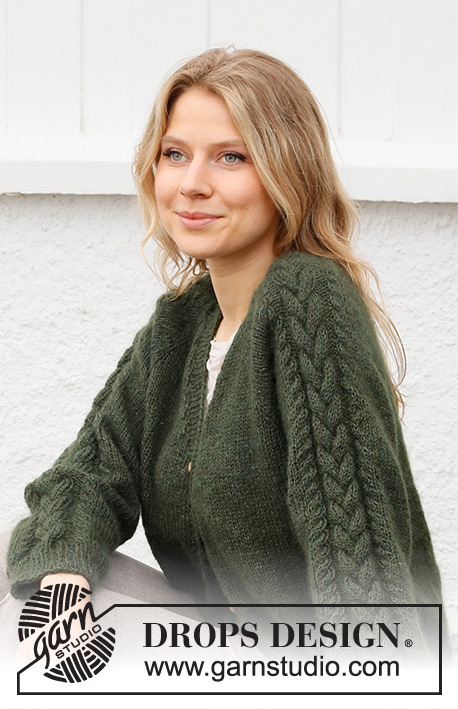
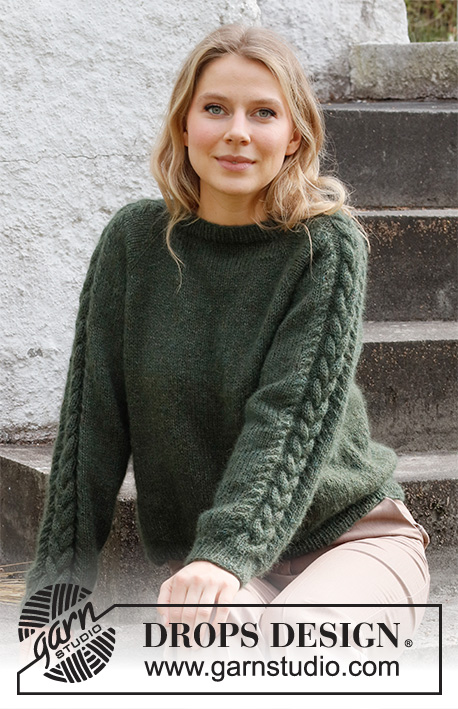
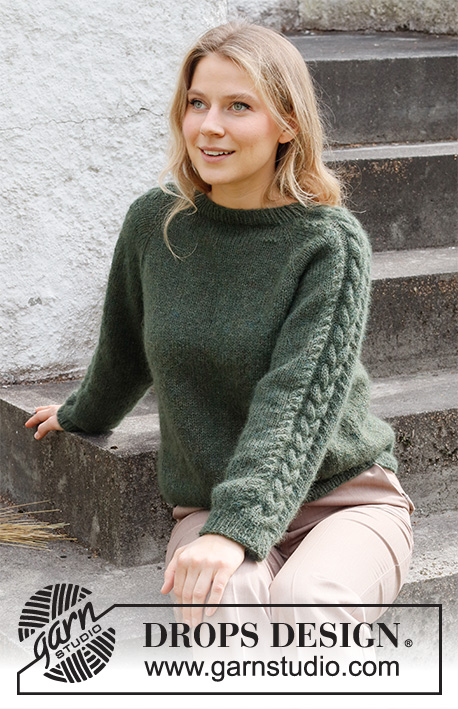
Knitted sweater in DROPS Alpaca and DROPS Kid-Silk. The piece is worked top down with raglan and cables on the sleeves. Sizes S - XXXL.
DROPS 215-5 |
|||||||||||||||||||
|
------------------------------------------------------- EXPLANATIONS FOR THE PATTERN: ------------------------------------------------------- PATTERN: See diagram A.1. RAGLAN: Increase 1 stitch on each side of the stitch in stockinette stitch (stitch with marker thread) in each transition between body and sleeves (= 8 stitches increased on the round). Increase 1 stitch by making 1 yarn over. On the next round work the yarn overs twisted to avoid holes. Then work the new stitches in stockinette stitch. DECREASE TIP (for sleeves): Decrease 1 stitch on either side of the marker thread as follows: Work until there are 3 stitches left before the marker thread, knit 2 together, knit 2 (marker thread sits between these 2 stitches), slip 1 stitch as if to knit, knit 1 and pass the slipped stitch over the knitted stitch. BINDING-OFF TIP: To avoid the bind-off edge being tight you can bind off with a larger size needle. If the edge is still tight, make 1 yarn over after approx. each 4th stitch at the same time as binding off; the yarn overs are bind off as normal stitches. ------------------------------------------------------- START THE PIECE HERE: ------------------------------------------------------- SWEATER – SHORT OVERVIEW OF THE PIECE: The yoke is worked in the round with circular needle from mid-back and top down. AT THE SAME TIME increases are made for raglan. The yoke is divided for body and sleeves and the body continued in the round. The sleeves are worked in the round with short circular needle/double pointed needles, top down. YOKE: Cast on 88-92-96-100-104-108 stitches with circular needle size 4 mm = US 6 and 1 strand Kid-Silk and 1 strand Alpaca (= 2 strands). Knit 1 round, then work rib (knit 1, purl 1) over all stitches for 3 cm = 1⅛". Change to circular needle size 5 mm = US 8 and insert 1 marker here. The yoke will now be measured from this marker. Insert 4 marker threads in the piece as follows (without working the stitches): Count 11-12-13-14-15-16 stitches (= half back piece), insert 1 marker thread in the next stitch, count 20 stitches (= sleeve), insert 1 marker thread in the next stitch, count 22-24-26-28-30-32 stitches (= front piece), insert 1 marker thread in the next stitch, count 20 stitches (= sleeve), insert 1 marker thread in the next stitch, there are 11-12-13-14-15-16 stitches left on the round before the first marker thread (= half back piece). Knit 1 round where you increase 6 stitches evenly on both sleeves = 100-104-108-112-116-120 stitches (26 stitches on each sleeve). Then work stockinette stitch over the front and back pieces and A.1 (= 26 stitches) over each sleeve, AT THE SAME TIME on the first round, increase to RAGLAN in each transition between body and sleeves – read description above. Increase to raglan every 2nd round a total of 22-25-27-29-33-36 times on both sides of all 4 stitches with marker threads = 276-304-324-344-380-408 stitches. REMEMBER THE KNITTING GAUGE! After the last increase to raglan continue working without further increases until the piece measures 20-23-25-27-31-34 cm = 8"-9"-9¾"-10⅝"-12¼"-13⅜" from the marker. The next round is worked as follows: Work the first 34-38-41-44-49-53 stitches (= half back piece), place the next 70-76-80-84-92-98 stitches on 1 thread for the sleeve and cast on 6-6-6-8-10-12 new stitches on the needle (= in side under the sleeve), work the next 68-76-82-88-98-106 stitches (= front piece), place the next 70-76-80-84-92-98 stitches on 1 thread for the sleeve and cast on 6-6-6-8-10-12 new stitches on the needle (= in side under the sleeve) and work the remaining 34-38-41-44-49-53 stitches (= half back piece). THE PIECE IS NOW MEASURED FROM HERE! BODY: = 148-164-176-192-216-236 stitches. Continue with stockinette stitch until the piece measures 27-26-26-26-24-23 cm = 10⅝"-10¼"-10¼"-10¼"-9½"-9" from the division. Change to circular needle size 4 mm = US 6. Work rib (purl 1, knit 1) over all stitches until the rib measures 4 cm = 1½". Loosely bind off with knit over knit and purl over purl, read BINDING-OFF TIP. The sweater measures approx. 56-58-60-62-64-66 cm = 22"-22¾"-23⅝"-24⅜"-25¼"-26" from the shoulder. SLEEVE: Place the 70-76-80-84-92-98 stitches from the thread on the one side of the piece on double pointed needles/short circular needle size 5 mm = US 8 and knit up 1 stitch in each of the 6-6-6-8-10-12 stitches cast on under the sleeve = 76-82-86-92-102-110 stitches. Insert a marker thread in the middle of the 6-6-6-8-10-12 stitches under the sleeve. Allow the thread to follow your work onwards; it will be used when decreasing under the sleeve. Start at the marker thread and continue with stockinette stitch and A.1 in the round. When the piece measures 3 cm = 1⅛" from the division, decrease 2 stitches under the sleeve – read DECREASE TIP. Decrease like this every 3½-3-2-1½-1-1 cm = 1¼"-1⅛"-¾"-½"-⅜"-⅜" a total of 10-11-13-16-19-21 times = 56-60-60-60-64-68 stitches. Continue working until the sleeve measures 38-36-35-33-30-28 cm = 15"-14¼"-13¾"-13"-11¾"-11" from the division (or to desired length; shorter measurements in larger sizes due to longer yoke). Work 1 round where you decrease 12 stitches evenly over the stitches in A.1 = 44-48-48-48-52-56 stitches. Change to double pointed needles size 4 mm = US 6 and work rib (= knit 1, purl 1) for 4 cm = 1½". Loosely bind off with knit over knit and purl over purl but to avoid the bind-off edge being tight, use double pointed needles size 5 mm = US 8. Work the other sleeve in the same way. |
|||||||||||||||||||
Diagram explanations |
|||||||||||||||||||
|
|||||||||||||||||||
 |
|||||||||||||||||||
Have you finished this pattern?Tag your pictures with #dropspattern #deepwoodssweater or submit them to the #dropsfan gallery. Do you need help with this pattern?You'll find 29 tutorial videos, a Comments/Questions area and more by visiting the pattern on garnstudio.com. © 1982-2026 DROPS Design A/S. We reserve all rights. This document, including all its sub-sections, has copyrights. Read more about what you can do with our patterns at the bottom of each pattern on our site. |
|||||||||||||||||||


With over 40 years in knitting and crochet design, DROPS Design offers one of the most extensive collections of free patterns on the internet - translated to 17 languages. As of today we count 324 catalogs and 12290 patterns - 12280 of which are translated into English (US/in).
We work hard to bring you the best knitting and crochet have to offer, inspiration and advice as well as great quality yarns at incredible prices! Would you like to use our patterns for other than personal use? You can read what you are allowed to do in the Copyright text at the bottom of all our patterns. Happy crafting!
Post a comment to pattern DROPS 215-5
We would love to hear what you have to say about this pattern!
If you want to leave a question, please make sure you select the correct category in the form below, to speed up the answering process. Required fields are marked *.