
Popular categories
Looking for a yarn?


Comments / Questions (135)
![]() Day wrote:
Day wrote:
My needle size is 6mm to get 17 sts and 22 rows. What size needle should I use to knit the yoke?
30.06.2025 - 15:04DROPS Design answered:
Dear Day, if you need needle size 6 mm to get the tension, you can go one size down for the rib; and don't forget to switch to larger needle after the 3 cm rib. Happy knitting!
01.07.2025 - 07:49
![]() Ryleigh wrote:
Ryleigh wrote:
Im knitting the size small and the stitch count for the raglan set up rnd is wrong. youre meant to split it into 20 st for the sleeves and 22st for the front and back, that makes 84 st total when youre working with 88 st. its supposed to be 20 st for the sleeves and 24 st for the front and back
09.06.2025 - 01:29DROPS Design answered:
Dear Ryleigh, note that the marker threads are here inserted each in one stitch (and not between stitches) so that you will have: 11 sts back piece + 1 st with a marker thread + 20 sts sleeve + 1 st with a marker thread + 22 sts front piece + 1 st with a marker thread + 20 sts sleeve + 1 st with a marker thread + 11 sts back piece = 11+1+20+1+22+1+20+1+11=88 sts. Happy knitting!
09.06.2025 - 10:29
![]() Ingalill wrote:
Ingalill wrote:
Vill sticka Deep Woods Sweater i enbart Drops Air Hur mycket garn går det åt av det i storlek M och vilka stickor behöver jag ha?
31.03.2025 - 23:31DROPS Design answered:
Hej Ingalill. Det går det åt 6 nystan Air i storlek M. Använd de stickor som gör att du får den stickfasthet som uppges i mönstret (bör vara ca samma som vi rekommenderar i mönstret). Mvh DROPS Design
01.04.2025 - 10:26
![]() Maaike Duivestein wrote:
Maaike Duivestein wrote:
Voor maat M: Bij de steekmarkeerders toevoegen voor voorpand, achterpand en mouw. Staat er 24 voor voorpand en achterpand, en 20 voor de mouwen. Echter bij elkaar zijn dit 88 steken. Mijn vraag is dus, moet ik de 4 overige steken aan het voorpand en achterpand toevoegen of bij de mouwen?
27.03.2025 - 20:16DROPS Design answered:
Dag Maaike,
Je voegt de markeerdraden in de steken en niet tussen 2 steken. Vermoedelijk dat dit het verschil van 4 steken veroorzaakt 😊
30.03.2025 - 10:17
![]() Pauline wrote:
Pauline wrote:
Bonjour, j'ai réalisé ce modèle il y a quelques semaines et il rend vraiment très bien cependant il me parait petit pour un S par rapport à ce que porte le modèle sur vos photos. Je dois en faire un autre pour ma mère qui semble avoir les mêmes mensurations que votre mannequin, pourriez vous m'indiquez la taille qu'elle porte ? Je vous remercie d'avance pour votre reponse ainsi que pour ce joli modèle !
03.03.2025 - 13:09DROPS Design answered:
Bonjour Pauline, la plupart du temps nos modèles portent soit un S soit un M; pour être certaine des mesures finales, mesurez un pull similaire qu'elle a et dont elle aime la forme et comparez ces mesures à celles du schéma, vous pourrez ainsi choisir la taille correspondante. Retrouvez plus d'infos ici. Bon tricot!
03.03.2025 - 16:13
![]() Carol wrote:
Carol wrote:
The pattern calls for two strands, one of each type of yarn. Why are the amounts of each type of yarn needed different then? Am I not reading thisnright?
23.02.2025 - 14:58
![]() Desoulle wrote:
Desoulle wrote:
Bonjour, pouvez vous donner les explications de ce modèle pour réaliser le pull de bas en haut avec des aiguilles droites ?
20.02.2025 - 15:50DROPS Design answered:
Bonjour Mme Dessoulle, nous ne sommes malheureusement pas en mesure d'adapter chacun de nos modèles à chaque demande; vous pouvez consulter les différents modèles de pulls sur notre site ici, ajoutez des filtres si besoin; cette leçon pourra vous aider à adapter facilement la plupart de nos modèles sur aiguilles droites. Bon tricot!
21.02.2025 - 08:11
![]() PIMOULLE wrote:
PIMOULLE wrote:
Bonjour, je suis en échec total sur ce tricot, n'ayant jamais tricoté avec des aiguilles circulaires...Est-il possible de trouver quelque part la conversion de ce modèle pour le tricoter avec des aiguilles droites? Sinon pouvez-vous m'indiquer un modele de pull femme qui conviendrait à la laine achetée afin de ne pas perdre l'intégralité de mon achat (aiguilles droites) Remerciements pour votre attention, cordiales salutations Elisabeth.
20.02.2025 - 09:44DROPS Design answered:
Bonjour Mme Pimoulle, vous trouverez différentes vidéos/leçons en haut de page sous les onglets du même nom, elles pourront peut-être vous aider (y compris une leçon pour adapter sur aiguilles droites). Sinon, vous pouvez naturellement consulter nos différents modèles à tricoter avec la même tension/les mêmes laines, utilisez le moteur de recherche ici. Bon tricot!
20.02.2025 - 11:42
![]() Kristin Nybrott wrote:
Kristin Nybrott wrote:
Har akkurat strikket en genser i Karisma og Kid-silk på pinner 4,5 og 5,5. Dette ga en strikkefasthet på 17 masker. Dette var en oppskrift hvor en skulle bruke Fritidsgarn. (Ble mykt og fint resultat, med riktig strikkefasthet) Vil denne kombinasjonen gå bra på denne genseren? Eventuelt hvilket alternativt garn kan en bruke som ikke inneholder alpakka?
10.02.2025 - 14:15DROPS Design answered:
Hej Kristin, ja det går bra med samme kombination hvis du holder de 17 masker på 10 cm som strikkefasthed, det er samme som der står i opskriften :)
12.02.2025 - 14:58
![]() Hélène Bergeron wrote:
Hélène Bergeron wrote:
Si je veux faire une rehausse pour le dos, est-ce que ça changerait pour le patron. Car je trouve qu’un chandail pas de rehausse est porté à tirer par en arrière. Merci
08.02.2025 - 17:41DROPS Design answered:
Bonjour Mme Bergeron, cette vidéo pourra vous aider pour les rangs raccourcis à tricoter, continuez bien à tricoter les diagrammes comme indiqué dans ce modèle (dans la vidéo, on tricote en jersey) - et tricotez bien les augmentations des raglans comme indiqué également dans ce modèle (différentes dans la vidéo). Bon tricot!
10.02.2025 - 10:00
|
|||||||||||||||||||
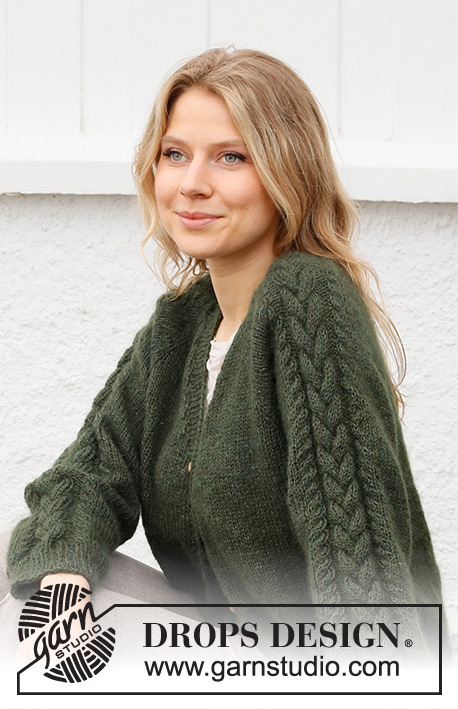
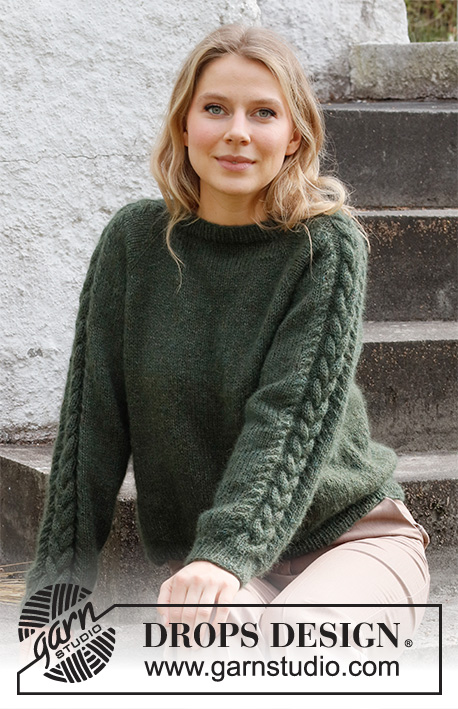
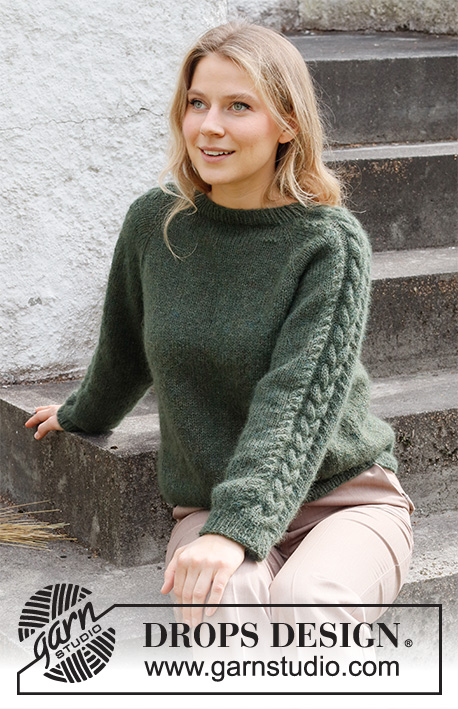
Deep Woods Sweater#deepwoodssweater |
|||||||||||||||||||
 |
 |
||||||||||||||||||
Knitted jumper in DROPS Alpaca and DROPS Kid-Silk. The piece is worked top down with raglan and cables on the sleeves. Sizes S - XXXL.
DROPS 215-5 |
|||||||||||||||||||
|
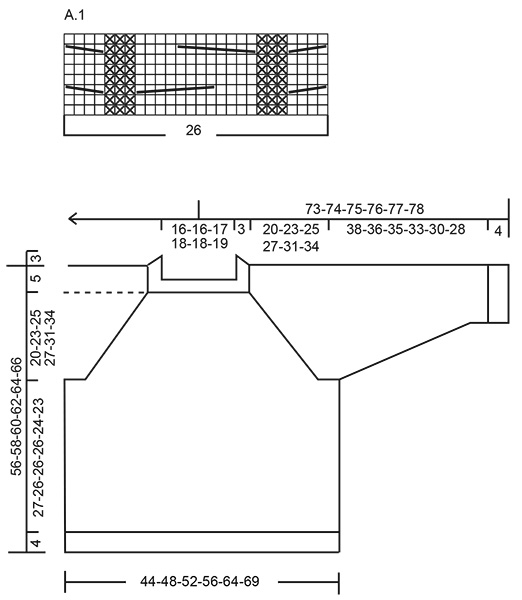
------------------------------------------------------- EXPLANATIONS FOR THE PATTERN: ------------------------------------------------------- PATTERN: See diagram A.1. RAGLAN: Increase 1 stitch on each side of the stitch in stocking stitch (stitch with marker thread) in each transition between body and sleeves (= 8 stitches increased on the round). Increase 1 stitch by making 1 yarn over. On the next round work the yarn overs twisted to avoid holes. Then work the new stitches in stocking stitch. DECREASE TIP (for sleeves): Decrease 1 stitch on either side of the marker thread as follows: Work until there are 3 stitches left before the marker thread, knit 2 together, knit 2 (marker thread sits between these 2 stitches), slip 1 stitch as if to knit, knit 1 and pass the slipped stitch over the knitted stitch. CASTING-OFF TIP: To avoid the cast-off edge being tight you can cast off with a larger size needle. If the edge is still tight, make 1 yarn over after approx. each 4th stitch at the same time as casting off; the yarn overs are cast off as normal stitches. ------------------------------------------------------- START THE PIECE HERE: ------------------------------------------------------- JUMPER – SHORT OVERVIEW OF THE PIECE: The yoke is worked in the round with circular needle from mid-back and top down. AT THE SAME TIME increases are made for raglan. The yoke is divided for body and sleeves and the body continued in the round. The sleeves are worked in the round with short circular needle/double pointed needles, top down. YOKE: Cast on 88-92-96-100-104-108 stitches with circular needle size 4 mm and 1 strand Kid-Silk and 1 strand Alpaca (= 2 strands). Knit 1 round, then work rib (knit 1, purl 1) over all stitches for 3 cm. Change to circular needle size 5 mm and insert 1 marker here. The yoke will now be measured from this marker. Insert 4 marker threads in the piece as follows (without working the stitches): Count 11-12-13-14-15-16 stitches (= half back piece), insert 1 marker thread in the next stitch, count 20 stitches (= sleeve), insert 1 marker thread in the next stitch, count 22-24-26-28-30-32 stitches (= front piece), insert 1 marker thread in the next stitch, count 20 stitches (= sleeve), insert 1 marker thread in the next stitch, there are 11-12-13-14-15-16 stitches left on the round before the first marker thread (= half back piece). Knit 1 round where you increase 6 stitches evenly on both sleeves = 100-104-108-112-116-120 stitches (26 stitches on each sleeve). Then work stocking stitch over the front and back pieces and A.1 (= 26 stitches) over each sleeve, AT THE SAME TIME on the first round, increase to RAGLAN in each transition between body and sleeves – read description above. Increase to raglan every 2nd round a total of 22-25-27-29-33-36 times on both sides of all 4 stitches with marker threads = 276-304-324-344-380-408 stitches. REMEMBER THE KNITTING TENSION! After the last increase to raglan continue working without further increases until the piece measures 20-23-25-27-31-34 cm from the marker. The next round is worked as follows: Work the first 34-38-41-44-49-53 stitches (= half back piece), place the next 70-76-80-84-92-98 stitches on 1 thread for the sleeve and cast on 6-6-6-8-10-12 new stitches on the needle (= in side under the sleeve), work the next 68-76-82-88-98-106 stitches (= front piece), place the next 70-76-80-84-92-98 stitches on 1 thread for the sleeve and cast on 6-6-6-8-10-12 new stitches on the needle (= in side under the sleeve) and work the remaining 34-38-41-44-49-53 stitches (= half back piece). THE PIECE IS NOW MEASURED FROM HERE! BODY: = 148-164-176-192-216-236 stitches. Continue with stocking stitch until the piece measures 27-26-26-26-24-23 cm from the division. Change to circular needle size 4 mm. Work rib (purl 1, knit 1) over all stitches until the rib measures 4 cm. Loosely cast off with knit over knit and purl over purl, read CASTING-OFF TIP. The jumper measures approx. 56-58-60-62-64-66 cm from the shoulder. SLEEVE: Place the 70-76-80-84-92-98 stitches from the thread on the one side of the piece on double pointed needles/short circular needle size 5 mm and knit up 1 stitch in each of the 6-6-6-8-10-12 stitches cast on under the sleeve = 76-82-86-92-102-110 stitches. Insert a marker thread in the middle of the 6-6-6-8-10-12 stitches under the sleeve. Allow the thread to follow your work onwards; it will be used when decreasing under the sleeve. Start at the marker thread and continue with stocking stitch and A.1 in the round. When the piece measures 3 cm from the division, decrease 2 stitches under the sleeve – read DECREASE TIP. Decrease like this every 3½-3-2-1½-1-1 cm a total of 10-11-13-16-19-21 times = 56-60-60-60-64-68 stitches. Continue working until the sleeve measures 38-36-35-33-30-28 cm from the division (or to desired length; shorter measurements in larger sizes due to longer yoke). Work 1 round where you decrease 12 stitches evenly over the stitches in A.1 = 44-48-48-48-52-56 stitches. Change to double pointed needles size 4 mm and work rib (= knit 1, purl 1) for 4 cm. Loosely cast off with knit over knit and purl over purl but to avoid the cast-off edge being tight, use double pointed needles size 5 mm. Work the other sleeve in the same way. |
|||||||||||||||||||
Diagram explanations |
|||||||||||||||||||
|
|||||||||||||||||||
|
|||||||||||||||||||
Have you finished this pattern?Tag your pictures with #dropspattern #deepwoodssweater or submit them to the #dropsfan gallery. Do you need help with this pattern?You'll find 29 tutorial videos, a Comments/Questions area and more by visiting the pattern on garnstudio.com. © 1982-2025 DROPS Design A/S. We reserve all rights. This document, including all its sub-sections, has copyrights. Read more about what you can do with our patterns at the bottom of each pattern on our site. |
|||||||||||||||||||


With over 40 years in knitting and crochet design, DROPS Design offers one of the most extensive collections of free patterns on the internet - translated to 17 languages. As of today we count 314 catalogues and 11822 patterns translated into English (UK/cm).
We work hard to bring you the best knitting and crochet have to offer, inspiration and advice as well as great quality yarns at incredible prices! Would you like to use our patterns for other than personal use? You can read what you are allowed to do in the Copyright text at the bottom of all our patterns. Happy crafting!
Post a comment to pattern DROPS 215-5
We would love to hear what you have to say about this pattern!
If you want to leave a question, please make sure you select the correct category in the form below, to speed up the answering process. Required fields are marked *.