
Popular categories
Looking for a yarn?


Comments / Questions (19)
![]() Ana Hunziker Convert wrote:
Ana Hunziker Convert wrote:
Buenos días, Quisiera saber si se puede obtener las explicaciones en español o en francés porque no entiendo su idioma! Muchas gracias
09.10.2024 - 11:27
![]() Gun Penhoat wrote:
Gun Penhoat wrote:
I read the questions and comments and found the answer that talks about an extra stitch in the main color when starting the purl row. Is this an errata in the pattern as this is the first I see about having to add an extra stitch in the main color. The chart doesn't show this and nowhere in the pattern do I find this mentioned. It isn't practical to have to unravel when you knit in light colors while you try to figure out where you're going wrong.
01.02.2023 - 21:40DROPS Design answered:
Dear Mrs Penhoat, there is no mistake in the pattern, you should repeat the 6 sts in the diagram reading right towards left and always end with the first stitch in diagram from RS / work the first stitch in diagram + repeat the 6 sts in diagram reading left towards right from WS. Happy knitting!
02.02.2023 - 09:27
![]() Gun Penhoat wrote:
Gun Penhoat wrote:
Again, thank you so much for the quick answer! Does that mean that both knit and purl rows are read from right to left? I read the purl row left to right and then the pattern reads 1 edge stitch, 1 Main, 1 contrast, 1 Main, 1 contrast, 2 Main.
01.02.2023 - 17:16DROPS Design answered:
Dear Mrs Penhoat, diagram is read from right side from the right towards the link and from wrong side from the left towards the right, so when you work the wrong side rows, work the first stitch in A.1 (on the right hand side = the one you end with from RS) then repeat diagram from the left towards the right, on the first row with pattern you will have then 2 sts Main on each side inside the edge stitches. Happy knitting!
02.02.2023 - 09:23
![]() Gun Penhoat wrote:
Gun Penhoat wrote:
I thought it would be plain sailing now when I got my question about increases answered, but no ... I'm stuck again. I have 141 stitches and went on to Row 6 and (purl) where the contrast starts. 1 edge stitch, then A1 starts with 1 Main color, and continues with 1 contrast, 1 Main, 1 contrast, 3 Main (the pattern row starts over with 1 Main so this becomes 3 Main), 1 contrast, I Main, 1 contrast etc.., I end up with 3 not 2 Main stitches before the edge stitch . Where am I going wrong?
01.02.2023 - 15:47DROPS Design answered:
Dear Mrs Penhoat, work your 141 sts as follwos: 1 edge stitch, repeat the 6 sts a total of 23 times (over the next 138 sts), ending with 1 Main, then work the next stitch as the first = 1 Main (so that there are now 2 Main inside the edge stitches on each side) and end with 1 edge stitch in garter stitch. Happy knitting!
01.02.2023 - 17:07
![]() Gun Penhoat wrote:
Gun Penhoat wrote:
Thank you so much for clarifying!
31.01.2023 - 23:03
![]() Gun Penhoat wrote:
Gun Penhoat wrote:
Thank you so much for the quick reply! I still have a question though ... am I right in thinking that there are 5 ROWS of MAIN COLOR before the different colored A1 chart actually starts?
31.01.2023 - 18:13DROPS Design answered:
Dear Gun, the 5 starting rows in the main colour are part of A.1. You immediately start working A.1 after the purl and decrease row, but the beginning of A.1 is 5 rows of the main colour. After these five rows, you will start changing colours as explained in the diagram. Happy knitting!
31.01.2023 - 23:00
![]() Gun Penhoat wrote:
Gun Penhoat wrote:
I have finished the rib and done the decrease 6 on the right-side row + increased to 111 stitches. Then I purled and decreased 6 on this purl row. When I look at the chart I now see 5 ROWS in MAIN COLOR before the chart itself. The third row of the 5 is an increase row. However, when I read the description it says to start the A1 chart with 18 (I'm knitting the 2nd size) repeats of the 6 stitch pattern, after the purl (with the decreased 6 stitches) row. HELP, PLEASE!
31.01.2023 - 11:58DROPS Design answered:
Dear Mrs Penhoat, just increase on 3rd row as stated for your size = there are now 141 sts on needle after this increase round, and now work A.1 as before: 1 edge st in garter st, repeat A.1 until 2 sts remain (there are now enough room for 23 repeats of A.1), work the first stitch in A.1 and end with 1 edge stitch in garter stitch. And continue like this, ie everytime you will increase, you will repeat A.1 more times in width but repeat A.1 until the last 2 sts and end with the first st in A.1 + 1 edge st in garter stitch. Happy knitting!
31.01.2023 - 17:33
![]() Jenny Douglas wrote:
Jenny Douglas wrote:
I have a further question. Should the garter stitch on each edge be worked in main colour or can you use the same colour as the stitch next to it?
04.12.2022 - 19:44DROPS Design answered:
Dear Mrs Douglas, you can work the edge stitches with the main colour used on the row. Happy knitting!
06.12.2022 - 10:13
![]() Jenny Douglas wrote:
Jenny Douglas wrote:
Regarding the "extra" stitch from A1, prior to the garter stitch. This is first stitch from A1. Row 6 is a purl row and after A1, the final two stitches will be a Wheat purl and a Wheat garter stitch. Following the chart, Starting row 7 I have a garter stitch, then a Wheat knit then a Brown knit, but this does not match the pattern. Should I add the extra stitch from A1 at the beginning of knit rows and the end of purl rows? Should extra stitch be from left hand side of chart?
04.12.2022 - 12:54DROPS Design answered:
Dear Mrs Douglas, on the 6th row (from WS) work first the 1st stitch in A.1 (= wheat), then repeat A.1 reading from the left towards the right) = there are 2 sts with wheat inside edge sts, then on row 7 (from RS), work A.1 (read from the right towards the left) starting with 1 st with wheat, then end with first st A.1 (= 1 st with wheat), pattern is now symmetrical. Happy knitting!
06.12.2022 - 09:45
![]() Åse Engseth wrote:
Åse Engseth wrote:
I str L er antall masker 291 iflg oppskriften når du deler av til bol og armer når jeg summerer alle delenes masker. Jeg sitter imidlertid med 267 masker, som er riktig iflg mønster etter økning nr 5. Jeg må bare rekke opp det jeg har strikket for det er ikke nok masker når arbeidet måler 25 cm fra merket, og hvordan skal man få resterende mønster til å passe da? Skuffet....
17.04.2022 - 19:45
|
|||||||||||||||||||||||||
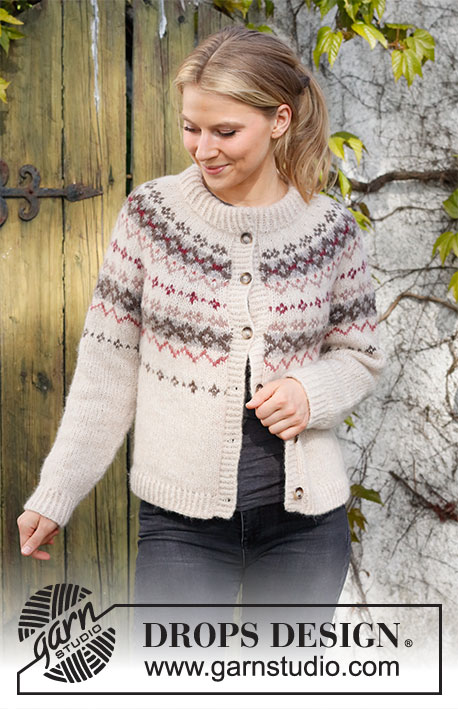
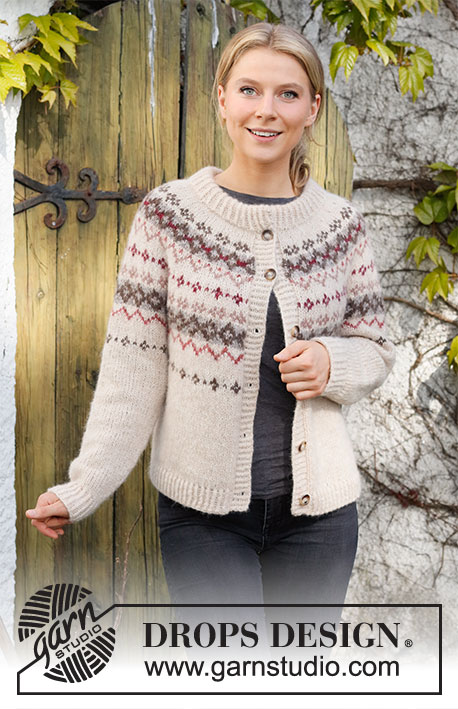
Mistletoe Kisses Jacket#mistletoekissesjacket |
|||||||||||||||||||||||||
 |
 |
||||||||||||||||||||||||
Knitted jacket in DROPS Air. The piece is worked top down with round yoke and Nordic pattern. Sizes S - XXXL.
DROPS 217-8 |
|||||||||||||||||||||||||
|
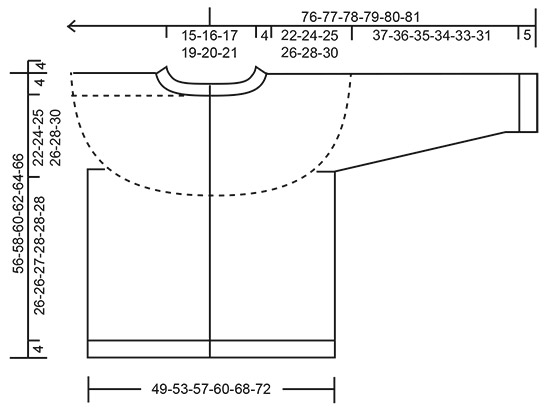
------------------------------------------------------- EXPLANATIONS FOR THE PATTERN: ------------------------------------------------------- RIDGE/GARTER STITCH (worked back and forth): Knit all rows. 1 ridge in height = Knit 2 rows. PATTERN: See diagram A.1. The diagram shows all rows in the pattern seen from the right side. INCREASE TIP-1 (evenly spaced): To work out how to increase evenly, count the total number of stitches on the needle (e.g. 93 stitches) minus bands (e.g. 12 stitches) and divide the remaining stitches by the number of increases to be made (e.g. 24) = 3.4. In this example, increase by making 1 yarn over after alternately each 3rd and 4th stitch. Do not increase on bands. On the next row work the yarn overs twisted to avoid holes. INCREASE TIP-2: Increase evenly as described under INCREASE TIP-1, but on the rows marked with star-2 and star-5 in the diagram, increase by working 2 stitches in the same stitch instead of making 1 yarn over (star-2 is from the right side and you knit in the front and back loops of the same stitch, star-5 is from the wrong side and you purl in the front and back loops of the same stitch). DECREASE TIP (for sleeves): Decrease 1 stitch on either side of the marker thread as follows: Work until there are 3 stitches left before the marker thread, knit 2 together, knit 2 (marker thread sits between these 2 stitches), slip 1 stitch as if to knit, knit 1 and pass the slipped stitch over the knitted stitch. BUTTONHOLES: Work buttonholes on the right band (when the garment is worn). 1 buttonhole = make 1 yarn over and knit 2 together. On the next row knit the yarn over to leave a hole. The first buttonhole is worked when the band measures 6-6-4-6-5-4 cm = 2⅜"-2⅜"-1½"-2⅜"-2"-1½" from the bottom edge. The remaining 5-5-6-6-6-6 buttonholes are worked with approx. 9-9½-8½-8½-9-9½ cm = 3½"-3¾"-3¼"-3¼"-3½"-3¾" between each one. BINDING-OFF TIP: To avoid the bind-off edge being tight you can bind off with a larger size needle. If the edge is still tight, make 1 yarn over after approx. each 4th stitch at the same time as binding off; the yarn overs are bind off as normal stitches. ------------------------------------------------------- START THE PIECE HERE: ------------------------------------------------------- JACKET – SHORT OVERVIEW OF THE PIECE: The neck and yoke are worked back and forth with circular needle from mid front and top down. The yoke is divided for body and sleeves and the body continued back and forth. The sleeves are worked in the round with short circular needle/double pointed needles, top down. The bands are worked to finish. NECK: Cast on 93-97-101-107-109-115 stitches (including 6 band stitches on each side towards mid front) with circular needle size 4.5 mm = US 7 and wheat. Purl 1 row (= wrong side). Now work rib as follows: ROW 1 (right side): 1 edge stitch in GARTER STITCH – read description above, * knit 1 twisted, purl 1 *, work from *-* until there are 2 stitches left on the row, knit 1 twisted and finish with 1 edge stitch in garter stitch. ROW 2 (wrong side): 1 edge stitch in garter stitch, * purl 1 twisted, knit 1, *, work from *-* until there are 2 stitches left on the row, purl 1 twisted and finish with 1 edge stitch in garter stitch. Continue this rib for 9 cm = 3½". When the rib is finished, knit 1 row from the right side as follows: Bind off the first 6 stitches, knit until there are 6 stitches left on the row and increase at the same time 24-26-28-28-32-38 stitches evenly spaced – read INCREASE TIP-1, work the last 6 stitches as before, turn, bind off the first 6 stitches and then purl to end of row = 105-111-117-123-129-141 stitches. Change to circular needle size 5.5 mm = US 9. Insert 1 marker inside the edge stitch at the beginning of the row; the yoke is measured from this marker! YOKE: Now work pattern as follows: Work 1 edge stitch in garter stitch, A.1 until there are 2 stitches left on the row (= 17-18-19-20-21-23 repeats of 6 stitches), work the first stitch in A.1 and 1 edge stitch in garter stitch. Continue back and forth like this and increase on each row marked with a star – read INCREASE TIP-2. Star-1: Increase 24-30-30-30-30-36 stitches evenly with yarn overs = 129-141-147-153-159-177 stitches. Star-2: Increase 30-30-30-30-30-30 stitches evenly, knitting 2 stitches in 1 stitch = 159-171-177-183-189-207 stitches. Star-3: Increase 30-30-30-30-30-30 stitches evenly with yarn overs = 189-201-207-213-219-237 stitches. Star-4: Increase 30-36-30-30-30-30 stitches evenly with yarn overs = 219-237-237-243-249-267 stitches. Star-5: Increase 24-30-30-30-36-36 stitches evenly, purling 2 stitches in 1 stitch = 243-267-267-273-285-303 stitches. Sizes S and M are now finished with increases. Go to all sizes. In sizes L, XL, XXL and XXXL continue working up to and including the row with: Star-6: Increase 24-18-30-36 stitches evenly with yarn overs = 291-291-315-339 stitches. All sizes: Continue with pattern until the piece measures 22-24-25-26-28-30 cm = 8¾"-9½"-9¾"-10¼"-11"-11¾" from the marker on the neck. The next row is worked as follows from the wrong side: Work the first 37-40-43-43-49-52 stitches (= right front piece), place the next 48-54-60-60-60-66 stitches on 1 thread for the sleeve and cast on 6-6-6-12-12-12 new stitches on the needle (= in side under sleeve), work the next 73-79-85-85-97-103 stitches (= back piece), place the next 48-54-60-60-60-66 stitches on 1 thread for the sleeve and cast on 6-6-6-12-12-12 new stitches on the needle (= in side under sleeve), work the last 37-40-43-43-49-52 stitches (= left front piece). Body and sleeves are finished separately. BODY: = 159-171-183-195-219-231 stitches. Continue back and forth with pattern as before and 1 edge stitch in garter stitch on each side. When A.1 has been completed in height, continue with wheat until the piece measures 26-26-27-28-28-28 cm = 10¼"-10¼"-10⅝"-11"-11"-11" from the division, knit 1 round where you increase 28-30-32-32-36-38 stitches evenly spaced = 187-201-215-227-255-269 stitches. Work 1 row back from the wrong side. Change to circular needle size 4.5 mm = US 7 and work rib as follows: ROW 1 (right side): 1 edge stitch in garter stitch – read description above, * knit 1 twisted, purl 1 *, work from *-* until there are 2 stitches left on the row, knit 1 twisted and finish with 1 edge stitch in garter stitch. ROW 2 (wrong side): 1 edge stitch in garter stitch, * purl 1 twisted, knit 1, *, work from *-* until there are 2 stitches left on the row, purl 1 twisted and finish with 1 edge stitch. Continue this rib for 4 cm = 1½". Bind off with knit over knit and purl over purl – read BINDING-OFF TIP. The jacket measures approx. 56-58-60-62-64-66 cm = 22"-22¾"-23⅝"-24⅜"-25¼"-26" from the shoulder down. SLEEVE: Place the 48-54-60-60-60-66 stitches from the thread on the one side of the piece on double pointed needles/short circular needle size 5.5 mm = US 9 and knit up 1 stitch in each of the 6-6-6-12-12-12 stitches cast on under the sleeve = 54-60-66-72-72-78 stitches. Insert a marker thread in the middle of the 6-6-6-12-12-12 stitches under the sleeve. Allow the thread to follow your work onwards; it will be used when decreasing under the sleeve. Continue in the round until you have finished A.1 in height. Then continue with wheat to finished length. When the sleeve measures 4 cm = 1½" from the division, decrease 1 stitch on each side of the marker thread – read DECREASE TIP. Decrease like this every 3½-3-2-2-1½-1½ cm = 1¼"-1⅛"-¾"-¾"-½"-½" a total of 9-11-13-15-14-17 times = 36-38-40-42-44-44 stitches. When the sleeve measures 37-36-35-34-33-31 cm = 14½"-14¼"-13¾"-13⅜"-13"-12¼" (shorter measurements in larger sizes due to longer yoke), knit 1 row where you increase 6-6-6-6-8-8 stitches evenly spaced = 42-44-46-48-52-52 stitches. Change to double pointed needles size 4.5 mm = US 7 and work rib (= knit 1 twisted, purl 1) for 5 cm = 2". Bind off with knit over knit and purl over purl – remember BINDING-OFF TIP. Work the other sleeve in the same way. ASSEMBLY: Fold the neck double to the inside of the garment and sew down. To avoid the neck being tight and rolling outwards it is important that the seam is elastic. Sew the ends of the neck together on each side with small stitches. RIGHT BAND: Start from the right side at the bottom edge of the right front piece, with circular needle 4.5 mm = US 7 and wheat and knit up 95-115 stitches, inside the 1 edge stitch, along the front piece as far as the neck (number of stitches should be divisible by 2 + 1). Purl 1 row from the wrong side. Now work rib as follows: ROW 1 (right side): 1 edge stitch in garter stitch – read description above, * knit 1 twisted, purl 1 *, work from *-* until there are 2 stitches left on the row, knit 1 twisted and finish with 1 edge stitch in garter stitch. ROW 2 (wrong side): 1 edge stitch in garter stitch, * purl 1 twisted, knit 1, *, work from *-* until there are 2 stitches left on the row, purl 1 twisted and finish with 1 edge stitch. Repeat rows 1 and 2 until the band measures 1 ½ cm = ½" – adjust so the next row is from the right side. Work BUTTONHOLES – read description above. Continue with rib until the band measures a total of 3 cm = 1⅛". Bind off with knit over knit and purl over purl. Sew the band to the neck inside the 1 edge stitch on the band and the bind-off edge on the neck. LEFT BAND: Knit up 95-115 stitches with circular needle 4.5 mm = US 7 and wheat along the left front piece (number of stitches should be divisible by 2 + 1) working from the right side, inside the 1 edge stitch and starting from where stitches were bind off on the neck. Purl 1 row from the wrong side, then work rib as follows: ROW 1 (right side): 1 edge stitch in garter stitch – read description above, * knit 1 twisted, purl 1 *, work from *-* until there are 2 stitches left on the row, knit 1 twisted and finish with 1 edge stitch in garter stitch. ROW 2 (wrong side): 1 edge stitch in garter stitch, * purl 1 twisted, knit 1, *, work from *-* until there are 2 stitches left on the row, purl 1 twisted and finish with 1 edge stitch. Repeat rows 1 and 2 until the rib measures 3 cm = 1⅛". Bind off with knit over knit and purl over purl. Sew the band to the neck, inside the 1 edge stitch on the band and the bind-off edge on the neck. Sew the buttons onto the band. |
|||||||||||||||||||||||||
Diagram explanations |
|||||||||||||||||||||||||
|
|||||||||||||||||||||||||
 |
|||||||||||||||||||||||||
 |
|||||||||||||||||||||||||
Have you finished this pattern?Tag your pictures with #dropspattern #mistletoekissesjacket or submit them to the #dropsfan gallery. Do you need help with this pattern?You'll find 36 tutorial videos, a Comments/Questions area and more by visiting the pattern on garnstudio.com. © 1982-2026 DROPS Design A/S. We reserve all rights. This document, including all its sub-sections, has copyrights. Read more about what you can do with our patterns at the bottom of each pattern on our site. |
|||||||||||||||||||||||||


With over 40 years in knitting and crochet design, DROPS Design offers one of the most extensive collections of free patterns on the internet - translated to 17 languages. As of today we count 324 catalogs and 12290 patterns - 12280 of which are translated into English (US/in).
We work hard to bring you the best knitting and crochet have to offer, inspiration and advice as well as great quality yarns at incredible prices! Would you like to use our patterns for other than personal use? You can read what you are allowed to do in the Copyright text at the bottom of all our patterns. Happy crafting!
Post a comment to pattern DROPS 217-8
We would love to hear what you have to say about this pattern!
If you want to leave a question, please make sure you select the correct category in the form below, to speed up the answering process. Required fields are marked *.