
Popular categories
Looking for a yarn?


Comments / Questions (32)
![]() Loulou wrote:
Loulou wrote:
Selon la légende, un carré vide est une maille endroit. Selon la photo, c'est du jersey, il faut donc que sur les rangs pairs ce soit des mail.es en des, n'est-ce pas ?
16.09.2020 - 21:53DROPS Design answered:
Bonjour Loulou, le pull se tricote en rond et pour tricoter du jersey en rond, on tricote toutes les mailles à l'endroit comme le montre cette vidéo. Bon tricot!
17.09.2020 - 10:07
![]() Pia wrote:
Pia wrote:
Tak. For en rigtig fin opskrift🌼
11.06.2020 - 09:21
![]() Venla wrote:
Venla wrote:
Hei! En ymmärrä mallipiirroksen silmukan lisäysohjetta. Jos silmukka lopuksi pudotetaan, niin siinähän ei silmukkamäärä kasva?
05.06.2020 - 22:03DROPS Design answered:
Hei, työhön lisätään 1 silmukka neulomalla aluksi 1 silmukka edellisen kerroksen silmukkaan ja sitten 1 silmukka puikolla olevaan silmukkaan. Vasta tämän jälkeen vasemman puikon silmukka pudotetaan puikolta.
09.06.2020 - 18:13
![]() Sine Nielsen wrote:
Sine Nielsen wrote:
4. række Knude i A1 kommer ikke til at ligge lige over 2. rækkes knuder. Skal der ikke kin være 5 masker mellem knuderne og ikke 6? I 5. og 6. række knuder er der kun 5 masker mellem knuderne
05.05.2020 - 20:37DROPS Design answered:
Hej Sine, har du set at der for et par uger siden blev lagt et nyt diagram ud? Nu skal det stemme :)
06.05.2020 - 08:19
![]() Dominika wrote:
Dominika wrote:
Dzień Dobry! Mam pytanie dot. podziału robótki na tył/przód i rękawy. W jaki sposób mam nabrać oczka (na bok, na rękaw). Jakiej metody mam użyć. Czy jest jakiś filmik, który to obrazuje? Z góry dziękuję za odpowiedź :)
03.04.2020 - 15:43DROPS Design answered:
Witaj Dominiko! Ja zawsze w takiej sytuacji nabieram oczka wykonując pętelki na drucie, a w kolejnym rzędzie przerabiam te oczka przekręcone (wkłuwając drut z tyłu zamiast z przodu oczka). Zobacz film TUTAJ. Pozdrawiamy!
06.04.2020 - 10:31
![]() Maria wrote:
Maria wrote:
Hola! Me encanta este patrón y lo estoy tejiendo.. pero no entiendo muy bien hasta donde del diagrama he de tejer si confecciono la talla M. Muchas gracias por facilitarnos esta gran cantidad de patrones tan preciosos.
09.02.2020 - 18:47DROPS Design answered:
Hola Maria. Cuando la labor mida aprox. 6 cm desde la división en todas las tallas finalizar A.x después de una vuelta del patrón de motas. Continuar en punto jersey en redondo sobre todos los puntos.
09.02.2020 - 20:39
![]() Claudia wrote:
Claudia wrote:
Ganz herzlichen Dank für die schnelle Hilfe.
06.02.2020 - 20:07
![]() Claudia wrote:
Claudia wrote:
Liebes DROPS Design Team, ich komme mit Reihe 15 im Muster A1 nicht zurecht. In R 14 habe ich je Muster 6 Maschen zur Verfügung; ich weiß nicht, aus welcher M ich die erste der beiden Zunahmen in R 15 stricken soll. Was mache ich falsch?
05.02.2020 - 20:38DROPS Design answered:
Liebe Claudia, am Anfang jeder A.1 nehmen Sie zuerst 1 Masche = 3. Symbol (so nehmen Sie 1 Masche in nächsten Maschen zu - siehe Zeit 00:37), dann das Knotchen (wie zuvor) im 1. Maschen stricken, dann eine Masche zunehmen (wie beim 1. Video aber dieses Mal wie bei Zeit 00:15). Viel Spaß beim stricken!
06.02.2020 - 09:50
![]() Tiziana wrote:
Tiziana wrote:
Buongiorno. Scusate non capisco al punto NOTA dove dice per le altre taglie Ax e Ay devono essere ripetuti fino alla lunghezza corretta , ma nello schema io non vedo il simbolo Ay. Grazie
28.01.2020 - 09:09DROPS Design answered:
Buongiorno Tiziana. Abbiamo corretto il testo; c'è solo il simbolo Ax. Buon lavoro!
28.01.2020 - 11:38
![]() Alicia wrote:
Alicia wrote:
Gracias por traducirlo a español .. es precioso y seguro que lo tejeré
17.01.2020 - 11:04
|
||||||||||
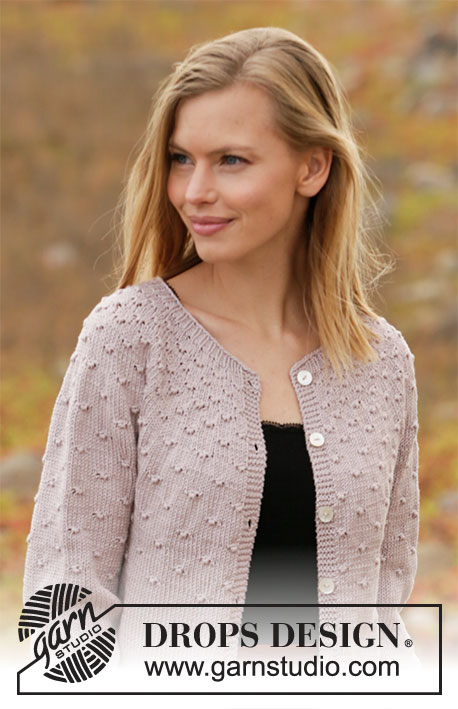
Dots and Drops#dotsanddropssweater |
||||||||||
 |
 |
|||||||||
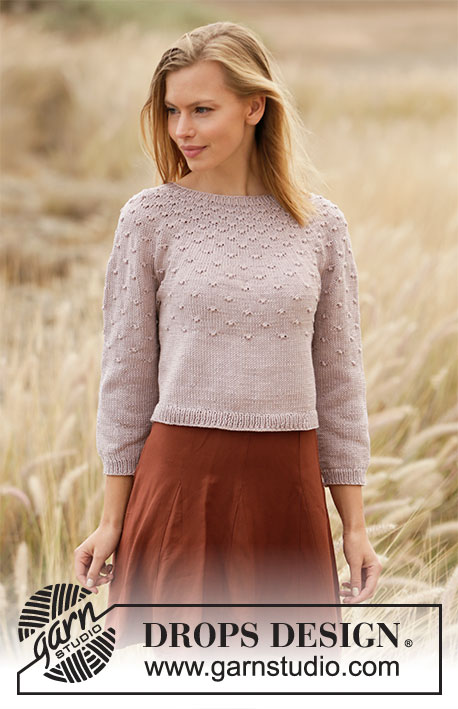
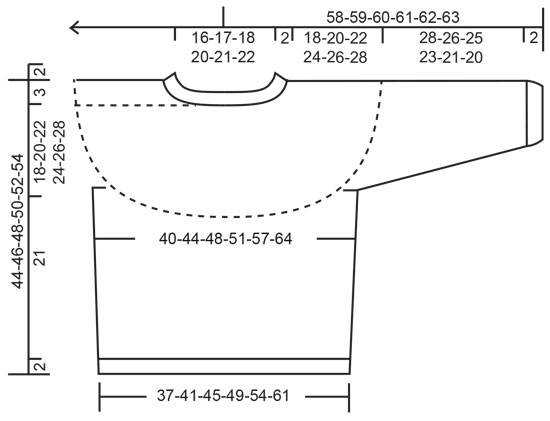
Knitted sweater in DROPS Muskat. The piece is worked top down with round yoke, knotted pattern and ¾-length sleeves. Sizes XS - XXL.
DROPS 213-9 |
||||||||||
|
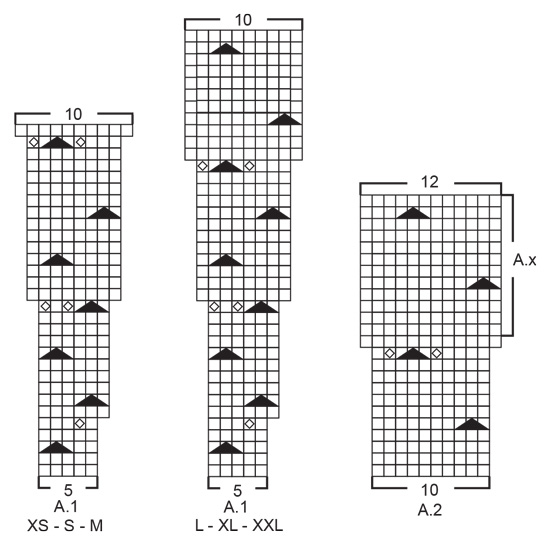
------------------------------------------------------- EXPLANATIONS FOR THE PATTERN: ------------------------------------------------------- PATTERN: See diagrams A.1 and A.2. Choose diagram for your size (applies to A.1). INCREASE TIP (evenly spaced): To work out how to increase evenly, count the total number of stitches on the needle (e.g. 92 stitches) and divide by the number of increases to be made (e.g. 18) = 5.1. In this example, increase by making 1 yarn over after approx. each 5th stitch. On the next round knit the yarn overs twisted to avoid holes. DECREASE TIP (for sides of body and mid under sleeves): Decrease 1 stitch on each side of the marker thread as follows: Work until there are 3 stitches left before the marker thread, knit 2 together, knit 2 (marker thread sits between these 2 stitches) slip 1 stitch as if to knit, knit 1 and pass the slipped stitch over the knitted stitch (= 2 stitches left). BINDING-OFF TIP: To avoid the bind-off edge being tight you can bind off with a larger size needle. If the edge is still tight, make 1 yarn over after approx. each 8th stitch at the same time as binding off and the yarn overs are bind off as normal stitches. ------------------------------------------------------- START THE PIECE HERE: ------------------------------------------------------- SWEATER – SHORT OVERVIEW OF THE PIECE: The neck and yoke are worked in the round with circular needle from mid back and top down. The yoke is divided for body and sleeves and the body continued in the round from the side. The sleeves are worked in the round with double pointed needles/short circular needle, top down. NECK: Cast on 92-96-100-110-114-118 stitches with circular needle size 3 mm = US 2,5 and Muskat. Knit 1 round, then work rib in the round (= knit 1 / purl 1) for 2 cm = ¾". Knit 1 round where you increase 18-24-30-30-41-52 stitches evenly spaced – read INCREASE TIP = 110-120-130-140-155-170 stitches. Knit 1 round (yarn overs are knitted twisted). Insert 1 marker in the middle of the round (= mid front). The yoke is measured from this marker! Then work the yoke as described below. YOKE: Change to circular needle size 4 mm = US 6 and work A.1 in the round (= 22-24-26-28-31-34 repeats of 5 stitches). Continue this pattern and increase as shown in A.1. REMEMBER THE KNITTING GAUGE! When A.1 has been completed there are 220-240-260-280-310-340 stitches on the needle. Continue with A.2 in the round (= 22-24-26-28-31-34 repeats of 10 stitches). Continue this pattern and increase as shown in A.2. After the last increase in A.2 there are 264-288-312-336-372-408 stitches on the needle. Continue working until the piece measures 18-20-22-24-26-28 cm = 7"-8"-8¾"-9½"-10¼"-11" from the marker on the neck – NOTE: In the smallest size A.2 is not finished at this point and in the other sizes A.x needs to be repeated to the correct length (the patterns will continue on the body and sleeves). Now divide the piece for the body and sleeves on the next round as follows: Work 38-42-46-49-55-62 stitches in pattern as before (= ½ back piece), place the next 56-60-64-70-76-80 stitches on 1 thread for sleeve, cast on 8-8-8-10-10-10 new stitches on the needle (= in side under the sleeve), work 76-84-92-98-110-124 stitches in pattern as before (= front piece), place the next 56-60-64-70-76-80 stitches on 1 thread for sleeve, cast on 8-8-8-10-10-10 new stitches on the needle (= in side under the sleeve) and work the remaining 38-42-46-49-55-62 stitches in pattern as before (= ½ back piece). Cut the strand. Body and sleeves are finished separately. THE PIECE IS NOW MEASURED FROM HERE! BODY: = 168-184-200-216-240-268 stitches. Insert 1 marker thread in each side of the body, in the middle of the 8-8-8-10-10-10 stitches cast on under each sleeve. Allow the threads to follow your work onwards; they will be used when decreasing on each side of the body. Now continue the pattern AT THE SAME TIME as decreasing in the sides of the body as described below: Continue A.x in the round making sure you continue on the right row in the diagram after the yoke and make sure the knots are worked above the knots on the yoke. The 8-8-8-10-10-10 stitches cast on under each sleeve are worked in stockinette stitch. When the piece measures approx. 6 cm = 2⅜" from the division in all sizes finish A.x after a round of knots. Continue with stockinette stitch in the round over all stitches. AT THE SAME TIME when the piece measures 6 cm = 2⅜" from the division in all sizes decrease 1 stitch on each side of both marker threads – read INCREASE TIP (= 4 stitches decreased). Decrease like this every 5 cm = 2" a total of 3 times on each side = 156-172-188-204-228-256 stitches. Continue working until the piece measures 21 cm = 8¼" from the division in all sizes (there are 2 cm left to finished length; you can try the sweater on and work to desired length). Knit 1 round where you increase 16-16-18-20-22-24 stitches evenly spaced – remember INCREASE TIP = 172-188-206-224-250-280 stitches (the increase prevents the rib being tight). Change to circular needle size 3 mm = US 2,5 and work rib in the round (= knit 1 / purl 1) for 2 cm. Bind off with knit over knit and purl over purl – read BINDING-OFF TIP! The sweater measures approx. 44-46-48-50-52-54 cm = 17¼"-18"-19"-19¾"-10½"-21¼" from the shoulder down. SLEEVE: Place the 56-60-64-70-76-80 stitches from the thread on the one side of the piece on double pointed needles/short circular needle size 4 mm = US 6 and knit up 1 stitch in each of the 8-8-8-10-10-10 stitches cast on under the sleeve = 64-68-72-80-86-90 stitches. Insert a marker thread in the middle of the 8-8-8-10-10-10 stitches under the sleeve and allow the thread to follow your work onwards; it will be used when decreasing mid under sleeve. Now continue with pattern AT THE SAME TIME as you decrease mid under sleeve as follows: Start the round at the marker thread and work A.x in the round making sure you continue on the right row in the diagram after the yoke and that the knots are worked above the knots on the yoke. The 8-8-8-10-10-10 stitches cast on under the sleeve are worked in stockinette stitch. When the sleeve measures 12 cm = 4¾" from the division in all sizes, finish A.x after a round of knots. Continue with stockinette stitch in the round over all stitches. AT THE SAME TIME when the piece measures 2-2-2-2-3-3 cm = ¾"-¾"-¾"-¾"-1⅛"-1⅛" from the division decrease 2 stitches mid under the sleeve – read DECREASE TIP. Decrease like this every 3½-3-2½-1½-1-1 cm = 1¼"-1⅛"-⅞"-½"-⅜"-⅜" a total of 7-8-9-12-14-15 times = 50-52-54-56-58-60 stitches. Continue working until the piece measures 28-26-25-23-21-20 cm = 11"-10¼"-9¾"-9"-8¼"-8" from the division (there are 2 cm = ¾" left to finished length; you can try the sweater on and work to desired length). NOTE: Shorter measurements in larger sizes due to wider neck and longer yoke. Change to double pointed needles size 3 mm = US 2,5 and work rib in the round (= knit 1 / purl 1) for 2 cm = ¾". Bind off with knit over knit and purl over purl – remember BINDING-OFF TIP. The sleeve measures approx. 30-28-27-25-23-22 cm = 11¾"-11"-10⅝"-9¾"-9"-8¾" from the division. Work the other sleeve in the same way. |
||||||||||
Diagram explanations |
||||||||||
|
||||||||||
 |
||||||||||
 |
||||||||||
Have you finished this pattern?Tag your pictures with #dropspattern #dotsanddropssweater or submit them to the #dropsfan gallery. Do you need help with this pattern?You'll find 22 tutorial videos, a Comments/Questions area and more by visiting the pattern on garnstudio.com. © 1982-2026 DROPS Design A/S. We reserve all rights. This document, including all its sub-sections, has copyrights. Read more about what you can do with our patterns at the bottom of each pattern on our site. |
||||||||||


With over 40 years in knitting and crochet design, DROPS Design offers one of the most extensive collections of free patterns on the internet - translated to 17 languages. As of today we count 324 catalogs and 12285 patterns - 12275 of which are translated into English (US/in).
We work hard to bring you the best knitting and crochet have to offer, inspiration and advice as well as great quality yarns at incredible prices! Would you like to use our patterns for other than personal use? You can read what you are allowed to do in the Copyright text at the bottom of all our patterns. Happy crafting!
Post a comment to pattern DROPS 213-9
We would love to hear what you have to say about this pattern!
If you want to leave a question, please make sure you select the correct category in the form below, to speed up the answering process. Required fields are marked *.