
Popular categories
Looking for a yarn?


Comments / Questions (63)
![]() Lisbeth wrote:
Lisbeth wrote:
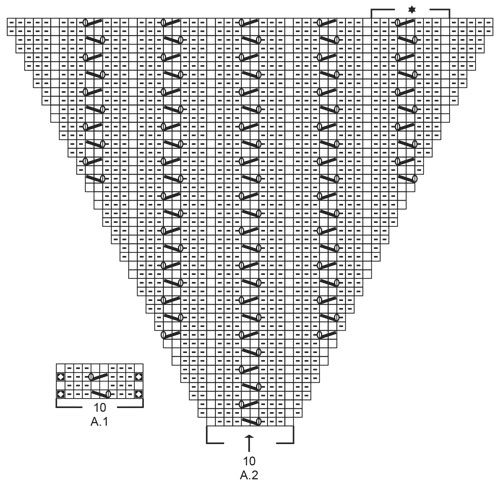
Når jeg skal strikke de 2 midterste masker af A1 og A2 i 3 række, skal de to masker så strikkes sammen til en? og mangler jeg så ikke en maske når jeg skal strikke 4. række? Vh Lisbeth
03.02.2020 - 19:40DROPS Design answered:
Hej Lisbeth, ja hver gang du ser en skrå streg som går over 2 masker skal de strikkes sammen ifølge symbolforklaringen og der skal laves et omslag enten før eller efter de 2 masker som strikkes sammen. God fornøjelse!
11.02.2020 - 09:57
![]() Magdalena wrote:
Magdalena wrote:
Ich habe eine frage zu den raglanzunahmen, welche jeweils zwischen A1 und A2 stattfinden: werden diese in der nächsten Runde jeweils verschränkt gestrickt? (manchmal muss ich sie ja je nach muster links oder rechst stricken) vielen dank für ihre antwort!!
26.01.2020 - 12:27DROPS Design answered:
Liebe Magdalena, die Zunahmen für Raglan werden verschränkt gestrickt - siehe RAGLANZUNAHMEN, die neuen Maschen am Vorder- und Rückenteil werden glatt rechts gestrickt und an den Ärmeln wie im Muster A.2 gezeigt. Viel Spaß beim stricken!
27.01.2020 - 10:09
![]() Libellule wrote:
Libellule wrote:
Bonjour, j'aime bien les 4 modèles envoyés en premier même si le tricot n'est pas mon fort je préfère le crochet.... Moi c'est juste pour vous signaler une petite erreur dans la couleur... le coloris rouge brique ne porte pas le n° 19 c'est rouge brique mix 09, le 19 c'est brique uni colour 19, pas important mais comme j'aime bien cette laine elle se tricote comme un charme..je me suis fait une robe au crochet avec l'année dernière. Merci pour vos jolis modèles
16.01.2020 - 19:48DROPS Design answered:
Bonjour Libellule, merci pour votre message et votre vigilance - le nom de la couleur a été modifiée. Bon tricot!
17.01.2020 - 09:27
![]() BERTRAND wrote:
BERTRAND wrote:
Simple et joli !
16.01.2020 - 18:32
![]() Wenda Workman wrote:
Wenda Workman wrote:
I have a friend who is a very skilled knitter, having achieved his master knitter certificate. He discourages top down patterns. He states that they never fit well and always lose shape because there are no side seams to help hold the knitting. Is this true? And, could running a line of steeking where a side seam would be help to hold the shape of the garmet? I love so many of your top down patterns and want to get knitting! Thanks Wenda
15.01.2020 - 01:21DROPS Design answered:
Dear Mrs Workman, shape depends on yarn, pattern and tension of course. If you follow our patterns, you will get the look you see on the picture. But that's also true that when working some yarn you will get more hold if you make side seams, but it has nothing to do with topdown patterns. Join us in the DROPS Workshop to see others' projects. Happy knitting!
15.01.2020 - 10:02
![]() Cris wrote:
Cris wrote:
Trop joli !
12.01.2020 - 11:06
![]() Ilaria wrote:
Ilaria wrote:
Beautiful design, lavely colour. I like the cardigan
24.12.2019 - 11:18
![]() Luz wrote:
Luz wrote:
Elegante y femenino al mismo tiempo. Espero impaciente comenzarlo ya
23.12.2019 - 05:17
![]() Carmen wrote:
Carmen wrote:
Genial, elegante, muy ponible....
20.12.2019 - 09:51
![]() Carmen wrote:
Carmen wrote:
Genial, elegante, muy ponible.....
20.12.2019 - 09:50
|
||||||||||||||||||||||
Evening Glow#eveningglowsweater |
||||||||||||||||||||||
 |
 |
|||||||||||||||||||||
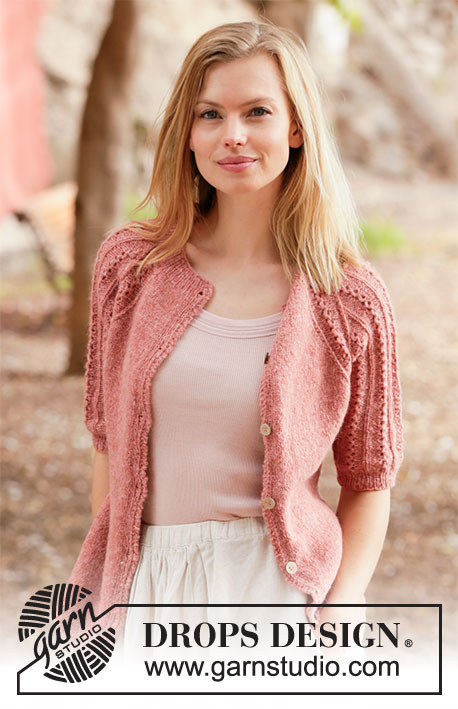
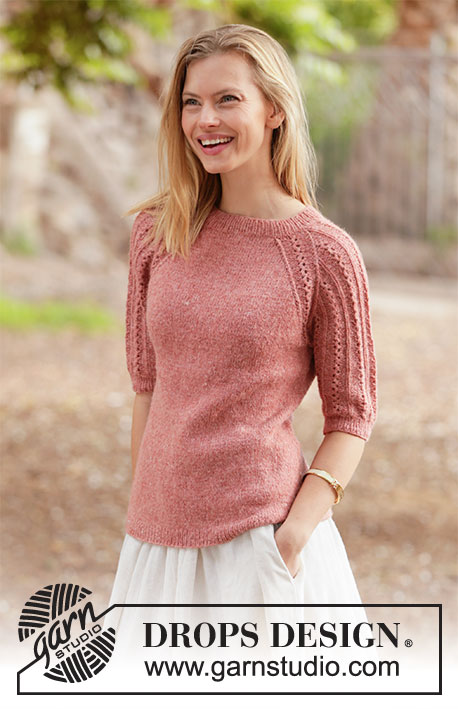
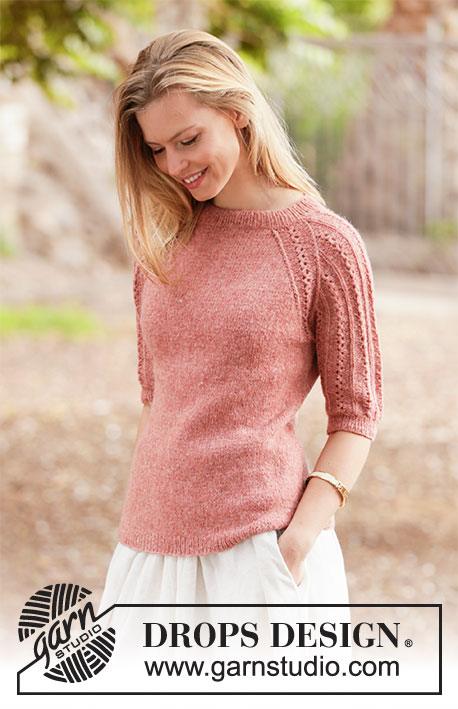
Knitted sweater in DROPS Sky. Piece is knitted top down with raglan and short sleeves with lace pattern. Size: S - XXXL
DROPS 212-1 |
||||||||||||||||||||||
|
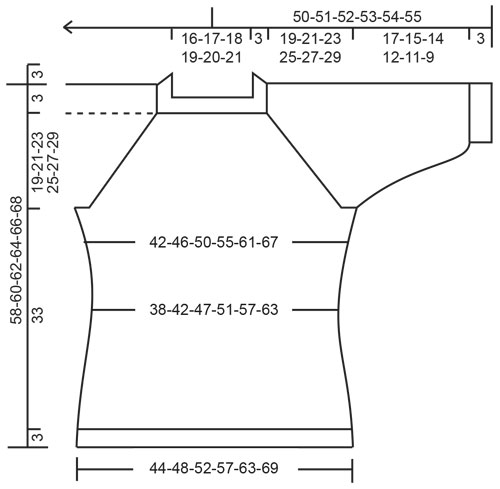
---------------------------------------------------------- EXPLANATION FOR THE PATTERN: ---------------------------------------------------------- INCREASE/DECREASE TIP (evenly): To calculate how to increase/decrease evenly, use the total number of stitches on row (e.g. 92 stitches) and divide stitches by number of increases/decreases to be done (e.g. 4) = 23. In this example increase by making 1 yarn over after every 23rd stitch. On next round work yarn overs twisted to avoid holes. To decrease in this example knit every 22nd and 23rd stitch together. PATTERN: See diagram A.1 (raglan line) and A.2 (pattern on sleeves). RAGLAN: Increase 1 stitch for raglan in each side of the 10 stitches in A.1 in every transition between front/back piece and sleeves (= 8 stitches increased in total on increase round). Increase 1 stitch by making 1 yarn over. On next round knit yarn overs twisted to avoid holes. Then work the new stitches in stockinette stitch on front and back piece and in A.2 on sleeves. DECREASE TIP-1 (applies to sides of body): Decrease 1 stitch on each side of marker thread as follows: Work until 3 stitches remain before marker thread, knit 2 together, knit 2 stitches (marker thread is between these 2 stitches), slip 1 stitch knitwise, knit 1, pass slipped stitch over stitch worked (= 2 stitches decreased). DECREASE TIP-2 (applies to mid under sleeves): Decrease 1 stitch on each side of marker thread as follows: Work until 3 stitches remain before marker thread, purl 2 together, purl 2 (marker thread is in the middle of these 2 stitches), purl 2 twisted together (= 2 stitches decreased). INCREASE TIP (applies to sides of body): Work until 1 stitch remains before marker thread, make 1 yarn over, knit 2 (marker thread is between these 2 stitches), make 1 yarn over (= 2 stitches increased). On next round knit yarn overs twisted to avoid holes. Then work the new stitches in stockinette stitch. BIND-OFF TIP: To avoid a tight bind-off edge you may use a larger needle size. If this also is too tight, work a 1 yarn over after approx. every 8th stitch while binding off (bind off yarn overs as regular stitches). ---------------------------------------------------------- START THE PIECE HERE: ---------------------------------------------------------- SWEATER - SHORT OVERVIEW OF THE PIECE: Work neck edge and yoke in the round on circular needle from mid back, top down. Now divide yoke for body and sleeves. Body is worked in the round from the side, top down. Work sleeves in the round on double pointed needles/short circular needle, top down. NECK EDGE: Cast on 92-96-100-106-110-114 stitches on circular needle size 3 mm = US 2,5 with Sky. Knit 1 round. Then work rib in the round (= knit 1/purl 1) for 3 cm = 1⅛". When rib is done, knit 1 round while increasing 4-8-8-6-2-6 stitches evenly - read DECREASE/INCREASE TIP = 96-104-108-112-112-120 stitches. Insert 1 marker in the middle of row (= mid front). Measure yoke from this marker. Switch to circular needle size 4 mm = US 6 and knit 1 round (knit all yarn overs twisted). Then work yoke as explained below. REMEMBER THE KNITTING GAUGE! YOKE: Insert 4 marker threads in piece as explained below (insert marker threads without working the stitches): Count 14-16-17-18-18-20 stitches (= ½ back piece), insert 1 marker thread before next stitch, count 20 stitches (= sleeve), insert 1 marker thread before next stitch, count 28-32-34-36-36-40 stitches (= front piece), insert 1 marker thread before next stitch, count 20 stitches (= sleeve), insert 1 marker thread before next stitch. 14-16-17-18-18-20 stitches remain on back piece after last marker thread. On next round begin pattern as explained below, AT THE SAME TIME increase for RAGLAN - read explanation above. I.e. work next round as follows: Work 9-11-12-13-13-15 stitches in stockinette stitch (= ½ back piece), increase 1 stitch for raglan, work A.1 (= 10 stitches – marker thread is in the middle of A.1), increase 1 stitch for raglan, work A.2 (= 10 stitches), increase 1 stitch for raglan, work A.1 (= 10 stitches – marker thread is in the middle of A.1), increase 1 stitch for raglan, work 18-22-24-26-26-30 stitches in stockinette stitch (= front piece), increase 1 stitch for raglan, work A.1 (= 10 stitches – marker thread is in the middle of A.1), increase 1 stitch for raglan, work A.2 (= 10 stitches), increase 1 stitch for raglan, work A.1 (= 10 stitches – marker thread is in the middle of A.1), increase 1 stitch for raglan, work 9-11-12-13-13-15 stitches in stockinette stitch (= ½ back piece). Continue pattern like this, and increase for raglan every other round 23-25-29-33-37-40 times in total (including increases explained on first round. NOTE! Work the increased stitches on sleeves in pattern until there are 5-5-7-7-7-7 repetitions in width over sleeve (see star in diagram that marks 1 repetition), then purl the next increased stitches until finished measurements (A.2 shows sleeve with all increases in size S). After last increase for raglan there are 280-304-340-376-408-440 stitches on needle. Work without increases until piece measures 19-21-23-25-27-29 cm = 7½"-8¼"-9"-9¾"-10⅝"-11⅜" from marker by the neck. Now divide yoke for body and sleeves, i.e. work last round as follows: Work 40-44-49-54-60-66 stitches in stockinette stitch (= ½ back piece), slip the next 60-64-72-80-84-88 stitches on 1 stitch holder, cast on 8 new stitches on needle (= in the side under sleeve), work 80-88-98-108-120-132 stitches in stockinette stitch (= front piece), slip the next 60-64-72-80-84-88 stitches on 1 stitch holder, cast on 8 new stitches on needle (= in the side under sleeve) and work the remaining 40-44-49-54-60-66 stitches in stockinette stitch (= ½ back piece). Cut the yarn. Finish body and sleeves separately. BODY: = 176-192-212-232-256-280 stitches. Insert 1 marker thread in each side on body, in the middle of the 8 stitches cast on under each sleeve= 88-96-106-116-128-140 stitches between marker threads. Move the marker threads upwards when working; they should be used for increase and decrease later in the sides on body. Work in stockinette stitch in the round. When piece measures 3 cm = 1⅛" from division, decrease 1 stitch on each side of both marker threads - read DECREASE TIP-1 (= 4 stitches decreased). Decrease like this every 3 cm = 1⅛" 4 times in total in each side = 160-176-196-216-240-264 stitches. Work until piece measures 16 cm = 6¼" from division. On next round increase 1 stitch on each side of both marker threads – read INCREASE TIP (= 4 stitches increased). Increase like this every 2½ cm = ⅞" 6 times in total in each side = 184-200-220-240-264-288 stitches. Work until piece measures 33 cm = 13" from division (approx. 3 cm = 1⅛" remain until finished measurements, try the sweater on and work to desired length). Switch to circular needle size 3 mm = US 2,5. Knit 1 round while increasing 36-40-44-48-52-58 stitches evenly - read INCREASE/DECREASE TIP = 220-240-264-288-316-346 stitches. Work rib in the round = knit 1/purl 1 for 3 cm = 1⅛". Bind off with knit over knit and purl over purl - read BIND-OFF TIP. Sweater measures approx. 58-60-62-64-66-68 cm = 22¾"-23⅝"-24⅜"-25¼"-26"-26¾" from shoulder and down. SLEEVES: Slip the 60-64-72-80-84-88 stitches from stitch holder in one side of piece on double pointed needles or a short circular needle size 4 mm = US 6, and pick in addition up 1 stitch in each of the 8 stitches cast on under sleeve = 68-72-80-88-92-96 stitches. Insert 1 marker thread in the middle of the 8 stitches cast on under sleeve. Move the marker thread upwards when working; it should be used for decrease mid under sleeve. Begin round at the marker thread and continue pattern in the round with A.2 over the middle 46-46-64-64-64-64 stitches, and purl the remaining 22-26-16-24-28-32 stitches mid under sleeve. When sleeve measures 2 cm = ¾" from division in all sizes, decrease 2 stitches mid under sleeve - read DECREASE TIP-2. Decrease like this every 3-2-1½-1-½-½ cm = 1⅛"-¾"-½"-⅜"-⅛"-⅛" 5-6-8-10-12-13 times in total = 58-60-64-68-68-70 stitches. Work until sleeve measures 17-15-14-12-11-9 cm = 6¾"-6"-5½"-4¾"-4⅜"-3½" from division (approx. 3 cm = 1⅛" remain until finished measurements, try the sweater on and work to desired length). NOTE! Shorter measurements in the larger sizes because of wider neck and longer yoke. Knit 1 round while decreasing 6-6-8-10-8-8 stitches evenly - remember INCREASE/DECREASE TIP = 52-54-56-58-60-62 stitches. Switch to double pointed needles size 3 mm = US 2,5. Work rib in the round = knit 1/purl 1 for 3 cm = 1⅛". Bind off with knit over knit and purl over purl - read BIND-OFF TIP. Work the other sleeve the same way. |
||||||||||||||||||||||
Diagram explanations |
||||||||||||||||||||||
|
||||||||||||||||||||||
 |
||||||||||||||||||||||
 |
||||||||||||||||||||||
Have you finished this pattern?Tag your pictures with #dropspattern #eveningglowsweater or submit them to the #dropsfan gallery. Do you need help with this pattern?You'll find 25 tutorial videos, a Comments/Questions area and more by visiting the pattern on garnstudio.com. © 1982-2026 DROPS Design A/S. We reserve all rights. This document, including all its sub-sections, has copyrights. Read more about what you can do with our patterns at the bottom of each pattern on our site. |
||||||||||||||||||||||


With over 40 years in knitting and crochet design, DROPS Design offers one of the most extensive collections of free patterns on the internet - translated to 17 languages. As of today we count 325 catalogs and 12298 patterns - 12288 of which are translated into English (US/in).
We work hard to bring you the best knitting and crochet have to offer, inspiration and advice as well as great quality yarns at incredible prices! Would you like to use our patterns for other than personal use? You can read what you are allowed to do in the Copyright text at the bottom of all our patterns. Happy crafting!
Post a comment to pattern DROPS 212-1
We would love to hear what you have to say about this pattern!
If you want to leave a question, please make sure you select the correct category in the form below, to speed up the answering process. Required fields are marked *.