
Looking for a yarn?


Comments / Questions (59)
![]() Peggy Mendez wrote:
Peggy Mendez wrote:
I'm adding short rows to this pattern, but struggling with how to work the sleeve pattern in the charts. Would I read the charts from right to left on the purl rows and reverse the stitches? Also, how would I reverse the slip 1 knitwise, k1, pass stitch over, Yarn over? I tried but it didn't come out correctly.
09.05.2025 - 17:20DROPS Design answered:
Dear Peggy, if you are working back and forth you need to read from left to right on purl side rows and reverse the stitches; you can take inspiration from the jacket versionof this pattern. The lace pattern is worked in right side rows, while in purl rows you only need to knit or purl (check that the rows on the right side always have the lace pattern; otherwise it will be difficult to adapt the short rows to the charts). Happy knitting!
11.05.2025 - 00:17
![]() Peggy Mendez wrote:
Peggy Mendez wrote:
Hello, I am getting ready to begin this pattern but I would like to add short rows. I'm not sure how I can do this with the raglan and chart patterns. Can anyone help me please?
08.05.2025 - 00:51DROPS Design answered:
Dear Mrs Mendez, you can take inspiration from this video showing how to work short rows for a neckline (you would have to start pattern at the same time as explained in this pattern as in the video it is worked only in stocking stitch). Happy knitting!
08.05.2025 - 09:47
![]() Marit Ellefseth wrote:
Marit Ellefseth wrote:
Hva er målene på denne genseren, overvidde?
01.01.2025 - 16:22DROPS Design answered:
Hei Marit. Alle mål til denne genseren finner du på målskissen nederst i oppskriften. mvh DROPS Design
07.01.2025 - 09:49
![]() Brigitte wrote:
Brigitte wrote:
Bei der Aufteilung der Maschen nach der Passe, gehört A1 zum Rumpfteil oder zu den Ärmeln?
31.12.2024 - 14:08
![]() Brigitte wrote:
Brigitte wrote:
Bei der Aufteilung der Maschen nach der Passe, gehört A1 zum Rumpfteil oder zu den Ärmeln?
31.12.2024 - 14:06
![]() Cecilia wrote:
Cecilia wrote:
Bonjour , après le rang 1 du motif, faut-il tricoter les augmentations à l'envers? Les augmentations pour les raglans sont à faire tous les deux rangs? Merci pour vos réponses. Amicalement
08.09.2024 - 21:15DROPS Design answered:
Bonjour Cécilia, les augmentations des raglans des manches se tricotent en point fantaisie comme indiqué dans le diagramme A.2 et celles du devant et du dos se tricotent en jersey (les jetés se tricotent torse à l'endroit au 1er tour pour éviter un trou). Vous augmentez effectivement tous les 2 tours. Bon tricot!
09.09.2024 - 10:49
![]() Nancy wrote:
Nancy wrote:
Hi, thanks for the previous reply, this is my first time knitting a sweater! Having slipped stitches onto a stitch holder, I am now at the next step where it tells me to cut the yarn. I don’t really understand what the purpose of this is. Could you please explain?
23.04.2024 - 22:49DROPS Design answered:
Hi Nancy, While working the yoke each round starts and finishes mid-back. When the yoke is finished and you have divided for the sleeves and body, the body is continued in the round, but each round now starts and finishes on one side, by the marker. This is why it is necessary to cut the strand. Happy knitting!
24.04.2024 - 06:41
![]() Nancy wrote:
Nancy wrote:
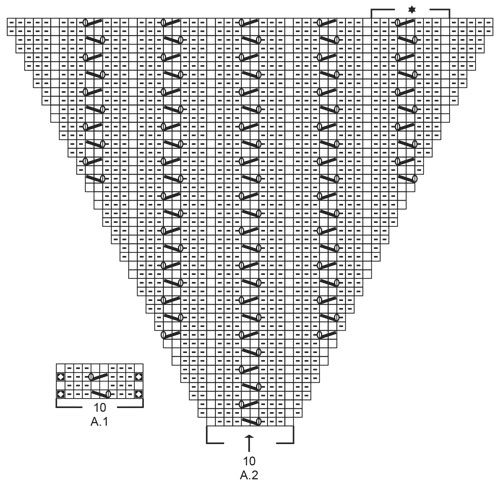
Hi, I’m just finishing off the yoke, and I’m a little confused where I should divide up the sleeves. It says in the pattern to work (for medium size) 44 stitches before slipping 64 on a stitch holder. However, having increased for raglan 25 times, I now have 41 stitches in between marker 1 (halfway through the back) and marker 2 (start of the sleeve). This would put the 44 stitches somewhere just beyond the middle of the A1 pattern. Is this correct?
16.04.2024 - 01:04DROPS Design answered:
Dear Nancy, the last 3 sts of A.1 before 1st sleeve belong to the sleeve by dividing and then the last 3 sts of A.1 before front piece belong to front piece by dividing, ie division is not made before/after A.1, but the first/last 3 sts in A.1 belongs to the sleeve while the first /last 7 sts belong to front/back piece. Happy knitting!
16.04.2024 - 08:18
![]() Eva Gaspar wrote:
Eva Gaspar wrote:
Hello team! I would like to have the sleeves longer. I am knitting this pattern in M size. Can I decrease in larger steps (not every 2 cm) so I have a longer sleeve ? will this logic work?
15.01.2024 - 12:28DROPS Design answered:
Dear Mrs Gaspar, you can take inspiration from similar garment with same tension and desired length for sleeves to adjust the required decreases. Happy knitting!
15.01.2024 - 16:16
![]() Carmen wrote:
Carmen wrote:
Hallo, ik probeer deze trui in maat L te maken . Ik heb de naald waar het patroon begon (12 steken in tricot , A1,A2 etc en als laatste weer 12 steken in tricot afgerond waardoor ik moet Met de volgende naald beginnen. Voor mij is onduidelijk of ik nu weer 12 steken in tricot moet breien en vervolgens A1,A2 etc en weer einde met 12 steken tricot of moet ik met verder met patroon A1,A2 etc. En einde met 12 steken tricot . Graag advies . Alvast mijn dank. Groet Carme
14.11.2023 - 17:39DROPS Design answered:
Dag Carmen,
Ja, je gaat gewoon zo verder in patroon, dus weer 12 tricotsteken aan het begin en het einde en de telpatronen ertussen, etc.
15.11.2023 - 13:45
|
||||||||||||||||||||||
Evening Glow#eveningglowsweater |
||||||||||||||||||||||
 |
 |
|||||||||||||||||||||
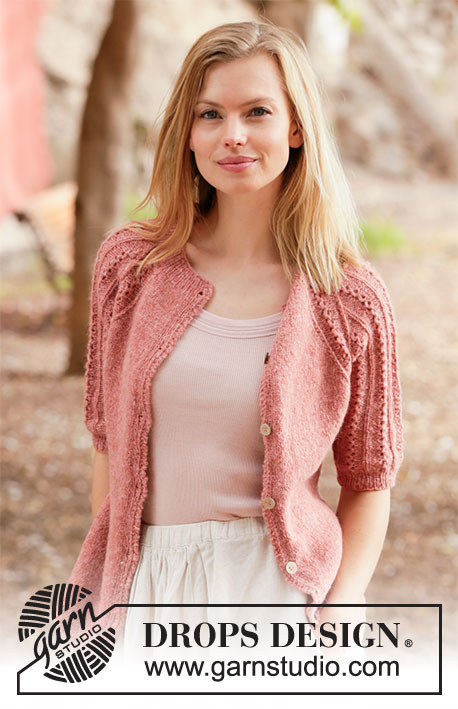
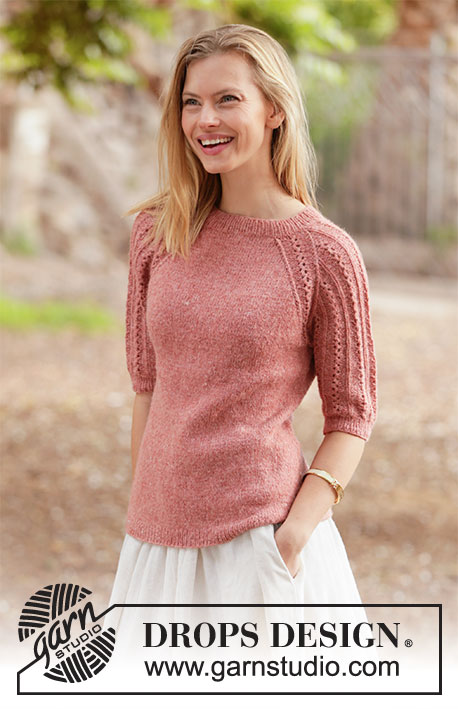
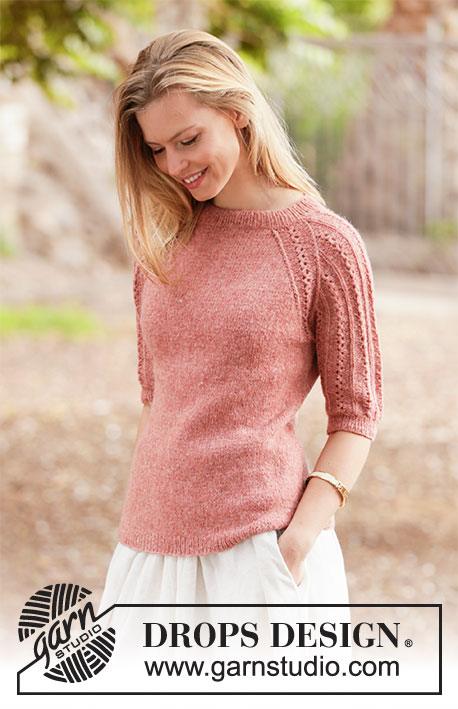
Knitted sweater in DROPS Sky. Piece is knitted top down with raglan and short sleeves with lace pattern. Size: S - XXXL
DROPS 212-1 |
||||||||||||||||||||||
|
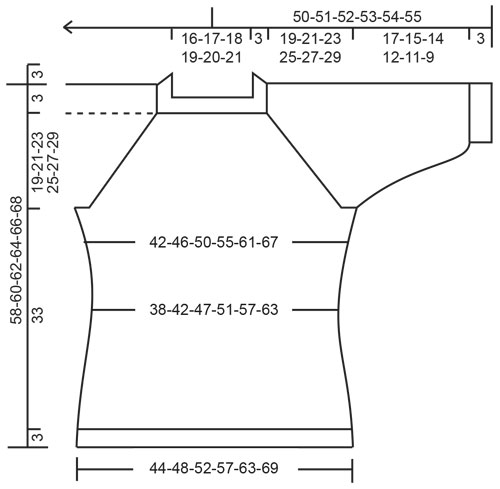
---------------------------------------------------------- EXPLANATION FOR THE PATTERN: ---------------------------------------------------------- INCREASE/DECREASE TIP (evenly): To calculate how to increase/decrease evenly, use the total number of stitches on row (e.g. 92 stitches) and divide stitches by number of increases/decreases to be done (e.g. 4) = 23. In this example increase by making 1 yarn over after every 23rd stitch. On next round work yarn overs twisted to avoid holes. To decrease in this example knit every 22nd and 23rd stitch together. PATTERN: See diagram A.1 (raglan line) and A.2 (pattern on sleeves). RAGLAN: Increase 1 stitch for raglan in each side of the 10 stitches in A.1 in every transition between front/back piece and sleeves (= 8 stitches increased in total on increase round). Increase 1 stitch by making 1 yarn over. On next round knit yarn overs twisted to avoid holes. Then work the new stitches in stockinette stitch on front and back piece and in A.2 on sleeves. DECREASE TIP-1 (applies to sides of body): Decrease 1 stitch on each side of marker thread as follows: Work until 3 stitches remain before marker thread, knit 2 together, knit 2 stitches (marker thread is between these 2 stitches), slip 1 stitch knitwise, knit 1, pass slipped stitch over stitch worked (= 2 stitches decreased). DECREASE TIP-2 (applies to mid under sleeves): Decrease 1 stitch on each side of marker thread as follows: Work until 3 stitches remain before marker thread, purl 2 together, purl 2 (marker thread is in the middle of these 2 stitches), purl 2 twisted together (= 2 stitches decreased). INCREASE TIP (applies to sides of body): Work until 1 stitch remains before marker thread, make 1 yarn over, knit 2 (marker thread is between these 2 stitches), make 1 yarn over (= 2 stitches increased). On next round knit yarn overs twisted to avoid holes. Then work the new stitches in stockinette stitch. BIND-OFF TIP: To avoid a tight bind-off edge you may use a larger needle size. If this also is too tight, work a 1 yarn over after approx. every 8th stitch while binding off (bind off yarn overs as regular stitches). ---------------------------------------------------------- START THE PIECE HERE: ---------------------------------------------------------- SWEATER - SHORT OVERVIEW OF THE PIECE: Work neck edge and yoke in the round on circular needle from mid back, top down. Now divide yoke for body and sleeves. Body is worked in the round from the side, top down. Work sleeves in the round on double pointed needles/short circular needle, top down. NECK EDGE: Cast on 92-96-100-106-110-114 stitches on circular needle size 3 mm = US 2,5 with Sky. Knit 1 round. Then work rib in the round (= knit 1/purl 1) for 3 cm = 1⅛". When rib is done, knit 1 round while increasing 4-8-8-6-2-6 stitches evenly - read DECREASE/INCREASE TIP = 96-104-108-112-112-120 stitches. Insert 1 marker in the middle of row (= mid front). Measure yoke from this marker. Switch to circular needle size 4 mm = US 6 and knit 1 round (knit all yarn overs twisted). Then work yoke as explained below. REMEMBER THE KNITTING GAUGE! YOKE: Insert 4 marker threads in piece as explained below (insert marker threads without working the stitches): Count 14-16-17-18-18-20 stitches (= ½ back piece), insert 1 marker thread before next stitch, count 20 stitches (= sleeve), insert 1 marker thread before next stitch, count 28-32-34-36-36-40 stitches (= front piece), insert 1 marker thread before next stitch, count 20 stitches (= sleeve), insert 1 marker thread before next stitch. 14-16-17-18-18-20 stitches remain on back piece after last marker thread. On next round begin pattern as explained below, AT THE SAME TIME increase for RAGLAN - read explanation above. I.e. work next round as follows: Work 9-11-12-13-13-15 stitches in stockinette stitch (= ½ back piece), increase 1 stitch for raglan, work A.1 (= 10 stitches – marker thread is in the middle of A.1), increase 1 stitch for raglan, work A.2 (= 10 stitches), increase 1 stitch for raglan, work A.1 (= 10 stitches – marker thread is in the middle of A.1), increase 1 stitch for raglan, work 18-22-24-26-26-30 stitches in stockinette stitch (= front piece), increase 1 stitch for raglan, work A.1 (= 10 stitches – marker thread is in the middle of A.1), increase 1 stitch for raglan, work A.2 (= 10 stitches), increase 1 stitch for raglan, work A.1 (= 10 stitches – marker thread is in the middle of A.1), increase 1 stitch for raglan, work 9-11-12-13-13-15 stitches in stockinette stitch (= ½ back piece). Continue pattern like this, and increase for raglan every other round 23-25-29-33-37-40 times in total (including increases explained on first round. NOTE! Work the increased stitches on sleeves in pattern until there are 5-5-7-7-7-7 repetitions in width over sleeve (see star in diagram that marks 1 repetition), then purl the next increased stitches until finished measurements (A.2 shows sleeve with all increases in size S). After last increase for raglan there are 280-304-340-376-408-440 stitches on needle. Work without increases until piece measures 19-21-23-25-27-29 cm = 7½"-8¼"-9"-9¾"-10⅝"-11⅜" from marker by the neck. Now divide yoke for body and sleeves, i.e. work last round as follows: Work 40-44-49-54-60-66 stitches in stockinette stitch (= ½ back piece), slip the next 60-64-72-80-84-88 stitches on 1 stitch holder, cast on 8 new stitches on needle (= in the side under sleeve), work 80-88-98-108-120-132 stitches in stockinette stitch (= front piece), slip the next 60-64-72-80-84-88 stitches on 1 stitch holder, cast on 8 new stitches on needle (= in the side under sleeve) and work the remaining 40-44-49-54-60-66 stitches in stockinette stitch (= ½ back piece). Cut the yarn. Finish body and sleeves separately. BODY: = 176-192-212-232-256-280 stitches. Insert 1 marker thread in each side on body, in the middle of the 8 stitches cast on under each sleeve= 88-96-106-116-128-140 stitches between marker threads. Move the marker threads upwards when working; they should be used for increase and decrease later in the sides on body. Work in stockinette stitch in the round. When piece measures 3 cm = 1⅛" from division, decrease 1 stitch on each side of both marker threads - read DECREASE TIP-1 (= 4 stitches decreased). Decrease like this every 3 cm = 1⅛" 4 times in total in each side = 160-176-196-216-240-264 stitches. Work until piece measures 16 cm = 6¼" from division. On next round increase 1 stitch on each side of both marker threads – read INCREASE TIP (= 4 stitches increased). Increase like this every 2½ cm = ⅞" 6 times in total in each side = 184-200-220-240-264-288 stitches. Work until piece measures 33 cm = 13" from division (approx. 3 cm = 1⅛" remain until finished measurements, try the sweater on and work to desired length). Switch to circular needle size 3 mm = US 2,5. Knit 1 round while increasing 36-40-44-48-52-58 stitches evenly - read INCREASE/DECREASE TIP = 220-240-264-288-316-346 stitches. Work rib in the round = knit 1/purl 1 for 3 cm = 1⅛". Bind off with knit over knit and purl over purl - read BIND-OFF TIP. Sweater measures approx. 58-60-62-64-66-68 cm = 22¾"-23⅝"-24⅜"-25¼"-26"-26¾" from shoulder and down. SLEEVES: Slip the 60-64-72-80-84-88 stitches from stitch holder in one side of piece on double pointed needles or a short circular needle size 4 mm = US 6, and pick in addition up 1 stitch in each of the 8 stitches cast on under sleeve = 68-72-80-88-92-96 stitches. Insert 1 marker thread in the middle of the 8 stitches cast on under sleeve. Move the marker thread upwards when working; it should be used for decrease mid under sleeve. Begin round at the marker thread and continue pattern in the round with A.2 over the middle 46-46-64-64-64-64 stitches, and purl the remaining 22-26-16-24-28-32 stitches mid under sleeve. When sleeve measures 2 cm = ¾" from division in all sizes, decrease 2 stitches mid under sleeve - read DECREASE TIP-2. Decrease like this every 3-2-1½-1-½-½ cm = 1⅛"-¾"-½"-⅜"-⅛"-⅛" 5-6-8-10-12-13 times in total = 58-60-64-68-68-70 stitches. Work until sleeve measures 17-15-14-12-11-9 cm = 6¾"-6"-5½"-4¾"-4⅜"-3½" from division (approx. 3 cm = 1⅛" remain until finished measurements, try the sweater on and work to desired length). NOTE! Shorter measurements in the larger sizes because of wider neck and longer yoke. Knit 1 round while decreasing 6-6-8-10-8-8 stitches evenly - remember INCREASE/DECREASE TIP = 52-54-56-58-60-62 stitches. Switch to double pointed needles size 3 mm = US 2,5. Work rib in the round = knit 1/purl 1 for 3 cm = 1⅛". Bind off with knit over knit and purl over purl - read BIND-OFF TIP. Work the other sleeve the same way. |
||||||||||||||||||||||
Diagram explanations |
||||||||||||||||||||||
|
||||||||||||||||||||||
|
||||||||||||||||||||||
|
||||||||||||||||||||||
Have you finished this pattern?Tag your pictures with #dropspattern #eveningglowsweater or submit them to the #dropsfan gallery. Do you need help with this pattern?You'll find 25 tutorial videos, a Comments/Questions area and more by visiting the pattern on garnstudio.com. © 1982-2025 DROPS Design A/S. We reserve all rights. This document, including all its sub-sections, has copyrights. Read more about what you can do with our patterns at the bottom of each pattern on our site. |
||||||||||||||||||||||


With over 40 years in knitting and crochet design, DROPS Design offers one of the most extensive collections of free patterns on the internet - translated to 17 languages. As of today we count 314 catalogs and 11821 patterns - 11811 of which are translated into English (US/in).
We work hard to bring you the best knitting and crochet have to offer, inspiration and advice as well as great quality yarns at incredible prices! Would you like to use our patterns for other than personal use? You can read what you are allowed to do in the Copyright text at the bottom of all our patterns. Happy crafting!
Post a comment to pattern DROPS 212-1
We would love to hear what you have to say about this pattern!
If you want to leave a question, please make sure you select the correct category in the form below, to speed up the answering process. Required fields are marked *.