
Popular categories
Looking for a yarn?


Comments / Questions (36)
![]() Cynthia Ward wrote:
Cynthia Ward wrote:
I don't understand how ours line up if I follow the instructions and chart, especially after adding stitches. I'm where it says "repeat this increase when the piece measures 30 cm = 11 3/4” = 216-240-264-288-320-352 stitches on the needle, purl the 2 stitches with the marking thread between them. Continue the pattern as before. My piece measures this at the 3 knitted rows. It doesn't respect the chart if I add purls here???? 30 years knitting and this pattern lacks vital info.
07.05.2021 - 22:27DROPS Design answered:
Dear Cynthia, the stitches increased on the sides will be knitted with sticting stitch, until the increas at 30 cm, then you will purl 1 stitch before and 1 stitch after the marker. These stitches are not incorporated in the pattern, but knitted on two sides of the stitches knitted with the pattern. Happy Knitting!
07.05.2021 - 23:02
![]() Hanne Petterson wrote:
Hanne Petterson wrote:
Er det sømandsbobler i denne opskrift, eller? Kan ikke forstå hvordan diagrammet skal blive til boblerne.
22.03.2021 - 09:48DROPS Design answered:
Hei Hanna. Ingen sømandsbobler, men strukturmønster strikket etter diagram A.1, som gir et lite boblete utseende. mvh DROPS design
22.03.2021 - 14:06
![]() Michelle Westcott wrote:
Michelle Westcott wrote:
Hi, can you please explain putting stitches into a thread and working these first so as not to cut the strand. Many thanks
16.03.2021 - 22:35DROPS Design answered:
Dear Michelle, it means, that forst, you knit the stitches, then, put the stitches already knitted on a stitchholder or a piece of yarn. This way, you will not have to cut the yarn, but can countinue to knit with it for the rest of the row. Happy Knitting!
17.03.2021 - 01:31
![]() Gerdine wrote:
Gerdine wrote:
In dit patroon meldt u bij “lijf” dat er voor armsgat 3st en 6 st afgekant moeten worden en dan weer 3 st. Maar bij beschrijving achterpand staat ook datje moet afkanten voor armsgat. Welke moet ik aanhouden? Dank voor uw reactie, Mvg Gerdine
18.02.2021 - 20:39DROPS Design answered:
Dag Gerdine,
Dat klopt. Je breit eerst het lijf in de rondte, dus de voor- en achterpand tegelijkertijd. Een toer begint in de zijnaad. Wanneer je begint met afkanten voor het armsgat kant je eerst 3 steken af voor het rechter armsgat dan 6 steken voor het linker armsgat en aan het eind van de toer de andere 3 steken voor het rechter armsgat. Vervolgens brei je de voor- en achterpanden apart verder, waarbij je tevens afkant voor de armsgaten. Dus je moet beide aanhouden.
02.03.2021 - 09:01
![]() Merete Henrichsen wrote:
Merete Henrichsen wrote:
Jeg har strikket denne model . Garn og færdigt mål helt rigtigt. Men- efter at have vasket den i hånden, rullet den i et håndklæde og tørret den fladt, er den blevet 1/2 gang større. Altså ubrugelig. Jeg har gjort den våd igen og prøvet at ´modellere´ den i målene efter tegningen på opskriften - et kæmpe arbejde og temmelig umuligt, Hvad har jeg gjort forkert? Jeg er meget spændt på svaret, da jeg har strikket 2 bluser mere af samme garn, men endnu ikke vasket dem.
02.11.2020 - 11:26DROPS Design answered:
Hej Merete, det er vigtigt at du følger vaskeanvisningen som står både på banderolen og på farvekortet. Det er muligt at du kan redde fibrene, hvis du prøver igen og følger anvisningen. Se her: DROPS BabyMerino - vask Held og lykke!
03.11.2020 - 15:31
![]() Helinä Ängeslevä wrote:
Helinä Ängeslevä wrote:
Mitä tarkoitetaan Mallineuleen kohdassa korkeus 20 cm ja tehdään 2 ja 2 silmukan lisäykset . Näillä 4 silmukalla neulotaa sileää. Miten käy mallikuvion kun lisätään silmukoita?
24.08.2020 - 22:32DROPS Design answered:
Lisätyillä silmukoilla neulotaan sileää neuletta, kunnes seuraavat lisäykset on tehty. Tämän jälkeen myös lisätyillä silmukoilla neulotaan mallineuletta.
08.12.2020 - 18:31
![]() Erika wrote:
Erika wrote:
Ik volg het telpatroontje maar ik krijg geen puff. Wat doe ik verkeerd?
13.08.2020 - 15:42DROPS Design answered:
Dag Erika,
Helaas kan ik niet meekijken wat er precies mis gaat waardoor je geen puffsteek krijgt. In het telpatroon worden alle naalden en steken aangegeven. Dus je breit 3 naalden met steeds 2 recht, 2 averecht. Dan 3 naalden alle steken recht. Dan 3 naalden met 2 averecht, 2 recht, enzovoort.
17.08.2020 - 21:20
![]() Guiselle wrote:
Guiselle wrote:
Hello. When you say increase till it measures 18 cm, do I have to do the increase in each round or only in the first one and then knit normal. Thanks
16.04.2020 - 13:43DROPS Design answered:
Dear Guiselle, when piece measures 10 cm, you increase 1 st on each side of both marker threads = you increase a total of 4 sts. Then work over these stitches until piece measures 18 cm. Now knit 1 round while increasing evenly on front + on back piec e= you should now have 208 to 344 depending on the size. This is only 1 increase round when piece measures 18 cm. You then increase on marker threads when piece measures 20 cm. Happy knitting!
16.04.2020 - 13:53
![]() Guiselle wrote:
Guiselle wrote:
How I increase with no hole ? I’m doing the first increasing in the body. Sorry I’m pretty new. Thanks
15.04.2020 - 19:31DROPS Design answered:
Hi Guiselle, You increase by making a yarn over the right needle. On the next round work the yarn over twisted (work in the back loop of the yarn over) to avoid holes. Happy knitting!
16.04.2020 - 07:25
![]() Bettina Rix wrote:
Bettina Rix wrote:
Jeg kan stadig ikke forstå hvordan jeg skal strikke de 4 masker i udtagningen, nu har jeg taget ud efter nye de udtagningsregler men jeg kan stadig ikke få de 4 udtagne masker til at passe ind i mønsteret
07.03.2020 - 13:50DROPS Design answered:
Hej Bettina, første gang du tager ud strikkes de nye masker i glatstrik, næste gang du tager ud, er der nok masker til at de kan strikkes ind i mønsteret. Sørg for at du udgår fra mønsteret på for og bagstykket. Dvs når det ikke stemmer i siden skal det strikkes i glatstrik. God fornøjelse!
10.03.2020 - 09:28
|
|||||||
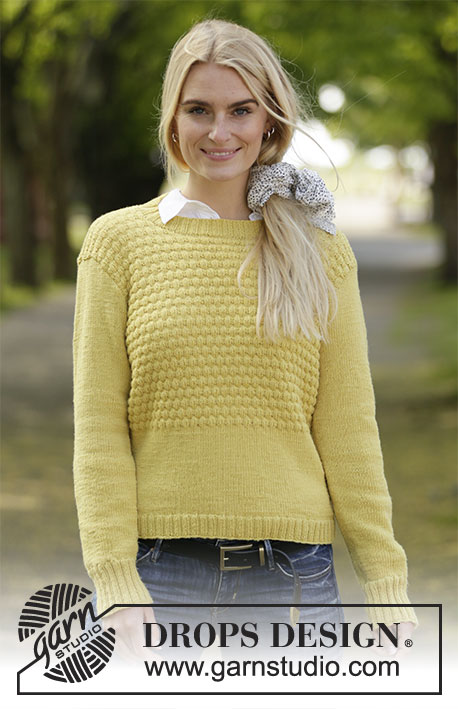
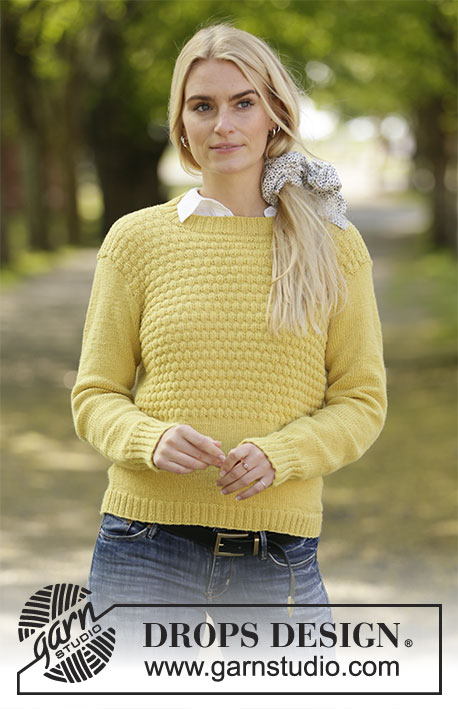
Golden Puffs#goldenpuffssweater |
|||||||
 |
 |
||||||
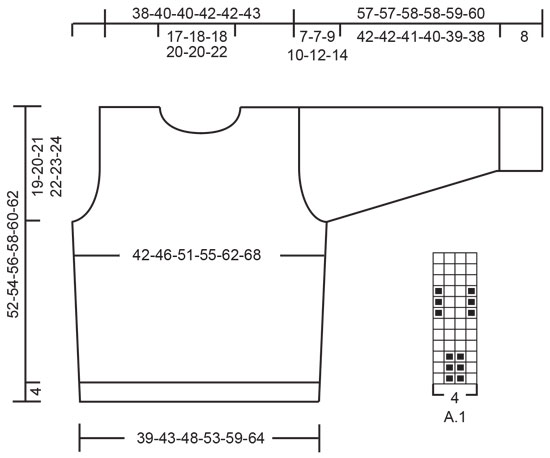
Knitted sweater in DROPS BabyMerino. The piece is worked in stockinette stitch with textured pattern. Sizes S - XXXL.
DROPS 207-17 |
|||||||
|
------------------------------------------------------- EXPLANATIONS FOR THE PATTERN: ------------------------------------------------------- PATTERN: See diagram A.1. The diagram shows all the rows in the pattern seen from the right side. DECREASE/INCREASE TIP (evenly spaced): To work out how to decrease/increase evenly, count the total number of stitches on needle (e.g. 232 stitches) and divide by the number of decreases/increases to be made (e.g. 44) = 5.3. In this example, decrease by working together approx. each 4th and 5th stitch. When increasing make1 yarn over after approx. each 5th stitch. On the next round work the yarn overs twisted to avoid holes. INCREASE TIP (for sides of body and mid under sleeves): Work until there are 3 stitches left before marker thread, 1 yarn over, knit 6 (marker thread sits in middle of these 6 stitches), 1 yarn over (= 2 stitches increased). On the next round work the yarn overs twisted to avoid holes. Then work the new stitches in stockinette stitch/textured pattern. ------------------------------------------------------- START THE PIECE HERE: ------------------------------------------------------- SWEATER – SHORT OVERVIEW OF THE PIECE: The piece is worked in the round, bottom up as far as the armholes, then the front and back pieces are finished separately, back and forth with circular needle. The sleeves are worked in the round with double pointed needles/short circular needle, bottom up. BODY: Cast on 232-260-288-312-352-384 stitches with circular needle size 2.5 mm = US 1,5 and BabyMerino. Knit 1 round then work rib in the round (= knit 2/ purl 2) for 4 cm = 1½". Knit 1 round where you decrease 44-52-56-60-68-76 stitches evenly spaced – read DECREASE/INCREASE TIP = 188-208-232-252-284-308 stitches. Insert 1 marker thread at the beginning of the round and 1 marker thread after 94-104-116-126-142-154 stitches and allow them to follow your work onwards; they will be used when increasing in the sides. Change to circular needle size 3 mm = US 2,5 and work stockinette stitch in the round. REMEMBER THE KNITTING GAUGE! When the piece measures 10 cm = 4" in all sizes increase 1 stitch on each sides of both marker threads – read INCREASE TIP = 192-212-236-256-288-312 stitches. When the piece measures 18 cm = 7" in all sizes knit 1 round where you increase 16-20-20-24-24-32 stitches evenly spaced (i.e. increase 8-10-10-12-12-16 stitches on the front piece and 8-10-10-12-12-16 stitches on the back piece) = 208-232-256-280-312-344 stitches. Then work A.1 in the round. AT THE SAME TIME when the piece measures 20 cm = 8", increase 1 stitch on each side of both marker threads – remember INCREASE TIP (= 4 stitches increased). These 4 stitches are worked in stockinette stitch until next increase in each side. Repeat this increase when the piece measures 30 cm = 11¾" = 216-240-264-288-320-352 stitches on the needle, purl the 2 stitches with the marking thread between them. Continue the pattern as before. When the piece measures 33-34-35-36-37-38 cm = 13"-13⅜"-13¾"-14¼"-14½"-15", bind off for the armholes; i.e. the next round is worked as follows: Bind off 3 stitches for the armhole, continue pattern as before over the next 102-114-126-138-154-170 stitches, bind off 6 stitches for the armhole, continue pattern as before over the next 102-114-126-138-154-170 stitches and bind off the last 3 stitches for the armhole. Cut the strand. The front and back pieces are finished separately. BACK PIECE: = 102-114-126-138-154-170 stitches. Continue the pattern as before and bind off stitches for the armholes at the start of the rows in each side as follows: Bind off 3 stitches 0-1-1-1-1-1 time in each side, bind off 2 stitches 0-0-2-3-5-7 times in each side and bind off 1 stitch 1-2-4-6-10-12 times in each side = 100-104-104-108-108-112 stitches left. Continue the pattern as before. When the piece measures 50-52-54-56-58-60 cm = 19¾"-20½"-21¼"-22"-22¾"-23⅝", bind off the middle 40-44-44-48-48-52 stitches for the neck and each shoulder is finished separately. Continue the pattern and bind off 2 stitches on the next row from the neck = 28 stitches left on the shoulder in all sizes. Continue working until the piece measures 51-53-55-57-59-61 cm = 20"-21"-21⅝"-22½"-23¼"-24". Knit 1 row from the wrong side and then bind off with knit from the right side. Work the other shoulder in the same way. The sweater measures approx. 52-54-56-58-60-62 cm = 20½"-21¼"-22"-22¾"-23⅝"-24⅜" from the shoulder down. FRONT PIECE: = 102-114-126-138-154-170 stitches. Continue the pattern as before and bind off stitches for the armholes at the beginning of each row in each side as follows: Bind off 3 stitches 0-1-1-1-1-1 time in each side, 2 stitches 0-0-2-3-5-7 times in each side and 1 stitch 1-2-4-6-10-12 times in each side = 100-104-104-108-108-112 stitches left. Continue the pattern as before. When the piece measures 44-46-48-50-52-54 cm = 17¼"-18"-19"-19¾"-20½"-21¼", place the middle 26-30-30-34-34-38 stitches on 1 thread for the neck but to avoid cutting the strand work these stitches before placing them on the thread. Each shoulder is finished separately. Continue the pattern and bind off stitches for the neck at the beginning of each row from the neck as follows: Bind off 2 stitches 3 times and then 1 stitch 3 times = 28 stitches left on the shoulder in all sizes. Work until the piece measures 51-53-55-57-59-61 cm = 20"-21"-21⅝"-22½"-23¼"-24". Knit 1 row from the wrong side and then bind off with knit from the right side. Work the other shoulder in the same way. SLEEVE: The sleeve is worked in the round with double pointed needles, bottom up. Change to short circular needle when necessary. Cast on 64-68-72-76-80-84 stitches with double pointed needles size 2.5 mm = US 1,5 and BabyMerino. Knit 1 round then work rib in the round (= knit 2/ purl 2) for 8 cm = 3⅛". Knit 1 round where you decrease 14-16-16-18-20-22 stitches evenly spaced – read DECREASE/INCREASE TIP = 50-52-56-58-60-62 stitches. Insert 1 marker thread at the beginning of the round = mid under sleeve and allow it to follow your work onwards; it will be used when increasing mid under sleeve. Change to double pointed needles size 3 mm = US 2,5 and work stockinette stitch in the round. When the sleeve measures 11-9-11-9-11-9 cm = 4⅜"-3½"-4⅜"-3½"-4⅜"-3½", increase 2 stitches mid under the sleeve – read INCREASE TIP. Increase like this every 2½-2½-2-2-1½-1½ cm = 1"-1"-¾"-¾"-½"-½" a total of 15-17-18-20-23-25 times = 80-86-92-98-106-112 stitches. Continue working until the sleeve measures 50-50-49-48-47-46 cm = 19¾"-19¾"-19¼"-19"-18½"-18". The next round is worked as follows: Start 3 stitches before the marker thread, bind off 6 stitches (= mid under sleeve) and work stockinette stitch to end of round. Now work the sleeve cap back and forth with circular needle size 3 mm = US 2,5 as follows: Continue with stockinette stitch and AT THE SAME TIME bind off stitches on each side as follows: Bind off 3 stitches 1-1-1-1-0-0 time on each side, 2 stitches 3-4-5-5-5-5 times on each side and 1 stitch 2-2-3-5-8-11 times on each side. Then bind off 2 stitches on each side until the sleeve measures approx. 56-56-57-57-58-59 cm = 22"-22"-22½"-22½"-22¾"-23¼". Bind off 3 stitches 1 time on each side and then bind off the remaining stitches. The sleeve measures approx. 57-57-58-58-59-60 cm = 22½"-22½"-22¾"-22¾"-23¼"-23⅝" from the top down. Work the other sleeve in the same way. ASSEMBLY: Sew the shoulder seams inside the bind-off edges. Sew in the sleeves inside the 1 edge stitch. NECK: Knit up from the right side approx. 108 to 134 stitches around the neck (including the stitches on the thread in front) with short circular needle size 2.5 mm = US 1,5. Knit 1 round where you increase evenly spaced to 128-136-136-148-148-160 stitches (the number of stitches should be divisible by 4). Work rib in the round (= knit 2 / purl 2) for approx. 3 to 3½ cm = 1⅛" to 1¼". Bind off with knit over knit and purl over purl. |
|||||||
Diagram explanations |
|||||||
|
|||||||
 |
|||||||
Have you finished this pattern?Tag your pictures with #dropspattern #goldenpuffssweater or submit them to the #dropsfan gallery. Do you need help with this pattern?You'll find 24 tutorial videos, a Comments/Questions area and more by visiting the pattern on garnstudio.com. © 1982-2026 DROPS Design A/S. We reserve all rights. This document, including all its sub-sections, has copyrights. Read more about what you can do with our patterns at the bottom of each pattern on our site. |
|||||||


With over 40 years in knitting and crochet design, DROPS Design offers one of the most extensive collections of free patterns on the internet - translated to 17 languages. As of today we count 324 catalogs and 12290 patterns - 12280 of which are translated into English (US/in).
We work hard to bring you the best knitting and crochet have to offer, inspiration and advice as well as great quality yarns at incredible prices! Would you like to use our patterns for other than personal use? You can read what you are allowed to do in the Copyright text at the bottom of all our patterns. Happy crafting!
Post a comment to pattern DROPS 207-17
We would love to hear what you have to say about this pattern!
If you want to leave a question, please make sure you select the correct category in the form below, to speed up the answering process. Required fields are marked *.