
Popular categories
Looking for a yarn?


Comments / Questions (92)
![]() Anne wrote:
Anne wrote:
Goedendag Ik probeerde steeds weer. Ik kom er niet uit met de twee geribbelde halsranden. Ik heb ze aan de uiteinden van de 66 steken aan de naalden hangen. Moeten ze uiteindelijk niet ergens aan vast komen te zitten of blijven het twee bungelende lapjes? Dat zal toch niet? Vriendelijke groeten. PS Dit is een enorm onduidelijk patroon. Dat moet toch helderder kunnen worden uitgelegd? En zoal seen andere klant hier al eerder vroeg: moeten de lapjes of zo: >...< Dank u
14.02.2021 - 23:22DROPS Design answered:
Dag Anne,
Deze uitstekende lapjes worden aan het einde aan het achterpand vastgenaaid, zie het stukje onderaan de beschrijving over 'afwerking'.
15.02.2021 - 09:34
![]() Anne Voerman wrote:
Anne Voerman wrote:
Goedendag Ik heb de halsranden gebreid en ben nu bezig ze op een rondbreinaald te zetten, met dan daartussen de 66 steken. Ik weet echter niet hoe ik de halsranden op de naald moet zetten. Met de boogjes naar buiten of naar binnen . Ik snap hier niks van. Is er ergens een filmpje ? Vriendelijke groeten Anne
14.02.2021 - 13:33
![]() Michèle Gaultier wrote:
Michèle Gaultier wrote:
Encore moi ok pour votre réponse ,mais dans la description de l empiecement il est écrit placer un marqueur à 5 mailles de chaque côté et dans votre explication ce serait 4 m pour la fin du rang ?
09.02.2021 - 12:14DROPS Design answered:
Bonjour Mme Gaultier, il manquait en fait 1 maille endroit... vous allez augmenter ainsi: 1 jeté, 1 m end, le marqueur, 1 m end, 1 jeté - les augmentations seront ainsi symétriques et il y a 2 mailles endroit (et non 1 seule) entre les augmentations du raglan. Merci pour votre retour, la correction a été faite. Bonne continuation!
09.02.2021 - 15:09
![]() Michèle Gaultier wrote:
Michèle Gaultier wrote:
Merci, pour votre réponse mais je ne comprends pas au début du rang 4mousse 1 jeté 1maille endroit le marqueur et 1 jeté mais à la fin cela donne le marqueur 1 jeté 1endroit 4mousse ça n'est pas symétrique. Donc au début avant le jeté j'ai 4 mailles et à la fin après le jeté j'ai 5 mailles ?
08.02.2021 - 14:28DROPS Design answered:
Bonjour Mme Gaultier, en début de rang vous tricotez ainsi la toute première augmentation: 4 m point mousse, 1 jeté, 1 maille endroit, marqueur, 1 jeté et vous tricotez la dernière augmentation ainsi quand il reste 5 mailles: 1 jeté, 1 maille endroit, marqueur, 1 jeté, 4 m point mousse. Vos augmentations sont symétriques. Bon tricot!
08.02.2021 - 15:52
![]() Michèle Gaultier wrote:
Michèle Gaultier wrote:
Voilà je ne comprends pas le raglan. Est ce qu' il faut partager le 1er rang et le faire en miroir . C est bien 1m avant le fil marqueur 1 jeté ensuite la maille endroit ,le fil marqueur et 1jeté .si je regarde votre tutoriel c est 1 jeté 1 maille endroit le marqueur 1 m endroit 1 jeté. A l'avance merci.
06.02.2021 - 11:26DROPS Design answered:
Bonjour Mme Gaultier, augmentez pour le raglan comme expliqué sous RAGLAN dans ce modèle (la vidéo et la leçon montre une technique standard, il faut toutefois suivre la technique correspondant au modèle), autrement dit, vous augmentez ainsi: 1 jeté, 1 m end, le fil marqueur, 1 jeté. Bon tricot!
08.02.2021 - 08:07
![]() Marie Ganting wrote:
Marie Ganting wrote:
Jag avser sticka December Moon 206-12 i mörkgrått. Blir det tokmelerat om jag tar en tråd Kid Silk askgrå (hittar inte mörkgrått) och en tråd Flora (alternativt Alpacka) mörkgrå? Vill inte ge ett brokigt intryck.
11.01.2021 - 18:54DROPS Design answered:
Marie. Fargevalg er ganske personlig,men vil mene at de fargene du skriver vil passe fint sammen. Både DROPS Flora, mørk grått og DROPS Kid-Silk, askgrått har litt melert i seg, slik at de vil gå fint sammen uten noen merkbare overgang. mvh DROPS design
18.01.2021 - 14:42
![]() Chan wrote:
Chan wrote:
Hello, yarn DROPS Lace is no longer available. What would be the best alternative, to get the same frothy look and feel as on the picture jumper? Thanks
04.01.2021 - 16:22DROPS Design answered:
Dear Chan, you could try with 2 strands Kid-Silk or 1 strand Flora + 1 strand Kid-Silk - try out swatching these to check if you like the fabric/texture - or any yarn from yarn group B - as DROPS Sky suggested here. Happy knitting!
05.01.2021 - 11:51
![]() Kitty wrote:
Kitty wrote:
Bonjour,je ne sais pas tricoter avec des aiguilles circulaires est il possible de réaliser ce pull avec des aiguilles droites ? merci
22.11.2020 - 19:28DROPS Design answered:
Bonjour Kitty! Bien sur, regardez la lecon DROPS ICI. Bon tricot!
22.11.2020 - 19:36
![]() Catlady101 wrote:
Catlady101 wrote:
Hi, is there any size guide, I found none in the FAQ and what exactly incm or inches are sizes S-XXL???
25.10.2020 - 17:12DROPS Design answered:
Dear Catlady101, there is no one that is good for all kind of size guide, as every style is, however at every pattern you will find the scamatics drawing, which has all the measurements you need to decide which size to make. Happy Knitting!
25.10.2020 - 21:24
![]() Brigitte wrote:
Brigitte wrote:
Liebe Drops, ist es korrekt, dass ich die 4 Maschen der rechten Halsblende nach den 66 neu angeschlagenen Maschen abstricke und einreihe? Den Umschlag der Raglanabnahmen in der Rückreihe li verschränkt abstricke? Vielen Dank für Eure Antwort
14.10.2020 - 08:10DROPS Design answered:
Liebe Brigitte, die neuen 66 M werden am Ende der letzen Reihe von der linken Blende angeschlagen, und diese Reihe enden Sie beim stricken die rechte Blende. Könnte Ihnen dieses Video (für eine andere Jacke) helfen?
14.10.2020 - 08:28
|
||||||||||
Simply Confident#simplyconfidentsweater |
||||||||||
 |
 |
|||||||||
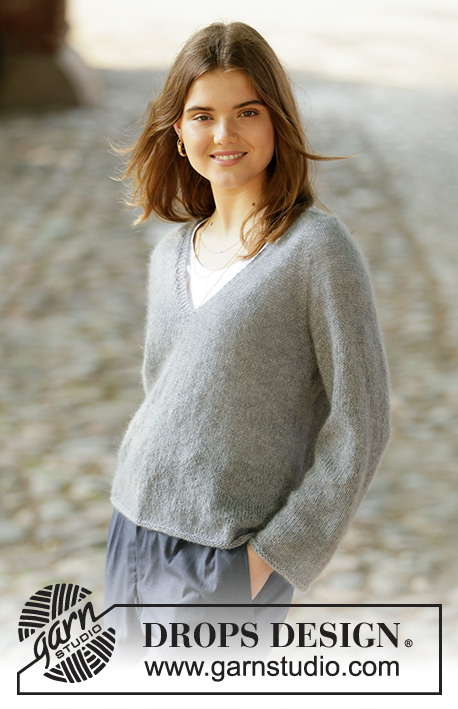
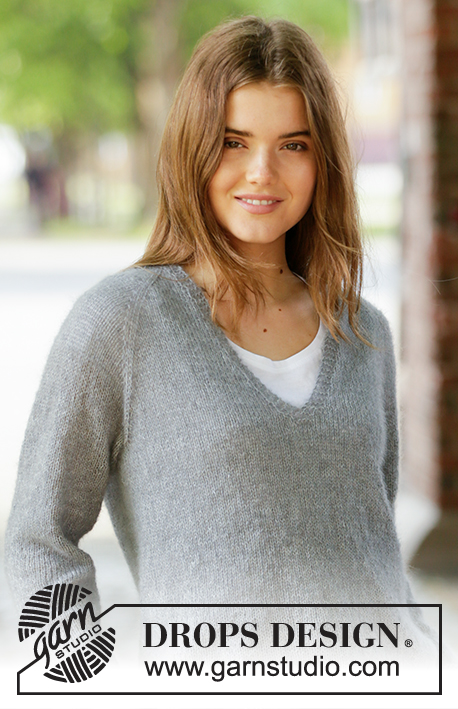
Knitted sweater with raglan and v-neck in DROPS Lace and DROPS Kid-Silk or DROPS Sky. The piece is worked top down. Sizes S - XXXL.
DROPS 205-14 |
||||||||||
|
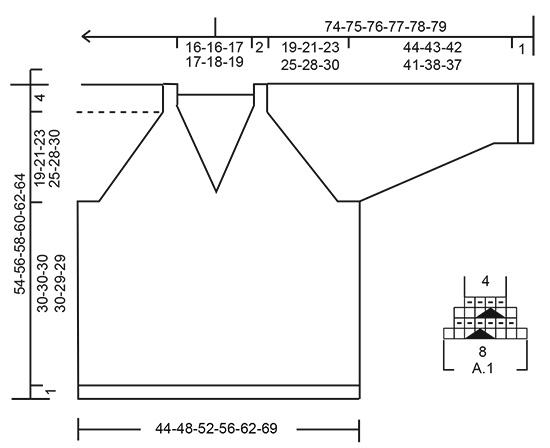
------------------------------------------------------- EXPLANATIONS FOR THE PATTERN: ------------------------------------------------------- RIDGE/GARTER STITCH (worked in the round): 1 ridge in height = 2 rounds; Knit 1 round and purl 1 round. RIDGE/GARTER STITCH (worked back and forth): Knit all rows. 1 ridge in height = Knit 2 rows. PATTERN: See diagram A.1. The diagram shows all rows in the pattern seen from the right side. SHORT ROWS-1 (for right neck-edge): Start from the right side and work as follows: * 1 ridge back and forth over the first 3 stitches, 1 ridge back and forth over all 4 stitches *, work from *-* a total of 3 times. SHORT ROWS-2 (for left neck-edge): Start from the wrong side and work as follows: * 1 ridge back and forth over the first 3 stitches, 1 ridge back and forth over all 4 stitches *, work from *-* a total of 3 times, then knit 1 row from the wrong side over all 4 stitches. RAGLAN: All increases are worked from the right side! Increase to raglan on each side of the marker thread as follows: Work until there is 1 stitch left before marker thread, 1 yarn over, knit 1 (marker thread sits here), knit 1, 1 yarn over (= 2 stitches increased). Increase like this at all the other marker threads (8 stitches increased on the round). On the next row/round work the yarn overs twisted to avoid holes. Then work the new stitches in stockinette stitch. V-NECK: All increases are worked from the right side! Increase 1 stitch inside the 4 stitches in garter stitch on each side of the piece by making 1 yarn over. On the next row purl the yarn overs twisted to avoid holes. Then work the new stitches in stockinette stitch. DECREASE TIP (for sleeves): Decrease 1 stitch on each side of the marker thread as follows: Work until there are 3 stitches left before the marker thread, knit 2 together, knit 2 (marker thread sits between these 2 stitches), slip 1 stitch as if to knit, knit 1 and pass the slipped stitch over the knitted stitch. ------------------------------------------------------- START THE PIECE HERE: ------------------------------------------------------- SWEATER – SHORT OVERVIEW OF THE PIECE: You first work 2 loose neck-edges. These are then placed on the circular needle and stitches are cast on for the neck as described in the text (the neck-edges are sewn together mid back and sewn onto the neck later). Then the yoke is worked back and forth from mid front and top down. AT THE SAME TIME, you increase stitches for v-neck and raglan. When the increases to v-neck are finished the piece is continued in the round. The sleeves are worked in the round with double pointed needles/short circular needle, top down. NECK-EDGES: Cast on 4 stitches with needle size 3.5 mm = US 4 and Lace + Kid-Silk (= 2 strands) or 1 strand Sky and work GARTER STITCH back and forth – read description above (row 1 = right side). When the neck edge measures 6-6-6½-6½-7-7½ cm = 2⅜"-2⅜"-2½"-2½"-2¾"-2⅞", work SHORT ROWS-1 – read description above. When the short rows are finished, work garter stitch back and forth over all 4 stitches for 6 cm = 2⅜" in all sizes; finish with a row from the wrong side (right neck-edge now measures 14-14-14½-14½-15-15½ cm = 5½"-5½"-5¾"-5¾"-6"-6⅛" in length on the inside where it is shortest). Cut the strand and lay the piece to one side. Work left neck-edge in the same way, but when it measures 6-6-6½-6½-7-7½ cm = 2⅜"-2⅜"-2½"-2½"-2¾"-2⅞", work SHORT ROWS-2 – read description above. When the short rows are finished, work garter stitch back and forth over all 4 stitches for 6 cm = 2⅜" in all sizes; finish with a row from the right side (left neck-edge now measures 14-14-14½-14½-15-15½ cm = 5½"-5½"-5¾"-5¾"-6"-6⅛" in length on the inside where it is shortest). Place the stitches on circular needle size 4 mm = US 6 (do not cut the strand) and cast on 66-66-68-68-70-72 stitches with the same circular needle (straight after the left neck edge) then knit the 4 stitches from the right neck edge = 74-74-76-76-78-80 stitches on the needle. Work the next row from the wrong side as follows: 4 stitches in garter stitch, work 2 stitches in the next stitch (= 1 stitch increased), purl until there are 5 stitches left on row, work 2 stitches in the next stitch (= 1 stitch increased) and work 4 stitches in garter stitch = 76-76-78-78-80-82 stitches. Insert a marker in the middle of the 4 neck-edge stitches on one side. THE PIECE IS NOW MEASURED FROM HERE! Now work the yoke as described below. YOKE: Insert 1 marker thread in each transition between body and sleeves (= 4 marker threads) as follows: Insert 1 marker thread 5 stitches in from each side, i.e., after 4 stitches in garter stitch + 1 knitted stitch (= transition between front pieces and sleeves), insert the next 2 marker threads after 16 new stitches on each side (= transition between sleeves and back piece). There are 34-34-36-36-38-40 stitches between the last 2 marker threads (= back piece). Work stockinette stitch with 4 stitches in garter stitch on each side towards the v-neck mid front. AT THE SAME TIME increase to raglan and v-neck as follows: REMEMBER THE KNITTING GAUGE! RAGLAN: On the first row from the right side start to increase to RAGLAN – read description above. Increase to raglan every 2nd row a total of 24-28-31-34-36-38 times. V-NECK: On row 3 start to increase to V-NECK – read description above. Increase like this every 4th row 4-5-6-7-8-8 times, then every 2nd row 10-9-9-8-8-9 times (= a total of 14-14-15-15-16-17 stitches increased for the v-neck on each side). When all increases to v-neck are finished, cut the yarn. Insert a marker on mid back. This is now the beginning of the round. Continue working in the round from right side; over the 8 stitches in garter stitch work pattern A.1. When A.1 has been completed in height 4 stitches have been decreased in the diagram. When all the increases to raglan (+ the 4 decreases in A.1) are finished there are 292-324-352-376-396-416 stitches on the round. Now continue with stockinette stitch until the piece measures 19-21-23-25-28-30 cm = 7½"-8¼"-9"-9¾"-11"-11¾" from the marker. Finish the round mid back. The next round is worked as follows: NOTE: The piece is divided for body and sleeves and 1-1-1-2-4-6 stitches from each side of each sleeve are worked into the body; the transitions between body and sleeves are no longer at the marker threads: Work the first 42-46-50-54-59-64 stitches (= half back piece), place the next 62-70-76-80-80-80 stitches on a thread for sleeve and cast on 8-8-10-10-12-16 new stitches on the needle (= in side under sleeve), work the next 84-92-100-108-118-128 stitches (= front piece), place the next 62-70-76-80-80-80 stitches on a thread for sleeve and cast on 8-8-10-10-12-16 new stitches on the needle (= in side under sleeve), work the remaining 42-46-50-54-59-64 stitches (= half back piece). Body and sleeves are finished separately. THE PIECE IS NOW MEASURED FROM HERE! BODY: = 184-200-220-236-260-288 stitches. Work stockinette stitch in the round with circular needle size 4 mm = US 6. When the piece measures 30-30-30-30-29-29 cm = 11¾"-11¾"-11¾"-11¾"-11⅜"-11⅜" change to circular needle size 3.5 mm = US 4. Work 2 ridges. Bind off. The sweater measures approx. 54-56-58-60-62-64 cm = 21¼"-22"-22¾"-23⅝"-24⅜"-25¼" from the shoulder down. SLEEVE: Place the 62-70-76-80-80-80 stitches from the thread on the one side of the piece on short circular needle/double pointed needles size 4 mm = US 6 and knit up 1 stitch in each of the 8-8-10-10-12-16 stitches cast on under the sleeve = 70-78-86-90-92-96 stitches. Insert a marker thread in the middle of the new stitches (= 4-4-5-5-6-8 new stitches on each side). Work stockinette stitch in the round. When the sleeve measures 4 cm = 1½" decrease 2 stitches under the sleeve – read DECREASE TIP. Decrease like this every 3½-2½-2-2-1½-1½ cm = 1¼"-1"-¾"-¾"-½"-½" a total of 10-13-16-17-17-18 times = 50-52-54-56-58-60 stitches. When the sleeve measures 44-43-42-41-38-37 cm = 17¼"-17"-16½"-16⅛"-15"-14½" change to double pointed needles size 3.5 mm = US 4 and work 2 ridges. Bind off. The sleeve measures approx. 45-44-43-42-39-38 cm = 17¾"-17¼"-17"-16½"-15¼"-15". Work the other sleeve in the same way. ASSEMBLY: Sew the neck-edges together mid back with the seam on wrong side. Stretch the neck-edge slightly and sew to the neck at the back. |
||||||||||
Diagram explanations |
||||||||||
|
||||||||||
 |
||||||||||
Have you finished this pattern?Tag your pictures with #dropspattern #simplyconfidentsweater or submit them to the #dropsfan gallery. Do you need help with this pattern?You'll find 26 tutorial videos, a Comments/Questions area and more by visiting the pattern on garnstudio.com. © 1982-2026 DROPS Design A/S. We reserve all rights. This document, including all its sub-sections, has copyrights. Read more about what you can do with our patterns at the bottom of each pattern on our site. |
||||||||||


With over 40 years in knitting and crochet design, DROPS Design offers one of the most extensive collections of free patterns on the internet - translated to 17 languages. As of today we count 324 catalogs and 12290 patterns - 12280 of which are translated into English (US/in).
We work hard to bring you the best knitting and crochet have to offer, inspiration and advice as well as great quality yarns at incredible prices! Would you like to use our patterns for other than personal use? You can read what you are allowed to do in the Copyright text at the bottom of all our patterns. Happy crafting!
Post a comment to pattern DROPS 205-14
We would love to hear what you have to say about this pattern!
If you want to leave a question, please make sure you select the correct category in the form below, to speed up the answering process. Required fields are marked *.