
Popular categories
Looking for a yarn?


Comments / Questions (150)
![]() Monica wrote:
Monica wrote:
Ik brei dit patroon in maat M en nu ik verder wil gaan met de mouwen klopt het patroon niet meer. Er staat dat ik 2 st in tricot moet breien, dan A.3 (over de 3 van de 5 nieuwe st + de 2 st van A.2 + de 5 eerste st van de vorige A.3) = 10 st, dan A.4 over de volgende 60 st, dan A.5 (de laatste 6 st van de vorige A.5 + de 2 st van A.2 + 3 st van de nieuwe st) en 2 st in tricot. Alle av st komen nu in het midden van mijn vorige av st...
18.08.2019 - 11:38DROPS Design answered:
Dag Monica,
Het is de bedoeling dat het patroon in de mouw goed doorloopt, zowel in de hoogte als in de breedte. Het patroon is gecontroleerd en het zou moeten kloppen. Kan het zijn dat je op een verkeerde naald in het patroon verder bent gegaan?
08.09.2019 - 18:33
![]() Karin wrote:
Karin wrote:
Skal jeg beggynne å øke etter 20omg eller skal jeg strikke mønster A1ferdig først,og 20 omgger etter
17.08.2019 - 16:37DROPS Design answered:
Hei Karin. Du øker på hver 2.omgang når du strikker A.1 Det økes totalt 8 masker på hver økeomgang (= 4 kast + 4 masker økt). God Fornøyelse!
20.08.2019 - 15:04
![]() Danielle wrote:
Danielle wrote:
Quand A-1 a été tricoté 1 fois = 238 mailles Mais après je retricote le schéma A-1 au complet une autre fois où je recommence où il y a une barre du côté droite du schéma...pour faire les 20 rangs? Merci
28.07.2019 - 22:48
![]() Kerry wrote:
Kerry wrote:
Pls can you clarify how the increases on the front and back bodice work.... Firstly, is there increases on every round and should all increases be knitted so as not to get holes? Thank you for your assistance
25.07.2019 - 16:55DROPS Design answered:
Hi Kerry! On front and back pieces increase with yarn overs before/after the 2 stitches in stocking stitch in each side (there will be 2 stitches stocking stitch between each raglan increase). On the next round knit the yarn overs twisted (= no holes) and the increased stitches are worked in stocking stitch. Increase like this every 2nd round. Happy knitting!
25.07.2019 - 18:02
![]() Jette Jensen wrote:
Jette Jensen wrote:
Strikkefastheden er opgivet til 21 m. i bredden og 28 p. i højden = 10x10 cm i glat strik, men ikke hvilken str. pind ?
17.07.2019 - 09:29DROPS Design answered:
Hei Jette. Det står rett under STRIKKEFASTHET. PINNER: DROPS SETTPINNER NR 4. DROPS RUNDPINNER NR 4: lengde på 40 cm og 80 cm til glattstrikk. DROPS SETTPINNER NR 3,5. DROPS RUNDPINNER NR 3,5: lengde på 40 og 80 cm til rillekanter. Pinne nr er kun veiledende. Får du for mange masker på 10 cm, bytt til tykkere pinner. Får du for få masker på 10 cm, bytt til tynnere pinner.
26.08.2019 - 14:58
![]() Natacha wrote:
Natacha wrote:
Histoire de manche suite:alors pour celles que ça intéresse ,j'ai tricoté les manches sans diminutions,juste au niveau du poignet diminution d'un coup de 30 mailles , 2 rangs côte mousse et voilà .Résultat : canon,mais c'est vrai que ça change l'esprit de cet ouvrage, c'est autre chose avec des manches bouffantes,j'aime bien ce côté romantique ...
04.07.2019 - 16:39
![]() Natacha wrote:
Natacha wrote:
Je tricote la taille S . Perso,je termine la première manche , c'est , à mon avis trop serré .Ça ne rend pas comme sur la photo.J'envisage : détricotage Arggg !!! jusqu’au 2 cm après la séparation et faire la manche sans diminution , carrément .Je dirai le résultat .
26.06.2019 - 11:49
![]() Mona wrote:
Mona wrote:
Forstår ikke helt at hver udtagning er på 8 masker og så står der at når jeg har taget ud 27 gange ( m) har jeg 330 masker og når jeg har taget ud 29 gange (l) så har jeg 350 maske . Jeg er nemlig nødt til at skifte størrelse her fra m til l
23.06.2019 - 09:29DROPS Design answered:
Hei Mona. Før økingene til raglan begynner har du 114 masker på pinnen i størrelse M. Så skal du øke 8 masker totalt 27 ganger (altså inkludert første økningen, som er forklart i oppskriften). 8 x 27 = 216 masker økt. 114 + 216 = 330 masker på pinnen. Det samme gjelder størrelse L: du har 118 masker før økningene, så øker du 8 masker 29 ganger (= 232 masker økt), og du har da 350 masker på pinnen. God fornøyelse.
27.06.2019 - 10:09
![]() Maritha Magnusson wrote:
Maritha Magnusson wrote:
Hej igen. Är det rätt att det blir en vriden maska och 2slätstickade maskor och en inte vriden på armen i början av ärmen. Eller är det vanlig raglan med vriden två slätstickning och en vriden. Den senare bör väl vara ej vriden så det blir hål på ärmen.
21.05.2019 - 08:59DROPS Design answered:
Hej. Vid raglanökningen stickas omslagen på ärmarna räta (=hål) på nästa varv, och omslagen på fram- och bakstycket stickas vridet räta (=inte hål) på nästa varv. Lycka till!
22.05.2019 - 07:52
![]() Carola Reise-Einig wrote:
Carola Reise-Einig wrote:
Wo kann man die Anleitungshefte kaufen? Gruß
20.05.2019 - 14:19DROPS Design answered:
Liebe Frau Reise-Einig, Anleitungshefte haben wir keine mehr, Anleitung können Sie gratis hier drücken. Viel Spaß beim stricken!
20.05.2019 - 14:49
|
|||||||||||||||||||||||||
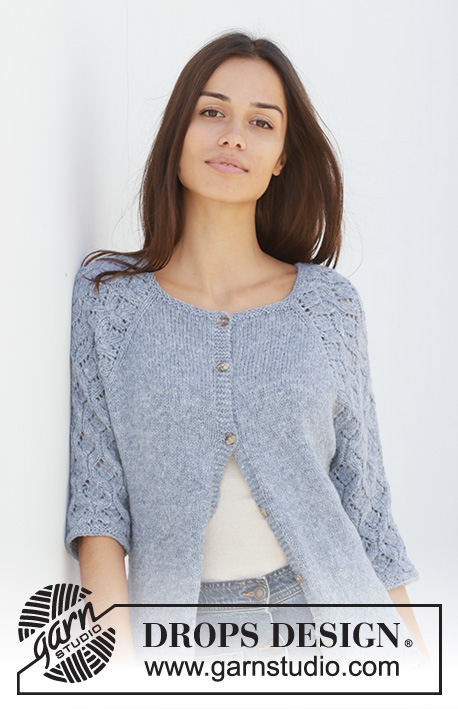
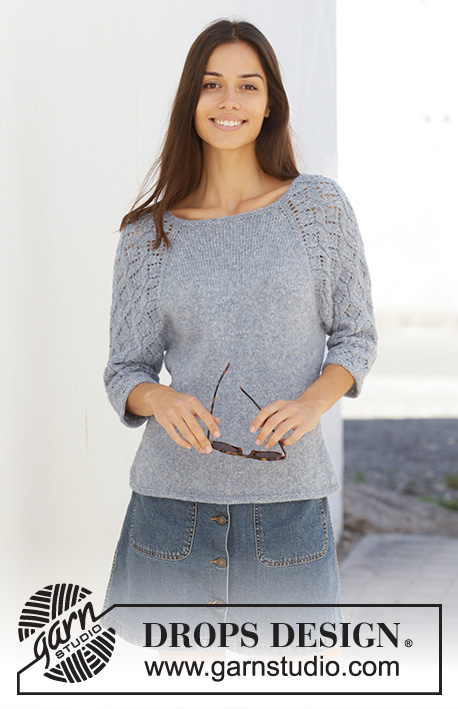
Blue Nostalgia#bluenostalgiasweater |
|||||||||||||||||||||||||
 |
 |
||||||||||||||||||||||||
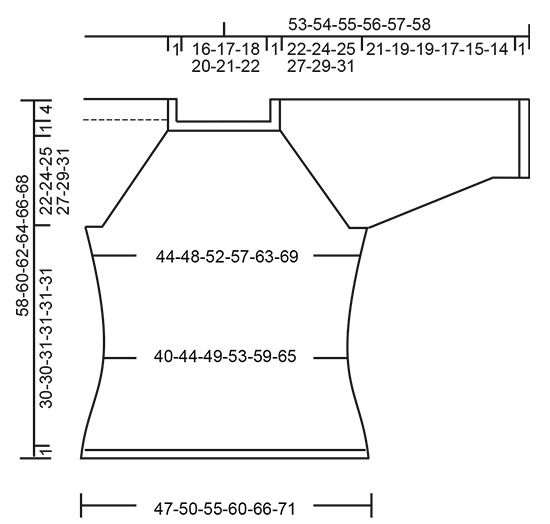
Knitted sweater with raglan in DROPS Sky. The piece is worked top down with lace pattern on sleeves. Sizes S – XXXL.
DROPS 199-3 |
|||||||||||||||||||||||||
|
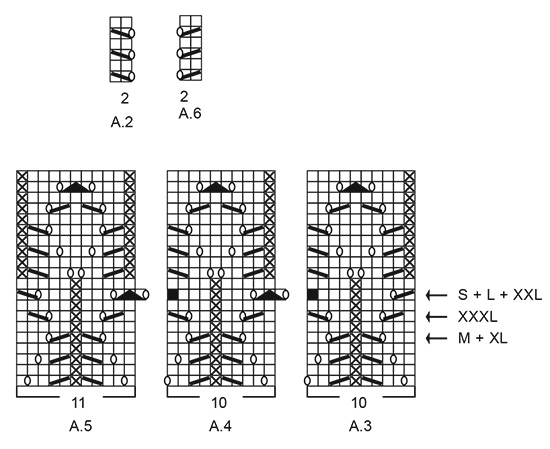
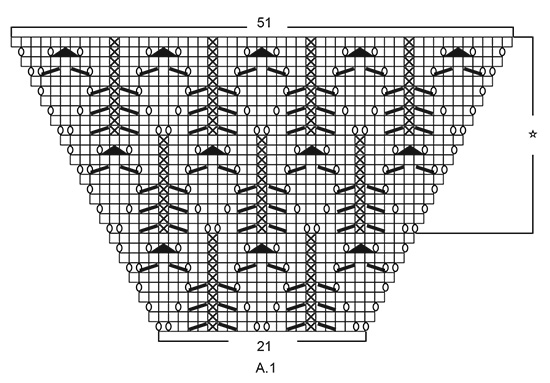
------------------------------------------------------- EXPLANATIONS FOR THE PATTERN: ------------------------------------------------------- RIDGE/GARTER STITCH (worked in the round): 1 ridge in height = 2 rounds; knit 1 round and purl 1 round. INCREASE TIP-1 (evenly spaced): To work out how to increase evenly, count the total number of stitches on the needle (e.g. 100 stitches), and divide by the number of increases to be made (e.g. 10) = 10. In this example, increase by making 1 yarn over after each 10th stitch. On the next round work the yarn overs twisted to avoid holes. PATTERN: See diagrams A.1 to A.6. Find your size in the diagrams (applies to A.3 to A.5). The diagrams show all rows in the pattern seen from the right side. DECREASE TIP (for sides of body and sleeves): Work until there are 3 stitches left before marker thread, knit 2 together, knit 2 (marker thread sits between these stitches), slip 1 stitch, knit 1 and pass the slipped stitch over the knitted stitch. INCREASE TIP-2 (for sides of body): Work until there are 2 stitches left before marker thread, 1 yarn over, knit 4 (marker thread sits in the middle of these stitches), 1 yarn over. On the next round work the yarn overs twisted to avoid holes. Then work the new stitches in stockinette stitch. ------------------------------------------------------- START THE PIECE HERE: ------------------------------------------------------- SWEATER - SHORT OVERVIEW OF THE PIECE: Yoke and body are worked in the round with circular needle from mid back, top down. Sleeves are worked in the round with short circular needle/double pointed needles, top down. YOKE: Cast on 100-106-110-116-120-126 stitches with circular needle size 3.5 mm = US 4 and Sky. Work 2 RIDGES – read description above. Knit 1 round where you increase 10-8-8-10-10-8 stitches evenly spaced – read INCREASE TIP-1 = 110-114-118-126-130-134 stitches. Change to circular needle size 4 mm = US 6. Knit 1 round. The next round is worked as follows: Work stockinette stitch over the first 15-16-17-19-20-21 stitches (= half back piece), 1 yarn over, 2 stitches in stockinette stitch, work A.1 over 21 stitches (= sleeve), 2 stitches in stockinette stitch, 1 yarn over, work 30-32-34-38-40-42 stitches in stockinette stitch (= front piece), 1 yarn over, 2 stitches stockinette stitch, work A.1 over 21 stitches (= sleeve), 2 stitches in stockinette stitch, 1 yarn over, work stockinette stitch over the last 15-16-17-19-20-21 stitches (= half back piece). There are now 118-122-126-134-138-142 stitches on the needle. Continue this pattern onwards; i.e. on the sleeves increase on each side as shown in A.1. On the next round knit the yarn overs (= holes) and the increased stitches are worked into the pattern as you go as shown in A.1. On front and back pieces increase with yarn overs before/after the 2 stitches in stockinette stitch in each side (there will be 2 stitches stockinette stitch between each raglan increase). On the next round knit the yarn overs twisted (= no holes) and the increased stitches are worked in stockinette stitch. Increase like this every 2nd round. You increase a total of 8 stitches on each increase-round (= 4 yarn overs + 4 stitches increased in A.1). REMEMBER THE KNITTING GAUGE! When A.1 has been worked 1 time in height there are 230-234-238-246-250-254 stitches on the needle. Continue this pattern onwards, i.e. the pattern repeats itself as shown in A.1. Each time you have worked 20 rounds there will be room for 1 more repeat of lace pattern in width on each sleeve. When you have increased a total of 24-27-29-32-34-38 times there are 302-330-350-382-402-438 stitches on the needle and the piece measures 18-20-22-24-25-28 cm = 7"-8"-8¾"-9½"-9¾"-11" from the cast-on edge mid front. Continue with stockinette stitch and pattern as before, but without increasing; i.e. the 69-75-79-85-89-97 stitches in A.1 are worked as follows: Work A.2 (= 2 stitches), 2-0-2-0-2-1 stitches in stockinette stitch, starting on the round marked with an arrow for your size work A.3 (= 10 stitches), A.4 over the next 40-50-50-60-60-70 stitches (= 4-5-5-6-6-7 reports of 10 stitches), A.5 (= 11 stitches), 2-0-2-0-2-1 stitches in stockinette stitch and A.6 (= 2 stitches). Continue until the piece measures approx. 23-25-26-28-30-32 cm = 9"-9¾"-10¼"-11"-11¾"-12½" from the cast-on edge mid front. The next round is worked as follows: Work 41-45-49-54-59-65 stitches in stockinette stitch (= half back piece), place the next 69-75-77-83-83-89 stitches on 1 thread for sleeve, cast on 10-10-12-12-14-14 new stitches on the needle (= in side under sleeve), work 82-90-98-108-118-130 stitches stockinette stitch (= front piece), place the next 69-75-77-83-83-89 stitches on 1 thread for sleeve, cast on 10-10-12-12-14-14 new stitches on the needle (= in side under sleeve) and work the remaining 41-45-49-54-59-65 stitches in stockinette stitch (= half back piece). Body and sleeves are finished separately. THE PIECE IS NOW MEASURED FROM HERE! BODY: = 184-200-220-240-264-288 stitches. Insert 1 marker thread on each side in the middle of the 10-10-12-12-14-14 stitches cast on under each sleeve. Allow them to follow your work onwards; they will be used a little later when decreasing/increasing. Work stockinette stitch. When the piece measures 2 cm = ¾" from the division decrease 1 stitch on each side of both marker threads - read DECREASE TIP = 4 stitches decreased. Decrease like this every 3 cm = 1⅛" a total of 4 times = 168-184-204-224-248-272 stitches. Continue working until the piece measures 14 cm = 5½" from the division. Now increase 1 stitch on each side of both marker threads – read INCREASE TIP-2 = 4 stitches increased. Increase like this every 2 cm = ¾" a total of 7 times = 196-212-232-252-276-300 stitches. Continue working until the piece measures 30-30-31-31-31-31 cm = 11¾"-11¾"-12¼"-12¼"-12¼"-12¼" from the division. Change to circular needle size 3.5 mm = US 4 and work 2 ridges. Loosely bind off, but to avoid the bind-off edge being tight you can bind off with needle size 4 mm = US 6. The sweater measures approx. 58-60-62-64-66-68 cm = 22¾"-23⅝"-24⅜"-25¼"-26"-26¾" from the shoulder down. SLEEVE: Place the 69-75-77-83-83-89 stitches from the thread on the one side of the piece on short circular needle/double pointed needles size 4 mm = US 6 and knit up 1 stitch in each of the 10-10-12-12-14-14 stitches cast on under the sleeve = 79-85-89-95-97-103 stitches. Insert 1 marker thread in the middle of the 10-10-12-12-14-14 stitches cast on under the sleeve and allow it to follow your work onwards; it will be used a little later when decreasing. Start the round at the marker thread. Start on the correct round in the diagrams so that the pattern continues from the yoke and work as follows: Work 4-2-4-2-3-1 stitches in stockinette stitch, A.3 (= 10 stitches), A.4 over the next 50-60-60-70-70-80 stitches (= 5-6-6-7-7-8 repeats of 10 stitches), A.5 (= 11 stitches) and 4-2-4-2-3-1 stitches in stockinette stitch. Continue this pattern. When the piece measures 2 cm = ¾" from the division, decrease 2 stitches mid under sleeve – remember DECREASE TIP. Decrease like this every 3rd-3rd-3rd-2nd-2nd-2nd round a total of 14-15-15-16-15-16 times = 51-55-59-63-67-71 stitches. The stitches which do not fit into the pattern as you decrease are worked in stockinette stitch, but make sure that if decreases are in the pattern you also make a yarn over. Continue working until the piece measures 21-19-19-17-15-14 cm = 8¼"-7½"-7½"-6¾"-6"-5½" from the division (shorter measurements in larger sizes due to longer yoke). Change to double pointed needles size 3.5 mm = US 4 and work 2 ridges. Loosely bind off, but to avoid the bind-off edge being tight you can bind off with needle size 4 mm = US 6. Sleeve measures approx. 22-20-20-18-16-15 cm = 8¾"-8"-8"-7"-6¼"-6" from the division. Work the other sleeve in the same way. |
|||||||||||||||||||||||||
Diagram explanations |
|||||||||||||||||||||||||
|
|||||||||||||||||||||||||
 |
|||||||||||||||||||||||||
 |
|||||||||||||||||||||||||
 |
|||||||||||||||||||||||||
Have you finished this pattern?Tag your pictures with #dropspattern #bluenostalgiasweater or submit them to the #dropsfan gallery. Do you need help with this pattern?You'll find 26 tutorial videos, a Comments/Questions area and more by visiting the pattern on garnstudio.com. © 1982-2026 DROPS Design A/S. We reserve all rights. This document, including all its sub-sections, has copyrights. Read more about what you can do with our patterns at the bottom of each pattern on our site. |
|||||||||||||||||||||||||


With over 40 years in knitting and crochet design, DROPS Design offers one of the most extensive collections of free patterns on the internet - translated to 17 languages. As of today we count 325 catalogs and 12298 patterns - 12288 of which are translated into English (US/in).
We work hard to bring you the best knitting and crochet have to offer, inspiration and advice as well as great quality yarns at incredible prices! Would you like to use our patterns for other than personal use? You can read what you are allowed to do in the Copyright text at the bottom of all our patterns. Happy crafting!
Post a comment to pattern DROPS 199-3
We would love to hear what you have to say about this pattern!
If you want to leave a question, please make sure you select the correct category in the form below, to speed up the answering process. Required fields are marked *.