
Popular categories
Looking for a yarn?


Comments / Questions (34)
![]() Marisol Ramírez wrote:
Marisol Ramírez wrote:
Cuál es el centro bajo de la manga
20.09.2020 - 19:38DROPS Design answered:
Hola Marisol. El centro bajo la manga es inicio de la vuelta donde está colocado el marcapuntos. Los aumentos para la manga se trabajan a cada lado del marcapuntos (es decir, en el centro bajo la manga).
27.09.2020 - 19:38
![]() Neille wrote:
Neille wrote:
Comment fait on le motif A4. Je ne vois pas dans la légende ce motif. Que signifie t'il ?
17.03.2020 - 18:19DROPS Design answered:
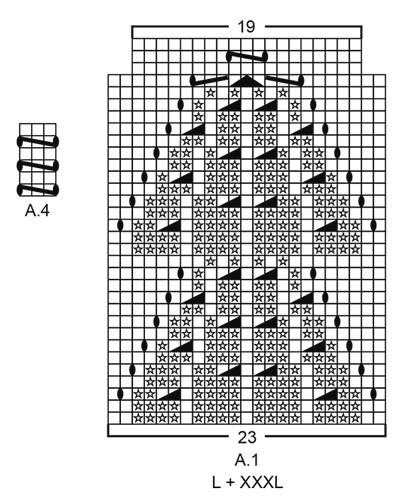
Bonjour Neille, dans A.4, vous tricotez: 1 jeté (à tricoter torse au rang suviant), glisser 1 maille à l'endroit, tricoter 2 mailles ensemble à l'endroit, passer la maille glissée par-dessus les 2 mailles tricotées ensemble (= 8ème symbole de la légende), 1 jeté (= à tricoter torse au rang suivant). Bon tricot!
18.03.2020 - 07:44
![]() Christel wrote:
Christel wrote:
Hej, går det att sticka in kids mohair tillsammans med flora för en exklusivare look? Hur beräknar jag åtgång av mohairnystan?
14.03.2020 - 08:57DROPS Design answered:
Hei Christel. Du kan ikke strikke inn Kid-Silk sammen med Flora i denne oppskriften, da strikkefastheten med 2 tråder ikke vil stemme med den oppgitte strikkefastheten. Du kan evnt strikke med bare Kid-Silk, bare husk å sjekke at din strikkefasthet da stemmer med det som er oppgitt i oppskriften. Evnt kan du finne en lignende oppskrift, men som er strikket med et garn fra garngruppe C (eller 2 tråder fra garngruppen A, slik som Flora og Kid-Silk) . God Fornøyelse!
16.03.2020 - 13:35
![]() Ulla Ljungberg wrote:
Ulla Ljungberg wrote:
Tack för snabbt svar. Nu har jag gjort alla uttag 6 st Storl.L och arbetet är 28cm. Vid 32 ska det göras iordning för ärmarna Hur är detta möjligt?
02.08.2019 - 14:54DROPS Design answered:
Hej Ulla, Vad är det som inte är möjligt?
02.08.2019 - 15:12
![]() Ulla Ljungberg wrote:
Ulla Ljungberg wrote:
Hur mäter man \"från det kortaste stället Mäter man inte nedifrån där man började sticka???
02.08.2019 - 13:22DROPS Design answered:
Hej Ulla, jo men som du ser har du ett litet vågmönster, här mäter du där det är som kortast. Lycka till :)
02.08.2019 - 13:29
![]() Moyra Thompson wrote:
Moyra Thompson wrote:
Thank you for your quick response to my question. On the sleeve section it says when A3 is complete to continue A4 over A3. A4 is graphed as yo, slk2p1o, yo.
06.05.2019 - 16:21DROPS Design answered:
Dear Mrs Thompson, when A.3 has been worked, you will now work A.4 (= 3 sts) over the middle 3 sts in A.3 = YO, slip 1 as if to K, K2 tog, psso, YO. So that the lace pattern at the end of A.3 will continue with A.4. Happy knitting!
07.05.2019 - 08:44
![]() Moyra Thompson wrote:
Moyra Thompson wrote:
I don’t understand how to do A4 over 17 stitches. Yo, sl1k2p1o, yo and then yo again ? How can I do two yo together ?
06.05.2019 - 05:45DROPS Design answered:
Hi Moyra, I imagine you mean A.2 as there is no A.4 in this pattern. The pattern includes 1 yarn over then slip 1 stitch, knit 2 together and pass the slipped stitch over the knitted together stitches and then 1 more yarn over. I hope this helps and happy knitting!
06.05.2019 - 07:51
![]() Anne-Marie wrote:
Anne-Marie wrote:
Man ska göra två omslag om stickan, för att det ska bli hål. På aviga sida så ska man sticka det ena omslaget men släppa ner det andra omslaget. Varför två omslag? Hålet blit srort och fult. Kan det inte fungera med bara ett omslag. Mvh Anne-Marie
27.04.2019 - 08:22DROPS Design answered:
Hei Anne-Marie. Du skal lage 2 kast nettopp fordi det skal bli et stort hull. Om du lager 1 kast er det fort at dette blir lite og ikke så godt synlig, siden garnet er så tynt. God fornøyelse
30.04.2019 - 07:28
![]() Monica wrote:
Monica wrote:
Buonasera, se volessi realizzare questo modello con la manica lunga, quanto filato in più mi ci vorrebbe? Grazie
15.03.2019 - 23:59DROPS Design answered:
Buongiorno Monica. Per verificare la quantità di filato in più necessaria, può contattare per mail o per telefono il suo rivenditore Drops di fiducia. Buon lavoro!
16.03.2019 - 06:48
![]() Ferlicot Catherine wrote:
Ferlicot Catherine wrote:
Bonjour, J'ai fais ce modèle avec la laine Flora que j'ai eu beaucoup de plaisir à tricoter. Malheureusement au premier lavage à froid ce gilet à rétréci de moitié !!! Il est complètement feutré et impossible à récupérer. Comment faut-t-il laver cette laine. Aucune indication sur les pelottes. Merci de votre réponse. Je peux vous faire parvenir ce gilet qui ne va pas à un enfant au delà de 8 ans !
07.03.2019 - 20:04DROPS Design answered:
Bonjour Mme Ferlicot, nous sommes désolés de votre mésaventure lors du lavage, vous pouvez retrouver les indications de lavage de chaque qualité sur chaque étiquette, sur son nuancier, et également quelques conseils supplémentaires ici. N'hésitez pas à contacter votre magasin DROPS, il aura certainement d'autres astuces pour vous. Bon tricot!
08.03.2019 - 08:02
|
||||||||||||||||||||||||||||||||||
Miss Flora Cardigan#missfloracardigan |
||||||||||||||||||||||||||||||||||
 |
 |
|||||||||||||||||||||||||||||||||
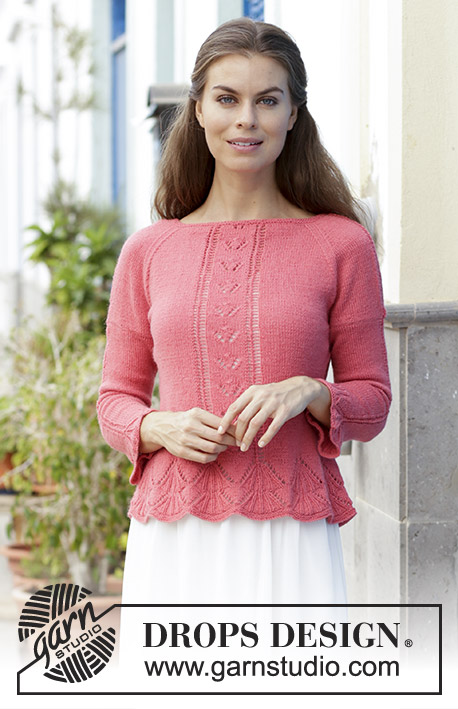
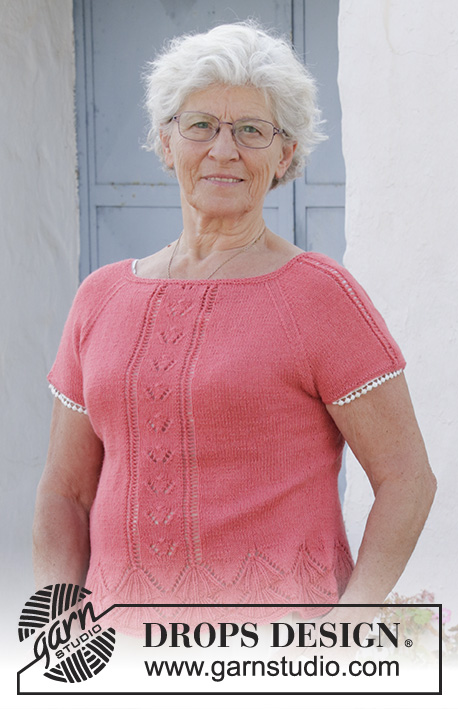
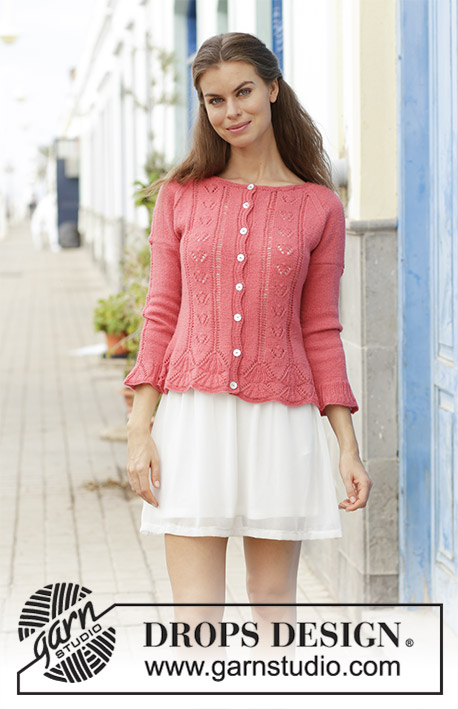
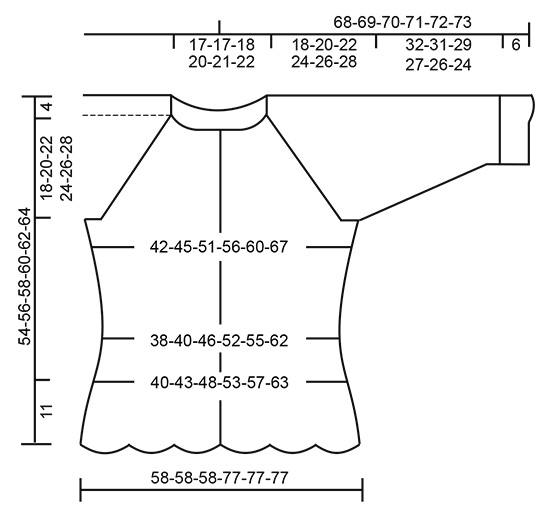
Knitted jacket with lace pattern, raglan and ¾ sleeves. Size: S - XXXL Piece is knitted in DROPS Flora.
DROPS 186-23 |
||||||||||||||||||||||||||||||||||
|
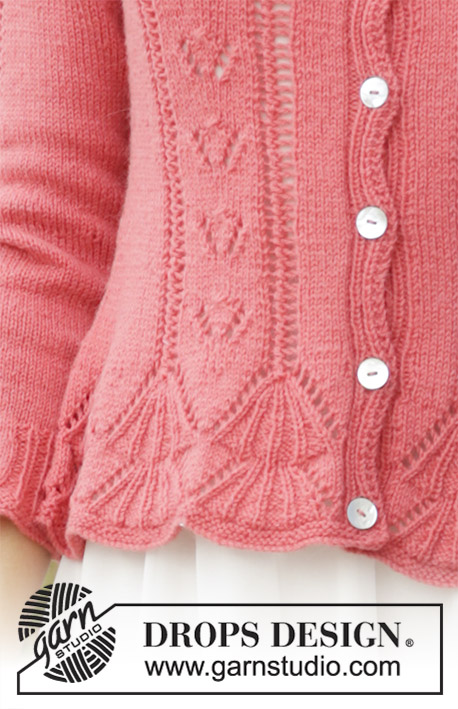
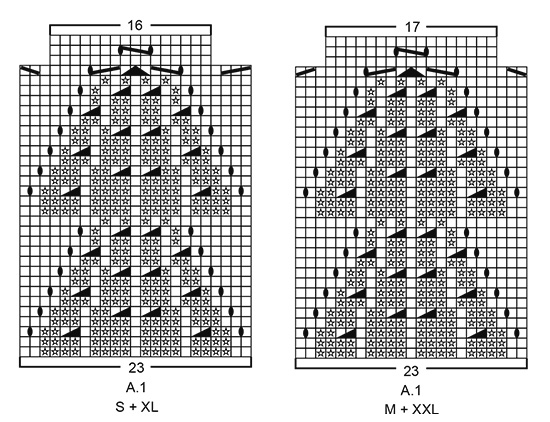
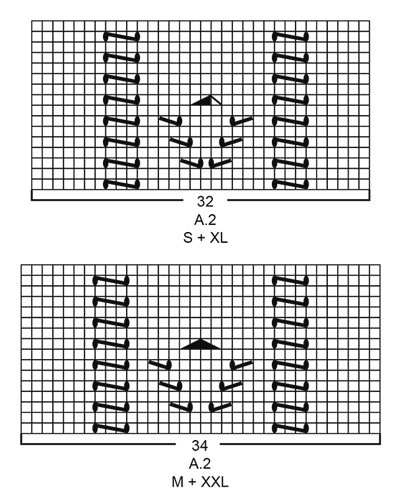
INFORMATION FOR PATTERN: GARTER STITCH (back and forth): 1 ridge = knit 2 rows. GARTER STITCH (worked in the round): 1 ridge = 2 rounds. Knit 1 round and purl 1 round. BAND: Work right band as follows (i.e. the 8 first stitches on needle when working from right side): 2 stitches in garter stitch, knit 1, purl 2, knit 1, purl 2. Work left band as follows (i.e. the 8 last stitches on needle when working from right side): Purl 2, knit 1, purl 2, knit 1, 2 stitches in garter stitch towards mid front. Continue bands with garter stitch over garter stitch, knit over knit and purl over purl. PATTERN: See diagrams A.1 to A.4. Choose diagram for your size (applies to A.1, A.2 and A.3). Diagrams show all rows in pattern seen from the right side. KNITTING TIP: If you do not want lace pattern up along mid back, work in stockinette stitch over the 32-34-38-32-34-38 stitches in A.2 mid back. DECREASE TIP-1 (applies to sides of body): All decreases are done from the right side. Begin 4 stitches before marker and knit 2 together, knit 4 (marker thread is in the middle of these 4 stitches), slip 1 stitch knitwise, knit 1, pass slipped stitch over stitch worked (= 2 stitches decreased). DECREASE TIP-2 (evenly): To calculate how to decrease evenly on row count total number of stitches on needle (e.g. 146 stitches) and subtract number of stitches after decrease (e.g. 136 stitches) = 10 stitches decreased evenly. Then calculate total number of stitches on row (e.g. 146 stitches), minus bands (e.g. 16 stitches) and divide the remaining stitches by number of decreases to be done (= e.g. 10) = 13. I.e. in this example knit approx. every 12th and 13th stitch together when decreasing 10 stitches. INCREASE TIP (applies to sides on body and mid under sleeves): Begin 3 stitches before marker thread, make 1 yarn over, knit 6 (marker thread is in the middle of these 6 stitches), make 1 yarn over (= 2 stitches increased). On next row/round work yarn overs twisted to avoid holes. RAGLAN: Decrease for raglan on each side of the 4 marker threads in every transition between body and sleeves (= 8 stitches decreased on every decrease row). All decreases are done from the right side! Begin 3 stitches before marker and knit 2 together, knit 2 (marker thread is in the middle of these 2 stitches), slip 1 stitch knitwise, knit 1, pass slipped stitch over stitch worked (= 2 stitches decreased). BUTTONHOLES: Decrease for buttonholes on right band (when garment is worn): 1 buttonhole = purl fourth and fifth stitch from edge together and make 1 yarn over. On next row (wrong side) knit the yarn over to make a hole. Decrease for buttonholes when piece measures: S: 2, 9, 16, 22, 29, 36, 42 and 48 cm. M: 2, 9, 16, 23, 30, 37, 44 and 50 cm. L: 2, 9, 16, 23, 30, 37, 44 and 52 cm. XL: 2, 9, 16, 24, 31, 38, 46 and 54 cm. XXL: 2, 10, 18, 25, 33, 41, 48 and 56 cm XXXL: 2, 10, 18, 26, 34, 42, 50 and 58 cm. NOTE! The last of these 8 buttonholes is decreased on first row from right side after picking up stitches for neck edge as explained in pattern. ---------------------------------------------------------- JACKET: Body is worked back and forth on circular needle from mid front, bottom up. Sleeves are worked in the round on double pointed needles/a short circular needle, bottom up. Then slip body and sleeves together and finish yoke back and forth on circular needle from mid front. BODY: Cast somewhat loosely on 292-292-292-384-384-384 stitches (including 8 band stitches in each side towards mid front) on circular needle size 3 mm / US 2.5 with Flora. Work 2 ridges in GARTER STITCH - see explanation above. Knit 1 row from right side and purl 1 row from wrong side with 2 edge stitches in garter stitch in each side. Work next row as follows from right side: 8 stitches BAND - see explanation above, work A.1 until 8 stitches remain on row (= 12-12-12-16-16-16 repetitions of 23 stitches), and finish with 8 stitches BAND. Continue pattern like this. REMEMBER THE KNITTING GAUGE and remember BUTTONHOLES on right band - see explanation above. When A.1 has been worked, there are 208-220-244-272-288-320 stitches on needle. Insert 1 marker thread 56-59-65-72-76-84 stitches in from each side (= 96-102-114-128-136-152 stitches between marker threads on back piece). Work next row as follows from right side: Work 8 stitches band as before, A.2 (= 32-34-38-32-34-38 stitches), 48-51-57-80-85-95 stitches in stockinette stitch, A.2 (= 32-34-38-32-34-38 stitches mid back – read KNITTING TIP), 48-51-57-80-85-95 stitches in stockinette stitch, A.2 (= 32-34-38-32-34-38 stitches) and finish with 8 stitches band as before. Continue pattern like this. AT THE SAME TIME when piece measures 12 cm / 4¾" on the shortest, decrease 1 stitch on each side of both marker threads - read DECREASE TIP-1 (= 4 stitches decreased). Decrease like this every 2-2-4-4-4-4 cm / ¾"-¾"-1½"-1½"-1½"-1½" a total of 3-3-2-2-2-2 times in each side = 196-208-236-264-280-312 stitches. When piece measures 22-20-20-22-20-20 cm / 8⅝"-7⅞"-7⅞"-8⅝"-7⅞"-7⅞", increase 1 stitch on each side of both marker threads – read INCREASE TIP (= 4 stitches increased). Increase like this every 2 cm / ¾" 5-6-6-5-6-6 times in total in each side = 216-232-260-284-304-336 stitches. Work until piece measures 32 cm on the shortest in all sizes. Work next row as follows from wrong side: Work 53-57-63-69-73-80 stitches as before (= front piece), bind off 10-10-12-12-14-16 stitches for armhole, work 90-98-110-122-130-144 stitches as before (= back piece), bind off 10-10-12-12-14-16 stitches for armhole and work the remaining 53-57-63-69-73-80 stitches as before (= front piece). Put piece aside and work the sleeves. SLEEVE: Cast on 87-87-87-95-95-95 stitches on double pointed needles or a short circular needle size 3 mm / US 2.5 with Flora. Work 2 ridges in GARTER STITCH in the round - see explanation above. Insert 1 marker thread at beginning of round (= mid under sleeve). Work next round as follows: * Knit 1, purl 3 *, work from *-* 8-8-8-9-9-9 times in total, work A.3 (= 23 stitches), * purl 3, knit 1 *, work from *-* 8-8-8-9-9-9 times in total. Continue with rib and pattern like this. When piece measures 2 cm / ¾" on the shortest, decrease all purl 3 (in the rib) to purl 2 by purling 2 together in every purl section = 71-71-71-77-77-77 stitches. When A.3 has been worked, there are 65-65-65-73-73-73 stitches on needle. Then work in stockinette stitch in the round, but continue A.4 over A.3 until finished measurements. AT THE SAME TIME when piece measures 8 cm / 3⅛" on the shortest, increase 2 stitches mid under sleeve - read INCREASE TIP. Increase like this 6-10-14-13-15-18 times in total in S: On every 18th round, in M: On every 9th round, in L and XL: On every 6th round, in XXL: On every 5th round, and in XXXL: On alternately every 3rd and every 4th round = 77-85-93-99-103-109 stitches. When sleeve measures 38-37-35-33-32-30 cm / 14⅞"-14½"-13¾"-13"-12½"-11¾" (shorter measurements in the larger sizes because of longer yoke), bind off 10-10-12-12-14-16 stitches mid under sleeve (bind off 5-5-6-6-7-8 stitches on each side of marker thread) = 67-75-81-87-89-93 stitches remain on needle. Put piece aside and knit the other sleeve the same way. YOKE: Slip sleeves on to same needle as body where armholes were bound off (without working the stitches first) = 330-362-398-434-454-490 stitches on needle. Remove the marker threads in piece. Insert 1 marker thread in every transition between body and sleeves (= 4 new marker threads). Begin from right side, continue back and forth in stockinette stitch and A.2 as before with 8 stitches band in each side as before. Continue in addition A.4 over the middle 3 stitches on each sleeve. When 2 rows have been worked back and forth over all stitches, begin decrease for RAGLAN on next row from the right side - see explanation above. Decrease for raglan every 4th row (i.e. every other row from right side) 6-5-4-4-6-7 times in total and then every other row (i.e. every row from right side) 17-22-27-30-30-31 times in total. AT THE SAME TIME when piece measures 48-50-52-54-56-58 cm / 19"-19¾"-20½"-21¼"-22"-22¾", slip the outermost 21-21-23-26-28-33 stitches in each side towards mid front on 1 stitch holder for neck, i.e. this is done at the beginning of the next 2 rows but work them before slipping them on stitch holder to avoid cutting the yarn. Continue back and forth as before and bind off for neck at the beginning of every row in each side as follows: bind off 3 stitches 1 time and 2 stitches 1 time. Then bind off 1 stitch at the beginning of every row in each side until decreases for raglan are finished. After all decreases for raglan and bind offs for neck, approx. 92-92-92-98-98-108 stitches remain on needle. NECK EDGE: Pick up from right side approx. 146-146-150-162-166-186 stitches around the neck (including stitches on stitch holders at the front) on a circular needle size 2.5 mm / US 1.5. Knit 1 row from wrong side. Then 1 knit row from right side while decreasing evenly to 136-136-140-150-154-160 stitches – read DECREASE TIP-2 and remember to decrease for last buttonhole on this row. Knit 1 row from wrong side, knit 1 row from right side and knit 1 row from wrong side. Bind off knitting from right side. Jacket measures approx. 54-56-58-60-62-64 cm / 21¼"-22"-22¾"-23⅝"-24⅜"-25¼" from shoulder and down. ASSEMBLY: Sew the openings under the sleeves. Sew the buttons on to the left band. |
||||||||||||||||||||||||||||||||||
Diagram explanations |
||||||||||||||||||||||||||||||||||
|
||||||||||||||||||||||||||||||||||
 |
||||||||||||||||||||||||||||||||||
 |
||||||||||||||||||||||||||||||||||
 |
||||||||||||||||||||||||||||||||||
 |
||||||||||||||||||||||||||||||||||
 |
||||||||||||||||||||||||||||||||||
Have you finished this pattern?Tag your pictures with #dropspattern #missfloracardigan or submit them to the #dropsfan gallery. Do you need help with this pattern?You'll find 36 tutorial videos, a Comments/Questions area and more by visiting the pattern on garnstudio.com. © 1982-2026 DROPS Design A/S. We reserve all rights. This document, including all its sub-sections, has copyrights. Read more about what you can do with our patterns at the bottom of each pattern on our site. |
||||||||||||||||||||||||||||||||||


With over 40 years in knitting and crochet design, DROPS Design offers one of the most extensive collections of free patterns on the internet - translated to 17 languages. As of today we count 325 catalogs and 12298 patterns - 12288 of which are translated into English (US/in).
We work hard to bring you the best knitting and crochet have to offer, inspiration and advice as well as great quality yarns at incredible prices! Would you like to use our patterns for other than personal use? You can read what you are allowed to do in the Copyright text at the bottom of all our patterns. Happy crafting!
Post a comment to pattern DROPS 186-23
We would love to hear what you have to say about this pattern!
If you want to leave a question, please make sure you select the correct category in the form below, to speed up the answering process. Required fields are marked *.