
Popular categories
Looking for a yarn?


Comments / Questions (33)
![]() Ver wrote:
Ver wrote:
Hola el patron esta disponible en español? no lo encuentro, si alguien me puede guiar le agradezco mucho
19.09.2019 - 16:14DROPS Design answered:
Hola Ver, Aquí está el link: https://www.garnstudio.com/pattern.php?id=8476&cid=23. Para cambiar de idioma pulsa el botón bajo la foto.
24.09.2019 - 23:55
![]() Annedore wrote:
Annedore wrote:
Hallo ihr lieben, danke auch von mir für die vielen kostenlosen Anleitungen. Ich hab das Tuch mit einer dünnen wolle gestrickt und es kleiner gemacht , sieht auch gut aus. Da kommt man mit 100g auch schon ziemlich weit.Die verkürzten Reihen sind ne gute Idee,allerdings finde ich, dass sich das Tuch so sehr ausdehnt und verzieht, mal sehen wie es sich nach dem dämpfen und spannen verhält
15.07.2019 - 09:05
![]() Lilou wrote:
Lilou wrote:
Bonjour, il y a pas mal de modèles que j'aimerai bien faire, mais qui me rebute, soit parce que les explications et/ou diagrammes sont trop compliqués. De plus, beaucoup trop de modèles avec aiguilles doubles pointes!!! en fait, beaucoup trop de modèles, pour tricoteuses averties. Dommage!.
02.06.2019 - 09:14DROPS Design answered:
Bonjour Lilou, pensez à consulter notre FAQ et notre rubrique Astuces & Aide, vous y trouverez notamment comment adapter un modèle sur aiguilles droites. Bon tricot!
03.06.2019 - 10:55
![]() Laurence wrote:
Laurence wrote:
Bonjour, pouvez vous m’expliquer comment on fait suivre le fil marqueur d’un rang à l’autre quand il se trouve dans la maille et non entre 2 mailles. Franchement je n’y arrive pas et je n’ai pas trouver de vidéo. Merci par avance.
01.06.2019 - 23:55DROPS Design answered:
Bonjour Laurence, vous pouvez utiliser des marqueurs que vous pourrez accrocher sur chacune des mailles indiquées, ou bien mettre un fil marqueur avant (sur l'endroit) la maille concernée. Bon tricot!
04.06.2019 - 08:40
![]() Amélie wrote:
Amélie wrote:
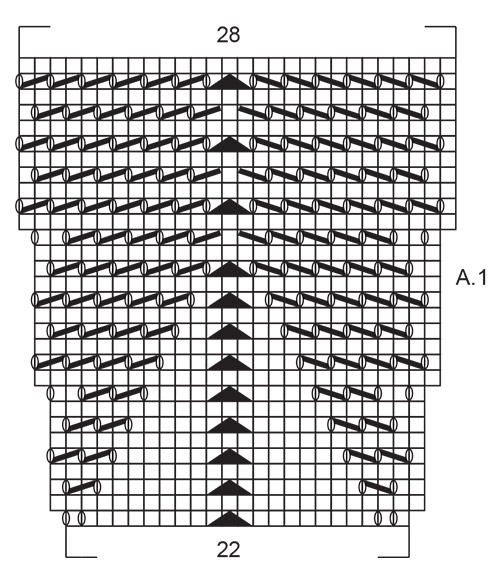
Et oui encore moi ! Une question le diagramme il se tricote de bas en haut ? Soit de 22 à 28 ?? Parce que sinon je comprend pas 😕
25.04.2019 - 21:03DROPS Design answered:
Bonjour Amélie, tout à fait, les diagrammes se lisent toujours (sauf indication contraire explicite) de bas en haut: on commence ici par 22 m et on aura 28 m quand A.1 sera terminé. plus d'infos ici sur les diagrammes. Bon tricot!
26.04.2019 - 08:48
![]() Amélie wrote:
Amélie wrote:
D’accord j’ai fais. Et les rangs raccourcis je les fais quand ?
18.03.2019 - 14:52DROPS Design answered:
Bonjour Amélie, quand vous avez vos 37 m, vous répétez les 4 rangs en augmentant au rang 1 à 2 m du bord, puis au rang suivant sur toutes les mailles à chaque marqueur - au rang 2, vous augmentez à 2 m du bord, puis vous tricotez 2 rangs sur toutes les mailles (rangs 3 et 4). Bon tricot!
19.03.2019 - 09:16
![]() Amélie wrote:
Amélie wrote:
J’ai rien compris je n’arrive pas à commencer. J’ai mes 13 mailles avec un marqueur que le 2,4,6,8,10 et 12 eme maille. Je suis à l’endroit je devrait donc tricoter deux mailles faire un jeter et tricoter jusqu’à la première maille avec un fil marqueur. Sauf que là je suis au début donc je ne peux pas tricoter deux mailles puisque j’ai tout de suite un fil marqueur 🤔🙃 je suis perdue. Puis-je avoir de l’aide s’il vous plaît.
18.03.2019 - 12:41DROPS Design answered:
Bonjour Amélie, votre 1er marqueur est dans la 2ème maille, vous tricotez donc 1 rang endroit en augmentant 1 m avant chacune des mailles avec un marqueur: 1 m end, 1 jeté, 1 m end (1er marqueur), 2 m end, 1 jeté, 1 m end (2ème marqueur) et ainsi de suite. Bon tricot!
18.03.2019 - 14:02
![]() Helga wrote:
Helga wrote:
Ich habe das Tuch gerade originalgetreu nachgestrickt, bin aber mit der angegebenen Wollmenge überhaupt nicht hingekommen. Ich habe von beiden Farben jeweils knapp 150 g verbraucht. Im Netz kann man nachlesen, dass das auch schon anderen Strickerinnen passiert ist. Abgesehen davon: Vielen Dank für die vielen kostenlosen Muster, ich habe schon etliches nachgestrickt, bisher ohne Probleme.
05.11.2018 - 19:37
![]() Anne Birthe Olsen wrote:
Anne Birthe Olsen wrote:
Kan det være rigtigt, at de to yderste sider bliver bredere end de stykker mellem de 6 midterste udtagninger? (Der er jo 8 udtagninger til 7 "mellemstykker")
04.11.2018 - 21:52DROPS Design answered:
Hej Anne Birthe, ja når du strikker vendepinde tager du også ud i siden, så de yderste stykker bliver bredere. God fornøjelse!
08.11.2018 - 08:42
![]() Camilla wrote:
Camilla wrote:
Hei. Jeg lurer på om det er riktig at jeg skal strikke rett fra vrangen når det står strikk 1 pinne rett fra vrangen?
29.09.2018 - 20:08DROPS Design answered:
Hei Camilla. Ja, det stemmer at du skal strikke rett fra vrangen når det står det. Om du strikker rett fra retten og rett fra vrangen vil du få rillemønster, og det er riktig at du skal ha rillemønster på dette sjalet. God fornøyelse
01.10.2018 - 11:20
|
||||||||||||||||
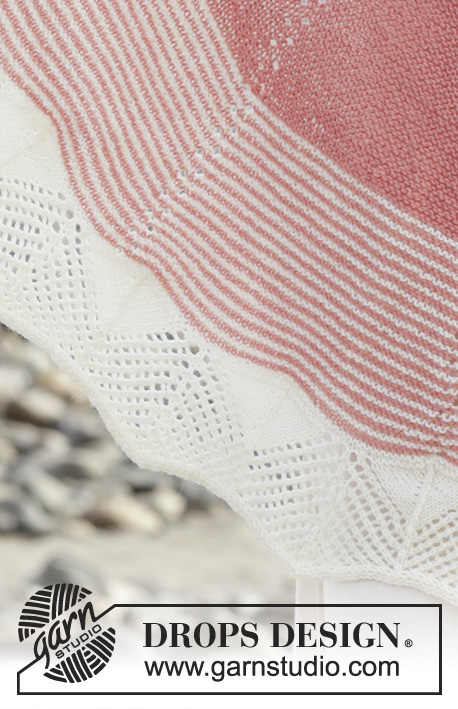
Strawberry Sorbet#strawberrysorbetshawl |
||||||||||||||||
 |
 |
|||||||||||||||
Knitted shawl with garter stitch, lace pattern and semi-circle shape. The piece is worked top down in DROPS Flora.
DROPS 190-15 |
||||||||||||||||
|
INFORMATION FOR THE PATTERN: RIDGE/GARTER STITCH (worked back and forth): 1 ridge = Knit 2 rows. PATTERN: See diagram A.1. The diagram shows all the rows in the pattern seen from the right side. ---------------------------------------------------------- SHAWL: The shawl is worked top down. Work back and forth on circular needle so that you have room for all the stitches. Cast on 7 stitches with circular needle size 4.5 mm / US 7 and peach pink. Work as follows from the right side: Knit 1 stitch, * 1 yarn over, knit1 stitch *, repeat from *-* a total of 6 times = 13 stitches. Knit 1 row from the wrong side. Now insert 6 marker threads in the piece without working the stitches, the marker threads are inserted in the stitches and follow your work upwards. Insert the marker threads in the following stitches: Stitch 2, stitch 4, stitch 6, stitch 8, stitch 10 and stitch 12. Then work and increase as follows: Knit 1 row and increase by making a yarn over before each stitch with a marker thread = 6 yarn overs. NOTE! All yarn overs are then knitted to leave holes. Knit 1 row from the wrong side, knit 1 row from the right side (without increasing) and knit 1 row from the wrong side = 19 stitches. Knit 1 row and increase by making a yarn over after each stitch with a marker thread = 6 yarn overs. Knit 1 row from the wrong side, knit 1 row from the right side (without increasing) and knit 1 row from the wrong side = 25 stitches. Knit 1 row and increase by making a yarn over before each stitch with a marker thread = 6 yarn overs. Knit 1 row from the wrong side, knit 1 row from the right side (without increasing) and knit 1 row from the wrong side = 31 stitches. Knit 1 row and increase by making a yarn over after each stitch with a marker thread = 6 yarn overs. Knit 1 row from the wrong side, knit 1 row from the right side (without increasing) and knit 1 row from the wrong side = 37 stitches. Continue with the same increases, but in addition, you will work short rows. Work as follows: ROW 1 with short row (= right side): Knit 2 stitches, 1 yarn over and knit to first stitch with a marker thread on this row, turn and knit back from the wrong side. Then knit 1 row from the right side where you increase before/after the marker thread stitches. ROW 2 with short row (= wrong side): Knit 2 stitches, 1 yarn over and knit to first stitch with a marker thread on this row, turn and knit back from the right side. Then knit 1 row from the wrong side = a total of 8 stitches increased on rows 1-2. ROW 3 (= right side): Knit. ROW 4 (= wrong side): Knit. Continue by repeating rows 1-4 (increase alternately before and after the marker thread stitches as before) until the piece measures approx. 35 cm / 13¾" (rows 1-4 have been worked a total of 30 times) and there are 277 stitches on the needle. Now work stripes with off white and peach pink as follows: * Change to off white and work rows 1 and 2 (with short rows). Change to peach pink and work rows 3 and 4 *. Repeat from *-* until the piece measures approx. 51 cm / 20" (rows 1-4 are worked with stripes a total of 16 times) and there are 405 stitches on the needle. From here, work with off white to finished length. Repeat rows 1-2 one more time = 413 stitches on needle. Work 1 RIDGE - see description above, and increase 10 stitches evenly on the first row of these ridges as follows: Knit 22 stitches, * 1 yarn over, knit 41 stitches *, repeat from *-* a total of 9 times and make 1 yarn over and knit 22 stitches. Knit 1 row where all yarn overs are knitted twisted = 423 stitches (the number of stitches is divisible by 22 + 5 stitches). Now continue working according to diagram A.1 with off white and stockinette stitch. (Row 1 = right side): Work 2 edge stitches in garter stitch, work A.1 over the next 418 stitches (= 19 times in width and there are 3 stitches left on the row), work 1 stitch stockinette stitch and 2 edge stitches in garter stitch. Work the diagram like this 1 time in height. The piece measures approx. 63 cm / 24¾" and there are 537 stitches on the needle. BINDING OFF: On the next row from the right side, you will bind off with i-cord binding off. It is important that the edge is bind off loosely so that the shawl has a nice shape and hangs neatly. You can use a larger needle size to bind off if necessary and make sure that all stitches are loose. Work and bind off as follows: * Knit 2 stitches, the next 2 stitches are knitted twisted together. Push the 3 stitches from the right needle back onto the left needle (in the same order) *, repeat from *-* until all stitches on the left needle have been bind off and there are 3 stitches left on the right needle. Push the stitches onto the left needle and cast them off with knit. Cut the strand and sew together the bind-off from the last 3 stitches so that the end of the shawl is neat. Fasten all loose strands. |
||||||||||||||||
Diagram explanations |
||||||||||||||||
|
||||||||||||||||
 |
||||||||||||||||
Have you finished this pattern?Tag your pictures with #dropspattern #strawberrysorbetshawl or submit them to the #dropsfan gallery. Do you need help with this pattern?You'll find 21 tutorial videos, a Comments/Questions area and more by visiting the pattern on garnstudio.com. © 1982-2026 DROPS Design A/S. We reserve all rights. This document, including all its sub-sections, has copyrights. Read more about what you can do with our patterns at the bottom of each pattern on our site. |
||||||||||||||||


With over 40 years in knitting and crochet design, DROPS Design offers one of the most extensive collections of free patterns on the internet - translated to 17 languages. As of today we count 324 catalogs and 12290 patterns - 12280 of which are translated into English (US/in).
We work hard to bring you the best knitting and crochet have to offer, inspiration and advice as well as great quality yarns at incredible prices! Would you like to use our patterns for other than personal use? You can read what you are allowed to do in the Copyright text at the bottom of all our patterns. Happy crafting!
Post a comment to pattern DROPS 190-15
We would love to hear what you have to say about this pattern!
If you want to leave a question, please make sure you select the correct category in the form below, to speed up the answering process. Required fields are marked *.