
Popular categories
Looking for a yarn?


Comments / Questions (40)
![]() Marj Crane wrote:
Marj Crane wrote:
P.S.: I'd like to keep the sleeves as narrow (that is, in the Small-size width) if I can, given the other alterations I've asked about. Is that possible? Many, many, thanks!!!!!!!!!!!!!!!!!!!!!!!!
16.12.2020 - 21:15
![]() Marj Crane wrote:
Marj Crane wrote:
I am 4 feet 10 inches tall. My bust is 37 inches (94 cm.), & my hips are 41 inches (104 cm.). I'm knitting the yoke in the S. size because I have narrow shoulders. I've completed chart A-3 except for its last 2 rounds. I have 275 stitches on my needles as the pattern requires. How many stitches should I "increase evenly" to get to 94 cm. at the bust line? Then, where & how do I increase so that the sweater measures 42 inches (107 cm.) at the hip? How do I get 58 cm. length? THANK YOU!!!!
16.12.2020 - 21:08DROPS Design answered:
Dear Mrs Crane, we are unfortunately not able to adjust every pattern to every single request, thank you for your comprehension. You can get help from the measurements in the chart for every size to adjust to your own fit - do not hesitate to contact the yarn where you bought the yarn, they should be able to assist you there, even per mail or telephone. Happy knitting!
17.12.2020 - 08:49
![]() Marj Crane wrote:
Marj Crane wrote:
Unless I'm missing something, the pattern doesn't seem to indicate where markers go or how many stitches there are between markers. Where do I place "marker threads"? May I use my plastic ring markers instead of "threads" as i do on other top-down patterns? Right now I have a plastic ring marker in the middle of the back and have worked all the short rows/elevation and round 1 of A1. I'm using size Small for the yoke. Sorry to have so many questions for you! Thank you!
02.11.2020 - 23:33DROPS Design answered:
Dear Mrs Crane, we do not use any marker thread for yoke, ie you work diagrams: A.1, then A.2 then A.3 and A.4 - at the same time you will increase evenly on the rows with an arrow in the diagrams. Then divide piece for body/sleeves - you then add a marker thread (or use a marker as you rather like, your choice) in the middle of the new stitches cast on mid under each sleeve. You will then start from one of this marker and increase on the markers. Hope this will help. Happy knitting!
03.11.2020 - 08:59
![]() Marj Crane wrote:
Marj Crane wrote:
After knitting the neck ribbing the pattern says to DECREASE 12 stitches. Should this say, instead, INCREASE 12 stitches? It seems odd to decrease after ribbing, which by its nature is tighter than stockinette. If, by chance, I'm correct what then are the subsequent stitch counts? Thanks again for your help!
01.11.2020 - 23:54DROPS Design answered:
Hi Marj, The pattern has more stitches on the neck to avoid it being tight. These are decreased when the neck is finished. Happy knitting!
02.11.2020 - 07:33
![]() Marj Crane wrote:
Marj Crane wrote:
On page 7 you refer to "A5A" and "A6A." I see charts A5 and A6 on page 9, but I don't see any charts labeled "A5A" and "A6A." Are the extra A's errors? Ordinarily I put a marker at every segment of a pattern, for example every 10 stitches. Doing so helps me keep track of where I am. I see in this pattern there are many yarn-overs. Does that mean my marking system won't work so don't use it? How do you "twist" a yarn-over? Thank you!!!
01.11.2020 - 02:57DROPS Design answered:
Dear Marj, yes, it seems the As are errors, we'll correct the pattern as soon as possible. It's recommended to separate each pattern repeat with a marker, instead of a certain number of stitches. That way, you can both keep track on how many repeats you've worked and the number of stitches you have. As for the method of twisting a yarn over, you can check the following lesson: https://www.garnstudio.com/video.php?id=12&lang=en Happy knitting!
01.11.2020 - 16:34
![]() Karen Bishop wrote:
Karen Bishop wrote:
Is it possible to have the sizes in inches instead of S, M, L etc. I am hoping to knit this for someone else, so the measurements are what I am working to?
23.10.2020 - 16:50DROPS Design answered:
Dear Karen, You can find the measurements of the piece on the shcematics drawing at the bottom of the page, below the pattern. Happy Knitting!
24.10.2020 - 03:50
![]() María Luisa wrote:
María Luisa wrote:
Buenas tardes, estoy trabajando el canesú en mi talla que es la XXL. Al terminar el diagrama A-4 tengo 594 puntos y no 396, ya que este diagrama a partir de la fila 17 aumenta 2 puntos en cada repetición. Por tanto al continuar y separar puntos para mangas, espalda y frente, ustedes han repartido puntos contando que para la talla XXL son 396= 60+78+120+78+60 y no es así. ¿Pueden decirme cuántos puntos y cómo los reparto para la talla XXL con 594 puntos? Muchas gracias!
09.12.2019 - 19:55DROPS Design answered:
Hola Maria Luisa. No hay aumentos en la fila 17. Los aumentos se trabajan solo en las filas marcadas con flechas y se aumenta el número de puntos que indica el patrón. Los dos cuadrados extra en el diagrama enseñan que la repetición del dibujo a partir de la fila 17 es de 6 puntos y no de 4.
15.12.2019 - 19:05
![]() Sarah wrote:
Sarah wrote:
Bonjour, c'est mon premier pull. Je me demandais donc quelle longueur (40 ou 80cm) utiliser à chaque fois que vous mentionnez un numéro d'aiguille ? Je tricote la taille XXL (si cela change quelque chose). Merci par avance. :)
23.02.2019 - 11:47DROPS Design answered:
Bonjour Sarah, la circonférence de l'aiguille doit toujours être inférieure à la circonférence de l'ouvrage quand on tricote en rond. Ainsi, vous commencez avec l'aiguille circulaire de 40 cm pour les côtes et l'empiècement, puis, quand vous aurez suffisamment de mailles, continuez avec celle de 80 cm (au cours de l'empiècement, quand on augmente). Vous reprendrez les mailles des manches avec celle de 40 cm et continuerez avec les doubles pointes quand vous aurez diminué trop de mailles pour avoir suffisamment de place pour l'aiguille de 40 cm. Bon tricot!
25.02.2019 - 08:26
![]() Line wrote:
Line wrote:
A4 i S og M avsluttes med en blå råd. A5 begynner med to blå rader. Dvs 3 blå på rad. I alle andre str er det bare 2 rader der. En feil, eller skal det være slik? Bildene viser bare 2 rader.
06.01.2019 - 13:04DROPS Design answered:
Hei Line. det skal være kun 2 blå rader i størrelse S og M: 1 der arbeidet deles inn til ermer og bol, og den første raden i A.5. Dette er nå endret. God fornøyelse
08.01.2019 - 12:56
![]() Christine wrote:
Christine wrote:
Merci pour votre réponse. Je connais cette technique. Le problème est que je suis en taille S/M et non XXL comme vous le pensez. J\'ai donc tricoté le motif A5 auquel manquent les trois derniers rangs, et ensuite le motif A6 complet. Autrement dit, je n\'ai que 2 rangs bleus entre les deux. Impossible de broder les points ici. Y a-t-il un moyen de couper, reprendre au tricot puis recoudre la partie déjà tricotée? Encore merci pour votre aide.
16.04.2018 - 14:10DROPS Design answered:
Bonjour Christine, je pensais vous faire gagner du temps... pour couper le tricot, vous pouvez utiliser cette technique, gardez bien les mailles des 2 côtés, vous pourrez ensuite assembler le bas du pull en grafting aux mailles que vous aurez tricotées sur les derniers tours de A.5. Bon tricot!
16.04.2018 - 15:31
|
|||||||||||||
Lofoten#lofotensweater |
|||||||||||||
 |
 |
||||||||||||
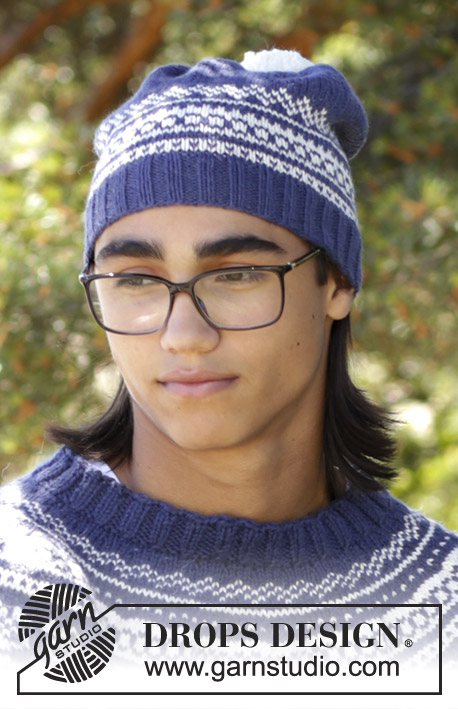
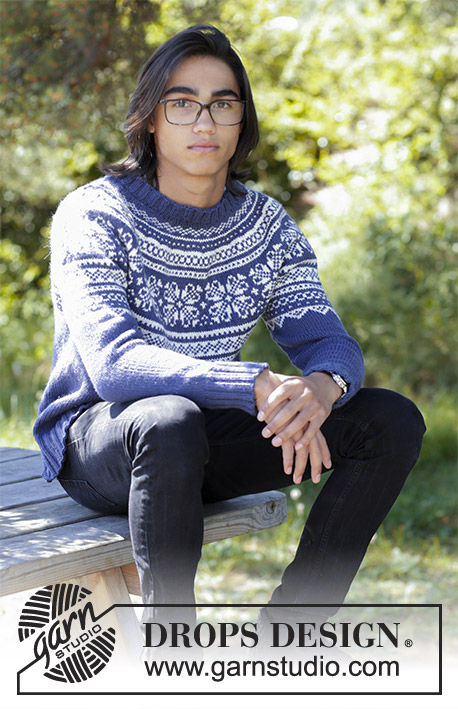
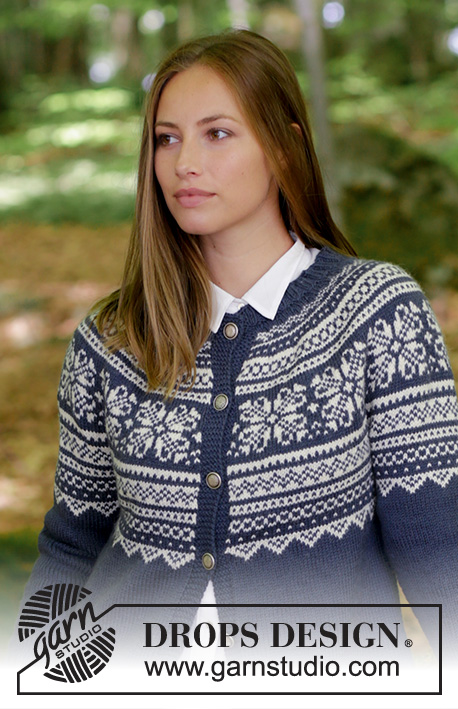
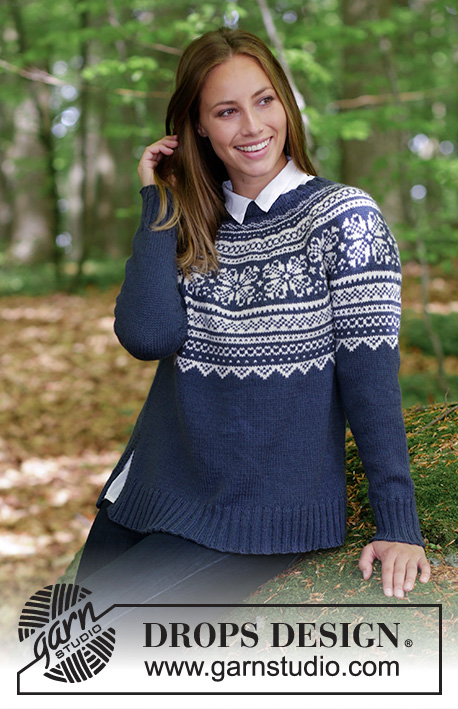
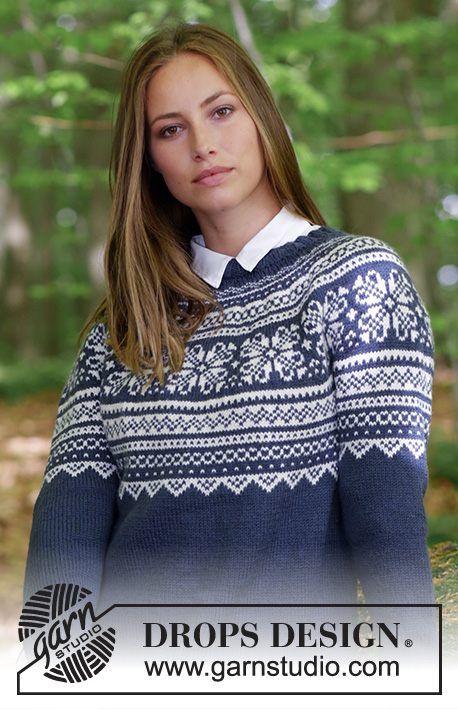
Knitted jumper with round yoke, multi-colored Norwegian pattern and A-shape, worked top down. Sizes S - XXXL. The piece is worked in DROPS Lima.
DROPS 181-9 |
|||||||||||||
|
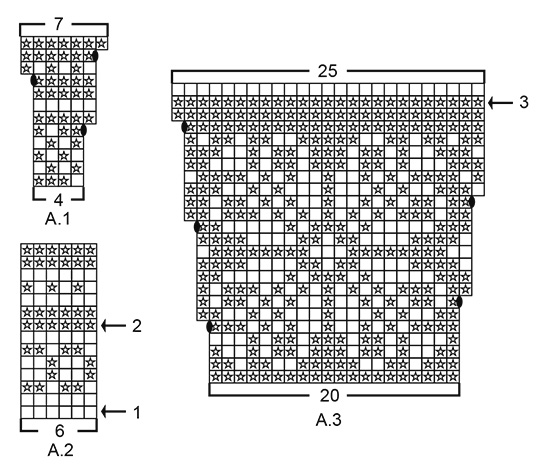
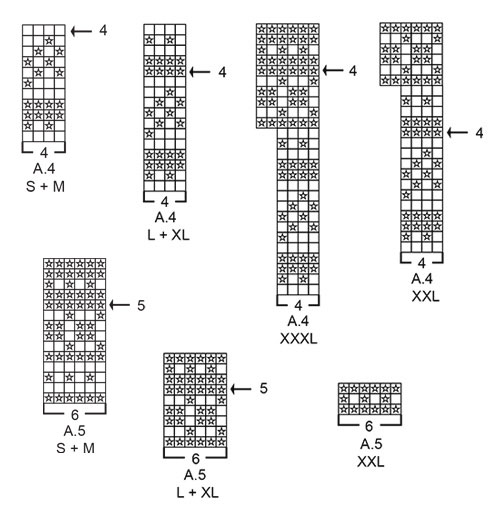
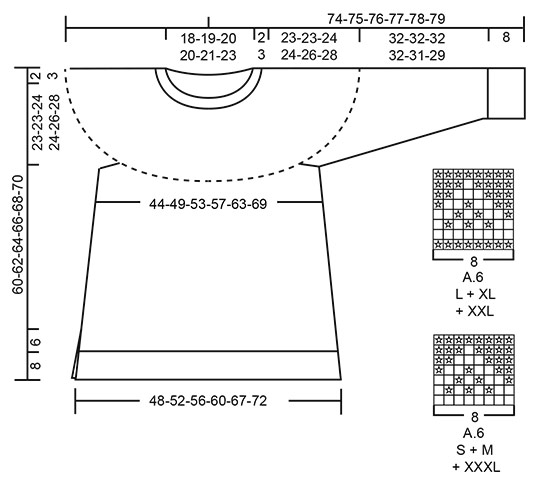
INFORMATION FOR THE PATTERN: RIDGE/GARTER STITCH (worked back and forth): 1 ridge = Knit 2 rows. DECREASE/INCREASE TIP: To work out how to decrease/increase evenly, count the total number of stitches on the needle (e.g. 104 stitches) and divide by the number of decreases/increases to be made (e.g. 12) = 8.6. In this example, knit together alternately every 7th and 8th stitch and every 8th and 9th stitch when decreasing. If you are increasing make 1 yarn over after alternately every 8th and 9th stitch; on the next round, knit the yarn overs twisted to prevent holes. ELEVATION: Insert 1 marker in the middle stitch on the needle (= mid back). Start from the right side with dark blue and knit until you have worked 11-11-12-13-13-14 stitches past the marker, turn, tighten the strand and purl 22-22-24-26-26-28 stitches. Turn, tighten the strand and knit 33-33-36-39-39-42 stitches, turn, tighten the strand and purl 44-44-48-52-52-56 stitches. Turn, tighten the strand and knit 55-55-60-65-65-70 stitches, turn, tighten the strand and purl 66-66-72-78-78-84 stitches. Turn, tighten the strand and knit to mid back. KNITTING TIP-1: To prevent the knitting gauge becoming tighter when working pattern, it is important that the strands do not tighten at the back of the piece. You can increase a needle size when working pattern if this is a problem. PATTERN: See diagrams A.1 to A.6. Choose diagram for your size. The whole of the pattern is worked in stockinette stitch. INCREASE TIP (for the sides of body): Start 2 stitches before the marker thread, make 1 yarn over, knit 4 (the marker thread sits in the middle of these 4 stitches), make 1 yarn over (= 2 stitches increased). On the next round, knit the yarn overs twisted to prevent holes. DECREASE TIP (for mid under sleeve): Start 2 stitches before the marker thread, knit 2 together, marker thread, slip 1 stitch as if to knit, knit 1, pass the slipped stitch over the knitted stitch (= 2 stitches decreased). ---------------------------------------------------------- JUMPER: The piece is worked in the round with circular needle, top down. It is divided for the split at the bottom of the body, front and back pieces are finished separately. The sleeves are worked in the round with short circular needle, top down. Change to double pointed needles when necessary. NECKLINE: Cast on 104-108-116-124-128-136 stitches with circular needle size 3 mm / US 2.5 and dark blue. Knit 1 round. Then work rib (= knit 2 / purl 2). When the rib measures 2-2-2-3-3-3 cm / ¾"-¾"-¾"-1⅛"-1⅛"-1⅛" knit 1 round where you decrease 12-12-16-16-16-16 stitches evenly on round – read DECREASE/INCREASE TIP = 92-96-100-108-112-120 stitches. Continue by working yoke as described below. YOKE: Change to circular needle size 4 mm / US 6. Knit 1 round. For a better fit, you can now work an ELEVATION in the back of the neck – see description above. When the elevation has been completed, work A.1 in the round (= 23-24-25-27-28-30 repeats of 4 stitches). Continue the pattern and increase as shown in the diagram. Read KNITTING TIP-1 and REMEMBER THE GAUGE! When A.1 has been completed, there are 161-168-175-189-196-210 stitches on the needle. Continue by working A.2 – AT THE SAME TIME on the first round, increase 31-36-47-51-56-60 stitches evenly on round (marked with arrow-1 in A.2) = 192-204-222-240-252-270 stitches on the needle. Continue the pattern. On the round marked with arrow-2 in A.2 increase 28-36-38-40-48-50 stitches evenly on round = 220-240-260-280-300-320 stitches. When A.2 has been completed, work A.3 in the round (= 11-12-13-14-15-16 repeats of 20 stitches). Continue the pattern and increase as shown in the diagram. After the last increase in A.3 there are 275-300-325-350-375-400 stitches on the needle. On the round marked with arrow-3 in A.3 increase 1-8-11-10-9-8 stitches evenly on the round = 276-308-336-360-384-408 stitches. When A.3 has been completed, work A.4 in the round (choose diagram for your size = 69-77-84-90-96-102 repeats of 4 stitches). On the round marked with arrow-4 in A.4 increase 10-8-14-8-12-16 stitches evenly on round = 286-316-350-368-396-424 stitches. When A.4 has been completed, the piece measures approx. 25-25-26-27-29-31 cm / 9¾"-9¾"-10¼"-10½"-11½"-12¼" from the cast on edge mid front. The next round is worked as follows with dark blue: Knit 43-47-51-55-60-65 stitches (= ½ back piece), place the next 58-64-74-74-78-82 stitches on a thread for sleeve, cast on 8-8-10-10-12-14 stitches (= in the side under the sleeve), knit 85-94-101-110-120-130 stitches (= front piece), place the next 58-64-74-74-78-82 stitches on a thread for sleeve, cast on 8-8-10-10-12-14 new stitches on the needle (= in the side under the sleeve) and knit the remaining 42-47-50-55-60-65 stitches (= ½ back piece). Cut the strand. Body and sleeves are finished separately. THE PIECE IS NOW MEASURED FROM HERE! BODY: = 186-204-222-240-264-288 stitches. Insert 1 marker thread in the middle of the 8-8-10-10-12-14 stitches which were cast on under the sleeve in each side and start the round by one of the marker threads. SIZES S, M, L, XL and XXL: Work A.5 in the round (= 31-34-37-40-44 repeats of 6 stitches). On the round marked with arrow-5 in A.5 increase 6-4-2-0-0 stitches evenly on round (for S, M and L, make sure you have the same number of stitches on the front and back pieces) = 192-208-224-240-264 stitches on the needle (96-104-112-120-132 stitches on front and back pieces). When A.5 has been completed, work A.6 in the round (= 24-26-28-30-33 repeats of 8 stitches). Continue the pattern until A.6 has been completed. Continue working as described below in ALL SIZES. SIZE XXXL = 288 stitches. Work A.6 in the round (= 36 repeats of 8 stitches – NOTE: in this size, you do not work A.5 because the repeat has been worked in A.4). Continue until A.6 has been completed. ALL SIZES: = 192-208-224-240-264-288 stitches on the needle and the piece measures approx. 8-8-6-6-4-3 cm / 3"-3"-2¼"-2¼"-1½"-1" from the separation by the armholes. Continue by working stockinette stitch with dark blue. AT THE SAME TIME on the first round after A.6 increase 1 stitch on each side of both marker threads – read INCREASE TIP (= 4 stitches increased). Increase in this way every 8-6-8-6-6-6 cm / 3"-2¼"-3"-2¼"-2¼"-2¼" a total of 2-3-3-3-4-4 times in each side = 200-220-236-252-280-304 stitches. When the piece measures 20-22-23-24-24-24 cm / 8"-8¾"-9"-9½"-9½"-9½" from the separation, work 6 stitches in GARTER STITCH – see description above, in each side (3 stitches in garter stitch on each side of both marker threads – the remaining stitches are continued in stockinette stitch). When you have worked 3 ridges in height, divide the piece by the marker threads for the split and the front and back pieces are continued separately. FRONT PIECE: = 100-110-118-126-140-152 stitches. Continue with stockinette stitch with 3 stitches garter stitch in each side. When the piece measures 51-53-55-57-59-61 cm / 20"-21"-21⅝"-22½"-23¼"-24" from the shoulder (approx. 5 cm / 2" from the separation for split) knit 1 row from the right side where you increase 24-26-30-30-32-36 stitches evenly on row (do not increase over the 3 stitches in garter stitch in each side) = 124-136-148-156-172-188 stitches. Purl 1 row from the wrong side with knit 3 edge stitches in each side (the yarn overs are purled twisted to prevent holes). Change to circular needle size 3 mm / US 2.5 and work the next row from the right side as follows: 3 edge stitches in garter stitch, * knit 2, purl 2 *, repeat from *-* until there are 5 stitches left on the needle, knit 2 and finish with 3 stitches in garter stitch. Continue rib in this way, but after 2 cm / ¾" increase all purl 2 (seen from the right side) to purl 3 by making 1 yarn over in the transition from knit 2 to purl 2 = 153-168-183-193-213-233 stitches. On the next row work the yarn overs twisted to prevent holes. Continue working until the rib measures 8 cm / 3⅛". Change to circular needle size 4 mm / US 6 and bind off with garter stitch over garter stitch, knit over knit and purl over purl. The whole jumper measures approx. 60-62-64-66-68-70 cm / 23⅝"-24⅜"-25¼"-26"-26¾"-27½" from the shoulder down. BACK PIECE: = 100-110-118-126-140-152 stitches. Work in the same way as described under FRONT PIECE. SLEEVE: Place the 58-64-74-74-78-82 stitches from the thread in the one side of the piece on short circular needle size 4 mm / US 6 and, in addition, knit up 1 stitch in each of the 8-8-10-10-12-14 stitches cast on under the sleeve = 66-72-84-84-90-96 stitches. Insert 1 marker thread in the middle of these 8-8-10-10-12-14 stitches and start the round by the marker thread (= mid under the sleeve). READ THE REST OF SLEEVE BEFORE CONTINUING! SIZES S, M, L, XL and XXL: Work A.5A in the round (= 11-12-14-14-15 repeats of 6 stitches). When A.5A has been completed, work A.6A in the round, but be aware that A.6A does not fit mid under sleeve in all sizes. When starting A.6A you have decreased 1-1-2-2-0 stitches mid under the sleeve as described below in ALL SIZES = 64-70-80-80-90 stitches on the needle. In other words, in S, L and XL start A.6A with the first stitch in the diagram and you work 8-10-10 repeats of 8 stitches. In size M, start A.6A with the 2nd stitch in the diagram and in XXL start A.6A with the 8th stitch in the diagram. SIZE XXXL: Work A.6A in the round (= 12 repeats of 8 stitches – NOTE: in this size, you do not work A.5A because this repeat has been worked in A.4A). ALL SIZES: When A.5A and A.6A have been completed, work stockinette stitch onwards with dark blue. AT THE SAME TIME when the piece measures 2-2-2-2-3-3 cm / ¾"-¾"-¾"-¾"-1"-1" from the separation under the sleeve, decrease 2 stitches mid under the sleeve – read DECREASE TIP. Decrease in this way every 2½-2-1½-1½-1-1 cm / ⅞"-¾"-½"-½"-⅜"-⅜" a total of 11-13-18-18-19-21 times = 44-46-48-48-52-54 stitches. Continue working until the sleeve measures 32-32-32-32-31-29 cm / 12½"-12½"-12½"-12½"-12¼"-11½" from the separation (shorter measurements in the larger sizes because of longer yoke). Knit 1 round where you increase 12-10-12-12-12-14 stitches evenly on round = 56-56-60-60-64-68 stitches. Change to double pointed needles size 3 mm / US 2.5 and work rib (= knit 2 / purl 2) for 8 cm / 3⅛". Bind off with knit over knit and purl over purl, but to avoid the bind-off edge being tight, make 1 yarn over after every 8th stitch at the same time as you bind off (the yarn overs are bind off as normal stitches). The sleeve measures approx. 40-40-40-40-39-37 cm / 15¾"-15¾"-15¾"-15¾"-15¼"-14½" from the separation. Work the other sleeve in the same way. |
|||||||||||||
Diagram explanations |
|||||||||||||
|
|||||||||||||
 |
|||||||||||||
 |
|||||||||||||
 |
|||||||||||||
Have you finished this pattern?Tag your pictures with #dropspattern #lofotensweater or submit them to the #dropsfan gallery. Do you need help with this pattern?You'll find 32 tutorial videos, a Comments/Questions area and more by visiting the pattern on garnstudio.com. © 1982-2026 DROPS Design A/S. We reserve all rights. This document, including all its sub-sections, has copyrights. Read more about what you can do with our patterns at the bottom of each pattern on our site. |
|||||||||||||


With over 40 years in knitting and crochet design, DROPS Design offers one of the most extensive collections of free patterns on the internet - translated to 17 languages. As of today we count 324 catalogs and 12290 patterns - 12280 of which are translated into English (US/in).
We work hard to bring you the best knitting and crochet have to offer, inspiration and advice as well as great quality yarns at incredible prices! Would you like to use our patterns for other than personal use? You can read what you are allowed to do in the Copyright text at the bottom of all our patterns. Happy crafting!
Post a comment to pattern DROPS 181-9
We would love to hear what you have to say about this pattern!
If you want to leave a question, please make sure you select the correct category in the form below, to speed up the answering process. Required fields are marked *.