
Popular categories
Looking for a yarn?


Comments / Questions (25)
![]() Rebecca wrote:
Rebecca wrote:
“ When the piece measures 8 cm decrease…” should we be measuring 8cm from the longest or shortest measurement from the scalloped edge? There’s a good 2cm difference between the two measurements depending on whether I measure from the top or bottom of a scallop.
28.10.2025 - 13:29DROPS Design answered:
Hi Rebecca, from the longest. We will add this information on the website. Thank you and happy knitting!
17.11.2025 - 09:30
![]() Vee wrote:
Vee wrote:
I knitted this in the colours shown on the pattern a few years ago. Why did you stop selling Flora in turquoise? It means that knitters cannot replicate the picture shown. Turquoise seems to have disappeared from other yarns too. Bring back turquoise please!
20.11.2024 - 10:52DROPS Design answered:
Thanks for your suggest, it will be forwared to our team. Happy knitting!
20.11.2024 - 13:43
![]() Pernille wrote:
Pernille wrote:
108 masker i halsen i XL…. Hvem kan få den over hovedet?
30.03.2024 - 01:22
![]() Pia wrote:
Pia wrote:
Salve, non ho ben compreso come realizzare lo sprone: " Dal 1°-1°-1°-2°-2°-2° ferro con diminuzioni, continuare lavorando A.1 a ogni lato con il panna". Per una taglia xl significa che dopo 2 ferri successivi alla diminuzione devo lasciare A4 e iniziare A1? A ogni lato di cosa? Grazie
14.06.2020 - 20:25DROPS Design answered:
Buongiorno Pia. Abbiamo corretto il testo: la frase è stata rimossa. La ringraziamo per la segnalazione. Buon lavoro!
14.06.2020 - 22:44
![]() Dagmar wrote:
Dagmar wrote:
With wave patterns do I measure from the long or short part?
23.03.2020 - 17:07DROPS Design answered:
Dear Dagmar, you can measure from the lower part. Happy knitting!
24.03.2020 - 09:33
![]() Bitte Gimming wrote:
Bitte Gimming wrote:
Hei! Vedr lengden på ermene. I oppskrifen står det: "Når ermet måler 44-43-43-42-40-39 cm felles det av osv." Jeg strikker i str M, og da skal lengden være 43 cm. Stemmer det at ermene i de små størrelsene skal være lengre enn i de større? Mvh Bitte
14.06.2018 - 09:24DROPS Design answered:
Hei Bitte. Ja det stemmer, de større størrelsene har videre ermkuppel/skulderparti og derfor strikkes de ikke like lange som de mindre størrelsene. God fornøyelse.
18.06.2018 - 14:10
![]() Rose wrote:
Rose wrote:
Kunt u misschien een aangepaste versie van het patroon plaatsen? Ik ben geen ervaren breister dus durf niet zelf de maat te nemen en het aantal steken uit te rekenen. Ik zou niet weten hoe, eerlijk gezegd! Ik draag confectiemaat S/M, dus een omvang van ongeveer 90 cm gemeten over de billen.
31.05.2018 - 14:26DROPS Design answered:
Dag Rose, Helaas is het voor ons niet mogelijk om patronen naar persoonlijke wens aan te passen. Je kunt wel altijd hulp vragen bij de winkel waar je het garen hebt gekocht en wellicht heb je wat aan de artikelen onder het kopje Tips&Hulp.
31.05.2018 - 15:13Rose wrote:
Hoe kan ik het patroon aanpassen zodat de onderkant van de trui niet wijd uitloopt, maar gewoon recht? Ik houd niet zo van wijde modellen. Ideaal vind ik een beetje getailleerd, dus smaller in de taille, maar aan de onderkant wel aangesloten. Een recht model is ook goed, maar niet wijd uitlopend. Dan wordt het een beetje een jurkje :-)
27.05.2018 - 09:31
![]() Maike wrote:
Maike wrote:
Gibt es eine bestimmte Regel zur Abnahme von Maschen bei gleichzeitigem Erhalt (bzw. rudimentären) Fortsetzen des Mustersatzes - insbesondere beim Stricken in Runden? Stricke ich z.B. immer die letzen 5/4/3... oder die ersten 5/4/3... Maschen des MS um ein gleichmäßiges Muster über die gesamte Passe beizubehalten? Schon jetzt vielen herzlichen Dank!
07.05.2017 - 15:13DROPS Design answered:
Liebe Maike, hier können sie lesen, wie man gleichmäßig abnehmen wird. Viel Spaß beim stricken!
08.05.2017 - 10:59
![]() Katrin Zolchow wrote:
Katrin Zolchow wrote:
Sehr geehrteschön Team, Die Erhöhung im Nacken kann gestrickt werden. Was ist, wenn ich diese nicht stricke? Sitzt dann der hinteren Bereich tiefer, zieht er sich sehr herunter? Wenn ich die Erhöhung stricke verschwindet dann die schöne runde Passform?
07.05.2017 - 07:32DROPS Design answered:
Liebe Frau Zolchow, die Erhöhung wird dann mehr Reihen hinten am Rückenteil geben, so wird die Halsauschnitt weniger hoch beim Vorderteil und höher beim Rücktenteil. Dieses Video zeigt with man eine Erhöhung strikt. Viel Spaß beim stricken!
08.05.2017 - 10:44
|
|||||||||||||||||||||||||
Spring Valley Jumper#springvalleyjumper |
|||||||||||||||||||||||||
|
|
|||||||||||||||||||||||||
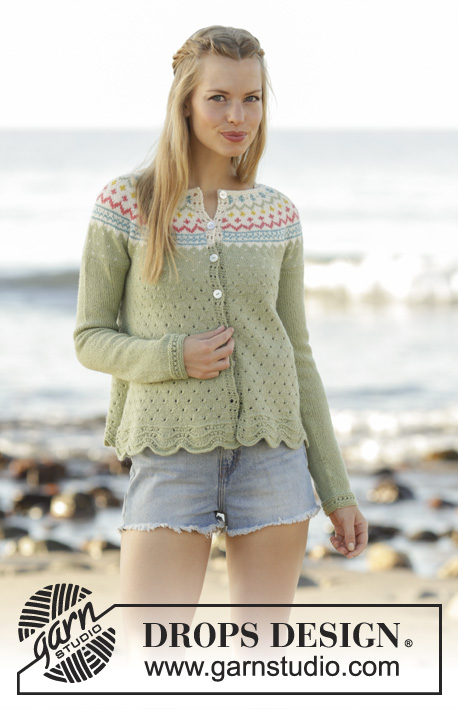
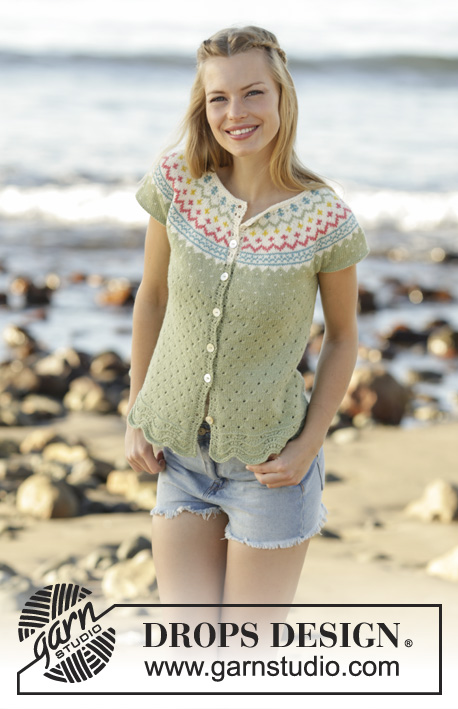
Knitted jumper with wave pattern, round yoke and multi-colored pattern in DROPS Flora. Size S - XXXL.
DROPS 175-9 |
|||||||||||||||||||||||||
|
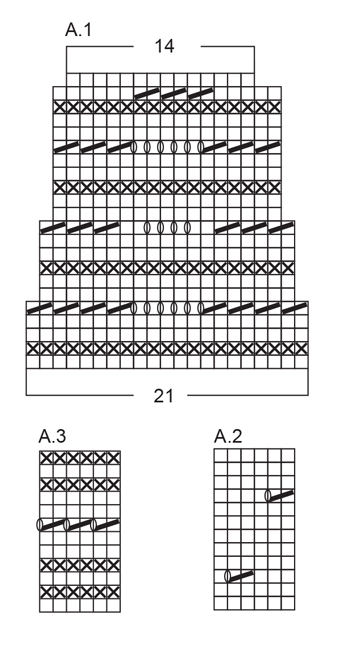
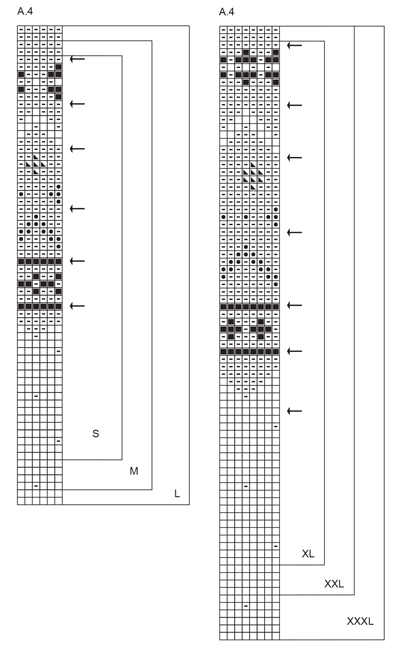
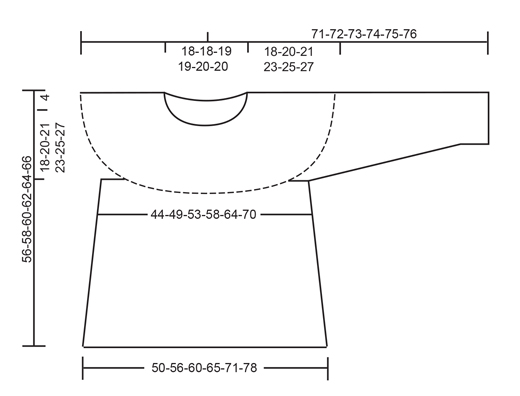
PATTERN: See diagrams A.1 to A.4. The whole of A.4 is worked in stockinette stitch – use the right diagram for your size. DECREASE TIP-1: Start 3 stitches before the marker thread in the side. Knit 2 together, knit 2 (the marker thread sits between these 2 stitches), slip 1 stitch, knit 1, pass the slip stitch over the knitted stitch. When decreasing in the sides, work the stitches that do not fit in A.3 in stockinette stich. DECREASE TIP-2: To work out how to decrease along the row, count all the stitches on the needle (e.g. 396 stitches) and divide by the number of decreases to be made (e.g. 42) = 9.4. In other words, in this example knit together approx. every 8th and 9th stitch. Decrease by knitting 2 stitches together. INCREASE TIP: Increase mid underarm: Increase 1 stitch by making 1 yarn over. Work until there is 1 stitch left before the marker thread. Make 1 yarn over, knit 2 (the marker thread sits between these 2 stitches) and make 1 yarn over. On the next round work the yarn over stitches twisted to prevent holes (the increased stitches are worked in stockinette stitch). RIDGE/GARTER STITCH (worked around): 1 ridge = 2 rounds. Knit 1 round and purl 1 round. ELEVATION: Cut the strand and begin mid back – insert a marker here. Work knit across the first 7-7-7-8-8-8 stitches, turn, tighten the strand and knit 14-14-14-16-16-16 stitches, turn, tighten the strand and knit 21-21-21-24-24-24 stitches, turn, tighten the strand and knit 28-28-28-32-32-32 stitches. Continue back and forth in this way by knitting 7-7-7-8-8-8 stitches more each time until you have knitted across the middle 63-63-63-72-72-72 stitches on the needle, knit to the marker thread mid back. ---------------------------------------------------------- JUMPER: The jumper is worked in the round on circular needle from bottom up. BODY: Cast on 357-399-441-462-504-546 stitches with circular needle size 3 mm / US 2.5 and pistachio. Work A.1 across all the stitches (= 17-19-21-22-24-26 repeats in width). REMEMBER THE GAUGE! When the next to last round of A.1 is completed there are 238-266-294-308-336-364 stitches on the needle, on the last round of A.1 adjust the number of stitches evenly along the round to 240-270-288-312-342-372 stitches. Work A.2 across all the stitches (= 40-45-48-52-57-62 repeats in width). Insert 2 marker threads in the piece, one at the beginning of the round and one after 120-135-144-156-171-186 stitches (= one marker thread in each side of the jumper). When the piece measures 8 cm / 3⅛" decrease 1 stitch on each side of the marker threads (= 4 stitches decreased) – READ DECREASE TIP-1. Decrease every 3 cm / 1" in total 8-9-9-9-9-9 times = 208-234-252-276-306-336 stitches. When the piece measures 34-34-35-35-35-35 cm / 13½"-13½"-13¾"-13¾"-13¾"-13¾" bind off 10-10-12-12-14-16 stitches in each side (= 5-5-6-6-7-8 stitches on each side of both marker threads) = 188-214-228-252-278-304 stitches. Lay the piece to one side and work the sleeves. SLEEVE: The sleeve is worked in the round on double pointed needles from bottom up, change to a small circular needle when there are enough stitches. Cast on 50-52-56-58-60-64 stitches with double pointed needle size 3 mm / US 2.5 and pistachio. Work A.3 across all the stitches. When A.3 has been completed once in height continue working stockinette stitch across all the stitches. Insert 1 marker thread at the beginning of the round = mid underarm. When the piece measures 6-6-6-6-8-8 cm / 2½"-2½"-2½"-2½"-3"-3" increase 1 stitch on each side of the marker thread mid underarm – READ INCREASE TIP. Increase every 3-2-1½-1½-1-1 cm / 1"-¾"-½"-½"-⅜"-⅜" in total 13-17-20-21-23-23 times = 76-86-96-100-106-110 stitches. When the sleeve measures 44-43-43-42-40-39 cm / 17¼"-17"-17"-16½"-15¾"-15¼" bind off 10-10-12-12-14-16 stitches mid underarm (= 5-5-6-6-7-8 stitches on each side of the marker thread) = 66-76-84-88-92-94 stitches. Work another sleeve in the same way. YOKE: Work the sleeves on to the same circular needle size 3 mm / US 2.5 as the body where there are bind-off stitches for the armholes, at the same time decrease 2-0-0-4-6-4 stitches evenly along the round = 318-366-396-424-456-488 stitches. Work A.4 across all the stitches (= 53-61-66-53-57-61 repeats of A.4). Continue this pattern upwards, AT THE SAME TIME decrease 36-42-42-40-40-48 stitches evenly along each round with an arrow – READ DECREASE TIP-2. When A.4 is completed in height there are 102-114-144-144-176-152 stitches on the needle. Work 1 round knit where a further 6-14-40-36-64-36 stitches are decreased evenly along the round = 96-100-104-108-112-116 stitches. For a better fit you can work a small ELEVATION at the back of the neck with off white – see description above. Finish by working 2 RIDGES with off white – see description above, then bind off. The jumper measures approx. 56-58-60-62-64-66 cm / 22"-22¾"-23⅝"-24⅜"-25¼"-26" to the shoulder. ASSEMBLY: Sew the openings under the sleeves. |
|||||||||||||||||||||||||
Diagram explanations |
|||||||||||||||||||||||||
|
|||||||||||||||||||||||||
 |
|||||||||||||||||||||||||
 |
|||||||||||||||||||||||||
 |
|||||||||||||||||||||||||
Have you finished this pattern?Tag your pictures with #dropspattern #springvalleyjumper or submit them to the #dropsfan gallery. Do you need help with this pattern?You'll find 27 tutorial videos, a Comments/Questions area and more by visiting the pattern on garnstudio.com. © 1982-2026 DROPS Design A/S. We reserve all rights. This document, including all its sub-sections, has copyrights. Read more about what you can do with our patterns at the bottom of each pattern on our site. |
|||||||||||||||||||||||||


With over 40 years in knitting and crochet design, DROPS Design offers one of the most extensive collections of free patterns on the internet - translated to 17 languages. As of today we count 324 catalogs and 12290 patterns - 12280 of which are translated into English (US/in).
We work hard to bring you the best knitting and crochet have to offer, inspiration and advice as well as great quality yarns at incredible prices! Would you like to use our patterns for other than personal use? You can read what you are allowed to do in the Copyright text at the bottom of all our patterns. Happy crafting!
Post a comment to pattern DROPS 175-9
We would love to hear what you have to say about this pattern!
If you want to leave a question, please make sure you select the correct category in the form below, to speed up the answering process. Required fields are marked *.