
Popular categories
Looking for a yarn?


Comments / Questions (258)
![]() Maika wrote:
Maika wrote:
Het laatste stuk van de trui is voor mij niet duidelijk. Het gaat om de ronding van de hals. Staat niet duidelijk omschreven Is het mogelijk om het laatste stuk van de trui anders te formuleren? Voor de rest was alles duidelijk.
17.04.2023 - 19:25DROPS Design answered:
Dag Maika,
Kan je laten weten waar je precies tegen aan loopt met de ronding van de hals. Wellicht kunnen we je dan beter helpen. Welke maat ben je aan het breien?
17.04.2023 - 20:50
![]() Wanja Wallin wrote:
Wanja Wallin wrote:
Hej! Jag stickar denna tröja och har börjat med ärmen. Har gjort första ökningen , min fråga är hur jag gör nästa varv när maskorna ska stickas in i mönstret. Jag fattar inte hur jag ska göra. Har ni möjligen en bild på en färdig tröja där man kan se hur det ser ut, eller en liten film kanske. Hoppas på snabbt svar Tack på förhand/Wanja Wallin
08.02.2023 - 20:49DROPS Design answered:
Hej Wanja, mønsteret skal fortsætte det mønster som allerede strikkes, det vil sige at det ikke kommer til at stemme midt under ærmet, men det stemmer som en forlængelse af det du strikker på ærmet :)
10.02.2023 - 10:16
![]() Barbara wrote:
Barbara wrote:
Riporto le maglie delle maniche su stesso ferro senza lavorare, inserendo dove ci sono gli scalfi. Io ho scalato 5 punti a inizio ferro, 10 centrali ( seconda manica ) e 5 a fine ferro. I punti di una manica li trasferisco dove ci sono le 10 maglie scalate ( in mezzo al ferro) e l’altra manica? All’ inizio o alla fine? E nel ferro dove inizio a lavorare , tutto a diritto le maglie, passo 4 maglie senza lavorare ad ogni scalfo( cioè due volte) o devo saltarle?
03.01.2023 - 11:52DROPS Design answered:
Buonasera Barbara, deve inserire le maglie delle maniche dove sono state diminuite le maglie per gli scalfi e inserire anche dei segnapunti nei punti di passaggio tra le maniche e il corpo. Il giro inizia 4 maglie dopo il segnapunti sul dietro. Buon lavoro!
05.01.2023 - 22:54
![]() Barbara wrote:
Barbara wrote:
Ho bisogno di aiuto per avvio dello sprone. Se trasferisco le maglie delle maniche sullo stesso ferro, senza lavorarle, nel ferro successivo dovrò saltare 4 maglie ad ogni segno tra manica e dietro? Ma dove ho scalato le dieci maglie avrò un filo volante ? Non capisco…. Le spiegazioni per avvio dello sprone!
02.01.2023 - 08:30DROPS Design answered:
Buonasera Barbara, in quel punto deve riportare tutte le maglie sullo stesso ferro. Buon lavoro!
02.01.2023 - 21:30
![]() Cristina Zannier wrote:
Cristina Zannier wrote:
Ora ho capito: nel mio caso, una M, nel FERRO 1 lavoro le 55 maglie e faccio le 8 diminuzioni, ne rimangono 47. Nel FERRO 2 lavoro 45 maglie passando quindi la prima e l'ultima maglia sul ferro senza lavorarle. Nel FERRO 3 lavoro 43 maglie passando sempre la prima e l'ultima senza lavorarle e diminuendo 8 maglie. Nel FERRO 4 lavoro 33 maglie passando sempre la prima e l'ultima. Quindi alla fine dalle 55 maglie iniziali ne risultano 55-8-8=39, tra cui 33 sono lavorate e 6 passate.
11.12.2022 - 16:28DROPS Design answered:
Buonasera Cristina, nel primo ferro lavora 55 maglie, che diventano 47 con le diminuzioni, poi deve girare il lavoro e lavorare subito le prime 45 maglie e poi girare il lavoro e proseguire come indicato. Buon lavoro!
11.12.2022 - 22:10
![]() Cristina Zannier wrote:
Cristina Zannier wrote:
Domanda sull'alzata dello scollo: FERRO 1 dritto: lavorare 55 m comprese le 8 da diminuire (ok) FERRO 2 rovescio: lavorare 45 m (ma 55-8=47, non capisco) FERRO 3 dritto: lavorare 43 m comprese le 8 da calare (ma non erano 45 prima? E non rimangono 45 dato che sul rovescio non si diminuisce? ) FERRO 4 rovescio: lavorare 33 m (come sopra, non capisco le diminuzioni 43-8= 25) Non capisco, vi chiedo un aiuto. Grazie
11.12.2022 - 12:44DROPS Design answered:
Buonasera Cristina, in quel punto si lavora a ferri accorciati, quindi non si lavora su tutte le maglie sui ferri ma solo sul numero di maglie indicato via via nel modello. Buon lavoro!
11.12.2022 - 22:08
![]() Cristina Zannier wrote:
Cristina Zannier wrote:
Buongiorno, non riesco a capire quando calare nella parte finale dell'alzata del collo. All'inizio e alla fine delle 55 maglie da lavorare avanti e indietro? Non capisco come distribuire queste 8 maglie da diminuire, non mi tornano i conti, perché considerando il diagramma A.2 sarebbero 6 i punti in cui fare le diminuzioni (all'inizio e alla fine delle 55maglie e prima e dopo i due segni messi in precedenza per segnare il centro di A.2). Non ne vengo fuori, aiuto.
11.12.2022 - 12:37DROPS Design answered:
Buonasera Cristina, deve diminuire le 8 maglie come riportato nel paragrafo "RAGLAN". Buon lavoro!
11.12.2022 - 22:07
![]() Barbara wrote:
Barbara wrote:
Lavoro con ferro circolare. Seguo istruzioni per Primo aumento davanti/dietro : va effettuato prima del segnapunti , come indicato e il secondo ( sull’altro lato del lavoro) subito dopo o alla fine del giro? Se subito dopo, mi trovo con due gettate successive : è corretto?
14.11.2022 - 07:33DROPS Design answered:
Buonasera Barbara, deve lavorare gli aumenti come indicato nel paragrafo "SUGGERIMENTO PER GLI AUMENTI (sul davanti e dietro)": ci saranno 2 maglie legaccio tra 2 gettati ad ogni aumento. Buon lavoro!
15.11.2022 - 22:09
![]() Kerrin wrote:
Kerrin wrote:
Hallo :) ich habe auch eine frage zu den raglanabnahmen/der längeren hinteren halsblende: ich habe (größe xl) jetzt 96 maschen auf der nadel. wenn ich jetzt die weiteren 78 maschen stricke, bis ich den neuen markierer setzen muss, werden dann in dieser runde auch wieder die raglanabnahmen mitgestrickt? also starte ich die erste runde direkt weiterhin mit einer abnahme? oder stricke ich tatsächlich 78 maschen ohne abzunehmen? danke und liebe grüße :)
24.10.2022 - 20:52DROPS Design answered:
Liebe Kerrin, bei dieser Reihe nehmen Sie nicht ab, es wird erst bei der 1. Reihe, und bei der 3. Reihe (= bei jeder Hinreihe) abgenommen. Viel Spaß beim stricken!
25.10.2022 - 09:13
![]() Cristina Zannier wrote:
Cristina Zannier wrote:
Buongiorno, ho iniziato a fare il maglione taglia m, quindi ho iniziato con i ferri circolari con 162 maglie, poi ho fatto il primo giro ma seguendo lo schema i rimangono maglie non lavorate perché da quel che ho capito il primo giro è così: 1m rov + (1m dir, 2m rov) x 25, 1m dir, 1m rov. Tutto questo x 2 = 156 maglie. E cosa faccio con le rimanenti 6 maglie?
15.10.2022 - 10:00DROPS Design answered:
Buonasera Cristina, la parte tra parentesi si deve lavorare altre 25 volte come indicato, cioè per un totale di 26 volte. Buon lavoro!
15.10.2022 - 12:41
|
|||||||
Twin River#twinriversweater |
|||||||
 |
 |
||||||
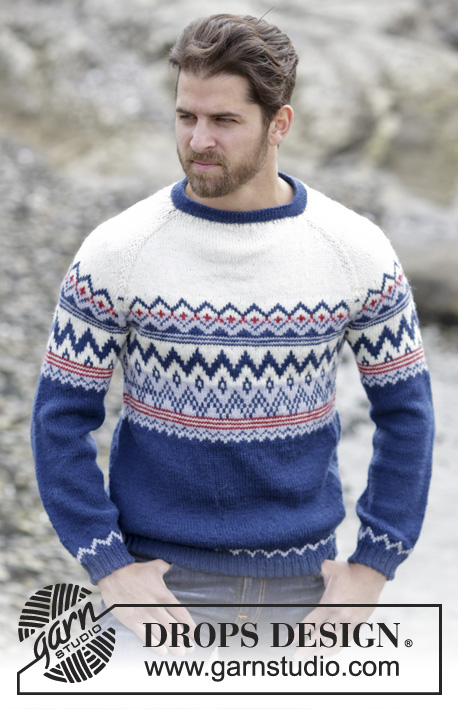
Knitted DROPS men’s jumper with textured pattern and raglan in Nepal. Size: S - XXXL.
DROPS 174-14 |
|||||||
|
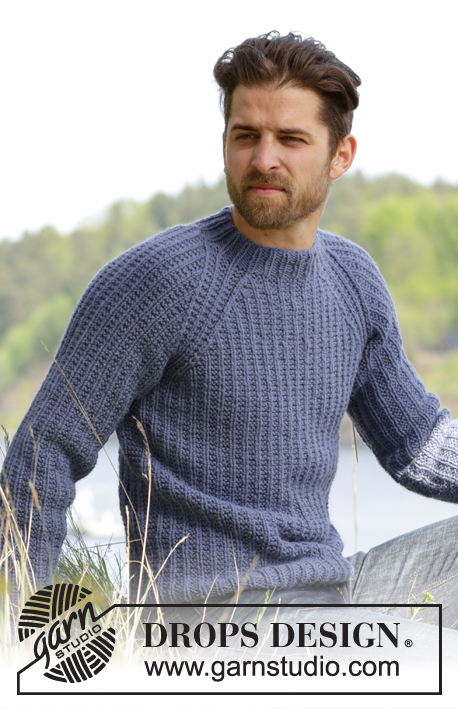
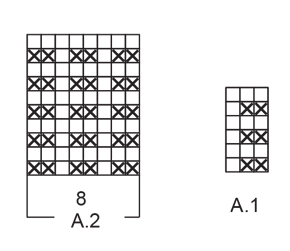
PATTERN: See diagrams A.1 and A.2. RAGLAN: Dec as follows before A.2: Work until 2 sts remain before A.2, K the next 2 tog. Dec as follows after A.2: Slip 1 st as if to K, K 1, psso INCREASE TIP (BODY): Inc 4 sts on round as follows: Work until 1 st remains before marker in the side, 1 YO, work 2 sts in garter st, 1 YO (= 2 sts inc). Repeat inc in the other side of piece. On next round work YO twisted to avoid holes. Work the new sts in garter st. INCREASE TIP (SLEEVE): Inc as follows mid under sleeve: Work until 1 st remains before marker, 1 YO, work 2 sts in garter st, 1 YO. On next round work YO twisted to avoid holes. Work the inc sts gradually in the pattern. NOTE: Work sts on each side of marker in garter st. RAGLAN DEC (ELEVATION): All dec are done from RS! Dec as follows after A.2: K 3 twisted tog. Dec as follows before A.2: Work until 3 sts remain before A.2, K 3 tog. ---------------------------------------------------------- JUMPER: Worked in the round. BODY: Cast on 150-162-168-192-210-234 sts with Nepal on circular needle size 5 mm / US 8. * P 1, (K 1, P 2), repeat from (-) 23-25-26-30-33-37 more times, K 1, P 1, insert a marker here (= side) *, repeat from *-* 1 more time. NOTE: Move the markers upwards when working. Continue rib in the round like this until piece measures 4 cm / 1½". Now work pattern A.1 as follows: Work the last 2 sts in A.1, then repeat A.1 the entire round until 1 st remains on round, work the first st in A.1. REMEMBER THE KNITTING GAUGE When piece measures 13-13-14-14-15-15 cm / 5⅛"-5⅛"-5½"-5½"-6"-6", inc 1 st on each side of each marker – see INCREASE TIP (BODY). Repeat inc when piece measures 27-28-29-29-30-30 cm / 10½"-11"-11½"-11½"-11¾"-11 3/4 = 158-170-176-200-218-242 sts. When piece measures 41-41-42-42-42-42 cm / 16"-16"-16½"-16½"-16½"-16½" (adjust so that next round worked is 2nd round in A.1), bind off sts for armholes as follows: bind off the first 5 sts on round, work the next 69-75-78-90-99-111 sts, bind off the next 10 sts for armhole, work the next 69-75-78-90-99-111 sts, bind off the remaining 5 sts. Cut the yarn. Put piece aside and knit the sleeves. SLEEVE: Work sleeves in the round on double pointed needles. Cast on 42-42-42-48-48-48 sts with Nepal on double pointed needles size 5 mm / US 8. Insert a marker at beg of round = mid under sleeve. Work rib as follows: P 1, K 1, * P 2, K 1 *, repeat from *-* until 1 st remains on round, P 1. Continue like this in the round until rib measures 4 cm / 1½". Now work pattern as follows: Work the last 2 sts in A.1, A.1 until 1 st remains on round, work the first st in A.1. When piece measures 9-8-7-6-10-9 cm / 3½"-3"-2¾"-2¼"-4"-3½", inc 1 st on each side of marker – see INCREASE TIP (SLEEVE). Inc like this approx. every 13th-9th-7th-7th-6th-5th round 8-11-14-14-14-17 times in total = 58-64-70-76-76-82 sts. When piece measures 51-50-49-48-47-46 cm / 20"-19¾"-19¼"-19"-18½"-18" - adjust so that next round worked is 2nd round in A.1, bind off the middle 10 sts under sleeve (= 5 sts on each side of marker) = 48-54-60-66-66-72 sts. Make another sleeve the same way. YOKE: Slip sleeves on to same circular needle size 5 mm / US 8 as body where armholes were bound off = 234-258-276-312-330-366 sts. This is done without working the sts. Insert a marker in every transition between sleeves and body = 4 markers. Beg round on back piece, 4 sts after marker between sleeve and back piece. Now continue pattern as before and work in addition A.2 (= 8 sts) in every transition between body and sleeves (markers are in the middle of A.2). On next round start dec for RAGLAN – see explanation above! NOTE: Dec differently on body and sleeves as follows: RAGLAN BODY: Dec every other round 21-24-24-24-26-26 times and every round 0-0-0-6-7-13 times (= 21-24-24-30-33-39 times in total). RAGLAN SLEEVES: Dec every 4th round 6-6-4-3-5-5 times and every other round 9-12-17-21-19-22 times (= 15-18-21-24-24-27 times in total). When all dec are done, 90-90-96-96-102-102 sts remain on round (= 144-168-180-216-228-264 sts in total dec). Now work pattern as before over the first 72-72-78-78-84-84 sts. Insert marker here (= between A.2 and right sleeve). Then work an elevation back and forth in neck in pattern as before AT THE SAME TIME dec for raglan on every row from RS over the sts worked – READ RAGLAN DEC (ELEVATION) as follows: NOTE: Tighten yarn at every turn to avoid holes. ROW 1 (= RS): Work 55-55-58-58-61-61 sts (including the 8 dec sts), ROW 2 (= WS): Turn and work 45-45-48-48-51-51 sts, ROW 3: Turn and work 43-43-46-46-49-49 sts (including the 8 dec sts), ROW 4: Turn and work 33-33-36-36-39-39 sts. There are now 74-74-80-80-86-86 sts on round. Turn and continue in the round with rib as follows: Work K over K and P over sts in garter st until rib measures 4 cm / 1½". Bind off sts with K over K and P over P. Jumper measures 64-66-68-70-72-74 cm / 25¼"-26"-26¾"-27½"-28⅜"-29⅛" from cast-on edge and up to shoulder. Fasten off. ASSEMBLY: Sew the openings under the sleeves. |
|||||||
Diagram explanations |
|||||||
|
|||||||
 |
|||||||
 |
|||||||
Have you finished this pattern?Tag your pictures with #dropspattern #twinriversweater or submit them to the #dropsfan gallery. Do you need help with this pattern?You'll find 24 tutorial videos, a Comments/Questions area and more by visiting the pattern on garnstudio.com. © 1982-2026 DROPS Design A/S. We reserve all rights. This document, including all its sub-sections, has copyrights. Read more about what you can do with our patterns at the bottom of each pattern on our site. |
|||||||


With over 40 years in knitting and crochet design, DROPS Design offers one of the most extensive collections of free patterns on the internet - translated to 17 languages. As of today we count 324 catalogs and 12245 patterns - 12235 of which are translated into English (US/in).
We work hard to bring you the best knitting and crochet have to offer, inspiration and advice as well as great quality yarns at incredible prices! Would you like to use our patterns for other than personal use? You can read what you are allowed to do in the Copyright text at the bottom of all our patterns. Happy crafting!
Post a comment to pattern DROPS 174-14
We would love to hear what you have to say about this pattern!
If you want to leave a question, please make sure you select the correct category in the form below, to speed up the answering process. Required fields are marked *.