
Popular categories
Looking for a yarn?


Comments / Questions (107)
![]() Francesca wrote:
Francesca wrote:
Non mi è chiaro come si procede dopo il 5° giro. Si deve lavorare il motivo A1 (1 volta) e di seguito il motivo A2, ripetendoli fino alla fine del giro? Grazie
31.10.2016 - 19:04DROPS Design answered:
Buonasera Francesca. Deve proseguire con il diagramma A1 sul diagramma A1 e il diagramma A2 su A2, aumentando come indicato nel diagramma A2. Buon lavoro!
31.10.2016 - 22:33
![]() Beatrice Balbi wrote:
Beatrice Balbi wrote:
Salve, avrei qualche dubbio sul modello, il 2° giro è composto da mb e catennella? se si come funzionano le ripetizioni di A.1 e A.2? non è sempre uguale? non capisco tutti quei numeri. mentre nel 3° e nel 5° giro come si fanno gli aumenti in A.2? ultima cosa non mi è molto chiaro il concetto del cambio colore. grazie.
14.10.2016 - 13:42DROPS Design answered:
Buongiorno Beatrice. Il secondo giro è formato da m.b e cat. I numeri fanno riferimento alle diverse taglie S - M - L - XL - XXL – XXXL. P.es per la taglia S deve prendere il primo numero: quindi lavora A1 sulle prime 10 m.a (quindi 5 volte), A.2 sulle 8 m.a successive (2 volte), A.1 sulle 6 m.a successive (= 3 volte), e così via. Al 3° e 5° giro aumenta a distanza regolare. Se p.es deve lavorare A1 su 12 m e aumentare 4 m aumenta 1 m ogni 3 m Per il cambio colore abbiamo leggermente modificato il testo. Buon lavoro!
14.10.2016 - 14:00
![]() Birte Giesbrecht wrote:
Birte Giesbrecht wrote:
Hallo, ich häkel gerade den Pulli. Dabei ist mir aufgefallen, dass für Größe M in Rd. 3 die Gesamtmaschenzahl nicht stimmt. Müssten 104 sein. Das zieht sich dann durch. Ab Rd. 4 stimmt die Angaben für A1 nicht mehr. Bitte einmal überprüfen und gegebenenfalls korrigieren.
11.10.2016 - 09:38DROPS Design answered:
Liebe Frau Giesbrecht, wenn Sie die 3. Reihe häkeln, haben Sie 6 Stb (1. Pfeil in A.2), dh: A.1 (12+2 M.), A.2 (6M. x 2), A.1 (6+4), A.2 (6x2), A.1 (22+4), A.2 (6x2), A.1(6+4), A.2 (6x2), A.1 (10+2)= 120 M.
11.10.2016 - 11:25
![]() Cecilia wrote:
Cecilia wrote:
I am very confused by row 3 and the increases. I think I am doing it well but when I get to row 4 I have lots os stitches left over when the instructions finish! Also I find the A1 and A2 diagram not very helpful. Is there any chance they can be explained in words? I hope so because I really love this pattern!
10.10.2016 - 21:39DROPS Design answered:
Dear Cecilia, you will find here how to read diagrams. The increases are included in diagram A.2, so that you just have to work diagram as shown to get the inc. When working 3rd row, inc evenly over the sts worked in A.1 (read here how to inc evenly) - Happy crocheting!
11.10.2016 - 09:01
![]() Hannah wrote:
Hannah wrote:
Hej! Jag förstår inte förklaringen i början av mönstret om färgbyte. Jag är med på att man hämtar den nya färgen innan sista genomdragningen (som också visas i videon), men sedan förstår jag inte tillägget om de fyra luftmaskorna. Hur skall jag göra? Mvh Hannah
02.10.2016 - 03:02DROPS Design answered:
Hej Hannah. Du henter traaden (farven) 2 omg nede og med den nye farve hekler du 1 kjm om omg der blev heklet (dvs om sidste st/fm). Herefter hekler du med den nye farve 4 lm og trek gennem sidste lökke paa naalen.
04.10.2016 - 15:35
![]() Monique Abma wrote:
Monique Abma wrote:
Goeiemiddag, Ik heb een vraag over patroon 173-37. ik kom in toer 3 ook niet uit net als de vorige schrijfster. Ik maak maat s dus hoef ik niet extra te meerderen. Toch? Ik houd een heleboel steken over omdat ik in toer 2 gemeerderd heb naar 100 steken. Kunt u het nog een keer uitleggen? Misschien lees ik het telpatroon niet goed. alvast bedankt! vr gr Monique
26.09.2016 - 12:11DROPS Design answered:
Hoi Monique. Je hebt 4 keer 2 herhalingen van A.2 op de toer = 8 in totaal. Je meerdert alleen in A.2 - je hebt in toer 3 geen extra meerderingen voor maat S. Elke 4 stk in A.2 worden in toer 2 6 stk = 2 nieuwe stk per herhaling = 16 in totaal = 100 stk. In toer 4 haak je (in A.2) vasten en lossen (6 per herhaling) en in toer 5 meerder je nogmaals: van 6 naar 8 stk per herhaling.
27.09.2016 - 16:05Tali wrote:
Hi. I'm stuck in round 3, I don't understand how to do the increase. When trying to increase evenly I keep running out of spaces to crochet in or having extra empty spaces in the end of the round. The only way the numbers add up is if I do the 2 or 4 increase in a cluster between A1 and A2. But then the work start to curl.. Can you please explain how to do the increase for size M? Thank you
15.09.2016 - 05:41DROPS Design answered:
Dear Tali, when working round 3 inc in each A.1 evenly as stated,ie: 1st A.1: inc 2 st evenly, in 2nd, 3rd and 4th A.1: inc 4 sts evenly and in last A.1 inc 2 sts evenly. Read more here about how to inc evenly here. Happy crocheting!
15.09.2016 - 09:09
![]() Malin Sjöberg wrote:
Malin Sjöberg wrote:
Hej! Jag är ny på diagram och förstår inte hur jag ska virka "på höjden". Jag fastnar på v 2 och förstår inte hur jag ska komma vidare från v 1 till 2. Hur gör jag praktiskt med maskorna i diagrammet?
14.09.2016 - 17:26DROPS Design answered:
Hej Malin. Se under VIRKINFO: hvordan du starter og afslutter en varv. Og laes her mere om hvordan du skal laese vores diagrammer.
15.09.2016 - 12:15
![]() Trudi wrote:
Trudi wrote:
Please canmyou tell me what the chest measurements are for the small and medium sized Misty Mountain Jumper. I cannot tell from the pattern which size I need to be making - thank you
10.09.2016 - 21:59DROPS Design answered:
Dear Trudi, scrolling down the page you can find a measurement chart in cm: compare it with a garment you have and you like and you'll find the right size. For size S bust measure is 86 cm, for size M it's 92 cm. Happy crocheting!
11.09.2016 - 09:52
![]() Anne wrote:
Anne wrote:
I don't understand the explanations from round 3, I really tried to but I don't. ..I think that it is not well explained and would deserve to be to be much more easier.. if someone want to help me that would be fine?... Si quelqu'un peut m'aider à comprendre les explications??merci
30.08.2016 - 21:27DROPS Design answered:
Bonjour Anne, au 3ème tour du pull, crochetez les diagrammes A.1 et A.2 comme indiqué tout en augmentant à intervalles réguliers dans A.1 comme indiqué (pas d'augmentations en taille S, augmentez seulement dans A.2), c'est-à-dire augmentez comme vous avez fait au 2ème tour à intervalles réguliers dans les mailles de A.1 et augmentez dans A.2 comme dans le diagramme. Placez bien des marqueurs entre chaque diagramme pour bien les repérer et augmenter comme il faut. Bon crochet!
31.08.2016 - 09:33
|
||||||||||||||||||||||
Misty Mountain#mistymountainsweater |
||||||||||||||||||||||
|
|
||||||||||||||||||||||
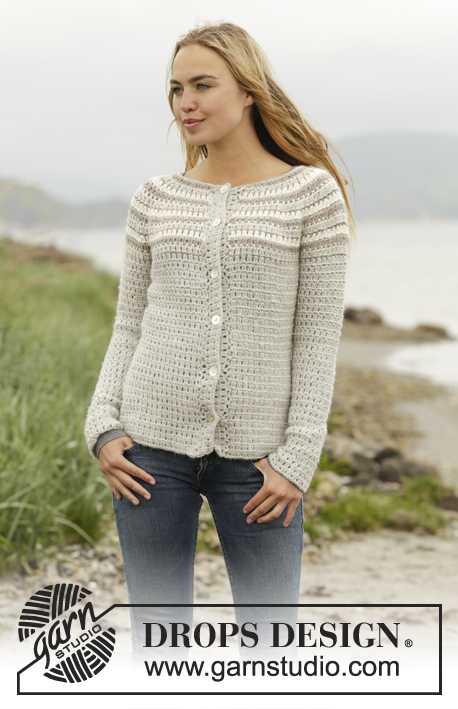
Crochet DROPS jumper and hat with stripes, worked top down in “Puna”. Size: S - XXXL.
DROPS 173-37 |
||||||||||||||||||||||
|
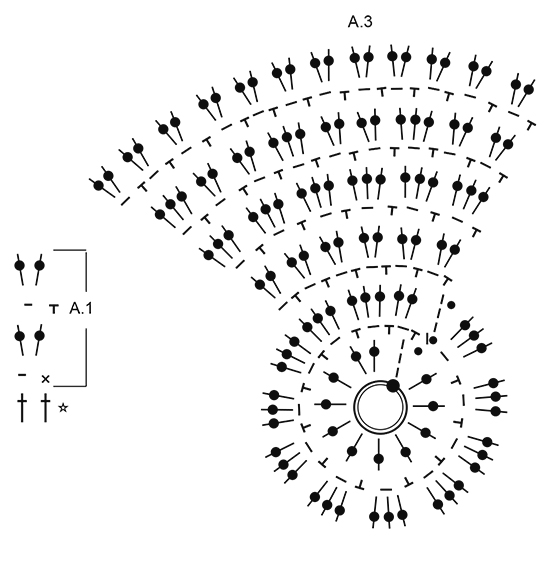
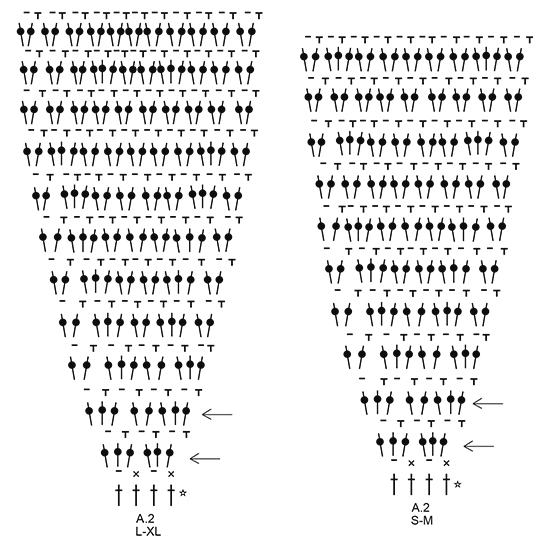
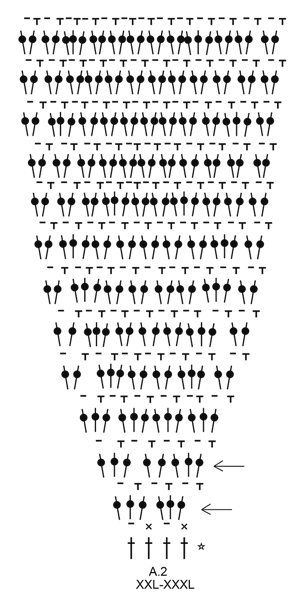
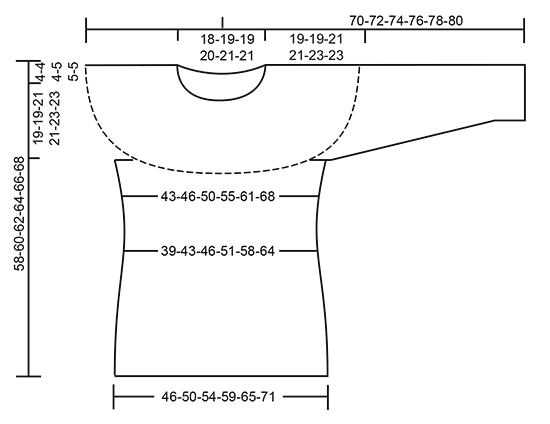
PATTERN: See diagrams A.1 to A.3. See diagram for correct size. CROCHET INFO: Beg every sc round with 1 ch (this replaces first sc) and finish with 1 sl st in first ch from beg of round. Beg every round with dc with 3 ch (= first dc) and finish with 1 sl st in 3rd ch at beg of round. At the end of every round with dc/sc work as follows: Before last pull through of last dc/sc switch color as follows: Get next color, i.e. 2 round down (1 dc round and 1 sc round), with the new color work 1 sl st around round it was worked on (i.e. around last dc/sc), ch 4, pull then through last loop on hook. This is done to avoid a tight strand in the piece. STRIPES: STRIPE 1: 1 round off white. STRIPE 2: 1 round light gray. STRIPE 3: 1 round taupe. DECREASE TIP (applies to body): Adjust so that next round is 1 round with dc. Work as before until 1 ch remains before marker, * work 1 dc around next ch, but wait with last pull through, work 1 dc more around same ch, but on last pull through, pull yarn through all sts on hook (= 1 dc dec) *, repeat from *-* around next ch (i.e. on the other side of marker) = 2 dc dec at each marker (= 4 dc in total). Every time you dec, repeat A.1 2 times less in total in width. INCREASE TIP: Adjust so that next round is 1 round with dc. Work as before until 1 ch remains before marker, * work 3 dc around next ch *, repeat from *-* 2 times in total = 2 dc inc at marker, repeat at both markers (= 4 dc inc in total). Every time you inc, repeat A.1 2 more times in total in width. DECREASE TIP-1 (applies to sleeve): Adjust so that next round is 1 round with dc. * Work 1 dc around first/next ch on round but wait with last pull through, work 1 dc more around the same ch but on last pull through, pull yarn through all sts on hook (= 1 dc dec) *, repeat from *-* around next ch = 2 dc dec. Every time you dec, repeat A.1 1 time less in total in width. Dec alternately at beg and end of round (i.e. when dec at the end work as before until 2 ch remain on round). ---------------------------------------------------------- JUMPER: The piece is worked top down. Rounds start mid back. YOKE: Work 96-101-101-110-115-120 ch on hook size 4.5 mm/US 7 with taupe and form a ring with 1 sl st in first ch. Work 3 ch (= 1 dc) - READ CROCHET INFO, 1 dc in each of the next 5-3-3-5-3-1 ch, * skip ch 1, 1 dc in each of the next 6 ch *, repeat from *-* the entire row = 84-88-88-96-100-104 dc. Work 2nd round (= round with sc/ch) in pattern as follows in STRIPES – see explanation above. Work A.1 over the first 10-12-12-12-14-14 dc (= 5-6-6-6-7-7 times in width), A.2 over the next 8 dc (= 2 times in width), A.1 over the next 6-6-6-8-8-8 dc (= 3-3-3-4-4-4 times in width), A.2 over the next 8 dc (= 2 times in width), A.1 over the next 20-22-22-24-26-28 dc (= 10-11-11-12-13-14 times in width), A.2 over the next 8 dc (= 2 times in width), A.1 over the next 6-6-6-8-8-8 dc (= 3-3-3-4-4-4 times in width), A.2 over the next 8 dc (= 2 times in width), A.1 over the last 10-10-10-12-12-14 dc (= 5-5-5-6-6-7 times in width). Repeat A.1 vertically and inc as shown in A.2 AT THE SAME TIME inc evenly as follows: Work 3rd round in pattern AT THE SAME TIME inc evenly as follows: Work A.1 over the first 10-12-12-12-14-14 sts and inc 0-2-2-4-4-4 dc evenly, A.2 as before (= 2 times in width), A.1 over the next 6-6-6-8-8-8 sts and inc 0-4-4-4-4-4 dc evenly, A.2 as before, A.1 over the next 20-22-22-24-26-28 sts and inc 0-4-4-6-6-8 dc evenly, A.2 as before, A.1 over the next 6-6-6-8-8-8 sts and inc 0-4-4-4-4-4 dc evenly, A.2 as before, A.1 over the last 10-10-10-12-12-14 sts and inc 0-2-2-2-4-4 dc evenly = 100-120-120-132-138-144 dc (includes inc in A.2). REMEMBER THE CROCHET GAUGE! Work 4th round in pattern as follows: Work A.1 over the first 10-14-14-16-18-18 dc, A.2 as before, A.1 over the next 6-10-10-12-12-12 dc, A.2 as before, A.1 over the next 20-26-26-30-32-36 dc, A.2 as before, A.1 over the next 6-10-10-12-12-12 dc, A.2 as before, A.1 over the last 10-12-12-14-16-18 dc. Work 5th round in pattern AT THE SAME TIME inc evenly as follows: Work A.1 over the first 10-14-14-16-18-18 sts and inc 0-0-0-2-0-4 dc evenly, A.2 as before (= 2 times in width), A.1 over the next 6-10-10-12-12-12 sts and inc 0-2-4-4-0-0 dc evenly, A.2 as before, A.1 over the next 20-26-26-30-32-36 sts and inc 0-0-2-4-4-8 dc evenly, A.2 as before, A.1 over the next 6-10-10-12-12-12 sts and inc 0-2-4-4-0-0 dc evenly, A.2 as before, A.1 over the last 10-12-12-14-16-18 sts and inc 0-0-2-2-2-4 dc evenly = 116-140-148-164-160-176 dc (includes inc in A.2). Continue pattern and inc in A.2. When last round remains in A.2, piece measures approx. 18-18-19-19-21-21 cm / 7"-7"-7½"-7½"-8¼"-8¼" from neck edge (= 212-236-260-276-304-320 dc). Work last round of A.2 as follows: Work A.1 over the first 10-14-14-18-18-22 dc, A.2 over the next 20-20-22-22-26-26 dc (= 1 time in width), 8-8-8-10-10-12 ch, skip the next 46-52-58-60-64-64 dc (i.e. 20-20-22-22-26-26 dc A.2, 6-12-14-16-12-12 dc A.1 and 20-20-22-22-26-26 dc A.2 for sleeve), A.2 over the next 20-20-22-22-26-26 dc (= 1 time in width), A.1 over the next 20-26-28-34-36-44 dc, A.2 over the next 20-20-22-22-26-26 dc (= 1 time in width), 8-8-8-10-10-12 ch, skip the next 46-52-58-60-64-64 dc (i.e. 20-20-22-22-26-26 dc A.2, 6-12-14-16-12-12 dc A.1 and 20-20-22-22-26-26 dc A.2 for sleeve), A.2 over the next 20-20-22-22-26-26 dc (= 1 time in width), A.1 over the last 10-12-14-16-18-22 dc = 136-148-160-176-196-216 sts. Continue piece with light gray. Work next round as follows: Work A.1 over the first 30-34-36-40-44-48 sts, 1 dc in each of the 8-8-8-10-10-12 ch under sleeve, insert 1 marker between these sts, A.1 over the next 60-66-72-78-88-96 sts, 1 dc in each of the 8-8-8-10-10-12 ch under sleeve, insert 1 marker between these, A.1 over the last 30-32-36-38-44-48 sts. Insert 1 marker in piece, NOW MEASURE PIECE FROM HERE. Then repeat A.1 over all sts. When piece measures 4 cm / 1½" from marker, dec 2 dc at each marker - READ DECREASE TIP. Dec like this every 4-4½-4½-5½-5½-6 cm / 1½"-1¾"-1¾"-2¼"-2¼"-2½" 3 times in total = 124-136-148-164-184-204 sts. When piece measures 14-16-16-17-17-19 cm / 5½"-6¼"-6¼"-6¾"-6¾"-7½" from marker, inc 2 dc at each marker – see INCREASE TIP. Inc like this every 2½ cm / ⅞" a total of 6 times = 148-160-172-188-208-228 dc. Continue pattern until piece measures 35-37-37-38-38-40 cm / 13¾"-14½"-14½"-15"-15"-15¾" from marker (= 54-56-58-59-61-63 cm / 21¼"-22"-22¾"-23¼"-24"-24¾" from neck edge), adjust to finish with 1 round dc. Fasten off. SLEEVE: = 46-52-58-60-64-64 dc. Work first round on sleeve with same color as last stripe in sc on body. Sleeve is worked in the round, top down. Beg by working mid under sleeve as follows: Work 1 sc in the 5th-5th-5th-5th-5th-6th ch of the 8-8-8-10-10-12 ch worked in armhole on body, work 1 ch (= 1 sc), work 1 sc in each of the next 3-3-3-5-5-6 ch, A.1 (i.e. 1 round with sc and ch) over the 46-52-58-60-64-64 dc over sleeve, finish with 1 sc in each of the remaining 4-4-4-4-4-5 ch under sleeve = 54-60-66-70-74-76 sts. Continue piece with light gray. Insert 1 marker in piece, NOW MEASURE PIECE FROM HERE. Work A.1 in the round. When piece measures 3 cm / 1" from marker, dec 2 dc under sleeve - READ DECREASE TIP-1. Dec like this every 3-2½-2-2-2-2 cm / 1⅛"-⅞"-¾"-¾"-¾"-¾" 11-13-15-17-18-18 times in total = 32-34-36-36-38-40 sts. When piece measures 42-44-43-45-45-47 cm / 16½"-17¼"-17"-17¾"-17¾"-18½" from marker, adjust to finish with 1 round dc. Fasten off. Work the other sleeve the same way. NECK EDGE: Work with light gray from RS as follows: Work 1 sc in every ch where dc was worked in first round (= 84-88-88-96-100-104 sc). Fasten off. ---------------------------------------------------------- HAT: Work piece top down, in STRIPES - see explanation above. Work 4 ch on hook size 3.5 mm/E/4 with taupe and form a ring with 1 sl st in first ch. Work A.3 – see CROCHET INFO! After the 3 first rounds of A.3 (= 36 dc) repeat A.3 4 times in total on the round. REMEMBER THE CROCHET GAUGE! When working last round of A.3, inc 0-2-4 dc evenly = 96-98-100 dc. Piece measures approx. 17 cm / 6¾" in diameter. Then work A.1 over all sts (= 48-49-50 times on round). When piece measures 23-24-25 cm / 9"-9½"-9¾" in total from the top, adjust so that last round is a round with dc, work 1 sc in every dc (continue with stripes). Work 3 rounds in total with 1 sc in every st. Piece measures 24-25-26 cm / 9½"-9¾"-10¼" in total from the top. Fasten off. |
||||||||||||||||||||||
Diagram explanations |
||||||||||||||||||||||
|
||||||||||||||||||||||
 |
||||||||||||||||||||||
 |
||||||||||||||||||||||
 |
||||||||||||||||||||||
 |
||||||||||||||||||||||
Have you finished this pattern?Tag your pictures with #dropspattern #mistymountainsweater or submit them to the #dropsfan gallery. Do you need help with this pattern?You'll find 14 tutorial videos, a Comments/Questions area and more by visiting the pattern on garnstudio.com. © 1982-2026 DROPS Design A/S. We reserve all rights. This document, including all its sub-sections, has copyrights. Read more about what you can do with our patterns at the bottom of each pattern on our site. |
||||||||||||||||||||||


With over 40 years in knitting and crochet design, DROPS Design offers one of the most extensive collections of free patterns on the internet - translated to 17 languages. As of today we count 324 catalogs and 12285 patterns - 12275 of which are translated into English (US/in).
We work hard to bring you the best knitting and crochet have to offer, inspiration and advice as well as great quality yarns at incredible prices! Would you like to use our patterns for other than personal use? You can read what you are allowed to do in the Copyright text at the bottom of all our patterns. Happy crafting!
Post a comment to pattern DROPS 173-37
We would love to hear what you have to say about this pattern!
If you want to leave a question, please make sure you select the correct category in the form below, to speed up the answering process. Required fields are marked *.