
Popular categories
Looking for a yarn?


Comments / Questions (98)
![]() Vendula wrote:
Vendula wrote:
Dobrý den, v českém překladu chybí u trupu, že se mají změnit jehlice na 4mm po upletení pružného lemu 5cm
15.03.2026 - 22:37DROPS Design answered:
Dobrý den Vendy, Děkujeme za upozornění, návod jsme doplnili o chybějící překlad. Hodně zdaru!
07.04.2026 - 10:46
![]() Dorothy wrote:
Dorothy wrote:
Where do I start after putting the sleeves on the same circular needle as the body. Please advise. Thanks
09.01.2026 - 22:31DROPS Design answered:
Hi Dorothy, It is neatest to start the new round mid-under 1 sleeve. Regards, Drops Team.
12.01.2026 - 07:21
![]() Dorine wrote:
Dorine wrote:
Hello, the patterns says for 2 years 184 stitches. That would be 90 cm (21 st.). But is has to be 60 cm. What is wrong about the pattern?
09.01.2026 - 20:32DROPS Design answered:
Hi Dorine, the lower part of the sweater is knitted in rib. The tension for rib and for the pattern is different. Everything is going to be ok. Happy knitting!
12.01.2026 - 08:37
![]() Véronique wrote:
Véronique wrote:
Bonjour, je ne comprends pas comment tricoter les 58 mailles du devant/dos du 1er rang après les 5cm de cotes ( changement d’aiguilles) selon le schéma A2. Comment lire le symbole rond à l’intérieur du carré. Merci pour votre réponse. V.
21.10.2025 - 19:09DROPS Design answered:
Bonjour Véronique, le diagramme A.1 se compose de côtes, le rond noir correspond à une maille envers sur l'endroit (la case blanche à 1 maille endroit sur l'endroit); tricotez ces 58mailles ainsi à la hauteur indiquée, puis au dernier tour des côtes, tricotez A.2 = vous allez ainsi diminuer des mailles pour préparer à tricoter le diagramme A.3. Bon tricot!
28.10.2025 - 18:55
![]() Eva-Maria Diekhans wrote:
Eva-Maria Diekhans wrote:
Hallo ich möchte den Pullover für mein Enkelkind stricken in größe 2.Jahren .Laut Anleitung soll ich 184 maschen anschlagen bei einer Wolle von 21×28 reihen das wird viel zu groß. Mit freundlichen Grüßen
11.10.2025 - 09:23
![]() Natacha wrote:
Natacha wrote:
Que signifie répéter l’augmentation tous les 2,5 Rangs. Je ne comprends pas. J’ai fini les augmentations et la manche ne fzit que 15 cm de longueur au lieu de 26 ( taille 5-6 ans)
18.09.2025 - 17:11DROPS Design answered:
Bonjour Natacha, les augmentations des manches sont indiquées en cm et non en nombre de rangs, autrement dit, en taille 5/6 ans, vous augmentez 10 fois au total tous les 2,5 cm, la 1ère fois quand la manche mesure 8 cm, puis la 2ème à 10,5 cm, la 3ème à 13 cm, la 4ème à 15,5 cm, etc, la dernière se fait à 30, 5 cm. Bon tricot!
18.09.2025 - 18:41
![]() Birgit Andersen wrote:
Birgit Andersen wrote:
Ja tak Jeg vil gerne have denne opskrift
03.07.2025 - 17:21
![]() Gertraud Lindlacher wrote:
Gertraud Lindlacher wrote:
Hallo, ich bin beim Halsausschnitt etwas verwirrt ... ich soll da ca 100Maschen aufnehmen, hab die 20 stillgelegten und die 68 die ich in Reihen gestrickt hab. Ich brauch doch bloß bei der Schrägung für den Hals jeweils 6 Maschen aufnehmen damit sich das ausgeht oder? Finde den Begriff aufnehmen etwas verwirrend, aber ich denke mal es ist so gedacht wie ich geschrieben habe?
23.04.2025 - 11:10DROPS Design answered:
Liebe Frau Lindlacher, die Maschen sollen Sie um den Halsausschnitt stricken / auffassen: also die 20 stillgelegten Maschen stricken + in den abgekettenen Maschen beidseitig ca 6 Maschen auffassen + die 68 Maschen von der Passe stricken = insgesamt 100 Maschen. Kann das Ihnen helfen?
23.04.2025 - 15:56
![]() Chris wrote:
Chris wrote:
Bonjour, le diagramme A1 représente 5 rangs, mais c'est bien au bout de 5cm qu'il faut faire les diminutions n'est-ce pas ? Je vais refaire en conséquence.
21.02.2025 - 15:35DROPS Design answered:
Bonjour Chris, A.1 est représenté sur 4 rangs mais vous répétez les côtes ainsi en hauteur jusqu'à ce que l'ouvrage mesure 5 cm, puis vous tricotez en jersey les mailles tricotées en côtes 2/2 et vous tricotez A.2 au-dessus des mailles de A.1 (vous diminuez aussi dans A.2, mais à des endroits précis pour préparer les torsades de A.3 qui seront ensuite tricotées). Bon tricot!
21.02.2025 - 15:43
![]() Madeleine Abrahami wrote:
Madeleine Abrahami wrote:
Bonjour Je suis juste après toutes les diminutions Vous dites de relever des mailles pour le col mais on n'a rien rabattu comment faire ? Merci
07.11.2024 - 14:29DROPS Design answered:
Bonjour Mme Abrahami, vous reprenez les mailles qui restent de l'empiècement + vous relevez des mailles le long de l'espace entre la dernière maille du devant gauche et les mailles en attente + vous tricotez les mailles en attente + vous relevez les mailles entre les mailles en attente et le devant droit = vous avez entre 104 à 100 mailles autour de l'encolure. Bon tricot!
07.11.2024 - 16:39
|
|||||||||||||||||||||||||||||||
Lucky Jack#luckyjacksweater |
|||||||||||||||||||||||||||||||
 |
 |
||||||||||||||||||||||||||||||
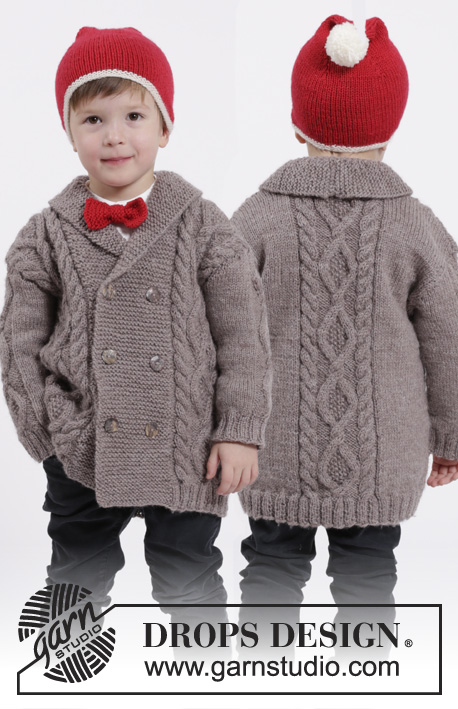
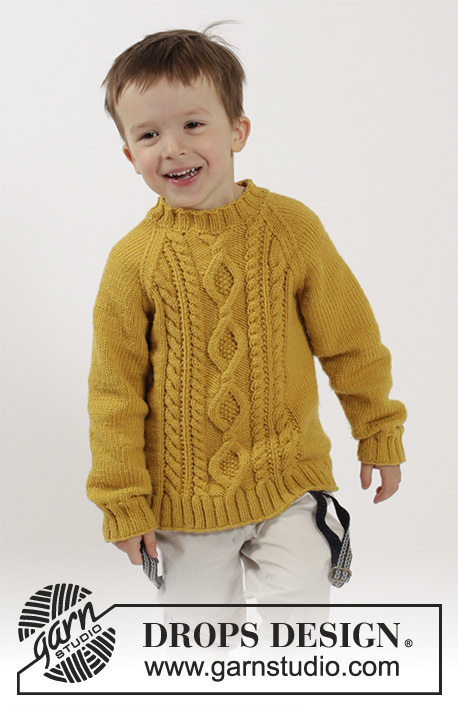
Knitted sweater with raglan and cables in DROPS Merino Extra Fine. Size children 2 - 10 years
DROPS Children 26-3 |
|||||||||||||||||||||||||||||||
|
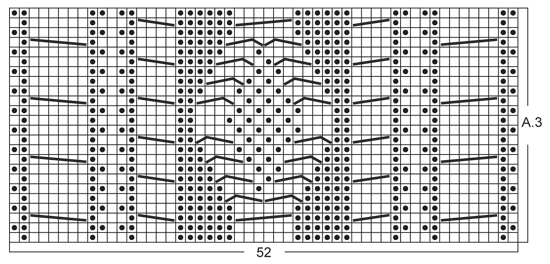
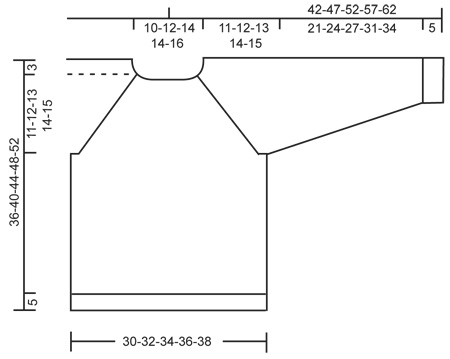
PATTERN: See diagrams A.1 to A.3. The diagrams show all rows in pattern seen from RS. RAGLAN: Dec for raglan on each side of marker in every transition between sleeves and body. DEC AS FOLLOWS FROM RS: Beg 3 sts before marker and K 2 tog, K 2 (marker is between these 2 sts), slip 1 st as if to K, K 1, psso (= 2 sts dec). DEC AS FOLLOWS FROM WS: Beg 3 sts before marker and P 2 twisted tog, P 2 (marker is between these 2 sts) and P 2 tog (= 2 sts dec). ---------------------------------------------------------- BODY: Worked in the round on circular needle. Cast on 184-200-208-216-224 sts on circular needle size 3.5 mm / US 4 with Merino Extra Fine. K 1 round. Work next round as follows: SIZE 2 + 3/4 + 7/8 YEARS: K 1, * P 2, K 2 *, repeat from *-* 4-5-6 times in total, work rib according to diagram A.1 over the next 58 sts (= mid front), * K 2, P 2 *, repeat from *-* 8-10-12 times in total, K 2, work rib according to diagram A.1 over the next 58 sts (= mid back), * K 2, P 2 *, repeat from *-* 4-5-6 times in total and finish with K 1. SIZE 5/6 + 9/10 YEARS: P 1, * K 2, P 2 *, repeat from *-* 5-6 times in total, K 2, work rib according to diagram A.1 over the next 58 sts (= mid front), * K 2, P 2 *, repeat from *-* 11-13 times in total, K 2, work rib according to diagram A.1 over the next 58 sts (= mid back), * K 2, P 2 *, repeat from *-* 5-6 times in total and finish with K 2 and P 1. Continue rib like this until piece measures 5 cm / 2". Switch to circular needles size US 6/4mm and work next round as follows FOR ALL SIZES: K the first 17-21-23-25-27 sts and dec at the same time 3-5-5-5-5 sts evenly over these sts, work and dec according to A.2 over the next 58 sts, K over the next 34-42-46-50-54 sts and dec at the same time 6-10-10-10-10 sts evenly over these sts, work and dec according to A.2 over the next 58 sts, K the last 17-21-23-25-27 sts and dec at the same time 3-5-5-5-5 sts evenly over these sts. After A.2, there are 160-168-176-184-192 sts on needle. Work next round as follows: 14-16-18-20-22 sts in stockinette st, work pattern according to diagram A.3 (= 52 sts), 28-32-36-40-44 sts in stockinette st, work pattern according to diagram A.3 (= 52 sts) and finish with 14-16-18-20-22 sts in stockinette st. Continue pattern like this. REMEMBER THE KNITTING GAUGE When piece measures 22-25-28-31-34 cm / 8¾"-9¾"-11"-12¼"-13½", work next round as follows: bind off 3 sts for armhole, work the next 74-78-82-86-90 sts as before (= front piece), bind off 6 sts for armhole, work the next 74-78-82-86-90 sts as before (= back piece) and bind off the last 3 sts for armhole. Put piece aside and knit the sleeves. SLEEVE: Worked in the round on double pointed needles. Cast on 32-36-40-44-44 sts on double pointed needles size 3.5 mm / US 4 with Merino Extra Fine. K 1 round. Then work rib = K 2/P 2 until piece measures 5 cm / 2". Switch to double pointed needles size 4 mm / US 6 and work in stockinette st. When piece measures 6-8-8-8-7 cm / 2½"-3"-3"-3"-2¾", inc 2 sts mid under sleeve. Repeat inc every 2-2-2½-2½-2½ cm / ¾"-¾"-⅞"-⅞"-⅞" a total of 10-10-10-11-13 times = 52-56-60-66-70 sts. When piece measures 26-29-32-36-39 cm / 10¼"-11½"-12½"-14¼"-15¼", bind off the middle 6 sts mid under sleeve = 46-50-54-60-64 sts remain on needle. Put piece aside and make another sleeve. YOKE: Slip sleeves on to same circular needle as body where armholes were bound off (without working them first) = 240-256-272-292-308 sts on needle. Insert 1 marker in all transitions between sleeves and body piece = 4 markers. Continue in the round with stockinette st and pattern as before. AT THE SAME TIME on first round dec for RAGLAN in every transition between body and sleeves – see explanation above (= 8 sts dec). Repeat dec for raglan every other round a total of 14-16-16-17-17 times and then every round a total of 3-3-5-7-9 times. AT THE SAME TIME when piece measures 32-35-39-42-46 cm / 12½"-13¾"-15¼"-16½"-18", slip the middle 28-26-26-20-20 sts mid front on 1 stitch holder for neck (work sts before slipping them on the stitch holder). Then finish piece back and forth on circular needle from mid front and bind off for neck at beg of every row in each side as follows: bind off 2 sts 1-1-1-2-2 times and 1 st 1-2-2-2-2 times. After all dec for raglan and bind offs for neck, 70-70-70-68-68 sts remain on needle. NECK EDGE: Pick up from RS on circular needle size 3.5 mm / US 4 approx. 104-104-104-100-100 sts around the neck (includes sts on stitch holder at the front). P 1 round. Then K 1 round while dec evenly to 60-68-76-80-88 sts. Then work rib = K 2/P 2 for 3 cm / 1", then bind off with K over K and P over P. ASSEMBLY: Sew the openings under the sleeves. |
|||||||||||||||||||||||||||||||
Diagram explanations |
|||||||||||||||||||||||||||||||
|
|||||||||||||||||||||||||||||||
 |
|||||||||||||||||||||||||||||||
 |
|||||||||||||||||||||||||||||||
 |
|||||||||||||||||||||||||||||||
Have you finished this pattern?Tag your pictures with #dropspattern #luckyjacksweater or submit them to the #dropsfan gallery. Do you need help with this pattern?You'll find 27 tutorial videos, a Comments/Questions area and more by visiting the pattern on garnstudio.com. © 1982-2026 DROPS Design A/S. We reserve all rights. This document, including all its sub-sections, has copyrights. Read more about what you can do with our patterns at the bottom of each pattern on our site. |
|||||||||||||||||||||||||||||||


With over 40 years in knitting and crochet design, DROPS Design offers one of the most extensive collections of free patterns on the internet - translated to 17 languages. As of today we count 324 catalogs and 12290 patterns - 12280 of which are translated into English (US/in).
We work hard to bring you the best knitting and crochet have to offer, inspiration and advice as well as great quality yarns at incredible prices! Would you like to use our patterns for other than personal use? You can read what you are allowed to do in the Copyright text at the bottom of all our patterns. Happy crafting!
Post a comment to pattern DROPS Children 26-3
We would love to hear what you have to say about this pattern!
If you want to leave a question, please make sure you select the correct category in the form below, to speed up the answering process. Required fields are marked *.