
Popular categories
Looking for a yarn?


Comments / Questions (45)
![]() Lene Andresen wrote:
Lene Andresen wrote:
Det er feil i mønsteret i forhold til merketrådene som skal settes inn. Str L. Her er +merketrådene: Strikk 28+4+7+6+4+27+26+4+7+6+4+28=151 men så kommer det til slutt strikk 1m og da blir det 152, vil tolke det dithen at man ikke skal strikke den siste maska?? Er det rett??
24.11.2015 - 10:48DROPS Design answered:
Hej Lene, Du har ret, den sidste maske er for meget, den skal bare slettes. Vi lægger en rettelse ud. Tak for info og god fornøjelse!
25.11.2015 - 13:37
![]() Annettr wrote:
Annettr wrote:
Antal maskor från början: tex: 151stycken. Men när man sätter markörer blir maskantalet 152. Hur gör jag nu?
09.11.2015 - 10:02DROPS Design answered:
Hej, du sætter de 8 markörer (1 på varje sida av 4 raglanm) till raglan mellan maskorna, och de andra 5 (mitt på ärmen och mitt fram&bak) Lycka till!
20.11.2015 - 13:37
![]() Brouillet wrote:
Brouillet wrote:
Il est indiqué de débuter la ré-hausse au milieu du dos. Est-ce qu'on tricote la moitié d'un rang pour si rendre?
09.07.2015 - 23:42DROPS Design answered:
Bonjour Mme Brouillet, la ré-hausse dos commence au milieu dos, tricotez d'abord les mailles jusqu'à la moitié du dos, et continuez comme indiqué pour votre taille. Bon tricot!
10.07.2015 - 08:42
![]() Eli Svarva wrote:
Eli Svarva wrote:
Hei! I starten av jakken: skal jeg strikke 15 omganger mønster uten å øke noe på bolen når jeg strikker str M? Slik at økningen er kun på armene de første 15 omgangene?
07.07.2015 - 21:26DROPS Design answered:
I str M øger du til raglan på hver 2. p 15 gange både til ærmer og til bol samtidigt. God fornøjelse!
08.07.2015 - 14:54Annie Pedersen wrote:
Denne oppskriften er vanskelig å forstå... Øketipset ???
13.04.2015 - 18:23DROPS Design answered:
Hei Annie. Du skal bruge öketipset naar du strikker raglan - hvor du skal öke og hvordan
17.04.2015 - 15:19
![]() Randi Smenes wrote:
Randi Smenes wrote:
Jeg ser at noe mangler hos oppskrifter. Det burde skrive fra starten f eks 2 rette og 2 vrang som jeg så bildet. Jeg prøver å strikke denne typen. og jeg var litt skuffet. og også hvor langt cm. jeg har regnet ut summen 139 masker og leste det står en maske til blir 140 ?. og også det står 111 inkl 1kant-m i rille. betyr 109 pluss2(kantmaske)?
10.10.2014 - 09:22DROPS Design answered:
Hei. Dette er en modell som er strikket ovenfra og ned og ender opp med vrangbord 2r/2vr. 111 m inkl 1 kanmaske på hver side betyr 109+2
16.10.2014 - 17:54
![]() Holland wrote:
Holland wrote:
Als alle markeerders en merkdraden geplaatst zijn na de ronding zegt het patroon dat er nog 1 steek te breien is. Maar die steek is er niet meer. Graag advies hoe de merkdraden en markeerders juist te plaatsen.
26.09.2014 - 17:10DROPS Design answered:
Hoi Holland. Kan je aangeven welke maat je breit? Dan kan ik sneller nakijken. Alvast bedankt.
30.09.2014 - 16:49
![]() Strikke Pinne wrote:
Strikke Pinne wrote:
Hvaer poenget med å strike ovenfra og ned:kompliserende
26.08.2014 - 15:01DROPS Design answered:
Hei Strikkepinne. Vi har valgt at designe en del af vores modeller ovenfra og ned efter önske fra brugere. Heldigvis er der stadigvaek ogsaa mange mönstre som strikkes nedefra og op. God fornöjelse.
26.08.2014 - 15:29Maxine wrote:
Lovely, I haven't done very much fair isle and this would be great to wear so would love the pattern.
08.07.2014 - 16:50
![]() Beate wrote:
Beate wrote:
Total klasse
28.06.2014 - 19:39
|
|||||||
Silver Dream Cardigan#silverdreamcardigan |
|||||||
 |
 |
||||||
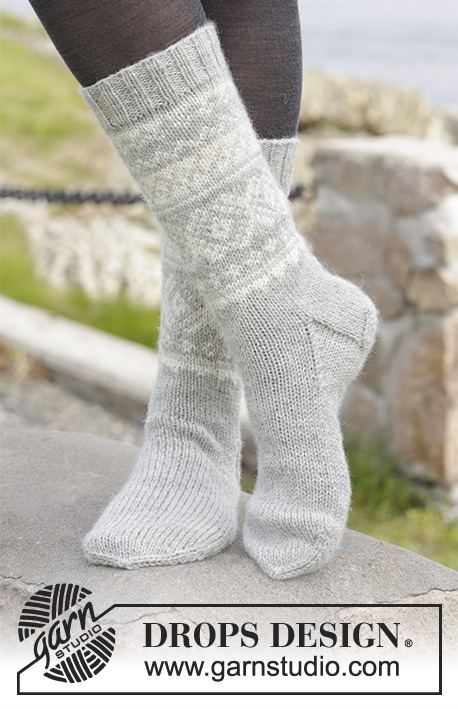
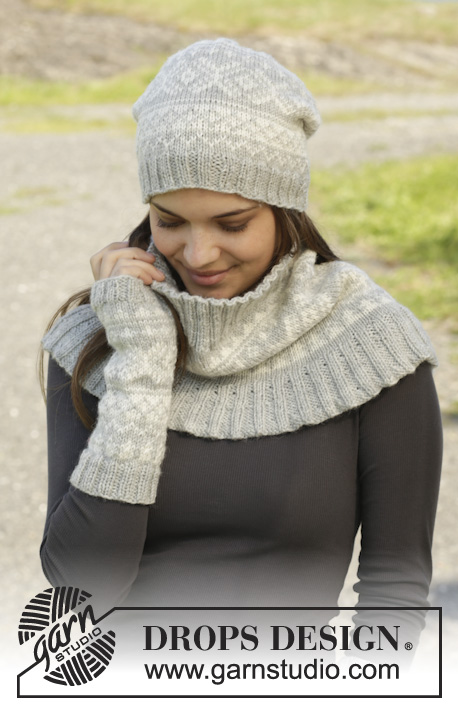
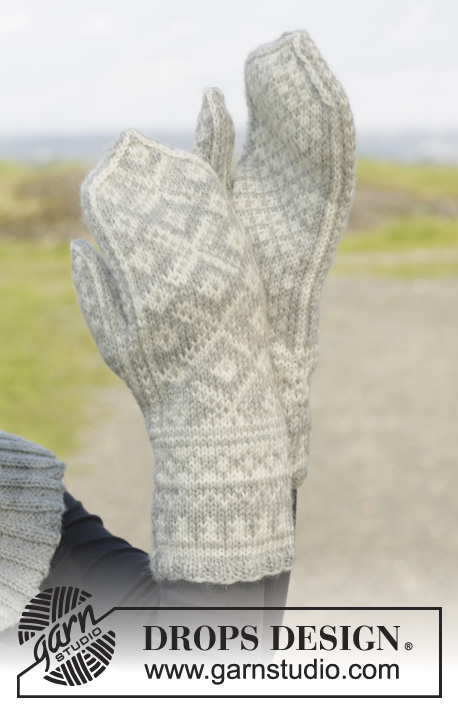
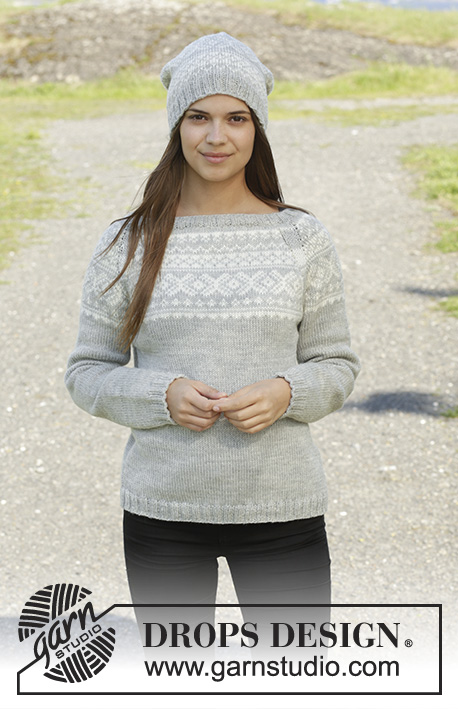
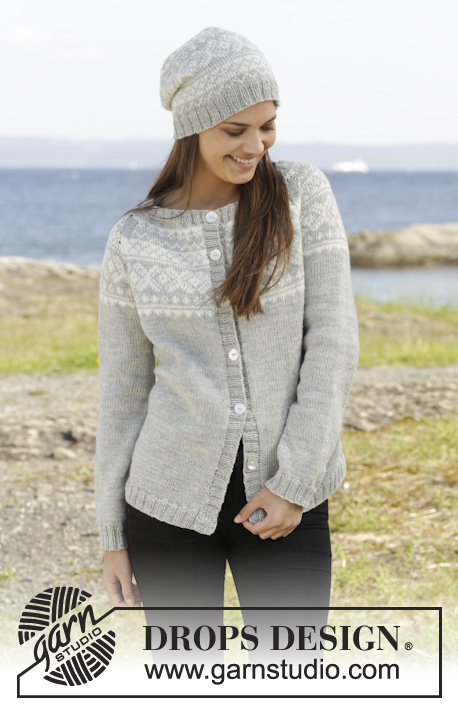
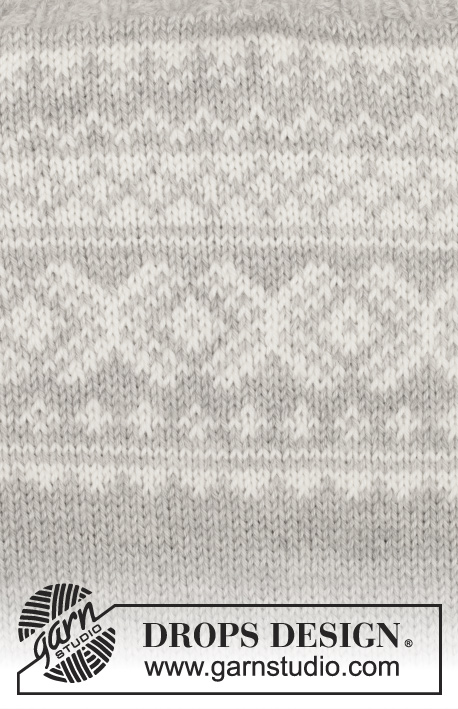
Knitted DROPS jacket and hat with Norwegian pattern, worked top down in ”Karisma”. Size: S - XXXL.
DROPS 157-1 |
|||||||
|
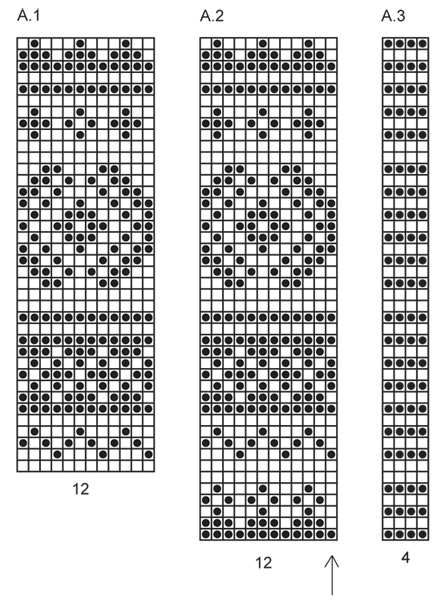
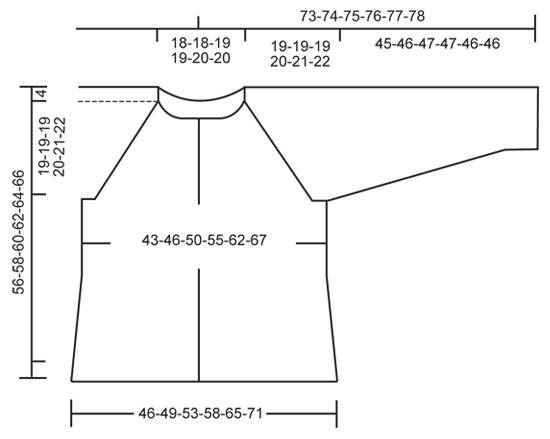
GARTER ST (back and forth on needle): K all rows. 1 ridge = K2 rows. PATTERN: See diagrams A.1-A.3. Work entire pattern in stockinette st. ELEVATION: Work an elevation in the back of neck as follows: NOTE! On every turn in the middle of piece slip 1st st, tighten yarn and continue to work. Beg mid back and work until 22-25-28-29-29-31 sts remain, turn, tighten yarn and work until 22-25-28-29-29-31 sts remain in the other side. Turn, tighten yarn and work until 37-41-46-49-49-53 sts remain, turn, tighten yarn and work until 37-41-46-49-49-53 sts remain in the other side. Turn, tighten yarn and work until 53-58-65-70-70-76 sts remain, turn, tighten yarn and work until 53-58-65-70-70-76 sts remain in the other side. INCREASE TIP (applies to raglan): Inc 1 st by making a YO before and after the 4 sts between markers on front piece/back piece and sleeves. K YO twisted on next row. Work the inc sts in the pattern. PATTERN TIP: Diagram A.3 shows how to work the 4 raglan sts to avoid large spaces between sts. After diagram work piece with light pearl gray until finished. ---------------------------------------------------------- JACKET: Worked back and forth on circular needle, top down. Work neck edge and band at the end. Cast on 111-111-115-119-123-123 sts (includes 1 edge st in GARTER ST - see explanation above) on circular needle size 4 mm / US 6 with light pearl gray. P 1 row from WS. Continue with stockinette st with 1 edge st in garter st in each side until finished measurements - AT THE SAME TIME on next row inc 12-28-36-40-36-52 sts evenly = 123-139-151-159-159-175 sts. P 1 row from WS. Then work ELEVATION - see explanation above - in the neck. REMEMBER THE GAUGE! Then work 2 rows over all sts, next row is from RS. Work 1 row and at the same time insert 8 markers and 5 strands in the piece as follows: Work 22-25-28-29-29-31 sts, insert a marker after these sts and insert a strand in the 2nd st from beg (= mid front on right front piece). Work 4 sts, insert a marker, work 6-7-7-8-8-10 sts, insert a strand in the last st on right needle (= mid st on sleeve). Work 5-6-6-7-7-9 sts, insert a marker. Work 4 sts, insert a marker, work 21-24-27-28-28-30 sts, insert a strand in the last st on right needle (= middle of back piece). Work 20-23-26-27-27-29 sts, insert a marker. Work 4 sts, insert a marker, work 6-7-7-8-8-10 sts, insert a strand in the last st on right needle (= middle of sleeve). Work 5-6-6-7-7-9 sts, insert a marker. Work 4 sts, insert a marker. Work 22-25-28-29-29-31 sts, insert a strand in next to last st (= mid front on left front piece). READ ALL OF THE FOLLOWING SECTION BEFORE CONTINUING: Now work PATTERN according to diagram A.2 - READ PATTERN TIP! NOTE: St with strand on back piece, front piece and sleeves should fit st with arrow in diagram. Count out towards the side (i.e. the pattern will not fit in transitions between body and sleeves). AT THE SAME TIME inc for raglan in every transition between body and sleeves as follows - READ INCREASE TIP: ON BODY: Inc every round 0-0-0-2-10-14 times in total, every other round 14-15-17-19-20-20 times in total and then every 4th round 6-6-5-4-2-2 times in total (= 81-89-97-105-119-131 sts on back piece and 42-46-50-54-61-67 sts on each front piece) ON SLEEVE: Inc every other round 14-15-19-20-25-23 times in total and every 4th round 6-6-4-4-2-4 times in total (= 59-63-67-71-77-81 sts on sleeve). Piece measures approx. 19-19-19-20-21-22 cm / 7½"-7½"-7½"-8"-8¼"-8¾" from cast-on edge at the front, now measure piece from here! After all inc for raglan, there are 283-307-331-355-395-427 sts on needle. Work next row as follows from RS: Work the first 42-46-50-54-61-67 sts (= front piece), slip the next 59-63-67-71-77-81 sts on stitch holder (= sleeve), cast on 8-8-8-10-10-10 new sts, work 81-89-97-105-119-131 sts (= back piece), slip the next 59-63-67-71-77-81 sts on stitch holder (= sleeve), cast on 8-8-8-10-10-10 new sts, work the remaining 42-46-50-54-61-67 sts (= front piece) = 181-197-213-233-261-285 sts. Insert 1 marker in the middle of the 8-8-8-10-10-10 new sts under each sleeve. Then work in stockinette st with 1 edge sts in garter st in each side as before until piece measures approx. 36-37-38-39-40-41 cm / 14¼"-14½"-15"-14¼"-15¾"-16⅛" from cast-on edge at the front. Then inc 1 st by making a YO on each side of the middle 2 sts in each side (marker is in the middle of these sts), P YO twisted on next row (= 4 sts inc). Repeat inc every 4-4-4-5-5-5 cm / 1½"-1½"-1½"-2"-2"-2" 2 more times (= 3 times in total) = 193-209-225-245-273-297 sts. Work until piece measures 52-54-56-58-60-62 cm / 20½"-21¼"-22"-22¾"-23⅝"-24⅜" from cast-on edge at the front. On next row from RS, inc 7 sts evenly in all sizes = 200-216-232-252-280-304 sts. Switch to circular needle size 3.5 mm / US 4. Work rib as follows from WS: 1 edge st in garter st, * P 2, K 2 *, repeat from *-* until 3 sts remain. Finish with P 2 and 1 edge st in garter st. Work until rib measures approx. 4 cm / 1½". Bind off with K over K and P over P. SLEEVE: Work piece in the round on circular needle in stockinette st. Slip sts from one stitch holder back on circular needle size 4 mm / US 6 (= 59-63-67-71-77-81 sts). Work in stockinette st and cast on 8-8-8-10-10-10 new sts at the end of row = 67-71-75-81-87-91 sts. Insert a marker in the middle of the new sts under the sleeve. When piece measures approx. 3 cm / 1", dec 1 st on each side of the middle 2 sts under sleeve (marker is in the middle of these 2 sts). Switch to double pointed needles when needed. Repeat dec every 3½-3½-3-2½-2-2 cm / 1¼"-1¼"-1"-⅞"-¾"-¾" 8-9-10-12-15-16 more times (= 9-10-11-13-16-17 times in total) = 49-51-53-55-55-57 sts. When piece measures 41-42-43-43-42-42 cm / 16"-16½"-17"-17"-16½"-16½", inc 7-5-7-5-9-7 st evenly = 56-56-60-60-64-64 sts. Switch to double pointed needles size 3.5 mm / US 4 and work rib (K 2, P 2) until piece measures 45-46-47-47-46-46 cm / 17¾"-18"-18½"-18½"-18"-18" from where new sts were cast on. Bind off with K over K and P over P. Work the other sleeve the same way. LEFT BAND: Work band back and forth on circular needle size 3.5 mm / US 4. Pick up 120-124-128-132-136-140 sts, (no of sts must be divisible by 4) inside 1 edge st on left front piece with light pearl gray. Work rib as follows from WS: 1 st in garter st, * P 2, K 2 *, repeat from *-*, finish with P 2 and 1 st in garter st. Then work K over K and P over P until rib measures 3 cm / 1". Bind off with K over K and P over P. RIGHT BAND: Work as left band but when band measures approx. 1.5 cm / ½", dec for 5-5-6-6-6-6 buttonholes evenly (dec for buttonholes in P sections seen from RS). 1 buttonhole = P 2 tog and make 1 YO – top buttonhole should be approx. 6 cm / 2⅜" from the top (there should also be 1 buttonhole on neck edge), the other buttonholes should be approx. 8 cm / 3⅛" apart. The distance after last buttonhole down towards edge is larger. NECK EDGE: Beg at the edge on right band at the top. Use circular needle size 3.5 mm / US 4 and pick up 128-128-132-136-140-140 sts (no of sts must be divisible by 4) with light pearl grey around the entire edge and over left band. Work rib as follows (1st row = WS): 1 st in garter st, * P 2, K 2 *, repeat from *-*, finish with P 2 and 1 st in garter st. Continue with K over K and P over P with 1 st in garter st in each side of piece. When neck edge measures 1 cm / ⅜", dec for 1 buttonhole over the other buttonholes on right band. Continue rib until neck edge measures approx. 2 cm / ¾". Bind off with K over K and P over P. ASSEMBLY: Sew holes tog under sleeves and fasten yarn. ---------------------------------------------------------- HAT: Worked in the round on circular needle, switch to double pointed needles when needed. Cast on 116 sts with light pearl gray on circular needle size 3.5 mm / US 4. Work rib = K 2/P 2 until piece measures approx. 4 cm / 1½". Switch to circular needle size 4 mm / US 6. K 1 round with pearl gray while AT THE SAME TIME dec 8 sts evenly = 108 sts. Then work pattern according to diagram A.1 (= 9 repetitions on round). REMEMBER THE GAUGE! When A.1 has been worked 1 time vertically, continue with light pearl gray and stockinette st. Work 1 round AT THE SAME TIME insert 9 markers in the hat with 12 sts between every marker. On next round, dec 1 st after every marker by K 2 tog (= 9 sts dec). Repeat dec every other round 10 times in total = 18 sts. On next round K tog all sts 2 by 2 = 9 sts. Cut the yarn and pull it through the remaining sts, tighten tog and fasten. The hat measures approx. 25 cm / 9¾" vertically. |
|||||||
Diagram explanations |
|||||||
|
|||||||
 |
|||||||
 |
|||||||
Have you finished this pattern?Tag your pictures with #dropspattern #silverdreamcardigan or submit them to the #dropsfan gallery. Do you need help with this pattern?You'll find 33 tutorial videos, a Comments/Questions area and more by visiting the pattern on garnstudio.com. © 1982-2026 DROPS Design A/S. We reserve all rights. This document, including all its sub-sections, has copyrights. Read more about what you can do with our patterns at the bottom of each pattern on our site. |
|||||||


With over 40 years in knitting and crochet design, DROPS Design offers one of the most extensive collections of free patterns on the internet - translated to 17 languages. As of today we count 324 catalogs and 12290 patterns - 12280 of which are translated into English (US/in).
We work hard to bring you the best knitting and crochet have to offer, inspiration and advice as well as great quality yarns at incredible prices! Would you like to use our patterns for other than personal use? You can read what you are allowed to do in the Copyright text at the bottom of all our patterns. Happy crafting!
Post a comment to pattern DROPS 157-1
We would love to hear what you have to say about this pattern!
If you want to leave a question, please make sure you select the correct category in the form below, to speed up the answering process. Required fields are marked *.