
Popular categories
Looking for a yarn?


Comments / Questions (212)
![]() Liz wrote:
Liz wrote:
Hi, love the pattern but confused on the right sleeve instructions. It says to use M.1 and start 7 stitches in. When I do that, I complete the round of 65 stitches with 2 remaining. What do I do with those? Or am I not understanding the directions? Thank you!
23.08.2025 - 22:33DROPS Design answered:
Dear Liz, you start in the 7th stitch in the chart, but the first stitch in the needles. So you work the chart over all stitches, but the first repeat starts in the middle of the chart; this is so that the pattern is better centered in the mid-front sleeve. Happy knitting!
25.08.2025 - 01:38
![]() Hennie wrote:
Hennie wrote:
Jeg er i tvivl om diagram m2, er det meningen at der skal strikkes 2 masker sammen for hver rapport, eller 2 masker sammen i hver side af bærestykket? Hvis det er i hver side, er det så på alle 8 pinde??
01.08.2025 - 14:23DROPS Design answered:
Hei Hennie. For å skape det bølgemønstret denne blusen har, skal de 4 første og de 4 siste maskene strikkes 2 og 2 sammen = 4 felte masker, samtidig økes det 4 masker/4 kast på samme pinne, = samme maskeantall (bortsett fra når man kommer høyere opp i diagrammet). Dette gjøres på hver rapport det strikkes ( (= 16-17-20-21 rapporter rundt). mvh DROPS Design
25.08.2025 - 11:39
![]() Joanne wrote:
Joanne wrote:
Hello thank you for this gorgeous pattern... i am lost because it says when completed diagram M2 95sts remain... there are no deductions i can see
18.06.2025 - 00:16DROPS Design answered:
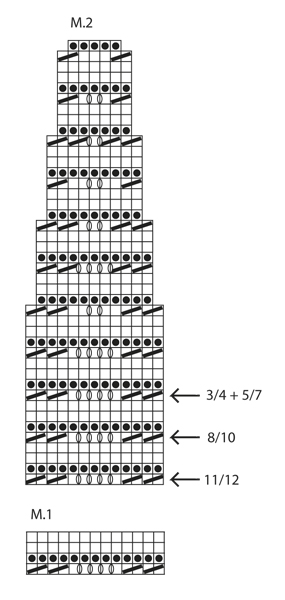
Dear Joanne, you will decrease in each repeat of M.2 in width by working less yarn overs than you will decrease stitches, so that M.2 starts over 13 sts but ends with 5 sts only, so that you will have: 5 front band stitches + 17repeats 5 sts (85 sts) and 5 sts = 95 sts left. Happy knitting!
19.06.2025 - 10:01
![]() Reidun Ekornrød wrote:
Reidun Ekornrød wrote:
Skjønner ikke hvorfor en skal stoppe med 14 masker igjen, trodde det skulle være 5m på vær side til stolpe, kan du forklare det for meg,strikker den største størrelsen med 194
10.06.2025 - 10:12DROPS Design answered:
Hei Reidun, Første pinnen inkluderer felling av masker (2 rett sammen) for å redusere antall masker, ellers er hele pinnen strikket rett (vi anbefaler å legge opp for mange masker slik at oppleggingskanten ikke blir stram). Da har du 179 masker på pinnen og strikker 3 pinner til med rett. Etter det strikker du M.1 med 5 stolpemasker i hver side i riller. Hilsen Drops Team.
11.06.2025 - 06:52
![]() Christa wrote:
Christa wrote:
Wonder Wave Cardigan str 8/10år. Højre ærme: "fortsæt med M1-start i den 4. m I diag, talt fra højre, i str 8/10 år strikkes den første m ret..... Det har jeg gjort, og trevlet op igen, for mønsteret 'ligger' ikke korrekt ift 'tungekanten'?? ...men hvordan kan det også komme til at se ud som ryg/forstykke, når der på ærmet strikkes 6 r, 2 r sm, og på ryg-/forstykke strikkes 10r,2 r sm ?? Tak for forhåbentligt hurtigt svar! Vh Christa
07.06.2025 - 00:59DROPS Design answered:
Hej Christa, du strikker 6 r, 2 r sm for at få det rigtige antal masker før du starter med M.1 (i den 4.maske) :)
12.06.2025 - 08:23
![]() Lena Skålberg wrote:
Lena Skålberg wrote:
Ska sticka höger ärm, och precis börjat med M1. Undrar hur man gör med varvet början efter att man stickat ihop sista och första maskin. Var är början på varvet då? Var sätter man markören för början? Är ju noga att man gör rätt, så det funkar när man ska sticka på ärmen. Försökt räkna men snurrar bara runt. Tacksam för svar.
01.06.2025 - 14:19DROPS Design answered:
Hei Lena. Vi skal hjelpe deg så godt vi kan, men hvilken str. strikker du? mvh DROPS Design
02.06.2025 - 13:25
![]() Keshni Govender wrote:
Keshni Govender wrote:
How do I read the M2 graph that decreases for pattern R-030-bn
22.05.2025 - 13:50
![]() Keshni wrote:
Keshni wrote:
How do I read the M2 graph that decreases for pattern R-030-bn
22.05.2025 - 13:50DROPS Design answered:
Dear Mrs Keshni, read M.2 from the bottom up, from the right towards the left from RS and from the left towards the right from WS - start with the arrow matching the size; Do not hesitate to add markers between each repeat in width so that you can check and track number of stitches in each repeat all the row, especially when decreasing. Happy knitting!
22.05.2025 - 15:50
![]() Tanja wrote:
Tanja wrote:
Jeg er ved at strikke ryg- og forstykket. Når det måler ca. 18 cm skal jeg lukke af til ærmer. Når jeg måler fra pinden til nederste del af bølgen måler det 18 cm. Når jeg måler til øverste del af bølgen måler det 17 cm. Når jeg måler ved stolpemaskerne måler det 16. Hvilket mål skal jeg gå efter?
11.05.2025 - 13:15DROPS Design answered:
Hei Tanja. Ville ha målt fra den nederste delen av bølgemønstret. mvh DROPS Design
19.05.2025 - 13:13
![]() Bonaria Floris wrote:
Bonaria Floris wrote:
Buongiorno scusa se ti scrivo nuovamente ma vorrei capire come fare lo sprone e dove diminuire le maglie per arrivare a 115 grazie
24.04.2025 - 07:41DROPS Design answered:
Buongiorno Floris, le diminuzioni sono incluse nella lavorazione del diagramma. Buon lavoro!
24.04.2025 - 10:59
|
|||||||||||||
Wonder Wave#wonderwavecardigan |
|||||||||||||
|
|
|||||||||||||
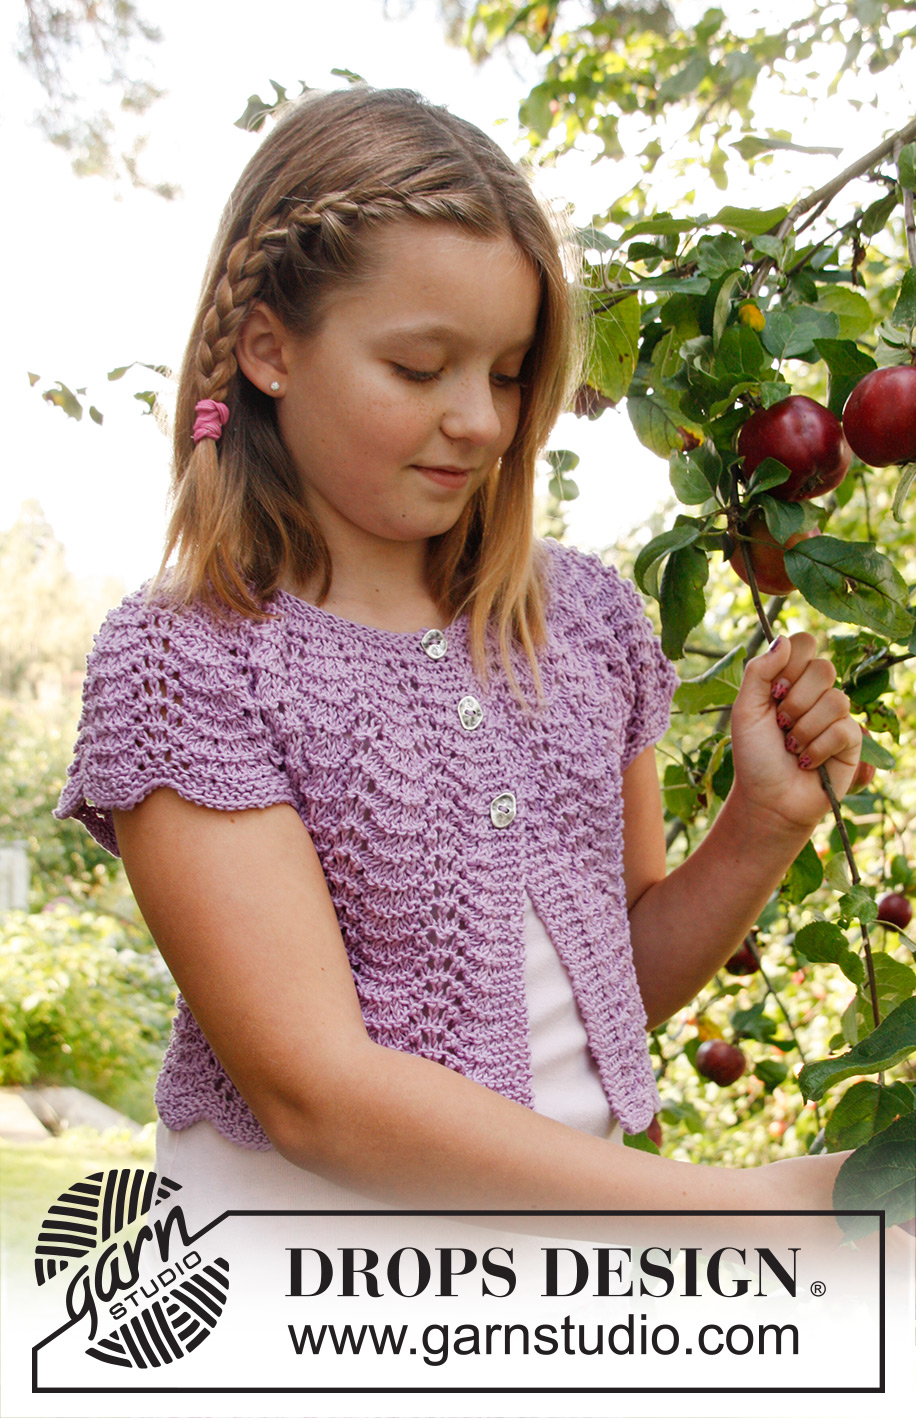
Knitted DROPS jacket with short sleeves, wavy pattern and round yoke in ”Muskat”. Size 3 - 12 years
DROPS Children 22-22 |
|||||||||||||
|
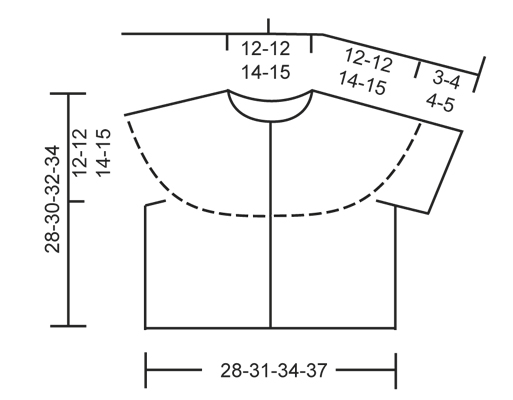
WAVY PATTERN: See diagrams M.1 and M.2. The diagrams show all rows in pattern seen from RS. GARTER ST (in the round on double pointed needles/circular needle): * K 1 round and P 1 round *, repeat from *-*. BUTTON HOLES: Bind off for button holes on right band from RS. 1 button hole = bind off 3rd band st from edge, on next row cast on 1 new st over the bound off st. Bind off for button holes when piece measures: SIZE 3/4 years: 18, 23 and 27 cm / 7", 8¾" and 10½" SIZE 5/7 years: 20, 25 and 29 cm / 8",9¾" and 11½" SIZE 8/10 years: 21, 27 and 31 cm / 8¼",10¼" and 12¼" SIZE 10/12 years: 23, 29 and 33 cm / 9", 11½" and 13" NOTE: Last button hole is bound off on row after diagram M.2 has been worked. --------------------------------------------------------- BODY: Worked back and forth on circular needle from mid front. Loosely cast on 152-166-180-194 sts (includes 5 band sts in each side) on circular needle size 4 mm / US 6 with Muskat. Work first row as follows from RS: * K 10, K 2 tog *, repeat from *-* until 8-10-12-14 sts remain, K these sts = 140-153-166-179 sts. Then K 3 rows back and forth. Continue with diagram M.1 with 5 band sts in each side in garter st until finished measurements. REMEMBER THE GAUGE! When piece measures approx. 16-18-18-19 cm / 6¼"-7"-7"-7½" (adjust so that 1 row remains of diagram M.1), work next row as follows (= WS): Work 34-37-41-44 sts, loosely bind off 7-7-6-6 sts for armhole, work 58-65-72-79 sts, loosely bind off 7-7-6-6 sts for armhole and work the rest of row (= 34-37-41-44 sts). Put piece aside and knit the sleeves. RIGHT SLEEVE: Worked in the round on double pointed needles. Cast on 59-59-74-74 sts on double pointed needles size 4 mm / US 6 with Muskat. Work first round as follows: * K 6, K 2 tog *, repeat from *-* until 3-3-2-2 sts remain, K these sts = 52-52-65-65 sts. Then P 1 round, K 1 round and P 1 round. Insert a marker at the beg of the round. Continue with diagram M.1 - beg in the 11th-1st-4th-7th sts in diagram, count from the right (in size 3/4 and 8/10 years, K first st, and at the end of round K this st tog with the last st on round). Continue working like this until piece measures approx. 3-4-4-5 cm / 1⅛"-1½"-1½"-2" (adjust so that 1 round of diagram M.1 remains). On next round bind off the FIRST 6-6-7-7 sts, work the rest of round = 46-46-58-58 sts. LEFT SLEEVE: Cast on and work as right sleeve but when piece measures 3-4-4-5 cm / 1⅛"-1½"-1½"-2", bind off like this: Size 3/4 and 8/10: bind off the FIRST 6-7 sts on round Size 5/7 and 11/12: bind off the LAST 6-7 sts on round (this is important to make the pattern correct on yoke). YOKE: Slip sleeves on to same circular needle as body where armholes were bind off = 218-231-270-283 sts. NOTE: It is very important that the right sleeve is inserted in the right side and the left sleeve is inserted in the left side so that the pattern fits onwards. Continue with diagram M.2 – start at the arrow for the correct size - with 5 band sts in garter st in each side (= 16-17-20-21 repetitions on the round). AT THE SAME TIME when piece measures 18-20-21-23 cm / 7"-8"-8¼"-9", bind off for BUTTON HOLES - see explanation above. When diagram M.2 has been worked vertically, 90-95-110-115 sts remain on needle. Work next row as follows from RS: K 5 (while at the same time casting/binding off for the last button hole), * K 2 tog, K 1 *, repeat from *-* until 7-6-6-5 sts remain, K these sts = 64-67-77-80 sts. K 3-3-5-5 rows back and forth, then bind off with K from RS. ASSEMBLY: Sew tog the openings under the sleeves and sew on buttons. |
|||||||||||||
Diagram explanations |
|||||||||||||
|
|||||||||||||
 |
|||||||||||||
 |
|||||||||||||
Have you finished this pattern?Tag your pictures with #dropspattern #wonderwavecardigan or submit them to the #dropsfan gallery. Do you need help with this pattern?You'll find 12 tutorial videos, a Comments/Questions area and more by visiting the pattern on garnstudio.com. © 1982-2026 DROPS Design A/S. We reserve all rights. This document, including all its sub-sections, has copyrights. Read more about what you can do with our patterns at the bottom of each pattern on our site. |
|||||||||||||


With over 40 years in knitting and crochet design, DROPS Design offers one of the most extensive collections of free patterns on the internet - translated to 17 languages. As of today we count 324 catalogs and 12291 patterns - 12281 of which are translated into English (US/in).
We work hard to bring you the best knitting and crochet have to offer, inspiration and advice as well as great quality yarns at incredible prices! Would you like to use our patterns for other than personal use? You can read what you are allowed to do in the Copyright text at the bottom of all our patterns. Happy crafting!
Post a comment to pattern DROPS Children 22-22
We would love to hear what you have to say about this pattern!
If you want to leave a question, please make sure you select the correct category in the form below, to speed up the answering process. Required fields are marked *.