
Popular categories
Looking for a yarn?


Comments / Questions (212)
![]() Mamieflo wrote:
Mamieflo wrote:
J'ai tricoté ces modèles en plusieurs exemplaires , âges et couleurs différentes pour mes trois premières petites filles en 2013 et maintenant cela passe aux deux suivantes, modèles adorables . J'ai été aidée quand j'ai rencontré un ennui , c'est vraiment agréable.
20.05.2017 - 18:24Christine Weir wrote:
Hi ...thanks for answering ....but does thatmean that when i've knitted 2 tog with the first stitch that this now becomes the last stitc on the next pattern row? i.that is k2
15.05.2017 - 11:56DROPS Design answered:
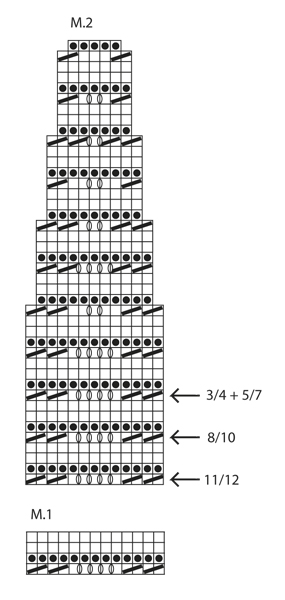
Dear Mrs Weir, the K2 tog at the end of row will become the 1st st at beg of round (= as in 4th st in diagram). Happy knitting!
15.05.2017 - 13:27Christine Weir wrote:
Hello.....i'm having trouble with the sleeves ....i'm doing the 9/10....i ubderstand having to knit the 1st stitch then knitting 2 together at the end of the row ...but the pattern doesnt line up....what am i doing wrong?
13.05.2017 - 01:26DROPS Design answered:
Dear Mrs Weir, in size 9/10 you are starting diagram on 4th st, ie K1 at the beg of round, but at the end of row work K2 tog (= 1st st on round = 4th st in diagram). Happy knitting!
15.05.2017 - 08:48
![]() Kirsten wrote:
Kirsten wrote:
Hej højre ærme der er mønster forkert i str 8 /10 jeg kan ikke få det til at passe lige meget hvor mange jeg har prøvet vil gerne have den strikket. Vil du ikke lige prøve selv om du kan få det til at passe
25.04.2017 - 19:19DROPS Design answered:
Hej Kirsten, jo det stemmer, når du har taget ind til 65 m så strikkes diagrammet som går over 13m 5 gange. Du starter diagrammet i 4.m fra højre (1 ret), fortsætter mod venstre og strikker de sidste 9 m af diagrammet, strikker diagrammet 4 hele gange og afslutter med de 3 første m i diagrammet og strikker den sidste m sammen med første m på omgangen. God fornøjelse!
03.05.2017 - 10:59
![]() Katy wrote:
Katy wrote:
Buonasera. Ho provato a realizzare il modello con i ferri n. 3,5 per la taglia 5-7 anni ma il lavoro risultava molto grande. Così ho montato le maglie per la misura 3-4. Le taglie norvegesi vestono più grande rispetto alle nostre? Perché vanno eseguite le diminuzioni durante il primo ferro? A cosa servono? Grazie! :-)
18.02.2017 - 18:18DROPS Design answered:
Buonasera Katy, deve utilizzare la misura di ferri che le consente di ottenere il campione indicato, in questo modo le misure corrisponderanno a quelle del modello. Le taglie indicate corrispondo a quelle italiane, anche le misure in cm. Le diminuzioni sul 1° ferro servono a sagomare il bordo inferiore. Buon lavoro!
18.02.2017 - 19:13
![]() Mona wrote:
Mona wrote:
Jeg forstår ikke hvordan jeg skal strikke ermene, har prøvd flere ganger. Jeg strikker str 8/10 og starter derfor M1 i den 4 m. Jeg strikker denne rett, men på slutten av første omgang av mønsteret strikker jeg denne rett sammen med siste maske. Stemmer fortsatt, men skal de sammenstrikkede maskene være på slutten av omgangen eller på begynnelsen? Når jeg så er ferdig med første rapport (4 omganger) av M1, så må jeg starte i den 2. m i mønster M1 for å få mønsteret til å stemme. Er dette riktig?
30.09.2016 - 22:15DROPS Design answered:
Hej Mona. Du strikker saadan her: 1 m r, saa begynder du efter fjerde m i M.1, dvs, du strikker de 9 sidste masker i A.1. Saa gentager du hele M.1 (13 m) 4 gange. Du har nu strikket 62 m, saa der er 3 m til overs. Strik disse som start af M.1, dvs, 2 m r samen, og saa den sidste m ret sammen med 1e m paa pinden.
12.10.2016 - 15:53
![]() Dania Ragnarsson wrote:
Dania Ragnarsson wrote:
I højre lrme str. 8/10 står der at man skal starte i 4 maske i diagrammet. Den fjerde maske er den ene af to der skal strikkes ret sammen. Hvordan starter man den første omgan i mønsteret? Det giver slet ikke mening at man skal stikke 1 ret og så fjerde madke i diagrammet- skal den også strikkes ret??
17.08.2016 - 19:11DROPS Design answered:
Hej Dania. Det er ikke 4. m, det er 4. pind. Du starter med de 5 stolpemasker og saa er det start af mönster (4e pind): 2 r sammen, 2 r sammen, 1 r, slaa om, 1 r, slaa om osv.
08.09.2016 - 13:03
![]() Fran Miller wrote:
Fran Miller wrote:
In the directions for the body it states to do M1 till a specific length and to adjust pattern so only 1 row remains of pattern. How do you adjust it? Do you just skip rows and do last row?
31.05.2016 - 14:37DROPS Design answered:
Dear Mrs Miller, you repeat M.1 in height adjusting the measurement to the size so that the next row (when binding off for armhole) will be worked from WS. So that when you will work yoke, you can continue from RS. Happy knitting!
31.05.2016 - 15:13
![]() Suzy Attwood wrote:
Suzy Attwood wrote:
I would love to see a top down version of this little sweater.
22.05.2016 - 16:34DROPS Design answered:
Dear Mrs Attwood, please find here the top down version for adult to this pattern, this may inspire you to adjust/adapt. Happy knitting!
23.05.2016 - 10:23
![]() Suzy Attwood wrote:
Suzy Attwood wrote:
I would love to see a top down version of this little sweater.
22.05.2016 - 16:34
|
|||||||||||||
Wonder Wave#wonderwavecardigan |
|||||||||||||
|
|
|||||||||||||
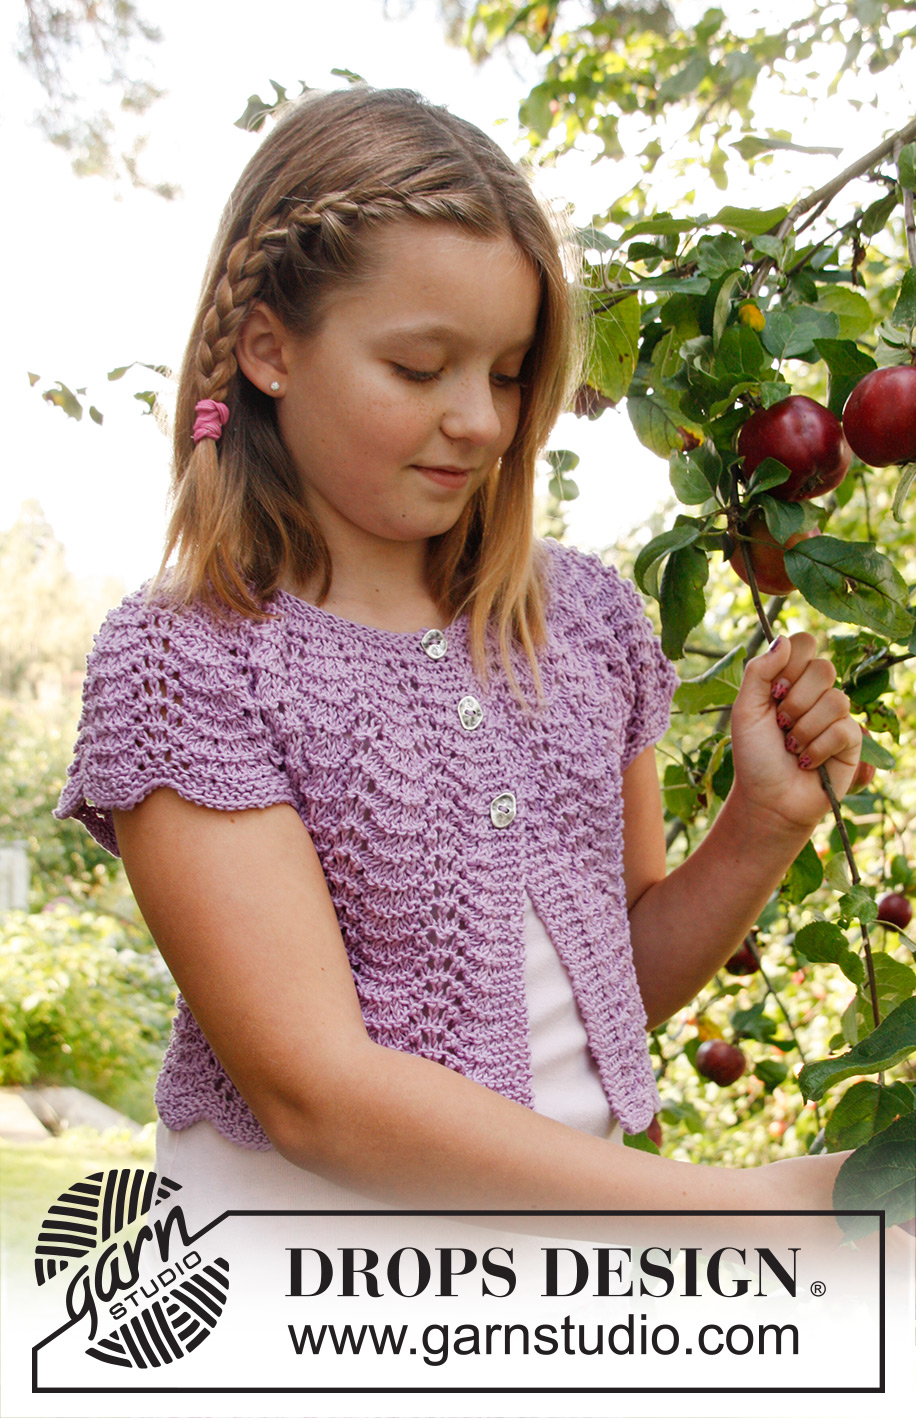
Knitted DROPS jacket with short sleeves, wavy pattern and round yoke in ”Muskat”. Size 3 - 12 years
DROPS Children 22-22 |
|||||||||||||
|
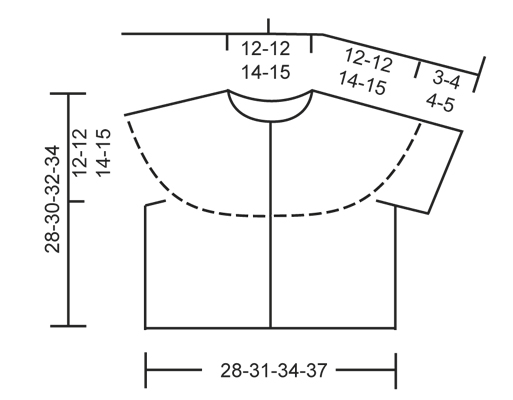
WAVY PATTERN: See diagrams M.1 and M.2. The diagrams show all rows in pattern seen from RS. GARTER ST (in the round on double pointed needles/circular needle): * K 1 round and P 1 round *, repeat from *-*. BUTTON HOLES: Bind off for button holes on right band from RS. 1 button hole = bind off 3rd band st from edge, on next row cast on 1 new st over the bound off st. Bind off for button holes when piece measures: SIZE 3/4 years: 18, 23 and 27 cm / 7", 8¾" and 10½" SIZE 5/7 years: 20, 25 and 29 cm / 8",9¾" and 11½" SIZE 8/10 years: 21, 27 and 31 cm / 8¼",10¼" and 12¼" SIZE 10/12 years: 23, 29 and 33 cm / 9", 11½" and 13" NOTE: Last button hole is bound off on row after diagram M.2 has been worked. --------------------------------------------------------- BODY: Worked back and forth on circular needle from mid front. Loosely cast on 152-166-180-194 sts (includes 5 band sts in each side) on circular needle size 4 mm / US 6 with Muskat. Work first row as follows from RS: * K 10, K 2 tog *, repeat from *-* until 8-10-12-14 sts remain, K these sts = 140-153-166-179 sts. Then K 3 rows back and forth. Continue with diagram M.1 with 5 band sts in each side in garter st until finished measurements. REMEMBER THE GAUGE! When piece measures approx. 16-18-18-19 cm / 6¼"-7"-7"-7½" (adjust so that 1 row remains of diagram M.1), work next row as follows (= WS): Work 34-37-41-44 sts, loosely bind off 7-7-6-6 sts for armhole, work 58-65-72-79 sts, loosely bind off 7-7-6-6 sts for armhole and work the rest of row (= 34-37-41-44 sts). Put piece aside and knit the sleeves. RIGHT SLEEVE: Worked in the round on double pointed needles. Cast on 59-59-74-74 sts on double pointed needles size 4 mm / US 6 with Muskat. Work first round as follows: * K 6, K 2 tog *, repeat from *-* until 3-3-2-2 sts remain, K these sts = 52-52-65-65 sts. Then P 1 round, K 1 round and P 1 round. Insert a marker at the beg of the round. Continue with diagram M.1 - beg in the 11th-1st-4th-7th sts in diagram, count from the right (in size 3/4 and 8/10 years, K first st, and at the end of round K this st tog with the last st on round). Continue working like this until piece measures approx. 3-4-4-5 cm / 1⅛"-1½"-1½"-2" (adjust so that 1 round of diagram M.1 remains). On next round bind off the FIRST 6-6-7-7 sts, work the rest of round = 46-46-58-58 sts. LEFT SLEEVE: Cast on and work as right sleeve but when piece measures 3-4-4-5 cm / 1⅛"-1½"-1½"-2", bind off like this: Size 3/4 and 8/10: bind off the FIRST 6-7 sts on round Size 5/7 and 11/12: bind off the LAST 6-7 sts on round (this is important to make the pattern correct on yoke). YOKE: Slip sleeves on to same circular needle as body where armholes were bind off = 218-231-270-283 sts. NOTE: It is very important that the right sleeve is inserted in the right side and the left sleeve is inserted in the left side so that the pattern fits onwards. Continue with diagram M.2 – start at the arrow for the correct size - with 5 band sts in garter st in each side (= 16-17-20-21 repetitions on the round). AT THE SAME TIME when piece measures 18-20-21-23 cm / 7"-8"-8¼"-9", bind off for BUTTON HOLES - see explanation above. When diagram M.2 has been worked vertically, 90-95-110-115 sts remain on needle. Work next row as follows from RS: K 5 (while at the same time casting/binding off for the last button hole), * K 2 tog, K 1 *, repeat from *-* until 7-6-6-5 sts remain, K these sts = 64-67-77-80 sts. K 3-3-5-5 rows back and forth, then bind off with K from RS. ASSEMBLY: Sew tog the openings under the sleeves and sew on buttons. |
|||||||||||||
Diagram explanations |
|||||||||||||
|
|||||||||||||
 |
|||||||||||||
 |
|||||||||||||
Have you finished this pattern?Tag your pictures with #dropspattern #wonderwavecardigan or submit them to the #dropsfan gallery. Do you need help with this pattern?You'll find 12 tutorial videos, a Comments/Questions area and more by visiting the pattern on garnstudio.com. © 1982-2026 DROPS Design A/S. We reserve all rights. This document, including all its sub-sections, has copyrights. Read more about what you can do with our patterns at the bottom of each pattern on our site. |
|||||||||||||


With over 40 years in knitting and crochet design, DROPS Design offers one of the most extensive collections of free patterns on the internet - translated to 17 languages. As of today we count 324 catalogs and 12291 patterns - 12281 of which are translated into English (US/in).
We work hard to bring you the best knitting and crochet have to offer, inspiration and advice as well as great quality yarns at incredible prices! Would you like to use our patterns for other than personal use? You can read what you are allowed to do in the Copyright text at the bottom of all our patterns. Happy crafting!
Post a comment to pattern DROPS Children 22-22
We would love to hear what you have to say about this pattern!
If you want to leave a question, please make sure you select the correct category in the form below, to speed up the answering process. Required fields are marked *.