
Popular categories
Looking for a yarn?


Comments / Questions (41)
![]() Ingegärd Eek wrote:
Ingegärd Eek wrote:
Hej Fick en stickbeställning på babyset nr 19-21 Har suttit jättelänge och sökt efter någon återförsäljare som har baby merino nr 12. som det står i beskrivningen att det ska vara, Till slut hittat jag på kommentarer att färgen utgått och ersatts med nr 24. VARFÖR kan ni inte gå in och rätta i era mönster om färger utgått.......... Ingen bra reklam för er Ingegärd Eek
09.08.2015 - 16:39
![]() Christianne wrote:
Christianne wrote:
Goeiendag! Ik wil dit vestje breien, maar kan kleur 12 niet meer bestellen. Ik kan niet goed inschatten wat andere mooie kleurencombinaties/ een goeie vervanging zou zijn, omdat ik geen winkel in de buurt heb met drops wol en op internet de kleuren niet goed kan inschatten. Hebben jullie misschien een voorstel voor alternatieve kleur(en) die ik zou kunnen bestellen? Groet, Christianne
25.07.2015 - 15:22DROPS Design answered:
Hoi Christianne. Je kan het kleurenoverzicht bekijken voor een andere lichtblauwe of neem contact (mail of telefoon) op met één van onze verkooppunten. Zij helpen u graag verder met deze soort vragen :-) Veel breiplezier.
27.07.2015 - 15:36
![]() Karin wrote:
Karin wrote:
Det står i oppskriften at det er farve nr 12, lyseblå som benyttes. Men den eksisterer ikke på farvekartet. Er den utgått og blitt erstattet med nr 24?
10.05.2015 - 12:04DROPS Design answered:
Hej Karin. Ja, den er udgaaet. Du kan erstatte med 24, men du kan ogsaa kontakte din DROPS butik hvis du vil have hjaelp til et alternativ.
11.05.2015 - 13:23
![]() Birthe wrote:
Birthe wrote:
Hallo :) also ich hab jetzt auch mit dem Set angefangen und folgendes Problem mit der Strickschrift: werden hier Hin- und Rückreihen gezeigt, oder nur die Hinreihen? Irgendwie sieht das Muster für nur Hinreihen so gedehnt aus...könnt ihr mir helfen?wo ist mein Denkfehler? Danke und viele Grüße frå tyskland ;)
27.04.2015 - 20:49DROPS Design answered:
Liebe Birthe, es werden alle R des Musters gezeigt, Hin- und Rück-R. Das ganze Muster wird glatt re gestrickt und Sie arbeiten die Musterung dementsprechend auch in Rück-R. Hilsen fra Tyskland! ;-)
28.04.2015 - 23:07
![]() Sara wrote:
Sara wrote:
SAMANAIKAISESTI kun työn pituus on 5-6-6 (7-7) cm, lisää keskelle hihan alle 2 s. Toista tällaiset lisäykset yht. 11-13-13 (15-15) kertaa KOISSA 1/3 kk + 12/18 kk + 2 v: Joka 4. krs, Koossa 6/9 kk: Joka 3. krs ja KOOSSA 3/4 v: Joka 5. krs = 59-63-69 (73-79) s. En siiis ymmärrä, 1/3kk, kuinka monta kertaa ja kuinka monta silmukkaa tulee lisätä. Kuinka usein? Kuinka monta silmukkaa lisäysten jälkeen tulee olla. Kiitos.
28.12.2014 - 23:19DROPS Design answered:
Koossa 1/3 kk lisätään 2 s joka 4. krs:lla yht. 11 kertaa. Työssä on lisäysten jälkeen 59 s.
09.01.2015 - 16:31
![]() Selina wrote:
Selina wrote:
Hallo! Ich hab angefangen dieses Jäckchen zu stricken und komme mit dem Muster nicht zurecht! Mir bleibt immer eine Masche übrig. Auch verstehe ich nicht warum die zweitletzte Masche wie die erste Masche in M1 gestrickt werden soll. Das geht sich auch in M2 nicht aus. Außerdem wirkt sich das bei mir nicht auf das Muster aus. Ich hab immer eine Masche zuviel! Könnt ihr mir bitte sagen was ich falsch verstehe? Bitte um schnelle Antwort! Liebe Grüße aus Österreich! :)
09.08.2014 - 05:18DROPS Design answered:
Sie haben ja 129-147-165 (183-201) M. M1 hat 18 M. Sie stricken die beiden Rand-M kraus re, bleiben 127-145-163 (181-199) M für M1. Das Muster geht rechnerisch nicht auf, es bleibt immer 1 M übrig (z.B. 127M = 7x 18M + 1 M, 145 M = 8x 18M + 1 M), diese 1 M ist die letzte M vor der Rand-M, d.h. die vorletzte M. Und die stricken Sie so wie die 1. M von M1. Das wird gemacht, damit das Muster beidseitig symmetrisch wird, also gleich aussieht.
12.08.2014 - 10:17
![]() Anne wrote:
Anne wrote:
Når M2 i trøjen strikkes, tages det lyseblå garn så også med på bagsiden på de pinde, hvor der ikke strikkes lus? Eller starter man med en ny tråd lyseblå på de pinde der skal strikkes lus på og hæfter enderne bagefter?
04.09.2012 - 12:43DROPS Design answered:
Ja du skal have begge tråde med hele tiden. Se gerne vores instruktionsvideo - Strikkevideo - Fair Isle - 2 farver
13.12.2012 - 12:16
![]() DROPS Design wrote:
DROPS Design wrote:
Du felle på hver side av de 3 m (1r, 1 vr, 1r) also utenfor.
31.05.2011 - 08:44
![]() Lovely wrote:
Lovely wrote:
Jeg forstår ikke fellingstipset for sokkene. Jeg tar utgangspunkt i de tre maskene midt bak 1r 1v 1r. Skal de to rette strikkes sammen med de to vrange som er utenfor disse, eller sammen med den vrange i midten? Uansett hvordan jeg gjør det, ender jeg ikke opp med annenhver rett og vrang... Skal jeg likevel bare strikke rett og vrang annenhver på neste runde... Uavhengig av hva det er lengre ned?
31.05.2011 - 00:30
![]() Drops Design wrote:
Drops Design wrote:
Jo hvis du fortsætter M2 lige efter M1 som du ser i diagrammet, så vil mønsteret automatisk blive forskudt, nøjagtig som du ser det i diagrammet. God fornøjelse!
23.08.2010 - 12:52
|
|||||||||||||
Sweet Cheeks#sweetcheeksjacket |
|||||||||||||
 |
 |
||||||||||||
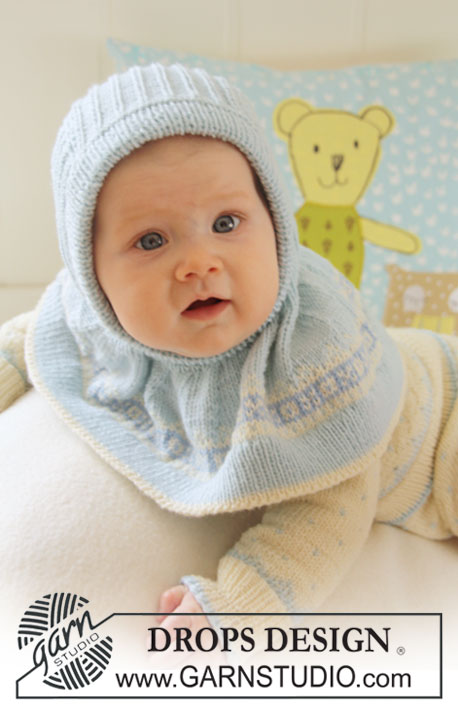
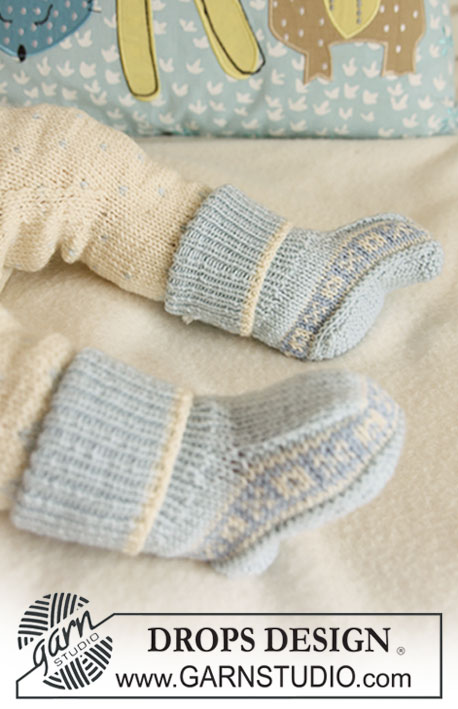
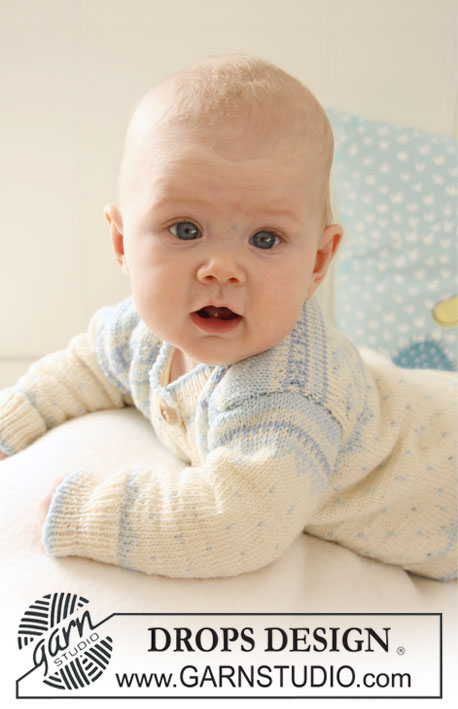
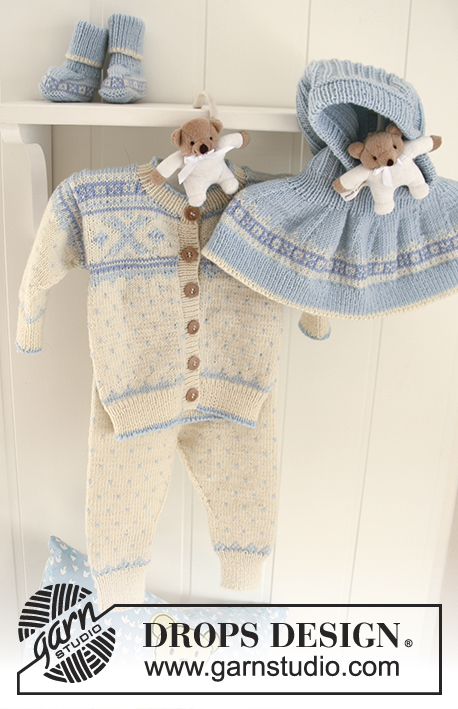
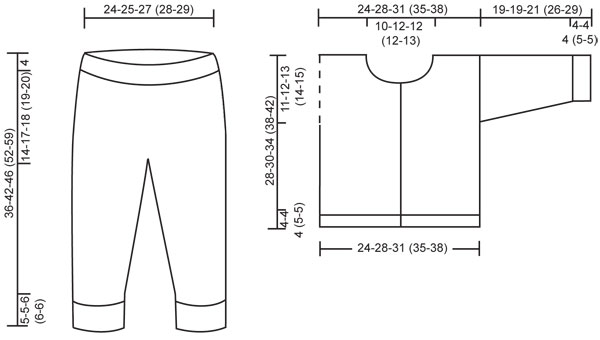
Set of knitted jacket, pants, hat and socks with Nordic pattern, for baby and children in DROPS BabyMerino
DROPS Baby 19-21 |
|||||||||||||
|
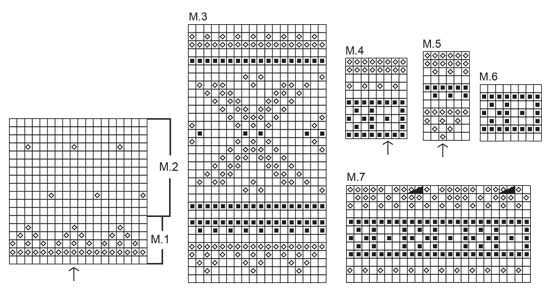
JACKET: PATTERN: See diagram M.1 to M.5. The entire pattern is worked in stockinette st. GARTER ST (back and forth on needle): K all rows. -------------------------------------------------------- -------------------------------------------------------- JACKET: BODY PIECE: Worked back and forth on circular needle from mid front. Cast on 153-177-201 (223-245) sts (includes 1 edge st each side towards mid front) on circular needle size 2 mm/US 0 with ice blue. Work 1 row rib, K1/P1 with K1 and 1 edge st in GARTER ST - see above - each side towards mid front (as seen from RS). Change to off-white and continue in rib. When rib measures 4-4-4 (5-5) cm / 1½"-1½"-1½" (2"-2") change to circular needle size 2.5 mm / US 1 and K 1 row from RS, AT THE SAME TIME dec 24-30-36 (40-44) sts evenly = 129-147-165 (183-201) sts. Insert a marker 33-37-42 (46-51) sts in from each side = 63-73-81 (91-99) sts between markers on back piece. Continue in M.1 with 1 edge st in garter st each side towards mid front – NOTE: work last but one st on needle like first st in M.1 to make pattern identical both sides of mid front. After M.1 continue in M.2 with 1 edge st in garter st each side. REMEMBER THE GAUGE! When piece measures approx 15-17-20 (23-26) cm / 6"-6¾"-8" (9"-10¼") - adjust to at least 2 rows after a row with dots in pattern - work M.3 (remember to work the last but one st on needle like first st in M.3 to make pattern identical both sides of mid front). AT THE SAME TIME when piece measures 17-18-21 (24-27) cm / 6¾"-7"-8¼" (9½"-10⅝") divide piece by markers for armhole and complete front and back pieces separately. BACK PIECE: = 63-73-81 (91-99) sts. Cast on 1 new st each side (= edge st for seam) = 65-75-83 (93-101) sts. Continue in M.3 with 1 edge st in garter st each side. After M.3 work M.4 with 1 edge st in garter st each side – NOTE: the arrow in M.4 marks the middle of back piece, count sts towards the side from here to see where to beg in M.4. After M.4 complete piece in ice blue. AT THE SAME TIME when piece measures 27-29-33 (37-41) cm / 10⅝"-11⅜"-13" (14½"-16⅛") bind off the middle 23-25-27 (27-29) sts for neck and complete each shoulder separately. Bind off 2 sts on neckline on next row = 19-23-26 (31-34) sts left on shoulder. Bind off when piece measures 28-30-34 (38-42) cm / 11"-11¾"-13⅜" (15"-16½"). RIGHT FRONT PIECE: = 33-37-42 (46-51) sts. Cast on 1 new st towards armhole (= edge st for seam) = 34-38-43 (47-52) sts. Continue in M.3 with 1 edge st in garter st each side. After M.3 work M.4 with 1 edge st in garter st each side – NOTE: adjust the pattern to make it look neat towards mid front, there should be 1 st in light blue mid front after edge st and before 1 off-white square or cross. After M.4 complete piece in ice blue. AT THE SAME TIME when piece measures 24-26-29 (33-36) cm / 9½"-10¼"-11⅜" (13"-14¼") slip 9-9-10 (11-12) sts towards mid front on a stitch holder for neck. Bind off to shape the neckline at the beg of every row from mid front: 2 sts 2-2-2 (1-1) times and 1 st 2-2-3 (3-4) times = 19-23-26 (31-34) sts left on shoulder. Bind off when piece measures 28-30-34 (38-42) cm / 11"-11¾"-13⅜" (15"-16½"). LEFT FRONT PIECE: Like right front piece but mirrored. SLEEVE: Worked in the round. Cast on 48-50-56 (58-64) sts on double pointed needles size 2 mm/US 0 with ice blue. Work 1 round rib, K1/P1, change to off-white and continue in rib. When piece measures 4-4-4 (5-5) cm / 1½"-1½"-1½" (2"-2") change to double pointed needles size 2.5 mm / US 1. K 1 round, AT THE SAME TIME dec 11-13-13 (15-15) sts evenly = 37-37-43 (43-49) sts. READ THE REST OF SLEEVE SECTION BEFORE CONTINUING! Work M.1 – adjust to the middle, see arrow in diagram. After M.1 continue in M.2 (adjust to the middle, see arrow) until piece measures approx 16-16-18 (23-26) cm / 6¼"-6¼"-7" (9"-10¼") – adjust to at least 2 rows after 1 row with dots in pattern. Now work M.5 (adjust to the middle, see arrow) – if necessary complete piece in ice blue after M.5 to reach final measurements. AT THE SAME TIME when piece measures 5-6-6 (7-7) cm / 2"-2⅜"-2⅜" (2¾"-2¾") inc 2 sts mid under sleeve. Repeat the inc a total of 11-13-13 (15-15) times as follows: SIZE 1/3 MONTHS + 12/18 MONTHS + 2 YEARS: on every 4th round SIZE 6/9 MONTHS: on every 3rd round SIZE 3/4 YEARS: on every 5th round = 59-63-69 (73-79) sts – incorporate inc sts in pattern as you go along. When piece measures approx 19-19-21 (26-29) cm / 7½"-7½"-8¼" (10¼"-11⅜") (M.5 is now finished and there may be a few rounds of ice blue) bind off loosely. ASSEMBLY: Sew shoulder seams. LEFT FRONT BAND: Pick up approx 75-83-93 (105-115) sts (divisible by 2 + 1 st) along left front piece on needle size 2 mm/US 0 with off-white. Work rib, K1/P1 with K1 and 1 edge st in garter st each side (as seen from RS). When front band measures 2 cm / ¾" bind off with K over K and P over P. RIGHT FRONT BAND: Like left front band but after 1 cm / ⅜" make 5-5-5 (6-6) buttonholes evenly distributed – place bottom buttonhole approx 1.5 cm / ½" from bottom edge and the top one approx 4 cm / 1½" from neckline (the last buttonhole is made on neckline). 1 BUTTONHOLE = bind off 2 sts and cast on 2 new sts on next row. NECKLINE: Pick up from RS approx 87 to 117 sts round neckline - includes sts on stitch holders at front and also pick up on front bands (no of sts divisible by 2 + 1 st) on circular needle size 2 mm/US 0 with off-white. Work rib, K1/P1 with K1 and 1 edge st in garter st each side towards mid front (as seen from RS). AT THE SAME TIME after 1 cm / ⅜" make 1 buttonhole in line with the others on front band. When neck measures 2 cm / ¾", change to ice blue, work 1 row rib and bind off with K over K and P over P. Set in sleeves inside 1 edge st. Sew on buttons. -------------------------------------------------------- PANTS: PATTERN: See diagram M.1 and M.2. The entire pattern is worked in stockinette st. DECREASING TIP: Beg 2 sts before marker and work sts as follows: K2 tog, slip 1 st as if to K, K1, psso. -------------------------------------------------------- -------------------------------------------------------- PANTS: Worked in the round from the waist down. Cast on 142-150-160 (166-172) sts on circular needle size 2 mm/US 0 with ice blue – beg of round = mid back. Work 1 round rib, K1/P1, change to off-white and continue in rib. When rib measures 4 cm / 1½" change to circular needle size 2.5 mm / US 1. K 1 round, AT THE SAME TIME dec 16-18-22 (22-22) sts evenly = 126-132-138 (144-150) sts. ELEVATION MID BACK: Now continue in M.2 at the same time work elevation mid back as follows: work 10-11-11 (12-12) sts from beg of round, turn piece (to avoid a hole slip first st as if to K and tighten thread). Work 20-22-22 (24-24) sts and turn piece. Work 30-33-33 (36-36) sts and turn piece. Work 40-44-44 (48-48) sts and turn piece. Continue like this by working a further 10-11-11 (12-12) sts before each turn another 8 times (= 12 shortened rows in total). Now continue in M.2 in the round on all sts. INC: When piece measures 13-16-17 (18-19) cm / 5⅛"-6¼"-6¾" (7"-7½") from the waist (measured mid front) insert a marker at beg of round and a marker after 63-66-69 (72-75) sts (to mark mid front and mid back). Now inc 1 st each side of both markers (= 4 inc sts per round) on every 3rd round a total of 6 times = 150-156-162 (168-174) sts. After the last inc piece measures approx 18-21-22 (23-24) cm / 7"-8¼"-8¾" (9"-9½") from the waist (measured mid front). LEG: Work 75-78-81 (84-87) sts - beg mid back and slip the remaining sts on a stitch holder. Continue in the round with M.2 as before - insert a marker on the inside of leg = beg of round. Now dec 1 st each side of marker – see DECREASING TIP - a total of 14-13-12 (11-10) times as follows: SIZE 1/3 MONTHS: on every 2nd and 3rd round alternately SIZE 6/9 MONTHS: on every 3rd and 4th round alternately SIZE 12/18 MONTHS: on every 4th and 5th round alternately SIZE 2 YEARS: on every 6th and 7th round alternately SIZE 3/4 YEARS: on every 9th and 10th round alternately = 47-52-57 (62-67) sts. When piece measures approx 27-33-36 (42-49) cm / 10⅝"-13"-14¼" (16½"-19¼") from the waist - adjust to after 2 rounds after a round with dots in pattern - work M.1 – beg at the top of diagram and see arrow marking the middle of round (= outside of leg). After M.1 change to off-white and double pointed needles size 2 mm/US 0. K 1 round, AT THE SAME TIME inc 11-12-13 (16-17) sts evenly = 58-64-70 (78-84) sts. Continue in rib, K1/P1 until piece measures 36-42-46 (52-59) cm / 14¼"-16½"-18" (20½"-23¼") from the waist (rib now measures approx 5-5-6 (6-6) cm / 2"-2"-2⅜" (2⅜"-2⅜")), change to ice blue, work 1 round rib and bind off loosely in rib. Knit the other leg in the same way. -------------------------------------------------------- HAT: PATTERN: See diagram M.7. The entire pattern is worked in stockinette st. GARTER ST (back and forth on needle): K all rows. -------------------------------------------------------- -------------------------------------------------------- HAT: Worked in the round first, from bottom edge towards the top, and then completed back and forth on needle. Round beg mid back. LOOSELY cast on 220-244-256 (280-288) sts on circular needle size 2 mm/US 0 with off-white and work 1 round rib K1/P1. Change to ice blue and continue in rib. When rib measures 3-3-3 (4-4) cm / 1⅛"-1⅛"-1⅛" (1½"-1½") change to circular needle size 2.5 mm / US 1. Work 1 round stockinette st with ice blue, AT THE SAME TIME dec 52-52-64 (64-72) sts evenly = 168-192-192 (216-216) sts. Now work M.7. After M.7 there are 154-176-176 (198-198) sts on needle, continue in the round in ice blue stockinette st. REMEMBER THE GAUGE! AT THE SAME TIME on 3rd round after M.7 dec 14-16-16 (18-18) sts evenly – i.e. K tog every 10th and 11 th st, BUT make sure dec sit over dec from last round in M.7. Repeat the dec on every other round a total of 4 times – NOTE: for every dec work 1 less stockinette st between each dec on round = 98-112-112 (126-126) sts on needle and piece measures approx 10-10-10 (11-11) cm / 4"-4"-4" (4⅜"-4⅜"). Work 2 rounds stockinette st, AT THE SAME TIME on second round dec 8-18-16 (26-22) sts evenly = 90-94-96 (100-104) sts. Change to circular needle size 2 mm/US 0 and work rib, K1/P1, until rib measures 2.5-2.5-2.5 (3-3) cm / ⅞"-⅞"-⅞" (1⅛"-1⅛"). Now continue back and forth on needle and work next ROW from mid back as follows: work rib as before on the first 35-36-37 (38-39) sts, slip the next 21-23-23 (25-27) sts on a stitch holder (without working the sts) = mid front. Change back to needle size 2.5 mm / US 1, turn piece and P 1 row from WS, AT THE SAME TIME inc 26-32-34 (44-50) sts evenly = 95-103-107 (119-127) sts on needle. NOW MEASURE PIECE FROM HERE! Work next row as follows from RS: 1 edge st in garter st, * K1/P3 *, repeat from *-* until 2 sts remain and finish with K1 and 1 edge st in garter st. Continue in rib like this back and forth on needle. When piece measures 11-12-13 (14-15) cm / 4⅜"-4¾"-5⅛" (5½"-6") slip the middle 31-31-35 (39-39) sts on a stitch holder for the middle piece of hat. K 1 row from RS, K 1 row from WS and K 1 row from RS on the outermost 32-36-36 (40-44) sts on one side of piece, then bind off in K sts from WS. Repeat on the other side of piece. Slip the 31-31-35 (39-39) sts from stitch holder back on needle and continue in rib with K1 and 1 edge st in garter st each side (as seen from RS) until middle piece measures 11-12-12 (14-15) cm / 4⅜"-4¾"-4¾" (5½"-6") from where sts were slipped on stitch holder. Work 2 rows garter st and bind off. ASSEMBLY: Sew middle piece to each side piece with neat sts inside 1 edge st each side. RIB BORDER ROUND FRONT OPENING: Pick up approx 120 to 160 sts (divisible by 2) round the opening (includes sts from stitch holder at front) on circular needle size 2 mm with ice blue. Work rib, K1/P1, in the round until rib measures 4 cm / 1½", bind off LOOSELY with K over K and P over P. Fold rib double towards WS and fasten with neat sts. -------------------------------------------------------- SOCKS: DECREASING TIP (applies to mid back on leg): Dec 1 st each side of the 3 middle sts mid back (= K1 + P1 + K1) by P2 tog. PATTERN: See diagram M.6. The pattern is worked in stockinette st. GARTER ST (back and forth on needle): K all rows. -------------------------------------------------------- -------------------------------------------------------- SOCK: With off-white and double pointed needles size 2 mm/US 0 cast on 58-66-72 (78-82) sts. Work 1 round rib, K1/P1, change to ice blue and continue in rib. When piece measures 2-3-4 (5-6) cm / ¾"-1⅛"-1½" (2"-2⅜") dec 2 sts mid back – see DECREASING TIP! Repeat the dec on every 2 cm / ¾" a total of 5 times = 48-56-62 (68-72) sts. When rib measures 10-11-12 (13-14) cm / 4"-4⅜"-4¾" (5⅛"-5½") change to double pointed needles size 2.5 mm / US 1. Work 1 round stockinette st, AT THE SAME TIME dec 6-10-16 (16-20) sts evenly = 42-46-46 (52-52) sts. Work 1 round stockinette st on all sts. Now slip the first 16-17-17 (19-19) sts and the last 16-17-17 (19-19) sts on round on separate stitch holders = 10-12-12 (14-14) sts left on needle for middle piece. Work 4-5-5.5 (7-8) cm / 1½"-2"-2¼" (2¾"-3⅛") stockinette st on these sts. Now slip sts from stitch holders back on needle, AT THE SAME TIME pick up 11-13-15 (18-22) sts each side of middle piece = 64-72-76 (88-96) sts. Cut the thread and now beg round mid back. Work 1-2-4 (5-7) rounds stockinette st in the round on all sts with ice blue. Continue in M.6 - NOTE: for size 12/18 months there will be 2 identical repeats of M.6 mid back. After M.6 work 1 round stockinette st with ice blue, then P 1 round on all sts and now bind off all sts except the 10-12-12 (14-14) sts from middle piece. Continue in GARTER ST - see above - back and forth on these sts for sole. When sole measures 10-11-12 (14-16) cm / 4"-4⅜"-4¾" (5½"-6¼") bind off. Sew sole to the sock with neat sts. |
|||||||||||||
Diagram explanations |
|||||||||||||
|
|||||||||||||
 |
|||||||||||||
 |
|||||||||||||
Have you finished this pattern?Tag your pictures with #dropspattern #sweetcheeksjacket or submit them to the #dropsfan gallery. Do you need help with this pattern?You'll find 30 tutorial videos, a Comments/Questions area and more by visiting the pattern on garnstudio.com. © 1982-2026 DROPS Design A/S. We reserve all rights. This document, including all its sub-sections, has copyrights. Read more about what you can do with our patterns at the bottom of each pattern on our site. |
|||||||||||||


With over 40 years in knitting and crochet design, DROPS Design offers one of the most extensive collections of free patterns on the internet - translated to 17 languages. As of today we count 324 catalogs and 12290 patterns - 12280 of which are translated into English (US/in).
We work hard to bring you the best knitting and crochet have to offer, inspiration and advice as well as great quality yarns at incredible prices! Would you like to use our patterns for other than personal use? You can read what you are allowed to do in the Copyright text at the bottom of all our patterns. Happy crafting!
Post a comment to pattern DROPS Baby 19-21
We would love to hear what you have to say about this pattern!
If you want to leave a question, please make sure you select the correct category in the form below, to speed up the answering process. Required fields are marked *.