
Popular categories
Looking for a yarn?


Comments / Questions (5)
![]() Ingrid Reyneke wrote:
Ingrid Reyneke wrote:
How do I assemble the sleeves. The bodice makes a small square under the arm?
31.03.2024 - 16:48DROPS Design answered:
Dear Ingrid, since knitted fabric is pretty flexible, you should treat it as a regular armhole, and ease the sleeves into it as you would with any other sleeves. Happy Knitting!
31.03.2024 - 21:01
![]() Ingrid Reyneke wrote:
Ingrid Reyneke wrote:
If I cast off the front centre neck stitches, how do I carry on as I can not work on the circular needle anymore?You can't carry yarn for the pattern? You also,if you change to straight needles have a right and wrong side how do you then knit the pattern?
11.03.2024 - 10:09DROPS Design answered:
Dear Mrs Reyneke, after the stitches for neck on front piece are cast off you continue in rows, ie back and forth on needle starting from neck and casting off stitches at the beg of every row from neck (both from RS and from WS), then cast off the middle stitches for neck on back piece and finish each shoulder separtely. At the same time continue pattern - read now diagrams from the left towards the right from WS making sure pattern will still be lined up. Happy knitting!
11.03.2024 - 14:30
![]() Kari Hodne wrote:
Kari Hodne wrote:
Hei. Strikker genser i mønster smådrops 12 - 15 str. 7-8. Holder på med første arm og tror at lengden på armen må være feil. Kan det være korrekt at armen skal være 44 cm før belegget skal strikkes i denne str.?? Vennligst sjekk dette og gi tilbakemelding, Pft. Kari
10.11.2015 - 16:53DROPS Design answered:
Hej Kari, ja opskriften og målene stemmer, så det er bare at følge opskriften. Men du er naturligvis altid velkommen til at lave ærmerne kortere eller længere (hvis du har garn nok). God fornøjelse!
26.11.2015 - 09:25
![]() Elke Rabsch wrote:
Elke Rabsch wrote:
Hallo, Ich stricke dieses Modell gerade für meinen Sohn, und möchte genau das gleiche Modell auch für meinen Mann stricken. Nun bräuchte ich Hilfe was die Maschenanzahl für Gr. XL betrifft und wieviel ich genau für das Armloch abketten müsste. Für Hilfe wäre ich echt dankbar. Liebe Grüße Elke Rabsch
12.01.2013 - 08:17DROPS Design answered:
Liebe Frau Rabsch, dieses Modell haben wir nur als Kindermodell. Leider fehlt uns die Zeit, einzelne Modelle auf Kundenwunsch umzurechnen. Aber wir haben viele Anleitungen für Herrenpullover online, bitte suchen Sie dort ein Modell aus.
14.01.2013 - 12:17Virginia McGannon wrote:
I have bought and knit Many patterns and yarn from your site. This one gives me trouble after I cast off front center neck stitches. The pattern starts at side. You can't carry yarn for the pattern from there for the rows. Very confusing. I finally cut and started at neck front and then the pattern doesn't work unless you carry both all the way each row?????I changed the top of the pattern so I don't have to do that. Written very unclear.
29.12.2011 - 01:30
|
||||||||||
Illias |
||||||||||
 |
 |
|||||||||
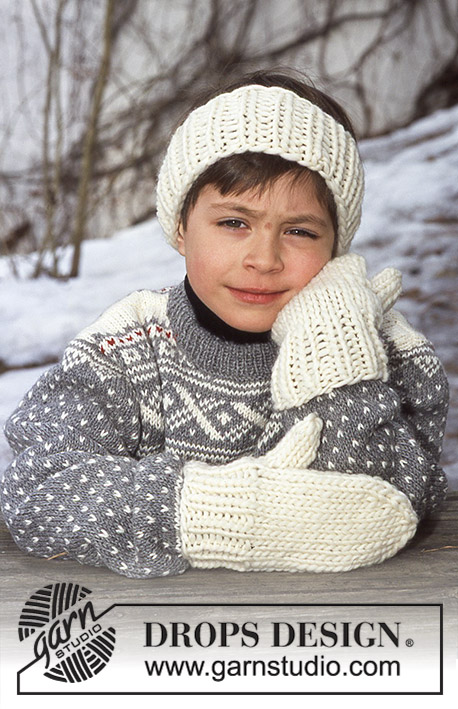
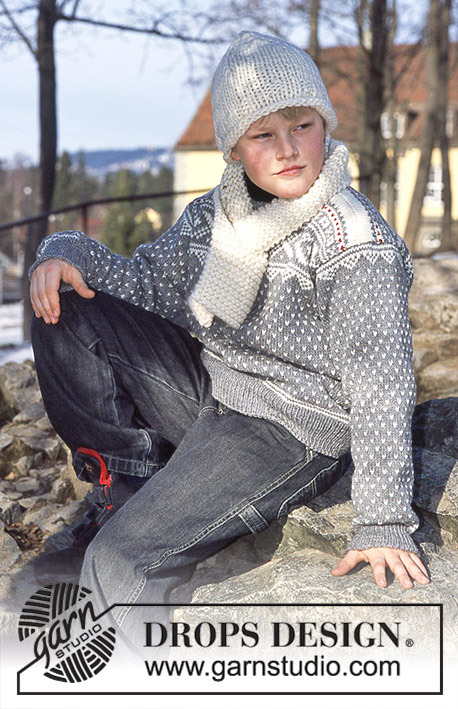
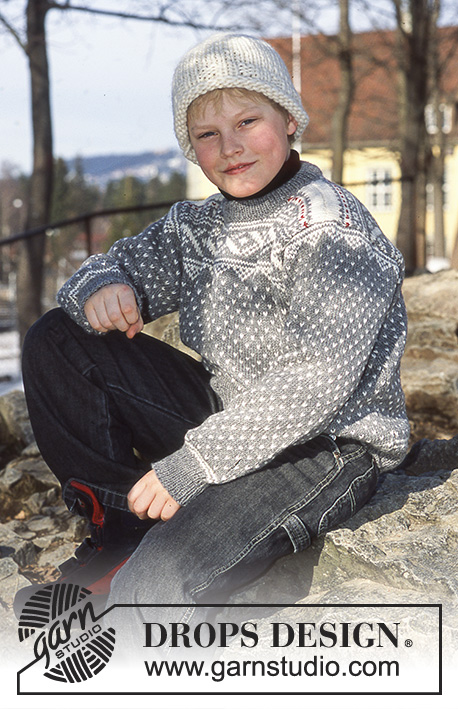
DROPS Jumper, hat and scarf
DROPS Children 12-15 |
||||||||||
|
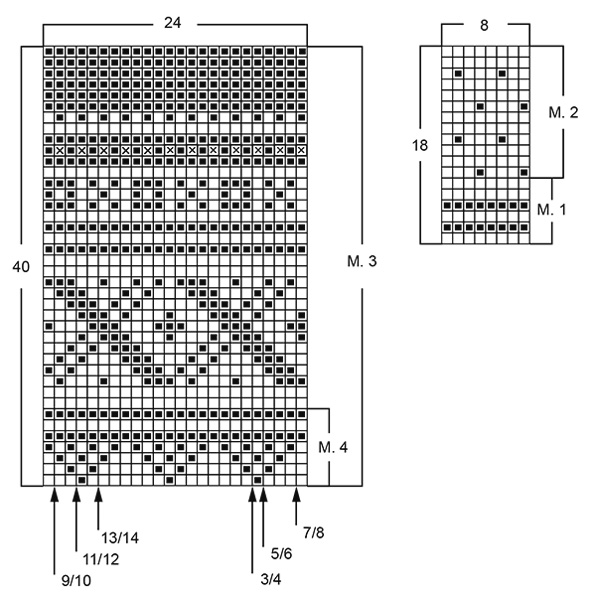
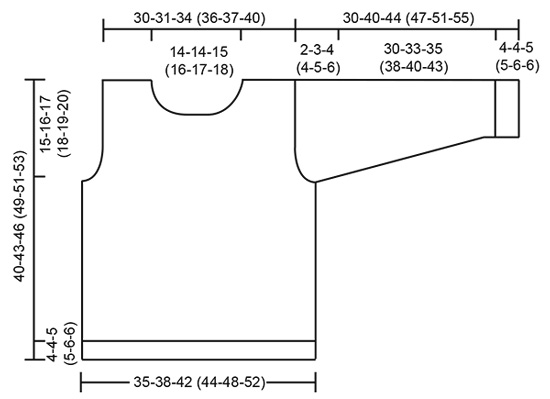
JUMPER Knitting gauge: 21 sts x 28 rows on needles size 4 mm / US 6 in stockinette sts = 10 x 10 cm / 4" x 4". Rib: *K1, P1*, repeat from *-*. Back and front piece: The jumper is worked in the round on circular needles all the way up to the neckline and cut for armholes afterwards. Cast on 144-160-176 (184-200-216) sts on circular needle size 3 mm / US 2or3 and work 4-4-5 (5-6-6) cm / 1½"-1½"-2" (2"-2½"-2½") in Rib. Change to needle size 4 mm / US 6 and continue in diagram M.1 and then diagram M.2. Remember your knitting gauge! When piece measures 25-27-29 (31-32-33) cm/9¾"-10⅝"-11⅜" (12¼"-12½"-13") work next row as follows: bind off 5-8-9 (9-11-13) sts for armhole, knit 63-65-71 (75-79-83) sts = front piece, bind off 9-15-17 (17-21-25) sts for armhole, knit 63-65-71 (75-79-83) sts = back piece, bind off 4-7-8 (8-10-12) sts for armhole . On next round cast on 5 new sts over the bind off armhole sts (these sts are to be cut for armholes and are not included in pattern) = 136-140-152 (160-168-176) sts. When piece measures 26-29-32 (35-37-39) cm / 10¼"-11⅜"-12½" (13¾"-14½"-15¼") work diagram M.3 – start by arrow for appropriate size on both back and front. When piece measures 34-37-40 (42-44-46) cm / 13⅜"-14½"-15¾" (16½"-17¼"-18") bind off the middle 11-11-13 (15-17-19) sts mid front for neck = 125-129-139 (145-151-157) sts left on round. Now finish the piece back and forth on needle, continue in M.3. Dec to shape the neckline on every other row each side: 3 sts 1 time, 2 sts 1 time and 1 st 4 times = 107-110-121 (127-133-139) sts. When piece measures 38-41-44 (47-49-51) cm / 15"-16⅛"-17¼" (18½"-19¼"-20") cast of the middle 25-25-27 (29-31-33) sts on back piece and work each side separately. Then bind off 2 sts 1 time towards neckline = 39-41-45 (47-49-51) sts left on shoulder (incl the 5 sts to be cut for armhole). Cast of remaining sts when M.3 is finished, piece measures approx 40-43-46 (49-51-53) cm / 15¾"-17"-18" (19¼"-20"-21"). Sleeves: Cast on 44-48-48 (52-52-56) sts on double pointed needles size 3 mm / US 2or3 with gray and work 4-4-5 (5-6-6) cm / 1½"-1½"-2" (2"-2½"-2½") in Rib. Change to needles size 4 mm / US 6, work diagram M.1 and then M.2. At the same time when sleeve measures 8 cm / 3⅛" inc 2 sts mid under arm a total of 10-10-12 (12-14-14) times as follows: Size 3/4 years: on every 7th round Size 5/6 – 9/10 – 13/14 years: on every 8th round Size 7/8 – 11/12 years: on every 7th and 8th round alternately = 64-68-72 (76-80-84) sts – incorporate new sts in M.2 as you go along. Read the rest of sleeve pattern before knitting it! When sleeve measures 34-37-40 (43-46-49) cm / 13⅜"-14½"-15¾" (17"-18"-19¼") work the rest of the sleeve back and forth on needle. At the same time when sleeve measures 33-37-41 (44-48-52) cm / 13"-14½"-16⅛" (17¼"-19"-20½") work M.4 – start at the right side of diagram for all sizes. After M.4 continue in gray until sleeve measures approx 36-40-44 (47-51-55) cm / 14¼"-15¾"-17¼" (18½"-20"-21⅝"). Work 2 cm / ¾" in reverse stockinette sts (for edge to be sewn on to body piece). Assembly: Insert a marker in the middle of the 5 armhole sts. Sew 2 machine seams on both sides of marker, 1st seam = ½ st from the marker, 2nd seam = ½ st from 1st seam. Cut for armhole. Sew shoulder seams. Neck: Pick up approx 80 to 100 sts (divisible by 2) round the neck on needle size 3 mm / US 2or3 with gray. Purl 1 round, knit 1 round and continue in Rib until neck measures 5-5-5 (6-6-6) cm / 2"-2"-2" (2½"-2½"-2½"). Bind off in Rib. Fold neck double and sew to wrong side. Sew sleeves to body pieces, fold edge on sleeve cap over the cut edge on front and back pieces and sew. HAT: Knitting gauge: 10 sts x 14 rows on needles size 9 mm / US 13 with Snow in stockinette sts = 10 x 10 cm / 4" x 4". Rib: *K2, P2*, repeat from *-* The hat is worked back and forth on needle. Cast on 44-48-52 sts on needle size 9 mm / US 13 with Snow and work 4 rows stockinette sts (= rolling edge). Make all measurements from this point. Work 3 cm / 1⅛" in Rib and then continue in stockinette sts until finished measurements. At the same time after the Rib dec 4-3-2 sts evenly on row = 40-45-50 sts. When piece measures 10.5-11-11.5 cm / 4¼"-4⅜"-4½" from RS place 5 markers as follows: 1 st, 1 marker, *8-9-10 sts, 1 marker*, repeat from *-* a total of 4 times, after the last marker there are 7-8-9 sts left. Now dec 1 st to the left of all markers on every row from the right side by K2 tog a total of 6-7-8 times = 10 sts left. Cut the yarn, pull it through remaining sts and sew. Sew hat mid back in the outer loops of sts. SCARF: Knitting gauge: 9 sts x 18 rows on needles size 10 mm / US 15 with Snow in garter sts = 10 x 10 cm / 4" x 4". Garter sts (back and forth on needle): Knit all rows Loosely cast on 12-14-16 sts on needle size 10 mm / US 15 with Snow and knit garter sts until scarf measures 10-12-14 cm / 4"-4¾"-5½". Now put half the sts on a holder. Continue over the remaining 6-7-8 sts until piece measures 19-22-25 cm / 7½"-8¾"-9¾" and put these sts on a holder. Put sts from the first holder back on needle and knit until piece measures 19-22-25 cm / 7½"-8¾"-9¾" . Put all sts back on same needle and knit until scarf measures approx 70-80-90 cm / 27½"-31½"-35½". Bind off loosely. |
||||||||||
Diagram explanations |
||||||||||
|
||||||||||
 |
||||||||||
 |
||||||||||
Have you finished this pattern?Tag your pictures with #dropspattern or submit them to the #dropsfan gallery. Do you need help with this pattern?You'll find 23 tutorial videos, a Comments/Questions area and more by visiting the pattern on garnstudio.com. © 1982-2026 DROPS Design A/S. We reserve all rights. This document, including all its sub-sections, has copyrights. Read more about what you can do with our patterns at the bottom of each pattern on our site. |
||||||||||


With over 40 years in knitting and crochet design, DROPS Design offers one of the most extensive collections of free patterns on the internet - translated to 17 languages. As of today we count 325 catalogs and 12298 patterns - 12288 of which are translated into English (US/in).
We work hard to bring you the best knitting and crochet have to offer, inspiration and advice as well as great quality yarns at incredible prices! Would you like to use our patterns for other than personal use? You can read what you are allowed to do in the Copyright text at the bottom of all our patterns. Happy crafting!
Post a comment to pattern DROPS Children 12-15
We would love to hear what you have to say about this pattern!
If you want to leave a question, please make sure you select the correct category in the form below, to speed up the answering process. Required fields are marked *.