
Popular categories
Looking for a yarn?


Comments / Questions (14)
![]() Andrea Fernández wrote:
Andrea Fernández wrote:
Buenas quería preguntarte en qué momento se hace A.1 en la manga pues no dice nada hay un error
13.03.2025 - 13:08
![]() Andrea Fernández wrote:
Andrea Fernández wrote:
Buenos días tengo una duda en la manga en ningún momento dice cuando se debe hacer A.1 solo dan las explicaciones para las vueltas ciertas y las disminuciones pero en la foto se ve claramente que hay 4 hileras del diagrama A.1
13.03.2025 - 13:06
![]() Ľubica wrote:
Ľubica wrote:
Dobrý den, opravdu se dělají zkrácené řádky u spodního okraje rukávu, v podpaží nemají se dělat nahoře u průramku? Děkuji
20.11.2024 - 09:54DROPS Design answered:
Dobrý den, L'ubico. Ano, zkrácenými řadami tvarujeme rukávovou hlavici na vrcholu průramku. Nejdříve nabereme oka kolem celého průramku pro rukáv (začínáme a končíme na středu vnitřní strany rukávu = v podpaží) a následně upleteme první zkrácenou řadu (tato řada začíná, kde předchozí skončila, tedy v podpaží). Dále již vyplétáme zkrácené řady kolem středu vnější strany rukávu označeného značkou. Přejeme pohodové pletení! :)
24.11.2024 - 16:16
![]() Marie wrote:
Marie wrote:
På bakstykket, skal kun p2 og p3 strikkes videre etter å ha strikket p1, p2 og p3? Synes det ser så kort ut med kun p2 og p3 i forhold til bildet!
13.05.2024 - 00:56DROPS Design answered:
Hej Marie, ikke sikker på at vi forstår dit spørgsmål. Du fortsætter med at gentage pind 2 og 3, så du fortsætter med at tage ud :)
14.05.2024 - 11:58
![]() Lila Matz wrote:
Lila Matz wrote:
Hallo liebes drops Team! In welchem Reihenabstand, werden bei den Ärmeln, die Lochreihen gestrickt? Vielen Dank Martina
22.03.2024 - 20:02DROPS Design answered:
Liebe Frau Matz, A.1 stricken Sie das erste Mal wenn die Ärmel 9 bzw 8 cm misst (siehe Größe), dann stricken Sie jeweils 9-9-8-8-8-7 cm glatt rechts zwischen jedem A.1 - siehe Abschnitt MUSTER. Viel Spaß beim Stricken!
02.04.2024 - 08:10
![]() Katie wrote:
Katie wrote:
Hi, I have some confusion about when to start A.1 on the front piece. For size M both front sides are worked for 11 cm, then 8 rows of increases are done, which by the gauge will get the piece to about 14cm. Then once you join the two front pieces it says to work until it measures 15cm then start A.1. which would mean only another 3 rows. However, in the photo it looks like there’s quite a few more rows between the joining of the front pieces and the beginning of the pattern. Why is that?
19.03.2024 - 21:03DROPS Design answered:
Dear Katie, to get the pattern working on both front and back piece when working them together, you will have to start A.1 after 15 cm in size M; depending on your tension in height you might need more or less row, measure these 15 cm along armhole, from where stitches were picked up for one of the shoulders. Happy knitting!
20.03.2024 - 08:07
![]() Beata wrote:
Beata wrote:
Dlaczego w opisie rękawa brakuje zaznaczenia, że można go robić z wykorzystaniem A1 (tak jest w,sweterku na zdjęciu)? Mniej więcej, co ile centymetrów należy go robić?
05.03.2024 - 01:24DROPS Design answered:
Witaj Beato, rzeczywiście ta informacja została pominięta. Korekta już została zgłoszona i wkrótce zostanie naniesiona. Prosimy o chwilkę cierpliwości. Pozdrawiamy!
05.03.2024 - 15:55
![]() Eveli wrote:
Eveli wrote:
Mint'n'honey
21.01.2024 - 14:23
![]() Aurore wrote:
Aurore wrote:
Tilleul
20.01.2024 - 14:52
![]() Lynda Kuit wrote:
Lynda Kuit wrote:
Wings of Spring
19.01.2024 - 10:02
|
|||||||||||||||||||
Mint Romance#mintromancesweater |
|||||||||||||||||||
 |
 |
||||||||||||||||||
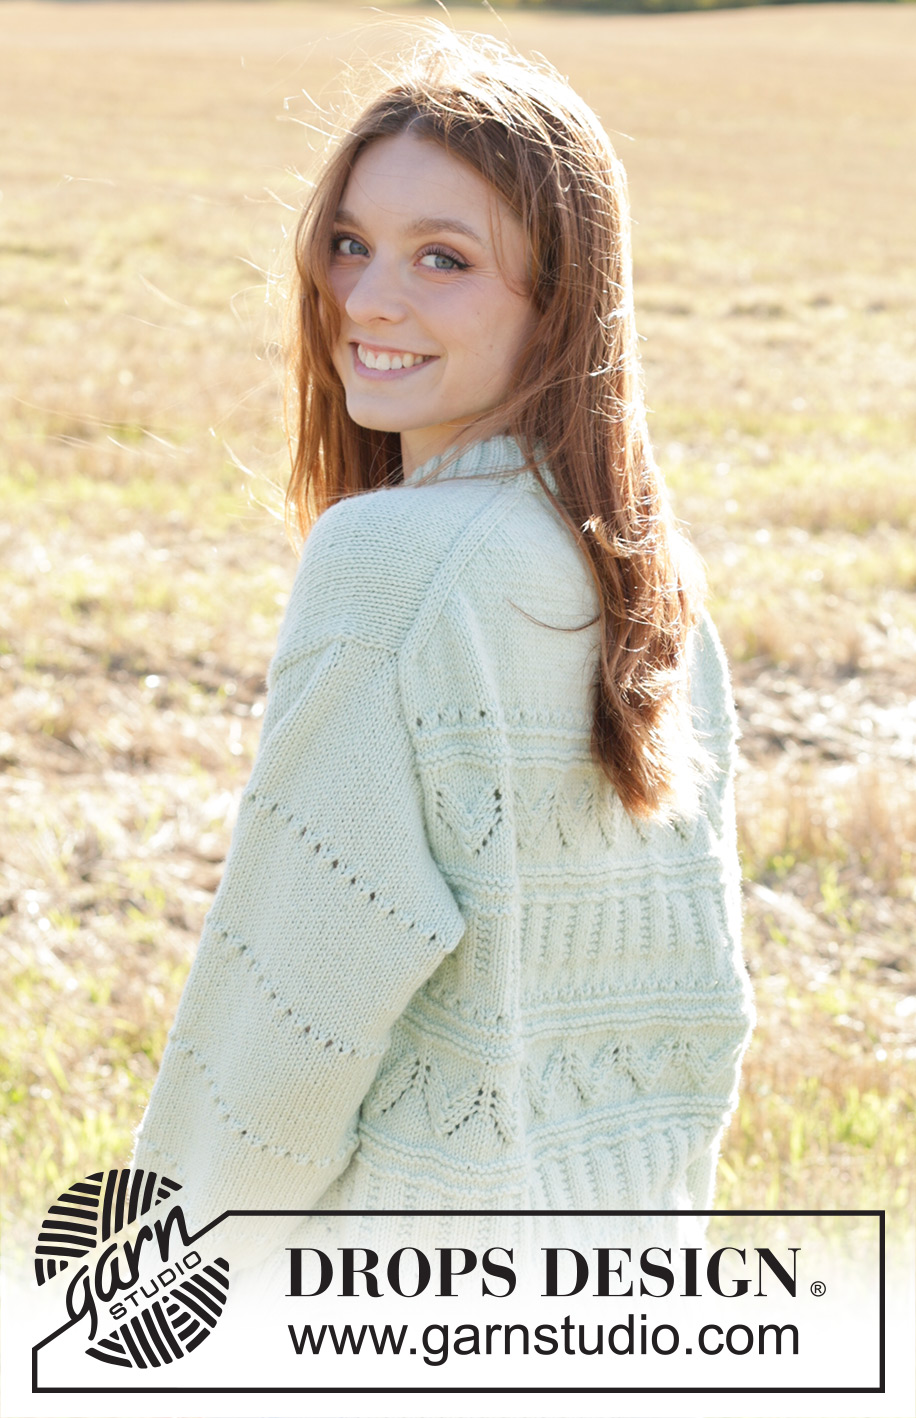
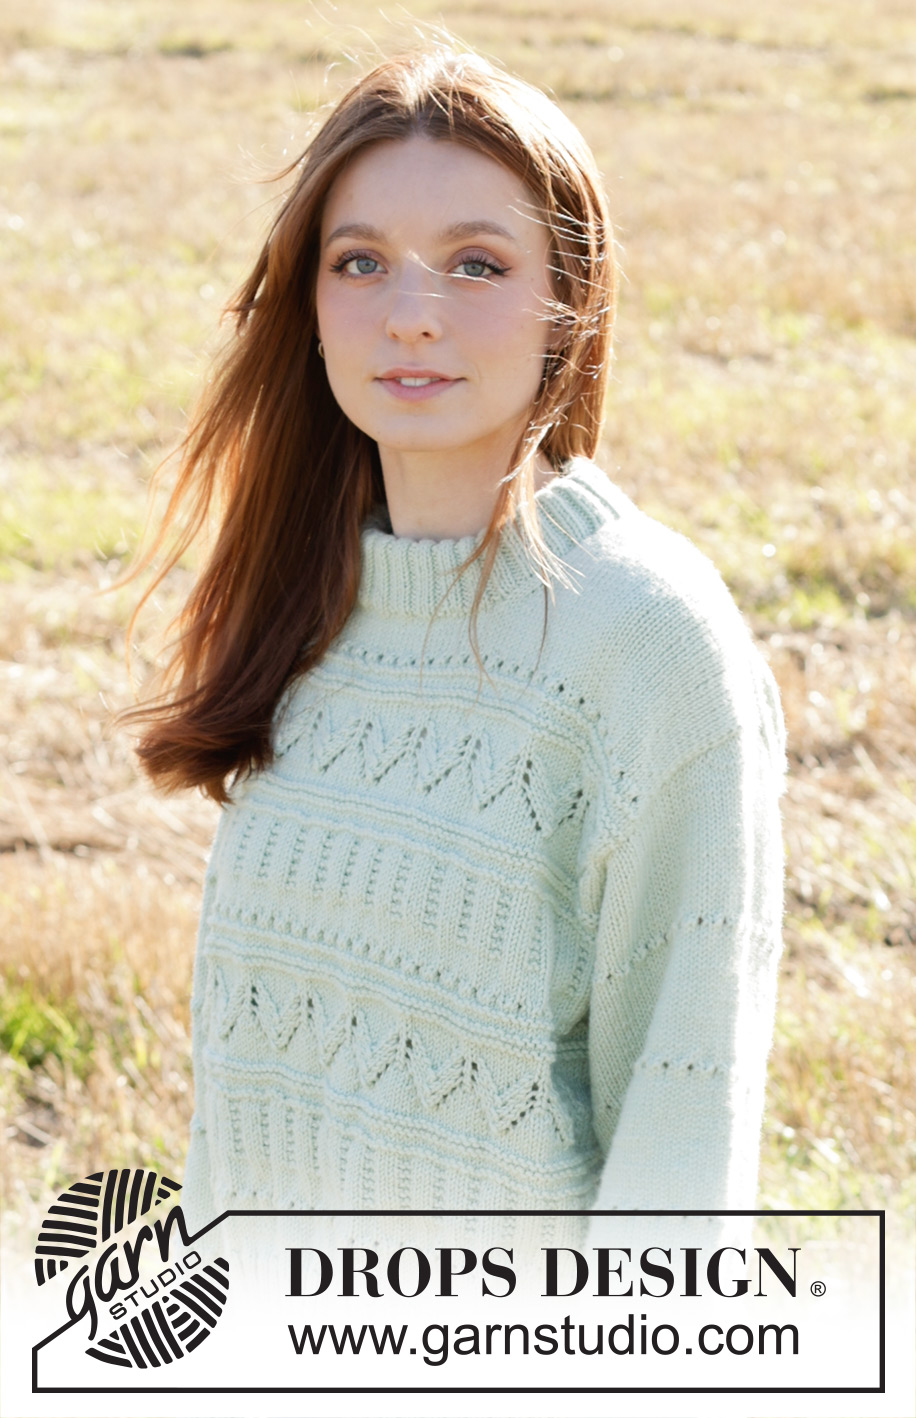
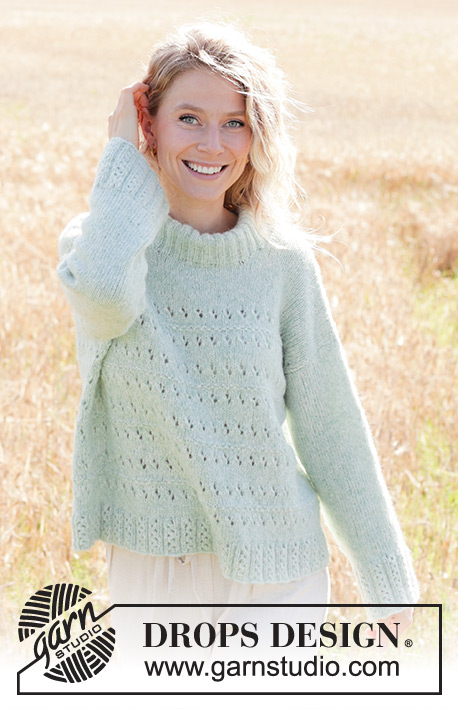
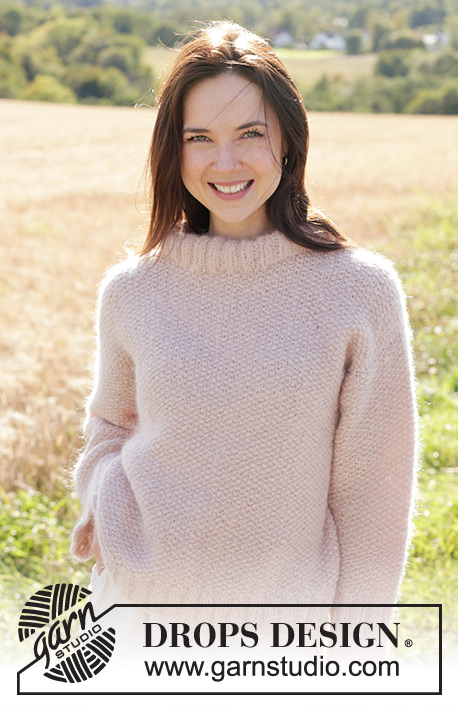
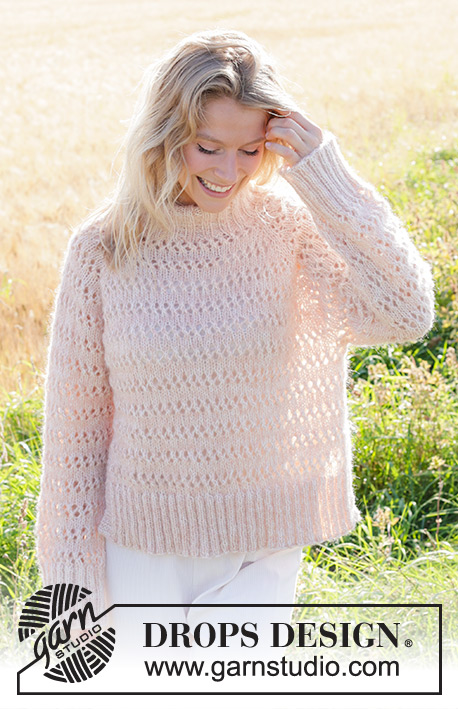
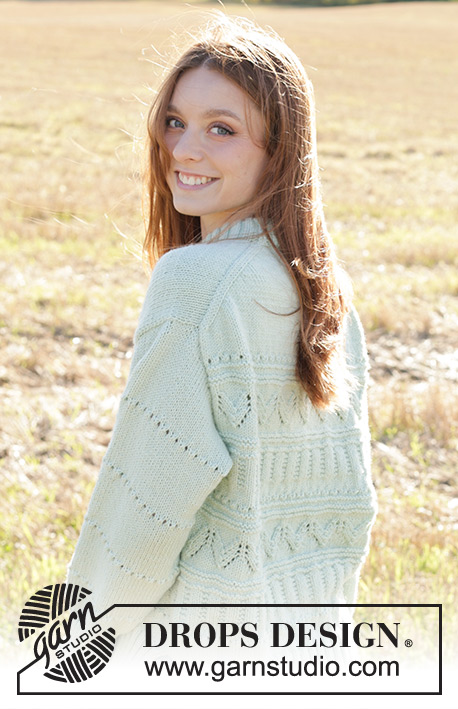
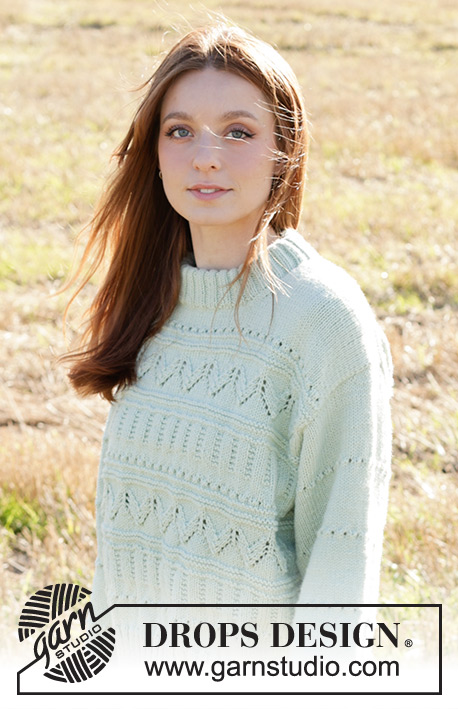
Knitted sweater in DROPS Daisy. The piece is worked top down with diagonal/European shoulders, lace pattern, double neck and split in sides. Sizes S - XXXL.
DROPS 249-12 |
|||||||||||||||||||
|
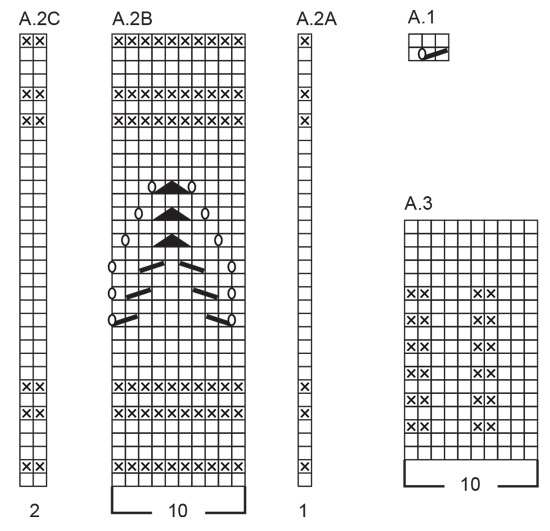
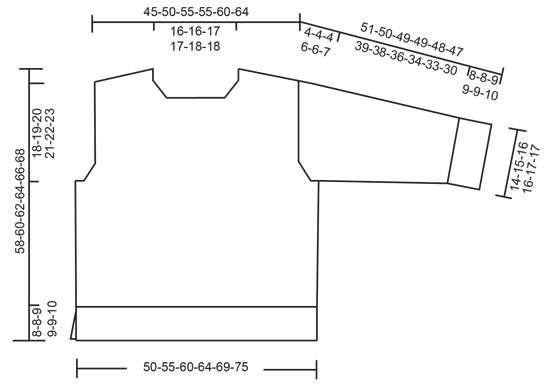
------------------------------------------------------- EXPLANATIONS FOR THE PATTERN: ------------------------------------------------------- GARTER STITCH (worked back and forth): Knit all rows, from both the right and wrong side. 1 ridge in height = knit 2 rows. I-CORD: FIRST 2 STITCHES: Worked as follows on every row: Slip 1 stitch purl-wise with yarn in front, knit 1. LAST 2 STITCHES: Worked as follows on every row: Work until there are 2 stitches left on the row, slip 1 stitch purl-wise with yarn in front, knit 1. PATTERN: See diagrams A.1 to A.3. The diagrams show all rows in the pattern, seen from the right side. INCREASE TIP-1: INCREASE 1 STITCH TOWARDS THE LEFT - from RIGHT SIDE: Use left needle to pick up yarn between 2 stitches from row below, pick up yarn from the front and knit in the stitch loop that is on the back of the needle. INCREASE 1 STITCH TOWARDS THE RIGHT - from RIGHT SIDE: Use left needle to pick up yarn between 2 stitches from row below, pick up yarn from the back and knit in the stitch loop that is on the front side of the needle. INCREASE TIP-2: INCREASE 1 STITCH TOWARDS THE RIGHT - from WRONG SIDE: Use left needle to pick up yarn between 2 stitches from row below, pick up yarn from the back and purl in the stitch loop that is on the front side of the needle. INCREASE 1 STITCH TOWARDS THE LEFT - from WRONG SIDE: Use left needle to pick up yarn between 2 stitches from row below, pick up yarn from the front and purl in the stitch loop that is on the back side of the needle. KNITTING TIP: When working short rows, you will be left with a small hole each time you turn – this can be closed by tightening the strand or by using the technique German Short Rows as follows: Slip the first stitch purl-wise, take the strand over the right needle and tighten well from behind (2 loops on the needle). Work these 2 loops together on the next row. DECREASE TIP (mid-under sleeves): Decrease 1 stitch on each side of the marker-thread as follows: Work until there are 3 stitches left before the marker-thread, knit 2 together, knit 2 (marker-thread sits between these 2 stitches), slip 1 stitch knit-wise, knit 1 and pass the slipped stitch over the knitted stitch). ------------------------------------------------------- START THE PIECE HERE: ------------------------------------------------------- SWEATER – SHORT OVERVIEW OF THE PIECE: The pattern uses both long and short needles; start with the length which fits the number of stitches and change when necessary. The piece is started back and forth, with cast-on stitches at the back of the neck, then working the back piece top down while increasing stitches on each side for the shoulders; these are slightly diagonal. The back piece is continued as far as the armholes. The front piece is then worked in 2 sections, knitting up stitches along 1 back shoulder, working pattern and increasing for the neckline, then this being repeated on the other shoulder. The 2 front sections are joined when the neckline is finished and worked as far as the armholes. The front and back pieces are joined using circular needle and the body is worked in the round, then divided for the split in each side and the front and back pieces finished separately, back and forth. Stitches are knitted up around the armholes for the sleeves, which are first worked back and forth with short rows for the sleeve cap, then finished in the round. Stitches are knitted up around the neckline and the neck worked in the round, then folded double to the inside. BACK PIECE: The piece is started back and forth. Cast on 35-35-37-37-39-39 stitches with circular needle size 4 MM = US 6 and DROPS Daisy. ROW 1 (wrong side): Purl. ROW 2 (right side): Read INCREASE TIP-1, knit 4, increase 1 stitch towards the left, knit until there are 4 stitches left, increase 1 stitch towards the right, knit 4. ROW 3 (wrong side): Read INCREASE TIP -2, purl 4, increase 1 stitch towards the right, purl until there are 4 stitches left, increase 1 stitch towards the left, purl 4. Repeat ROWS 2 and 3 until you have increased a total of 30-35-39-39-43-48 times on each side = 95-105-115-115-125-135 stitches. Insert 1 marker outermost on one side. The piece is now measured from here! Continue with stockinette stitch – REMEMBER THE KNITTING GAUGE - until the piece measures 2-3-4-4-4-5 cm = ¾"-1⅛"-1½"-1½"-1½"-2" from the marker. Now work PATTERN – read description above, with the first row from the right side as follows: 1 GARTER STITCH – read description above, 0-1-1-1-0-1 stockinette stitches, work A.1 until there are 1-1-2-2-2-1 stitches left, 0-0-1-1-0-0 stockinette stitches, 1 garter stitch. When A.1 is finished, work as follows from the right side: 1 garter stitch, A.2A, work A.2B 9-10-11-11-12-13 times in width, A.2C, 1 garter stitch. Continue this pattern back and forth. AT THE SAME TIME when there are 6-6-6-10-10-10 rows left in A.2 and the next row is from the right side, begin increasing for the armholes – the piece measures approx. 12-13-14-13-13-14 cm = 4¾"-5⅛"-5½"-5⅛"-5⅛"-5½" from the marker. INCREASE FOR ARMHOLES: ROW 1 (right side): Remember INCREASE TIP-1, work 1 garter stitch, increase 1 stitch towards the left, continue the pattern until there is 1 stitch left, increase 1 stitch towards the right, 1 garter stitch. ROW 2 (wrong side): Continue the pattern. Work ROWS 1 and 2 a total of 3-3-3-5-5-5 times (6-6-6-10-10-10 worked rows) = 101-111-121-125-135-145 stitches. After the last row from the wrong side, the piece measures approx. 13-14-15-15-15-16 cm = 5⅛"-5½"-6"-6"-6"-6¼", measured from the marker down the armhole. Cut the strand. Place the stitches on a stitch holder. LEFT FRONT PIECE: Find the left shoulder on the back piece as follows: Lay the piece flat, right side opp with the stitch holder towards you; left side of the piece is the left shoulder. Start from the right side (by the neck) and knit up 1 stitch in each row along the left back shoulder, inside 1 stitch = 30-35-39-39-43-48 stitches. All measurements on the front piece are measured from the knitted-up edge. Work stockinette stitch back and forth, with the first row from the wrong side, until the piece measures 11-11-11-12-12-12 cm = 4⅜"-4⅜"-4⅜"-4¾"-4¾"-4¾". Now increase for the neckline as follows: ROW 1 (right side): Remember INCREASE TIP-1, knit 3, increase 1 stitch towards the left, knit to end of row. ROW 2 (wrong side): Purl. Work ROWS 1 and 2 a total of 4 times (8 worked rows) = 34-39-43-43-47-52 stitches (next row is from the right side). Cut the strand. Place the stitches on a stitch holder. RIGHT FRONT PIECE: Start from the right side (by the shoulder) and knit up 1 stitch in each row along the right back shoulder, inside 1 stitch = 30-35-39-39-43-48 stitches. All measurements on the front piece are measured from the knitted-up edge. Work stockinette stitch back and forth, with the first row from the wrong side until the piece measures 11-11-11-12-12-12 cm = 4⅜"-4⅜"-4⅜"-4¾"-4¾"-4¾". Now increase for the neckline as follows: ROW 1 (right side): Knit until there are 3 stitches left, increase 1 stitch towards the right – remember INCREASE TIP-1. ROW 2 (wrong side): Purl. Work ROWS 1 and 2 a total of 4 times (8 worked rows) = 34-39-43-43-47-52 stitches (next row is from the right side). Now the 2 front pieces are joined as follows: FRONT PIECE (joining the right and left pieces): Work as follows from the right side: Work the 34-39-43-43-47-52 stitches from the right front piece, cast on 27-27-29-29-31-31 stitches for the neckline, work the 34-39-43-43-47-52 stitches from the left front piece = 95-105-115-115-125-135 stitches. Work stockinette stitch back and forth until the piece measures 14-15-15-16-18-18 cm = 5½"-6"-6"-6¼"-7"-7". Now work PATTERN, with the first row from the right side as follows: 1 garter stitch, 0-1-1-1-0-1 stockinette stitches, work A.1 until there are 1-1-2-2-2-1 stitches left, 0-0-1-1-0-0 stockinette stitches, 1 garter stitch. When A.1 is finished, work as follows from the right side: 1 garter stitch, A.2A, work A.2B 9-10-11-11-12-13 times, A.2C, 1 garter stitch. Continue this pattern back and forth. AT THE SAME TIME when there are 6-6-6-10-10-10 rows left in A.2 and the next row is from the right side, begin increasing for the armholes – the piece measures approx. 23-24-25-23-25-26 cm = 9"-9½"-9¾"-9"-9¾"-10¼". INCREASE FOR ARMHOLES: ROW 1 (right side): Remember INCREASE TIP-1, work 1 garter stitch, increase 1 stitch towards the left, continue the pattern until there is 1 stitch left, increase 1 stitch towards the right, 1 garter stitch. ROW 2 (wrong side): Continue the pattern. Work ROWS 1 and 2 a total of 3-3-3-5-5-5 times (6-6-6-10-10-10 worked rows) = 101-111-121-125-135-145 stitches. After the last row from the wrong side, the piece measures approx. 25-26-27-27-29-30 cm = 9¾"-10¼"-10⅝"-10⅝"-11⅜"-11¾". The back and front pieces are now joined for the body, and the piece is now measured from here! BODY: Work the 101-111-121-125-135-145 stitches on the front piece according to the first row in A.3, cast on 4-4-4-10-10-10 stitches (= side. Insert a marker-thread in the middle of the cast-on stitches), work the 101-111-121-125-135-145 stitches on the back piece, cast on 4-4-4-10-10-10 stitches (= side. Insert a marker-thread in the middle of the cast-on stitches) = 210-230-250-270-290-310 stitches. Allow the marker-threads to follow your work onwards; they are used for the split in each side. Work stockinette stitch to the first marker-thread (the round starts here) and work pattern as follows: A.3: Work A.3, 21-23-25-27-29-31 times on the round, AT THE SAME TIME on the last round increase 0-1-2-0-1-2 stitches evenly spaced = 210-231-252-270-291-312 stitches. A.1: When A.3 is finished, work A.1 over all stitches, AT THE SAME TIME on the last round decrease 0-1-2-0-1-2 stitches evenly spaced = 210-230-250-270-290-310 stitches. A.2B: When A.1 is finished, work A.2B, 21-23-25-27-29-31 times on the round. A.3: When A.2B is finished, work A.3, 21-23-25-27-29-31 times on the round, AT THE SAME TIME on the last round increase 0-1-2-0-1-2 stitches evenly spaced = 210-231-252-270-291-312 stitches. A.1: When A.3 is finished, work A.1 over all stitches, AT THE SAME TIME on the last round, decrease 0-1-2-0-1-2 stitches evenly spaced = 210-230-250-270-290-310 stitches. When A.1 is finished, work stockinette stitch until the body measures 28-29-29-31-31-31 cm = 11"-11⅜"-11⅜"-12¼"-12¼"-12¼", from the armhole. Now divide at both marker-threads for the split in each side. Leave the back piece stitches on the needle/on a stitch holder, and work the front piece back and forth as follows: FRONT PIECE: = 105-115-125-135-145-155 stitches. On the next row (right side) start the rib, AT THE SAME TIME increase 33-39-41-43-45-55 stitches evenly spaced on the row = 138-154-166-178-190-210 stitches, working as follows: Change to needle size 3 MM = US 2.5, work 2 stitches I-CORD – read description above, work rib knit 2, purl 2 – remember the increases) until there are 4 stitches left, knit 2, 2 stitches I-cord. When the rib measures 8-8-9-9-9-10 cm = 3⅛"-3⅛"-3½"-3½"-3½"-4", bind off. The sweater measures approx. 58-60-62-64-66-68 cm = 22¾"-23⅝"-24⅜"-25¼"-26"-26¾". BACK PIECE: Work in the same way as the front piece. SLEEVES: Lay the sweater flat and insert 1 marker at the top of the armhole = mid-top of shoulder (NOTE! Mid-top of shoulder is not where stitches were knitted up for the front piece but approx. 5-6 cm = 2"-2⅜" down the front piece). Use circular needle size 4 MM = US 6 and start in the middle of the cast-on stitches under the sleeve. Knit up 80-84-88-98-102-106 stitches around the armhole, with the same number of stitches on each side of the marker. Work stockinette stitch in short rows back and forth for the sleeve cap (gives a better fit), starting mid-under the sleeve and working as follows: ROW 1 (right side): Knit to 10-10-11-11-12-13 stitches past the marker, turn – read KNITTING TIP. ROW 2 (wrong side): Purl to 10-10-11-11-12-13 stitches past the marker, turn. ROW 3 (right side): Knit to 4-5-5-4-4-3 stitches past the previous turn, turn. ROW 4 (wrong side): Purl 4-5-5-4-4-3 stitches past the previous turn, turn. Repeat ROWS 3 and 4 until you have turned 6-6-6-8-8-10 times on each side. AFTER FINAL TURN: The last time you repeat row 4, turn and knit to the beginning of the round (mid-under sleeve). Insert 1 marker-thread here, which will be used when decreasing under the sleeve. Allow the marker-thread to follow your work onwards. Work stockinette stitch in the round. When the sleeve measures 2 cm = ¾" (measured mid-under the sleeve), decrease 2 stitches – read DECREASE TIP. Decrease like this every 2nd round 2-2-2-5-5-5 times, then every 4½-4½-3½-3-2½-2 cm = 1⅝"-1⅝"-1¼"-1⅛"-1"-¾" 8-8-9-10-11-12 times = 60-64-66-68-70-72 stitches. Continue working stockinette stitch and pattern in the round, at the same time, decrease mid under the sleeve, read both sections below and work as follows: DECREASE: When the sleeve measures 2 cm = ¾" (measured mid-under the sleeve), decrease 2 stitches – read DECREASE TIP. Decrease like this every 2nd round 2-2-2-5-5-5 times, then every 4½-4½-3½-3-2½-2 cm = 1⅝"-1⅝"-1¼"-1⅛"-1"-¾" 8-8-9-10-11-12 times = 60-64-66-68-70-72 stitches. PATTERN: When sleeve measures 9-9-8-8-8-8 cm = 3½"-3½"-3⅛"-3⅛"-3⅛"-3⅛" from the shoulder mid over sleeve), work pattern as follows: * work A.1 in the round as far as possible to the marker thread mid under sleeve (work the stitches that cannot fit pattern before marker thread in stockinette stitch), work 9-9-8-8-8-7 cm = 3½"-3½"-3⅛"-3⅛"-3⅛"-2¾" stockinette stitch*, work from *-* a total of 3 times in height, then work A.1 around the sleeve one more time (= a total of 4 eyelet rounds around the sleeve). Continue working in stockinette stitch until the sleeve measures 43-42-40-40-39-37 cm = 17"-16½"-15¾"-15¾"-15¼"-14½" from the shoulder. Change to double pointed needles size 3 MM = US 2.5 and work rib (knit 2, purl 2), AT THE SAME TIME increase 12-12-10-12-14-16 stitches evenly on the first round = 72-76-76-80-84-88 stitches. When the rib measures 8-8-9-9-9-10 cm = 3⅛"-3⅛"-3½"-3½"-3½"-4", bind off. The sleeve measures approx. 51-50-49-49-48-47 cm = 20"-19¾"-19¼"-19¼"-19"-18½" from the shoulder. DOUBLE NECK: Using circular needle size 3 MM = US 2.5. Starting from the right side on one shoulder line, knit up 116-116-120-124-128-128 stitches around the neckline, inside 1 stitch. The stitch count must be divisible by 4. Work rib in the round (knit 2, purl 2) for 9-9-9-11-11-11 cm = 3½"-3½"-3½"-4⅜"-4⅜"-4⅜". Change to circular needle size 4 MM = US 6 and bind off a little loosely. Fold the neck double to the inside and sew down. To avoid the neck being tight and rolling outwards, it is important that the seam is elastic. |
|||||||||||||||||||
Diagram explanations |
|||||||||||||||||||
|
|||||||||||||||||||
 |
|||||||||||||||||||
 |
|||||||||||||||||||
Have you finished this pattern?Tag your pictures with #dropspattern #mintromancesweater or submit them to the #dropsfan gallery. Do you need help with this pattern?You'll find 37 tutorial videos, a Comments/Questions area and more by visiting the pattern on garnstudio.com. © 1982-2026 DROPS Design A/S. We reserve all rights. This document, including all its sub-sections, has copyrights. Read more about what you can do with our patterns at the bottom of each pattern on our site. |
|||||||||||||||||||


With over 40 years in knitting and crochet design, DROPS Design offers one of the most extensive collections of free patterns on the internet - translated to 17 languages. As of today we count 324 catalogs and 12290 patterns - 12280 of which are translated into English (US/in).
We work hard to bring you the best knitting and crochet have to offer, inspiration and advice as well as great quality yarns at incredible prices! Would you like to use our patterns for other than personal use? You can read what you are allowed to do in the Copyright text at the bottom of all our patterns. Happy crafting!
Post a comment to pattern DROPS 249-12
We would love to hear what you have to say about this pattern!
If you want to leave a question, please make sure you select the correct category in the form below, to speed up the answering process. Required fields are marked *.