
Popular categories
Looking for a yarn?


Comments / Questions (69)
![]() Ingrid wrote:
Ingrid wrote:
Ich stricke den Pullover mit Drops Air in Größe XL. Sind die Angaben für die Passe (2. Absatz zur Passe unten, 3. Absatz Passe) und der Absatz zu Teilung in Rumpfteil und Ärmel für Größe XL richtig? Oder sind da Zahlen durcheinander geraten? Ich stricke meinen ersten Raglanpulli und bin mir unsicher. Danke für eine Antwort!
03.06.2025 - 20:30DROPS Design answered:
Liebe Ingrid, es solle so stimmen, wie kann man Ihnen helfen? Mit Zunahmen oder mit Muster?
04.06.2025 - 07:59
![]() Sara Uno wrote:
Sara Uno wrote:
Jeg er igang med bærestykket, men jeg er gået i stå, da mønsteret ikke længere passer. Jeg har fulgt opskriften (str L) og taget ud til raglan. Jeg har nu 55 masker på “ærmet” og 75 masker på hhv for- og bagstykke. Jeg laver raglan udt på for- og bagstykke på hver 2. omg og raglan udt på ærmerne på hver 4. Dog kan jeg ikke længere få hul mønsteret i ærmerne til at gå op med disse tal. Hvad kan grunden være til dette?
01.05.2025 - 21:32DROPS Design answered:
Hej Sara, jo du fortsætter mønsteret over de masker du startede med, og når du har nok nye masker, udvider du hulmønsteret i hver side af ærmerne, hvis du ikke har nok masker til hulmønster, så strikkes maskerne i glatstrik :)
08.05.2025 - 08:52
![]() Gudrun Liedtke wrote:
Gudrun Liedtke wrote:
Wie soll ich die Raglanlinie stricken bei der Passe, wenn die 29 cm noch nicht erreicht sind?
13.03.2025 - 21:56DROPS Design answered:
Liebe Frau Liedtke, stricken Sie das Lochmuster weiter aber ohne weitere Zunahmen, bis die Arbeit diese 29 cm erreicht. Viel Spaß beim Stricken!
14.03.2025 - 07:49
![]() Laura wrote:
Laura wrote:
Hei, toinen kysymys: miten mallineuletta on tarkoitus jatkaa ilman lisäyksiä niin että kuvio toistuu? Neulotaanko mallineuletta kaikilla muilla silmukoilla paitsi raglanlisäyksissä käytetyllä merkkisilmukalla?
20.02.2025 - 09:53DROPS Design answered:
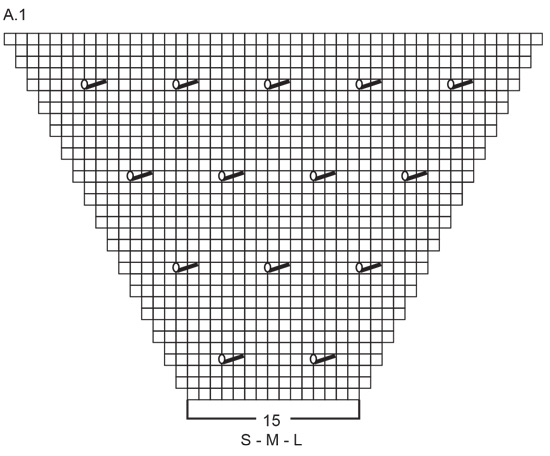
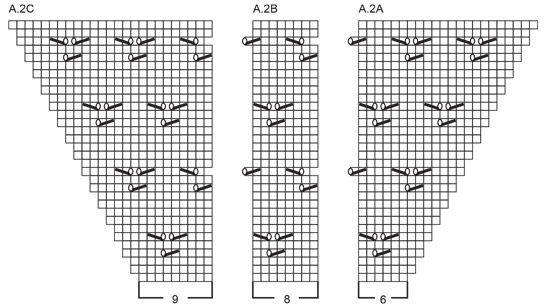
Juuri näin, kaikilla silmukoilla paitsi merkityillä silmukoilla neulotaan mallineuletta. Toista lisäysten jälkeen piirrosten mallikerrat kuten aiemmin. Piirroksen A.1 mallikerrassa on 15 silmukkaa (kossa S, M ja L). Piirroksen A.2A mallikerrassa on 6 silmukkaa, piirroksen A.2B mallikerrassa on 8 silmukkaa ja piirroksen A.2C mallikerrassa on 9 silmukkaa.
21.02.2025 - 17:04
![]() Laura wrote:
Laura wrote:
Hei, olen tekemässä kaarroketta ja seuraavaksi raglanlisäyksiä pitäisi tehdä etu- ja takapuolilla joka 2. Kerros ja hihoissa joka 4. Mitä tämä tarkoittaa? Tarkoittaako sitä että lisäyksiä ei tehdä joka kerta merkkisilmukan molemmin puolin?
17.02.2025 - 19:32DROPS Design answered:
Kyllä, hihojen puolella lisätään ainoastaan joka 4. kerroksella. Eli lisäyskerroksilla lisätään vuorotellen 8 ja 4 silmukkaa.
18.02.2025 - 18:20
![]() BERTA BARREIRO wrote:
BERTA BARREIRO wrote:
Bonjour, C\'est Berta à nouveau (taille 2). Il y a qque chose qui me tracasse quand même par rapport aux 48 augmentations. Comme je dois augmenter les manche / et le dos devant sur un rythme différent. Les petits trous des raglan ne vont pas être symétrique. Je vais avoir plus de trou côté raglan dos que jaugmente ts les deux rang,devant que côté manche que j\'augmente tous les 4 rangs. Est ce ainsi ? Merci pour votre aide Berta
02.02.2025 - 07:48DROPS Design answered:
Bonjour Mem Barreiro, effectivement, il n'y aura pas de trou sur les manches quand vous augmentez seulement pour le devant et le dos, si vous voulez conserver l'effet ajouté, vous pouvez tricoter côté manche (1 jeté = comme avant pour l'augmentation du raglan + 1 diminution = pour éviter d'augmenter). Bon tricot!
03.02.2025 - 10:34
![]() Annie Birk wrote:
Annie Birk wrote:
Kan hele bluse ikke strikkes rundt på rundpinde, så der kun strikkes et og lukkes af til huller med mønster?
26.01.2025 - 18:35
![]() BERTA wrote:
BERTA wrote:
Bonjour, Je fait la taille 2 et après avoir fait les augmentations des raglans j'ai 224 mailles. Je dois maintenant faire les augmentations (tous les 4 tours) pour le dos et le devant de façon à obtenir 272 mailles. Mais je n'ai pas bien compris ce passage : ces 48 augmentions sont pour les manches ou pour le devant ou pour le dos et en quelle proportion ? Je vous remercie par avance pour votre aide Berta
15.01.2025 - 20:40DROPS Design answered:
Bonjour Berta, vous devez maintenant augmenter tous les 2 tours alternativement 4 mailles seulement (dos & devant) et 8 mailles (dos, devant & manches), autrement dit, tricotez ainsi: *1 tour en augmentant 4 m (dos/devant), 1 tour sans augmenter, 1 tour en augmentant 8 m (dos, devant & manches), 1 tour sans augmenter*, tricotez ces 4 rangs 4 fois autrement au total = vous avez augmenté encore 8 fois pour le dos/le devant mais 4 fois seulement pour les manches (8x4+4x4=48). Bon tricot!
16.01.2025 - 09:19
![]() Janson wrote:
Janson wrote:
Bei der Passe : Warum erst bei den 4.Makierer zunehemen ? fängt man nicht erst bei den erten Makierer an ?
07.01.2025 - 02:29DROPS Design answered:
Liebe Janson, die 4. Markierung ist in die letzte Masche der Runde, bei den Zunahmen wird man mit der Zunahmen vor 4. Markierung beginnen - dann wird man am Ende der Runde 1 Masche vor der Masche mit der 4. Markierung zunehmen. Viel Spaß beim Stricken!
07.01.2025 - 10:02
![]() Margot wrote:
Margot wrote:
Bonjour, Peut-on remplacer le point mousse par du jersey ?
03.01.2025 - 14:03DROPS Design answered:
Bonjour Margot, dans ce modèle, on ne tricote que les mailles lisières de chaque côté du dos/devant (pour les fentes des côtés) au point mousse, vous pouvez les tricoter autrement si vous préférez. Le reste du modèle se tricote au point ajouré/en jersey. Bon tricot!
03.01.2025 - 15:45
|
|||||||||||||
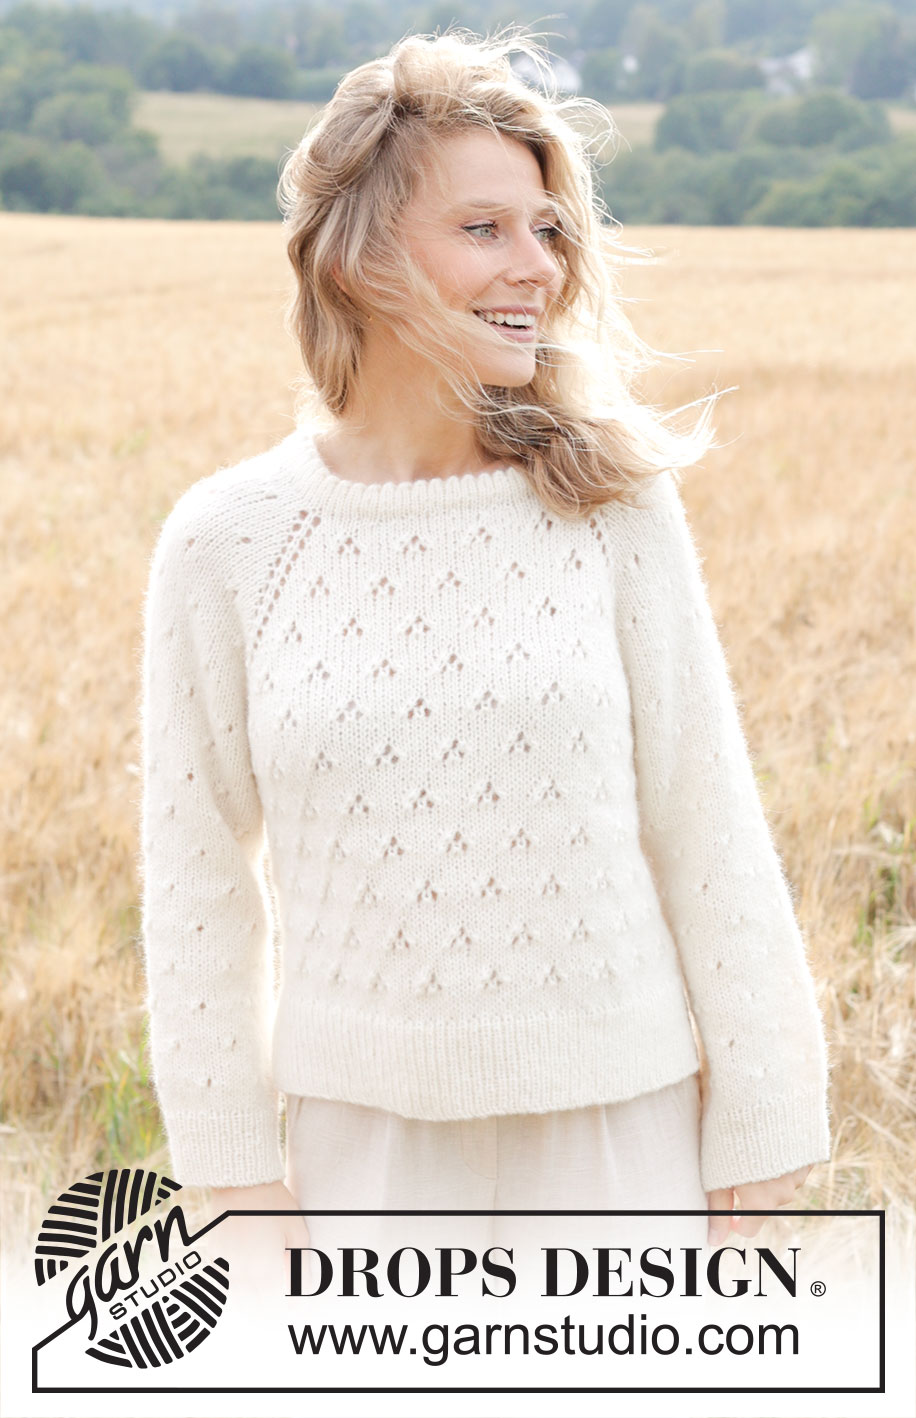
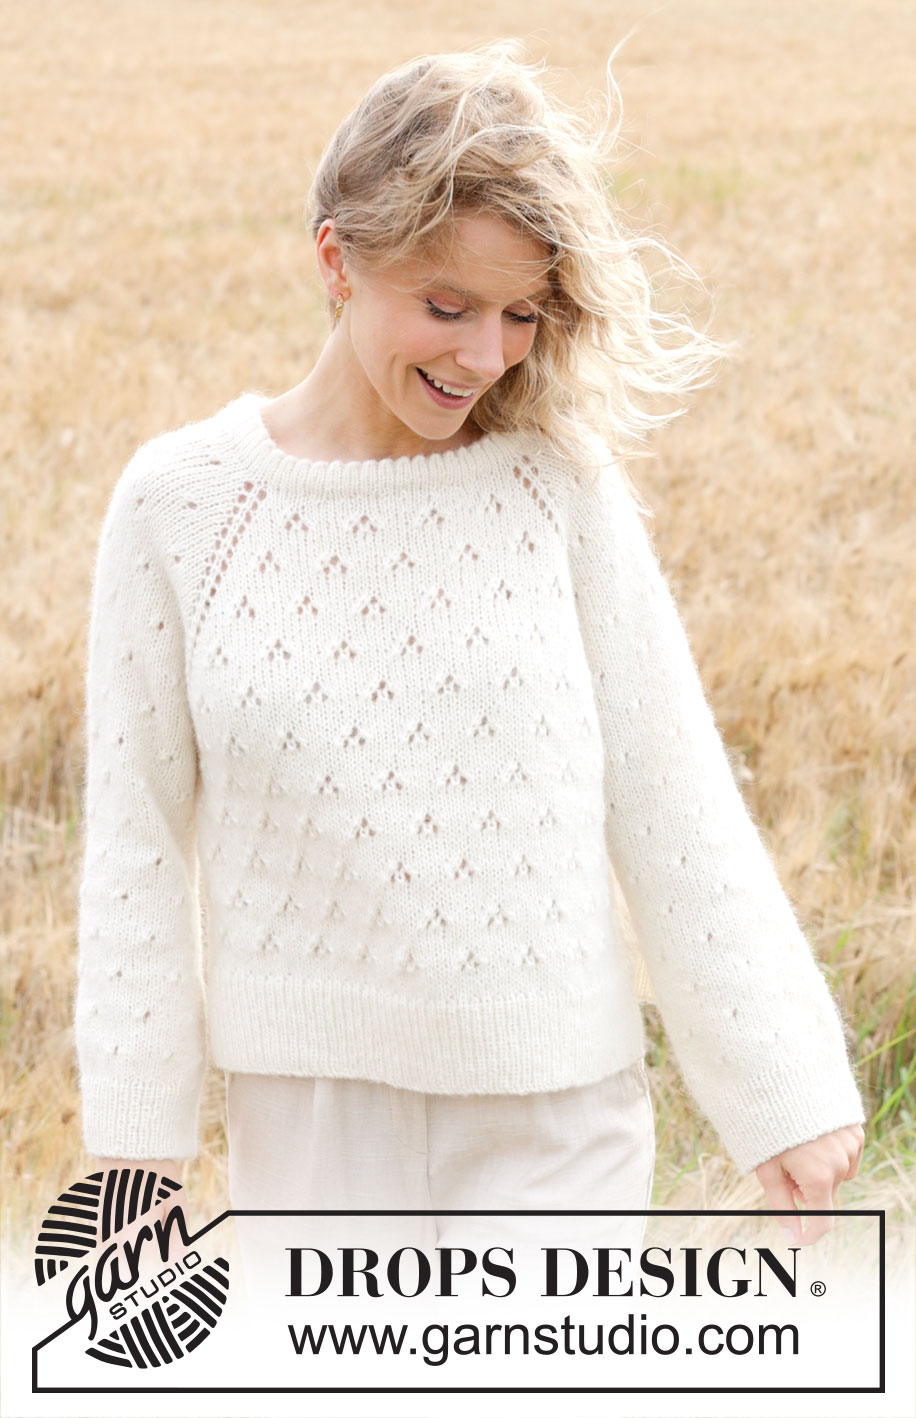
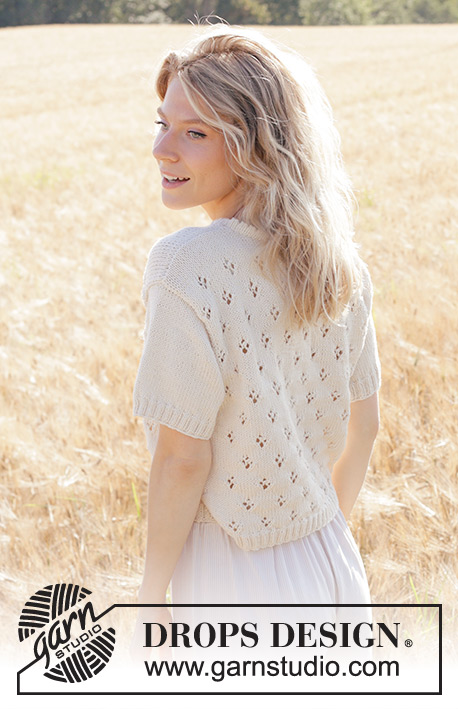
Spring Snowflake#springsnowflakesweater |
|||||||||||||
 |
 |
||||||||||||
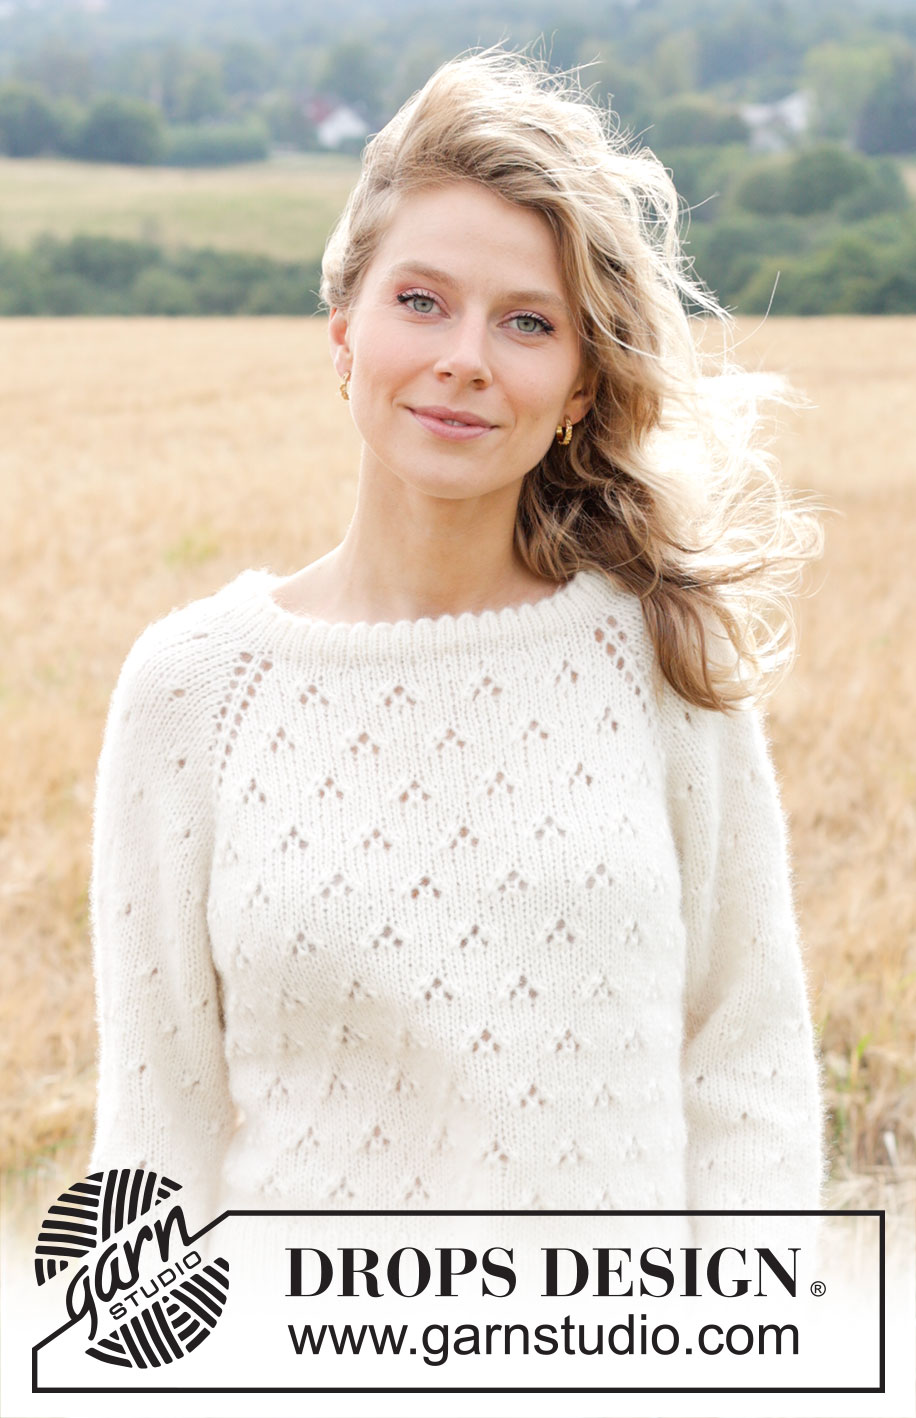
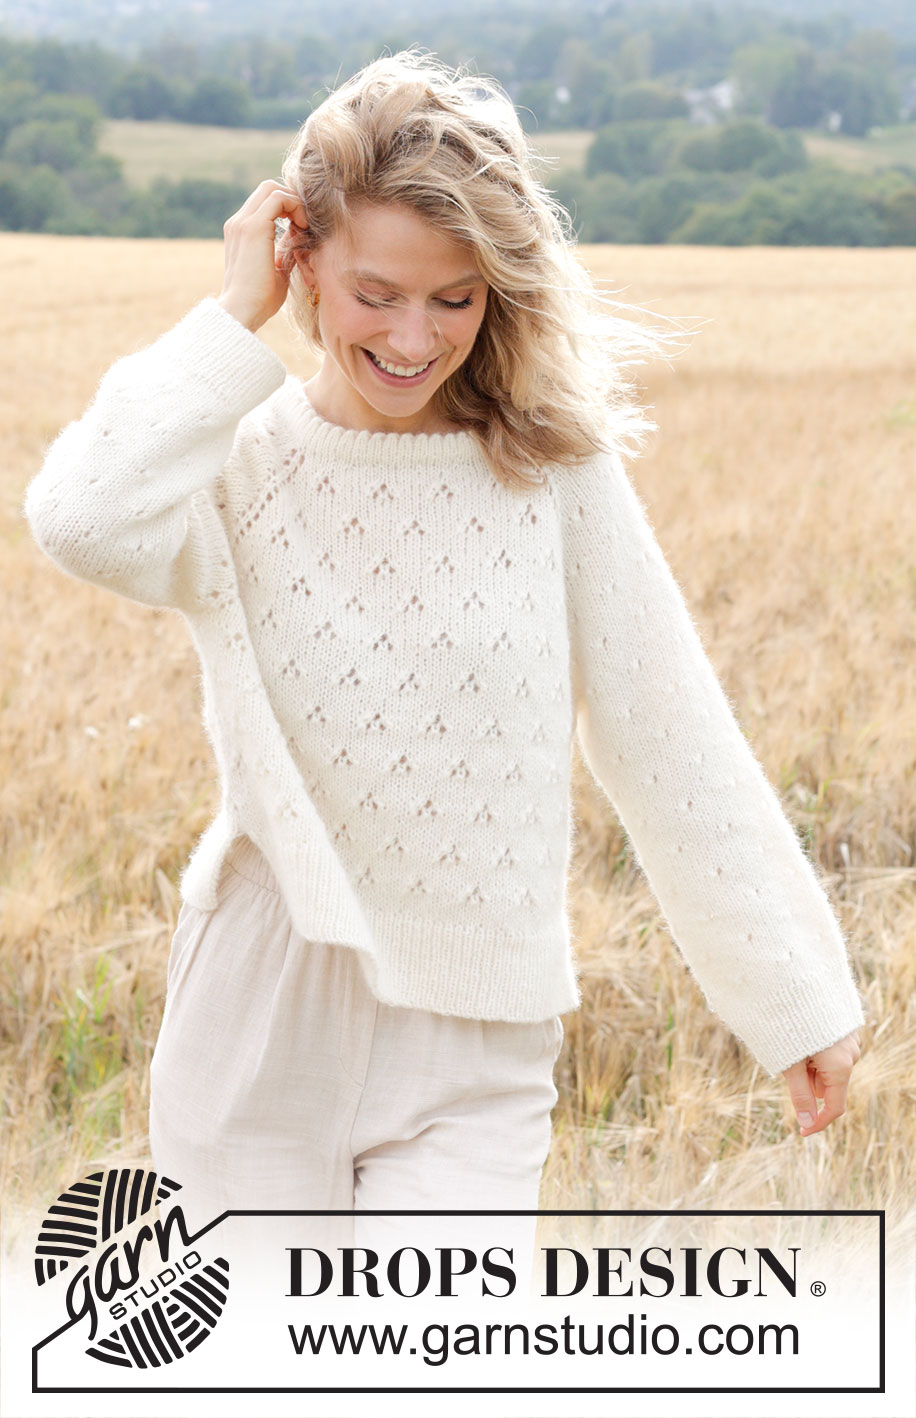
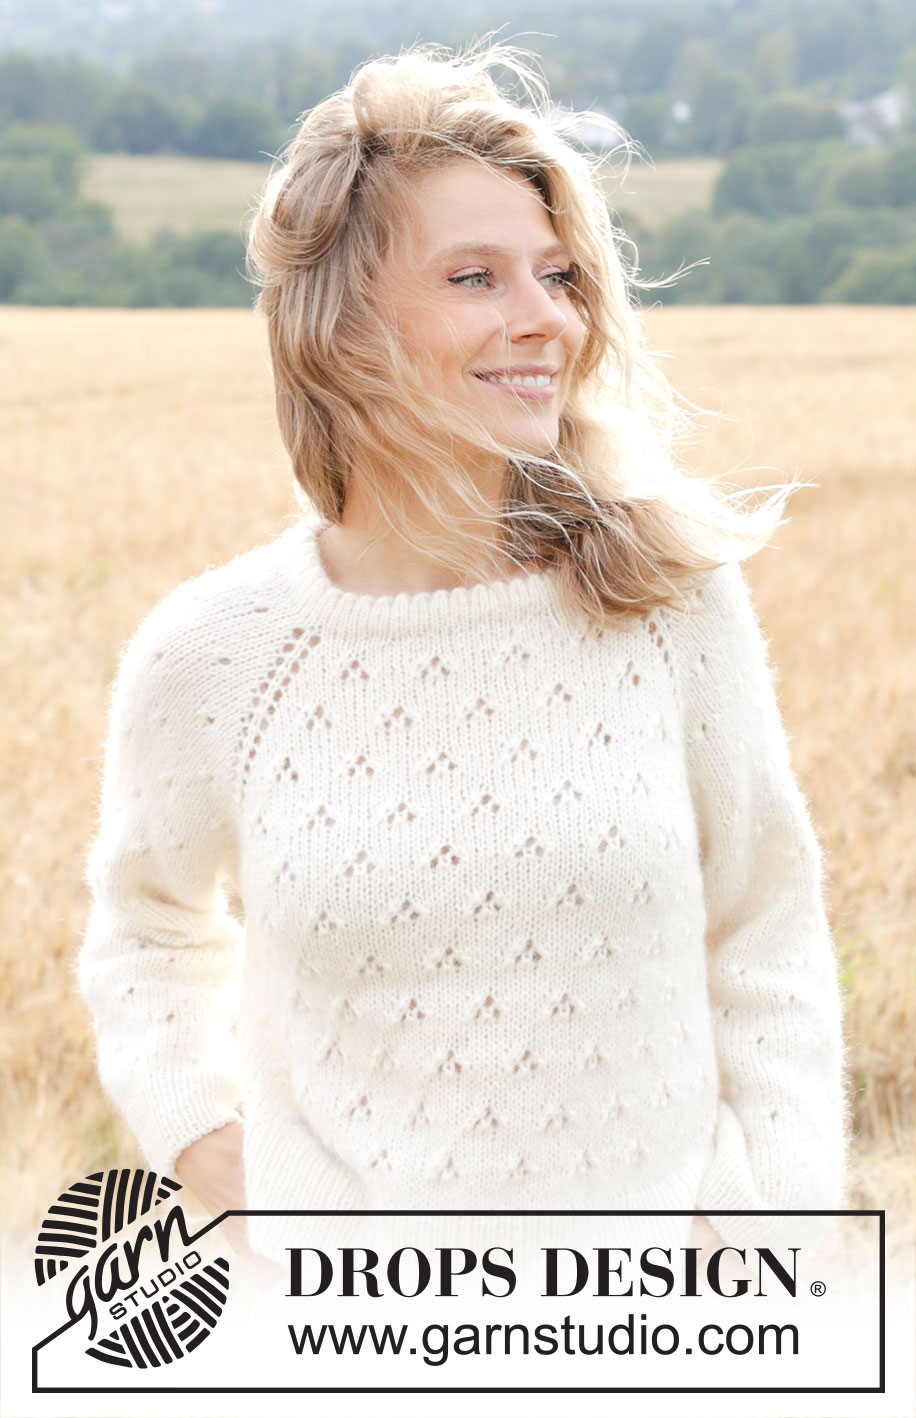
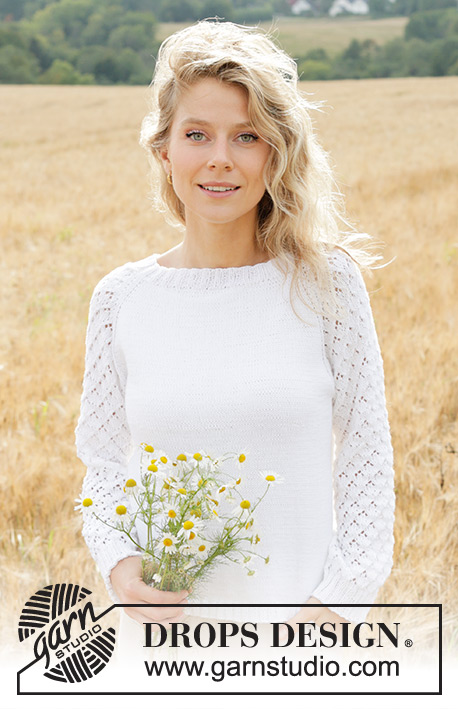
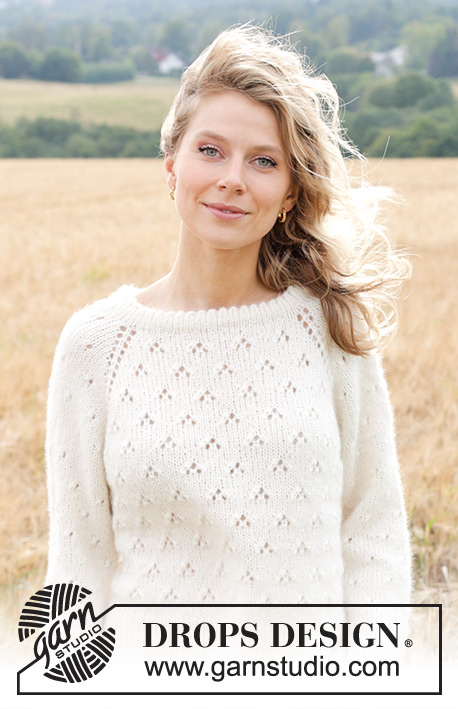
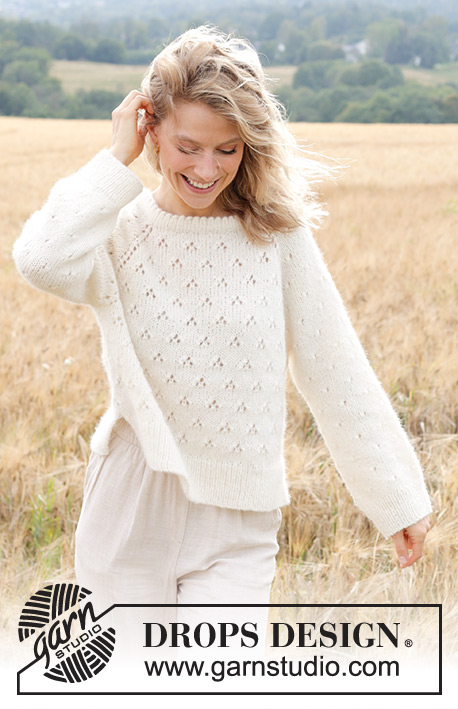
Knitted sweater in DROPS Air or DROPS Paris. The piece is worked top down with double neck, raglan, lace pattern and split in sides. Sizes S - XXXL.
DROPS 249-4 |
|||||||||||||
|
------------------------------------------------------- EXPLANATIONS FOR THE PATTERN: GARTER STITCH (worked back and forth): Knit all rows. 1 ridge = knit 2 rows. PATTERN: See diagrams A.1 (sleeve) and A.2 (front and back pieces). Choose diagram for your size (applies to A.1). As stitches are increased for raglan, work the new stitches into the pattern as shown in A.1 and A.2, i.e., work the new stitches in stockinette stitch until there is room for a complete repeat of the pattern. Any stitches which do not fit into the pattern as you increase are worked in stockinette stitch. INCREASE TIP (evenly spaced): Increase 1 stitch by making 1 yarn over, which is worked twisted on the next round to avoid a hole. RAGLAN: Increase 1 stitch after/before 1 knitted stitch in each transition between body and sleeves (4 marker-stitches called raglan-stitches in the text). Increase 1 stitch by making 1 yarn over, which is knitted on the next round to leave a hole. DECREASE TIP (for sleeves): Decrease 2 stitches on the round by decreasing 1 stitch on each side of the marker-stitch as follows: Work until there are 3 stitches left before the marker-stitch, knit 2 together, knit 3 (marker-stitch is the middle stitch), slip 1 stitch knit-wise, knit 1 and pass the slipped stitch over the knitted stitch (2 stitches decreased). ------------------------------------------------------- START THE PIECE HERE: ------------------------------------------------------- SWEATER – SHORT OVERVIEW OF THE PIECE: The pattern uses both long and short needles; start with the length which fits the number of stitches and change when necessary. The piece is worked top down, from the right back shoulder, in the round with circular needle. The double neck is worked first, then the yoke. When the yoke is finished, it is divided for body and sleeves, the body is continued in the round while the sleeves wait. The body is divided for the split in each side and each piece is finished separately, back and forth. The sleeves are worked in the round, top down. NECK: Cast on 90-94-94-102-106-112 stitches with circular needle size 5 MM = US 8 and DROPS Air or DROPS Paris. Change to circular needle size 3.5 MM = US 4 (casting on with a larger needle size makes the cast-on edge elastic). Work stockinette stitch in the round for 3 cm = 1⅛". On the next round work a row of holes (= folding edge) as follows: (Knit 2 together, 1 yarn over) to end of round. Continue with stockinette stitch until the neck measures 7 cm = 2¾" from the cast-on edge. Fold the neck double to the inside and work 1 more round of stockinette stitch, working every 4th stitch together with its corresponding stitch on the cast-on edge. You now have a double neck of approx. 3 cm = 1⅛". Insert 1 marker-thread in this round; the yoke is measured from here. YOKE: Change to circular needle size 5 MM = US 8, knit 1 round and increase 6-2-2-14-10-4 stitches evenly spaced – read INCREASE TIP = 96-96-96-116-116-116 stitches. Insert 4 markers, without working the stitches, which will be used when increasing for raglan. Count 15-15-15-17-17-17 stitches (= sleeve), insert marker-1 in the next stitch, count 31-31-31-39-39-39 stitches (= front piece), insert marker-2 in the next stitch, count 15-15-15-17-17-17 stitches (= sleeve), insert marker-3 in the next stitch, count 31-31-31-39-39-39 stitches (= back piece), insert marker-4 in the last stitch. Now work PATTERN at the same time as increasing for RAGLAN, working the first round as follows: Increase 1 stitch for RAGLAN after marker-4 – read description above, work PATTERN A.1 – read description above (= sleeve), increase 1 stitch for raglan on each side of marker-1, work A.2A, then A.2B, 2-2-2-3-3-3 times in width, A.2C (= front piece), increase 1 stitch for raglan on each side of marker-2, work A.1 (= sleeve), increase 1 stitch for raglan on each side of marker-3, work A.2A, then A.2B, 2-2-2-3-3-3 times in width, A.2C (= back piece), increase 1 stitch for raglan before marker-4, knit marker-stitch-4. Continue this pattern and increase for raglan on each side of the 4 raglan-stitches every 2nd round a total of 16-16-18-22-20-12 times (including the first increase described above) = 224-224-240-292-276-212 stitches. REMEMBER THE KNITTING GAUGE! Continue increasing as follows: Increase for raglan on the front and back pieces every 2nd round but only increase on the sleeves every 4th round (= alternately 4 and 8 increased stitches). Increase like this a total of 4-8-10-6-8-20 times on the front and back pieces (2-4-5-3-4-10 times on the sleeves). After the last increase there are 248-272-300-328-324-332 stitches. The yoke measures approx. 18-22-25-25-25-29 cm = 7"-8¾"-9¾"-9¾"-9¾"-11⅜" from the marker-thread on the neck. Continue working without further increases until the yoke measures 20-22-25-25-26-29 cm = 8"-8¾"-9¾"-9¾"-10¼"-11⅜" from the marker-thread. DIVIDE FOR BODY AND SLEEVES: Place the first 51-55-61-67-65-61 stitches on 1 thread for the sleeve (= between markers 4 and 1), cast on 7-7-7-7-15-23 stitches (= in side under sleeve), work the next 73-81-89-97-97-105 stitches in pattern as before (= front piece), place the next 51-55-61-67-65-61 stitches on 1 thread for the sleeve (= between markers 2 and 3), cast on 7-7-7-7-15-23 stitches (= in side under sleeve), work the last 73-81-89-97-97-105 stitches as before (= back piece). The body and sleeves are finished separately. The piece is now measured from here! BODY: = 160-176-192-208-224-256 stitches. Insert 1 marker in each side, in the middle stitch of the 7-7-7-7-15-23 cast-on under each sleeve. Allow the markers to follow your work onwards; they will mark the split in each side. Knit to the first marker. The round starts here. Continue A.2 in the round over all stitches – making sure to continue the pattern from the yoke. Work until the body measures 22-22-21-21-22-21 cm = 8¾"-8¾"-8¼"-8¼"-8¾"-8¼" from the division – adjusting so there are at least 5 knitted rounds after a row of holes. Now divide for the split in each side by each marker and finish the front and back pieces separately. FRONT PIECE: = 80-88-96-104-112-128 stitches, continued back and forth. On the first row (= right side), start working rib and increase 35-37-41-45-47-55 stitches evenly on the row as follows = 115-125-137-149-159-183 stitches: Change to circular needle size 3.5 MM = US 4, work 1 GARTER STITCH - read description above, rib (= knit 1, purl 1 – remember the increases), until there are 2 stitches left, knit 1 and 1 garter stitch. When the rib measures 8 cm = 3⅛", bind off with Italian bind-off or with rib. The sweater measures approx. 54-56-58-60-62-64 cm = 21¼"-22"-22¾"-23⅝"-24⅜"-25¼" from the shoulder. BACK PIECE: Work in the same way as the front piece. SLEEVES: Place the 51-55-61-67-65-61 stitches from the thread on the one side of the piece on short circular needle/double pointed needles size 5 MM = US 8 and knit up 1 stitch in each of the 7-7-7-7-15-23 stitches cast on under the sleeve = 58-62-68-74-80-84 stitches. Insert a marker in the middle of the 7-7-7-7-15-23 stitches under the sleeve. Start at the marker and continue A.1 in the round – making sure to continue the pattern from the yoke. Stitches which do not fit into the pattern under the sleeve are worked in stockinette stitch. . When the sleeve measures 2 cm = ¾" from the division, decrease 2 stitches under the sleeve – read DECREASE TIP. Decrease like this every 2nd round a total of 0-0-0-5-6-7 times, then every 2 cm = ¾" 4-5-8-5-6-6 times = 50-52-52-54-56-58 stitches. Continue working until the sleeve measures 39-38-36-36-35-32 cm = 15¼"-15"-14¼"-14¼"-13¾"-12½" from the division – adjusting so there are several knitted rounds after the last row of holes. There is approx. 6-6-6-7-7-7 cm = 2⅜"-2⅜"-2⅜"-2¾"-2¾"-2¾" left; try the sweater on and work to desired length before the rib. Change to double pointed needles size 3.5 MM = US 4 and start working rib (knit 1, purl 1), at the same time as increasing 8-8-10-10-10-10 stitches evenly on the first round = 58-60-62-64-66-68 stitches. When the rib measures 6-6-6-7-7-7 cm = 2⅜"-2⅜"-2⅜"-2¾"-2¾"-2¾", bind off with Italian bind-off or with rib. The sleeve measures approx. 45-44-42-43-42-39 cm = 17¾"-17¼"-16½"-17"-16½"-15¼". |
|||||||||||||
Diagram explanations |
|||||||||||||
|
|||||||||||||
 |
|||||||||||||
 |
|||||||||||||
 |
|||||||||||||
 |
|||||||||||||
Have you finished this pattern?Tag your pictures with #dropspattern #springsnowflakesweater or submit them to the #dropsfan gallery. Do you need help with this pattern?You'll find 33 tutorial videos, a Comments/Questions area and more by visiting the pattern on garnstudio.com. © 1982-2026 DROPS Design A/S. We reserve all rights. This document, including all its sub-sections, has copyrights. Read more about what you can do with our patterns at the bottom of each pattern on our site. |
|||||||||||||


With over 40 years in knitting and crochet design, DROPS Design offers one of the most extensive collections of free patterns on the internet - translated to 17 languages. As of today we count 324 catalogs and 12290 patterns - 12280 of which are translated into English (US/in).
We work hard to bring you the best knitting and crochet have to offer, inspiration and advice as well as great quality yarns at incredible prices! Would you like to use our patterns for other than personal use? You can read what you are allowed to do in the Copyright text at the bottom of all our patterns. Happy crafting!
Post a comment to pattern DROPS 249-4
We would love to hear what you have to say about this pattern!
If you want to leave a question, please make sure you select the correct category in the form below, to speed up the answering process. Required fields are marked *.