DROPS Air
DROPS Air
65% Alpaca, 28% Polyamide, 7% Wool
from 4.80 £ /50g
Get the yarn to make this pattern from 28.80£.

The yarn cost is calculated from the pattern’s smallest size and the yarn’s cheapest product type. Looking for an even better price? You might find it on the DROPS Deals!

DROPS SS24

Spring Snowflake

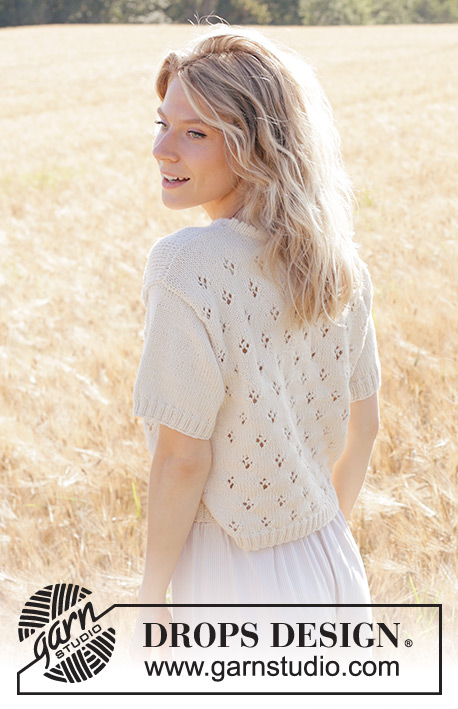
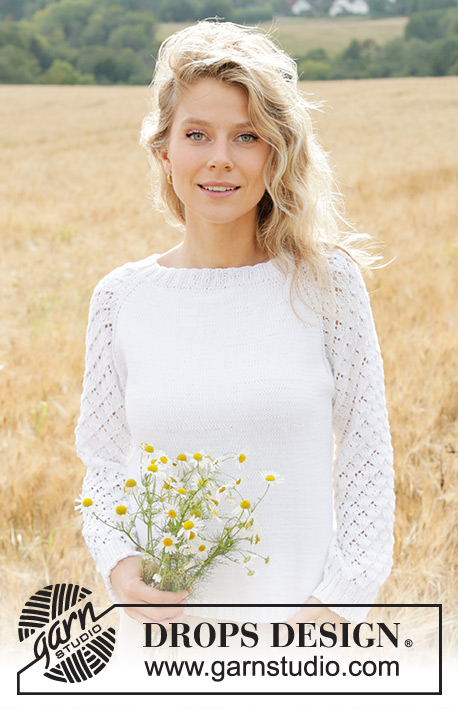
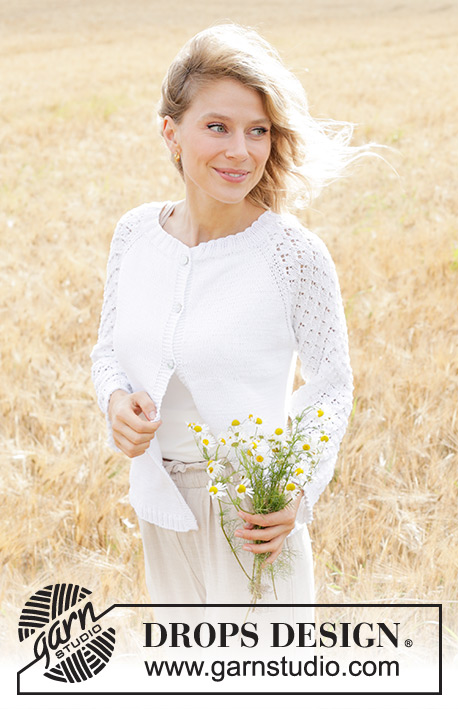
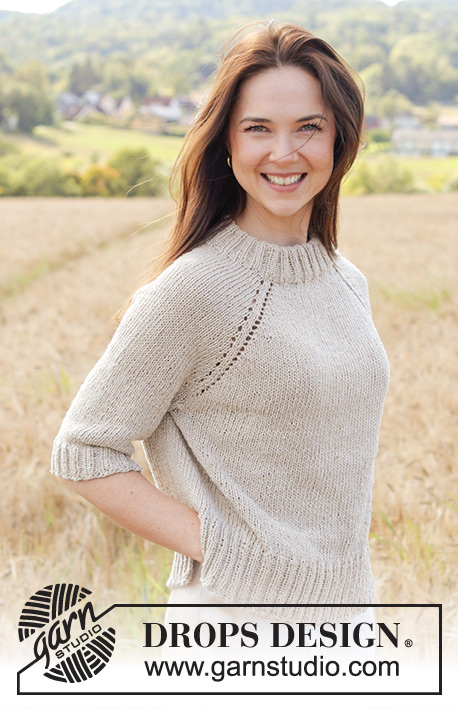
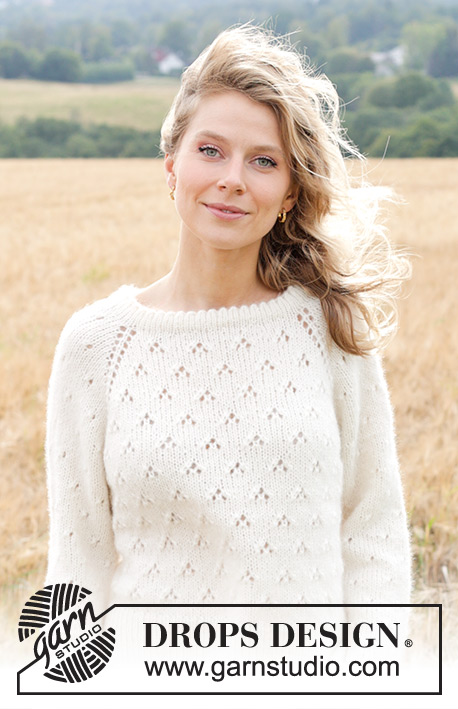
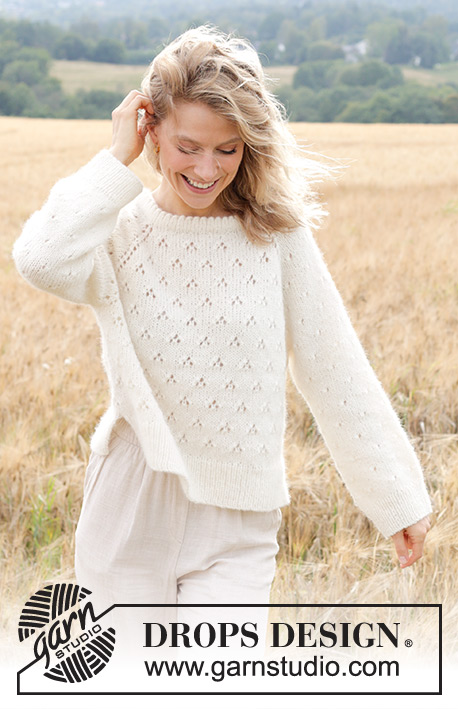
Knitted jumper in DROPS Air or DROPS Paris. The piece is worked top down with double neck, raglan, lace pattern and split in sides. Sizes S - XXXL.

DROPS 249-4
DROPS Design: Pattern ai-476
Yarn group C or A + A
-------------------------------------------------------

SIZES:
S - M - L - XL - XXL - XXXL

YARN:
DROPS AIR from Garnstudio (belongs to yarn group C)
300-300-350-350-400-450 g colour 01, off white

Or use:
DROPS PARIS from Garnstudio (belongs to yarn group C)
550-600-650-700-800-850 g colour 17, off white

NEEDLES:
DROPS CIRCULAR NEEDLES SIZE 5 MM: Length 40 cm and 80 cm.
DROPS CIRCULAR NEEDLES SIZE 3.5 MM: Length 40 cm and 80 cm.
DROPS DOUBLE POINTED NEEDLES SIZE 5 MM.
DROPS DOUBLE POINTED NEEDLES SIZE 3.5 MM.
The technique MAGIC LOOP can be used – you then only need 80 cm circular needle in each size.

KNITTING TENSION:
17 stitches in width and 22 rows in height with stocking stitch = 10 x 10 cm.
NOTE: Needle size is only a guide. If you get too many stitches on 10 cm, change to a larger needle size. If you get too few stitches on 10 cm, change to a smaller needle size.

-------------------------------------------------------

Alternative Yarn – See how to change yarns here
Yarn Groups A to F – Use the same pattern and change the yarn here
Yarn usage using an alternative yarn – Use our yarn converter here

-------------------------------------------------------

DROPS Air
DROPS Air
65% Alpaca, 28% Polyamide, 7% Wool
from 4.80 £ /50g
Get the yarn to make this pattern from 28.80£.

The yarn cost is calculated from the pattern’s smallest size and the yarn’s cheapest product type. Looking for an even better price? You might find it on the DROPS Deals!

Pattern instructions

NOTE: This pattern is written in British English. All measurements in charts are in cm. For conversion from cm to inches - click here. There are different terms for crocheting in British and American English. If this pattern includes crochet, click for "crochet terms" here. For this pattern in American English, please click here.
-------------------------------------------------------

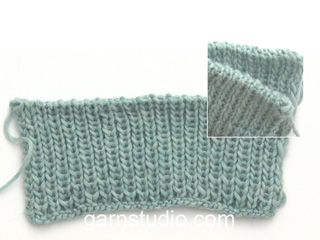
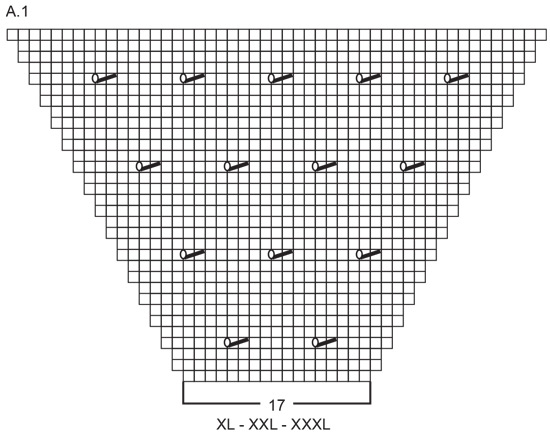
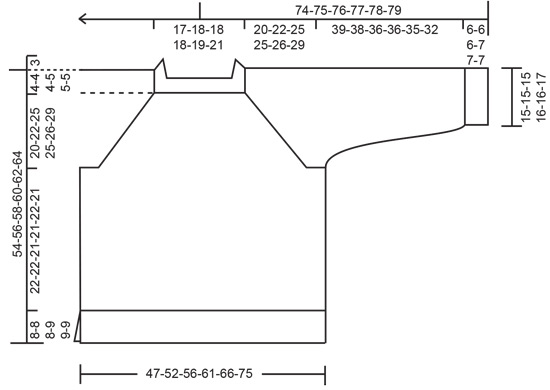
EXPLANATIONS FOR THE PATTERN:

GARTER STITCH (worked back and forth):
Knit all rows.
1 ridge = knit 2 rows.

PATTERN:
See diagrams A.1 (sleeve) and A.2 (front and back pieces). Choose diagram for your size (applies to A.1).
As stitches are increased for raglan, work the new stitches into the pattern as shown in A.1 and A.2, i.e., work the new stitches in stocking stitch until there is room for a complete repeat of the pattern. Any stitches which do not fit into the pattern as you increase are worked in stocking stitch.

INCREASE TIP (evenly spaced):
Increase 1 stitch by making 1 yarn over, which is worked twisted on the next round to avoid a hole.

RAGLAN:
Increase 1 stitch after/before 1 knitted stitch in each transition between body and sleeves (4 marker-stitches called raglan-stitches in the text). Increase 1 stitch by making 1 yarn over, which is knitted on the next round to leave a hole.

DECREASE TIP (for sleeves):
Decrease 2 stitches on the round by decreasing 1 stitch on each side of the marker-stitch as follows: Work until there are 3 stitches left before the marker-stitch, knit 2 together, knit 3 (marker-stitch is the middle stitch), slip 1 stitch knit-wise, knit 1 and pass the slipped stitch over the knitted stitch (2 stitches decreased).

-------------------------------------------------------

START THE PIECE HERE:

-------------------------------------------------------

JUMPER – SHORT OVERVIEW OF THE PIECE:
The pattern uses both long and short needles; start with the length which fits the number of stitches and change when necessary.
The piece is worked top down, from the right back shoulder, in the round with circular needle. The double neck is worked first, then the yoke. When the yoke is finished, it is divided for body and sleeves, the body is continued in the round while the sleeves wait. The body is divided for the split in each side and each piece is finished separately, back and forth. The sleeves are worked in the round, top down.

NECK:
Cast on 90-94-94-102-106-112 stitches with circular needle size 5 mm and DROPS Air or DROPS Paris. Change to circular needle size 3.5 mm (casting on with a larger needle size makes the cast-on edge elastic). Work stocking stitch in the round for 3 cm. On the next round work a row of holes (= folding edge) as follows: (Knit 2 together, 1 yarn over) to end of round. Continue with stocking stitch until the neck measures 7 cm from the cast-on edge.
Fold the neck double to the inside and work 1 more round of stocking stitch, working every 4th stitch together with its corresponding stitch on the cast-on edge.
You now have a double neck of approx. 3 cm.
Insert 1 marker-thread in this round; the yoke is measured from here.

YOKE:
Change to circular needle size 5 mm, knit 1 round and increase 6-2-2-14-10-4 stitches evenly spaced – read INCREASE TIP = 96-96-96-116-116-116 stitches.
Insert 4 markers, without working the stitches, which will be used when increasing for raglan.
Count 15-15-15-17-17-17 stitches (= sleeve), insert marker-1 in the next stitch, count 31-31-31-39-39-39 stitches (= front piece), insert marker-2 in the next stitch, count 15-15-15-17-17-17 stitches (= sleeve), insert marker-3 in the next stitch, count 31-31-31-39-39-39 stitches (= back piece), insert marker-4 in the last stitch.

Now work PATTERN at the same time as increasing for RAGLAN, working the first round as follows: Increase 1 stitch for RAGLAN after marker-4 – read description above, work PATTERN A.1 – read description above (= sleeve), increase 1 stitch for raglan on each side of marker-1, work A.2A, then A.2B, 2-2-2-3-3-3 times in width, A.2C (= front piece), increase 1 stitch for raglan on each side of marker-2, work A.1 (= sleeve), increase 1 stitch for raglan on each side of marker-3, work A.2A, then A.2B, 2-2-2-3-3-3 times in width, A.2C (= back piece), increase 1 stitch for raglan before marker-4, knit marker-stitch-4.
Continue this pattern and increase for raglan on each side of the 4 raglan-stitches every 2nd round a total of 16-16-18-22-20-12 times (including the first increase described above) = 224-224-240-292-276-212 stitches. REMEMBER THE KNITTING TENSION!

Continue increasing as follows:
Increase for raglan on the front and back pieces every 2nd round but only increase on the sleeves every 4th round (= alternately 4 and 8 increased stitches). Increase like this a total of 4-8-10-6-8-20 times on the front and back pieces (2-4-5-3-4-10 times on the sleeves).
After the last increase there are 248-272-300-328-324-332 stitches. The yoke measures approx. 18-22-25-25-25-29 cm from the marker-thread on the neck.
Continue working without further increases until the yoke measures 20-22-25-25-26-29 cm from the marker-thread.

DIVIDE FOR BODY AND SLEEVES:
Place the first 51-55-61-67-65-61 stitches on 1 thread for the sleeve (= between markers 4 and 1), cast on 7-7-7-7-15-23 stitches (= in side under sleeve), work the next 73-81-89-97-97-105 stitches in pattern as before (= front piece), place the next 51-55-61-67-65-61 stitches on 1 thread for the sleeve (= between markers 2 and 3), cast on 7-7-7-7-15-23 stitches (= in side under sleeve), work the last 73-81-89-97-97-105 stitches as before (= back piece). The body and sleeves are finished separately. The piece is now measured from here!

BODY:
= 160-176-192-208-224-256 stitches. Insert 1 marker in each side, in the middle stitch of the 7-7-7-7-15-23 cast-on under each sleeve. Allow the markers to follow your work onwards; they will mark the split in each side.
Knit to the first marker. The round starts here.
Continue A.2 in the round over all stitches – making sure to continue the pattern from the yoke. Work until the body measures 22-22-21-21-22-21 cm from the division – adjusting so there are at least 5 knitted rounds after a row of holes. Now divide for the split in each side by each marker and finish the front and back pieces separately.

FRONT PIECE:
= 80-88-96-104-112-128 stitches, continued back and forth.
On the first row (= right side), start working rib and increase 35-37-41-45-47-55 stitches evenly on the row as follows = 115-125-137-149-159-183 stitches:
Change to circular needle size 3.5 mm, work 1 GARTER STITCH - read description above, rib (= knit 1, purl 1 – remember the increases), until there are 2 stitches left, knit 1 and 1 garter stitch.
When the rib measures 8 cm, cast off with Italian cast-off or with rib. The jumper measures approx. 54-56-58-60-62-64 cm from the shoulder.

BACK PIECE:
Work in the same way as the front piece.

SLEEVES:
Place the 51-55-61-67-65-61 stitches from the thread on the one side of the piece on short circular needle/double pointed needles size 5 mm and knit up 1 stitch in each of the 7-7-7-7-15-23 stitches cast on under the sleeve = 58-62-68-74-80-84 stitches. Insert a marker in the middle of the 7-7-7-7-15-23 stitches under the sleeve.
Start at the marker and continue A.1 in the round – making sure to continue the pattern from the yoke. Stitches which do not fit into the pattern under the sleeve are worked in stocking stitch.
.
When the sleeve measures 2 cm from the division, decrease 2 stitches under the sleeve – read DECREASE TIP. Decrease like this every 2nd round a total of 0-0-0-5-6-7 times, then every 2 cm 4-5-8-5-6-6 times = 50-52-52-54-56-58 stitches. Continue working until the sleeve measures 39-38-36-36-35-32 cm from the division – adjusting so there are several knitted rounds after the last row of holes. There is approx. 6-6-6-7-7-7 cm left; try the jumper on and work to desired length before the rib.

Change to double pointed needles size 3.5 mm and start working rib (knit 1, purl 1), at the same time as increasing 8-8-10-10-10-10 stitches evenly on the first round = 58-60-62-64-66-68 stitches.
When the rib measures 6-6-6-7-7-7 cm, cast off with Italian cast-off or with rib. The sleeve measures approx. 45-44-42-43-42-39 cm.

Diagram

symbols = knit
symbols = between 2 stitches make 1 yarn over, which is knitted on next round (hole
symbols = knit 2 together
symbols = slip 1 stitch knit-wise, knit 1, pass slipped stitch over knitted stitch
diagram
diagram
diagram
diagram

Each of our patterns has specific tutorial videos to help you.

Do you have a question? See a list of frequently asked questions (FAQ)

Knitting tension is what determines the final measurements of your work, and is usually measured per 10 x 10 cm. It is provided like so: number of stitches in width x number of rows in height - eg: 19 stitches x 26 rows = 10 x 10 cm.

The knitting tension is very individual; some people knit/crochet loosely while others work tightly. You adjust the knitting tension with the needle size, which is why the suggested needle size is only meant as a guide! You need to adjust this (up or down) to ensure that YOUR knitting tension matches the knitting tension provided in the pattern. If you work with a different knitting tension than provided you will have a different yarn consumption, and your work will have different measurements than what the pattern suggests.

The knitting tension also determines which yarns can replace each other. As long as you achieve the same knitting tension you can replace one yarn with another.

See DROPS lesson: How to measure your tension/gauge

See DROPS video: How to make a gauge tension swatch

The required amount of yarn is provided in grams, eg: 450 g. To calculate how many balls you’ll need you first need to know how many grams are in 1 ball (25g, 50g or 100g). This information is available if you click on the individual yarn quality on our pages. Divide the amount required with the amount of each ball. For example, if each ball is 50g (the most common amount), the calculation will be as follows: 450 / 50 = 9 balls.

The important thing when changing from one yarn to another is that the knitting/crochet tension remains the same. This is so that the measurements of the finished piece will be the same as on the sketch provided. It is easier to achieve the same knitting tension using yarns from the same yarn group. It is also possible to work with multiple strands of a thinner yarn to achieve the knitting tension of a thicker one. Please try our yarn converter. We recommend you to always work a test swatch.

Please NOTE: when changing yarn the garment might have a different look and feel to the garment in the photo, due to individual properties and qualities of each yarn.

See DROPS lesson: Can I use a different yarn than the one mentioned in the pattern?

All our yarns are categorised into yarn groups (from A to F) according to thickness and knitting tension – group A contains the thinnest yarns and group F the thickest. This makes it easier for you to find alternative yarns to our patterns, should you wish to switch yarn. All yarns within the same group have a similar knitting tension and can easily replace each other. However, different yarn qualities have different structures and properties which will give the finished work a unique look and feel.

Click here for an overview of the yarns in each yarn group

At the top of all our patterns you’ll find a link to our yarn calculator, which is a helpful tool should you wish to use a different yarn than suggested. By filling in the yarn quality you wish to replace, the amount (in your size) and number of strands, the calculator will present good alternative yarns with the same knitting tension. Additionally it will tell you how much you’ll require in the new qualities and whether you’ll need to work with multiple strands. Most skeins are 50g (some are 25g or 100g).

If the pattern is worked with multiple colours, every colour will have to be calculated separately. Similarly, if the pattern is worked with several strands of different yarns (for example 1 strand Alpaca and 1 strand Kid-Silk) you will have to find alternatives for each, individually.

Click here to see our yarn calculator

Since different yarns have different qualities and textures we have chosen to keep the original yarn in our patterns. However, you can easily find options among our available qualities by using our yarn calculator, or simply pick a yarn from the same yarn group.

It is possible that some retailers still have discontinued yarns in stock, or that someone has a few skeins at home that they would like to find patterns for.

The yarn calculator will provide both alternative yarn as well as required amount in the new quality.

If you think it's hard to decide what size to make, it can be a good idea to measure a garment you own already and like the size of. Then you can pick the size by comparing those measures with the ones available in the pattern's size chart.

You'll find the size chart at the bottom of the pattern.

See DROPS lesson: How to read size chart

The needle size provided in the pattern serves only as a guide, the important thing is to follow the knitting tension. And since knitting tension is very individual, you will have to adjust the needle size to ensure that YOUR tension is the same as in the pattern – maybe you’ll have to adjust 1, or even 2 needle sizes, up or down to achieve the correct tension. For this, we recommend that you work test swatches.

Should you work with a different knitting tension than the one provided, the measurements of the finished garment might deviate from the measurement sketch.

See DROPS lesson: How to measure your tension/gauge

See DROPS video: How to make a tension/gauge swatch

Working a garment top-down provides more flexibility and room for personal adjustment. For example it is easier to try the garment on while working, as well as making adjustments to length of yoke and shoulder caps.

The instructions are carefully explaining every step, in the correct order. Diagrams are adjusted to the knitting direction and are worked as usual.

The diagram depicts all rows/rounds, and every stitch seen from the right side. It is read from bottom to top, from right to left. 1 square = 1 stitch.

When working back and forth, every other row is worked from the right side and every other row is worked from the wrong side. When working from the wrong side, the diagram will have to be worked reversed: from left to right, knit stitches are purled, purl stitches are knit etc.

When working in the round every round is worked from the right side and the diagram are worked from right to left on all rounds.

See DROPS lesson: How to read knitting diagrams

The diagram depicts all rows/rounds, and every stitch seen from the right side. It is worked from bottom to top, from right to left.

When working back and forth every other row is worked from the right side: from right to left and every other row is worked from the wrong side: from left to right.

When working in the round, every row in the diagram are worked from the right side, from right to left.

When working a circular diagram you start in the middle and work your way outwards, counter clockwise, row by row.

The rows usually start with a given number of chain stitches (equivalent to the height of the following stitch), this will either be depicted in the diagram or explained in the pattern.

See DROPS lesson: How to read crochet diagrams

Instructions for working several diagrams after each other on the same row/round, will often be written like so: “work A.1, A.2, A.3 a total of 0-0-2-3-4 times". This means you work A.1 once, then A.2 is worked once, and A.3 is repeated (in width) the number of times provided for your size – in this case like so: S = 0 times, M = 0 times, L=2 times, XL= 3 times and XXL = 4 times.

The diagrams are worked as usual: begin with the first row in A.1, then work the first row in A.2 etc.

See DROPS lesson: How to read knitting diagrams

See DROPS lesson: How to read crochet diagrams

The total width of the garment (from wrist-to-wrist) will be larger in the larger sizes, despite the actual sleeves being shorter. The larger sizes have longer sleeve caps and wider shoulders, so there will be a good fit in all sizes.

The measurement sketch/schematic drawing provides information regarding the full length of the garment. If it’s a jumper or a jacket the length is measured from the highest point on the shoulder closest to the neckline, and straight down to the bottom of the garment. It is NOT measured from the tip of shoulder. Similarly, the length of yoke is measured from the highest point on the shoulder and down to where yoke is split into body and sleeves.

On a jacket measures are never taken along bands, unless specifically stated. Always measure inside band stitches when measuring the length.

See DROPS lesson: How to read a schematic drawing

Diagrams are often repeated on the round or in height. 1 repeat is the diagram the way it appears in the pattern. If it says to work 5 repeats of A.1 in the round, then you work A.1 a total of 5 times after/next to each other in the round. If it says to work 2 repeats of A.1 vertically/in height you work the entire diagram once, then begin again at the start and work the entire diagram one more time.

Chain stitches are slightly narrower than other stitches and to avoid working the cast-on edge too tight, we simply chain more stitches to begin with. The stitch count will be adjusted on the following row to fit the pattern and measurement sketch.

The rib edge is more elastic and will contract slightly compared to, for example, stocking stitch. By increasing before the rib edge, you avoid a visible difference in width between the rib edge and the rest of the body.

It’s very easy to cast off too tightly, and by making yarn overs while casting off (and simultaneously casting these off) you avoid a too tight cast off edge.

See DROPS video: How to bind off with yarn overs (yo)

To achieve an even increase (or decrease) you can increase on, for example: every 3rd and 4th row alternately, like so: work 2 rows and increase on the 3rd row, work 3 rows and increase on the 4th. Repeat this until the increase is complete.

See DROPS lesson: Increase or decrease 1 st on every 3rd and 4th row alternately

Should you prefer to work in the round instead of back and forth, you may of course adjust the pattern. You’ll need to add steeks mid-front (usually 5 stitches), and follow the instructions. When you would normally turn and work from the wrong side, simply work across the steek and continue in the round. At the end you’ll cut the piece open, pick up stitches to work bands, and cover the cut edges.

See DROPS video: How to knit steeks and cut open

Should you prefer to work back and forth instead of in the round, you may of course adjust the pattern so you work the pieces separately and then assemble them at the end. Divide the stitches for the body in 2, add 1 edge stitch in each side (for sewing) and work the front and back pieces separately.

See DROPS lesson: Can I adapt a pattern for circular needles into straight needles?

Pattern repeats can vary slightly in the different sizes, in order to get the correct proportions. If you’re not working the exact same size as the garment in the photo, yours might deviate slightly. This has been carefully developed and adjusted so that the complete impression of the garment is the same in all sizes.

Make sure to follow instructions and diagrams for your size!

If you have found a pattern you like which is available in women’s size it’s not very difficult to convert it to men’s size. The biggest difference will be the length of sleeves and body. Start working on the women size that you think would fit across the chest. The additional length will be worked right before you cast off for the armhole/sleeve cap. If the pattern is worked top-down you can add the length right after the armhole or before the first decrease on sleeve.

Regarding additional yarn amount, this will depend on how much length you add, but it is better with a skein too many than too few.

All yarns will have excess fibres (from production) that might come off as lint or shedding. Brushed yarns (ie hairier yarns) have more of these loose, excess fibres, causing more shedding.

Shedding also depends on what is worn under or over the garment, and whether this pulls at the yarn fibres. It’s therefore not possible to guarantee that there will be no shedding

Below are some tips on how to get the best result when working with hairier yarns:

1. When the garment is finished (before you wash it) shake it vigorously so the looser hairs come off. NOTE: do NOT use a lint roller, brush or any method that pulls at the yarn.

2. Place the garment in a plastic bag and put it in your freezer - the temperature will cause the fibres to become less attached to each other, and excess fibres will come off easier.

3. Leave in the freezer for a few hours before taking it out and shaking it again.

4. Wash the garment according to the instructions on the yarn label.

Pilling is a natural process that happens to even the most exclusive of fibers. It's a natural sign of wear and tear that is hard to avoid, and that is most visible in high friction areas of your garment like a sweater's arms and cuffs.

You can make your garment look as new by removing the pilling, using a fabric comb or a pill/lint remover.

Still can't find the answer you need? Then scroll down and leave your question so one of our experts can try to help you. This will be done normally within 5 to 10 working days.
In the meantime, you can read the questions and answers that others have left to this pattern or join the DROPS Workshop on Facebook to get help from fellow knitters/crocheters!

You might also like...

Post a comment to pattern DROPS 249-4

We would love to hear what you have to say about this pattern!

If you want to leave a question, please make sure you select the correct category in the form below, to speed up the answering process. Required fields are marked *.

Comments / Questions (36)

country flag Annette Fischer wrote:

Hej Er det muligt at strikke blusen i en bomuldsgarn og i så fald, hvilken er bedst:) Mvh Annette

11.04.2024 - 09:36

DROPS Design answered:

Hei Annette. Du kan bruke DROPS Paris (som også står i oppskriften), ellers så kan du bruke 2 tråder DROPS Safran. Bruk vår garnkalkulator for å regne ut hvor mye garn du da må bruke. mvh DROPS Design

15.04.2024 - 10:16

country flag Iris wrote:

Bedankt, weet nu hoe ik verder kan breien.

06.03.2024 - 13:03

country flag Iris wrote:

Ik heb nog even een aanvulling op mijn vraag hieronder, Ik ben nu bij het stukje(Ga verder met meerderen als volgd )maat s . Moet ik als ik bij de naald van de gaatjes breien ben, ook weer van rechts helemaal naar links het patroon breien, en als ik dan nog steken over heb nog een keer weer van links naar recht breien tot aan de raglan. Want als ik dat doe dan komen op het einde richting de raglan de omslagen niet goed in het midden van de voorgaande gaatjes die ik heb gebreid. V.g iris

02.03.2024 - 13:58

country flag Iris wrote:

Hallo, ik heb nog een vraag over over het telpatroon. Als ik het hele patroon in de hoogte heb gebreid, begin ik dan weer onderaan opnieuw. En bij het breien van het lijf staat ga verder met A2, zijn dat de 3 kolommen samen?. V.g iris

01.03.2024 - 11:12

DROPS Design answered:

Dag Iris,

Ja, het telpatroon herhaalt zich inderdaad in de hoogte, dus je begint gewoon opnieuw onderaan. Als je op het lijf bent zet je het gecreëerde patroon voort, maar je hebt geen meerderingen meer door de raglan, dus komt het neer op het steeds herhalen van A.2B.

05.03.2024 - 23:01

country flag Lali wrote:

Ciao, ho appena finito di lavorare questo modello. È venuto benissimo, spiegazioni perfette! Vi ringrazio di cuore, complimenti!

20.02.2024 - 17:44

country flag Iris wrote:

Hallo drops team. Ik brei maat s. Ben nu bezig met de pas 69 steken, heb mijn markeer draden geplaatst en ben in patroon gaan breien en heb 1 keer gemeerderd voor raglan. Maar ik kom er nu niet meer uit. Mijn vraag is: als ik in patroon brei moet ik mijn meerderingen voor de raglan ook meetellen in het patroon( dus de omslagen die ik brei voor raglan) of begint het patroon na de meerderingen voor de raglan. V.g iris

19.02.2024 - 14:03

DROPS Design answered:

Dag Iris,

Je begint steeds op dezelfde plek met het patroon, dus je meerdert 1 steek voor de raglan aan elke kant van de markeerdraad en daarna brei je in patroon. In het patroon is rekening gehouden met de meerderingen. Gelijk na de meerdering begint het patroon dus.

21.02.2024 - 21:13

country flag Susana Araujo wrote:

Thank you for responding to my previous question. And what happens to those stitches? Are worked in stockinette stich all the time (knit)? Shall I move the marker up to the stitch just knitted in every row? I am sorry but I am a bit confused can't find mention in the pattern about what is done with the markers.

19.02.2024 - 09:21

DROPS Design answered:

Dear Mrs Auraujo, the 4 stitches with each a marker are worked in stocking stitch, ie these stitches are knitted every round, you can move markers up to these sts on every round. Happy knitting!

19.02.2024 - 15:13

country flag Veronique wrote:

Bonjour, j'ai déjà recommencé 2 fois et mon col ne ressemble absolument pas à celui de votre photo. Le mien ressemble plus à un col roulé... Savez vous ou je pourrais me tromper ? Merci

19.02.2024 - 03:41

DROPS Design answered:

Bonjour Véronique, vous devez procéder comme dans cette vidéo, sauf que vous allez tricoter 3 cm jersey avant le tour (2 m ens à l'end, 1 jeté), et quand votre ouvrage mesure 7 cm, pliez en double sur l'envers et toutes les 4 mailles, relevez 1 maille du montage pour la tricoter avec la maille suivante sur l'aiguille gauche. Dans la vidéo, on coud à la fin, ici, pour éviter la couture, on tricote les mailles ensemble. Bon tricot!

19.02.2024 - 09:46

country flag Susana Araujo wrote:

I am knitting the smaller size. On the first line for the Yoke says to increase 6 times so we have 96 stitches total but when working the first line of raglan with pattern the count is only for 92 stitches. Work 2X sleeves (Pat 1) = 30 stitches, + work A.2A 2X total = 12 + work A2.B 4X total = 32 + A.2C another 2X in total = 18. The final count (excluding the increases just done) is 92 stitches. What happened to the other 4 stitches from the 96?

19.02.2024 - 01:49

DROPS Design answered:

Hi Susana, The 4 missing stitches are your marker-stitches - the markers are inserted in the next stitch (not between stitches) when you are counting out for the different pieces and inserting the markers. Happy knitting!

19.02.2024 - 06:40

country flag Charmaine wrote:

Ik brei de trui in maat L. Ik heb nu 240 st en moet meerderen tot 300 st. Dat zijn 60 st, maar de meerderingen bestaan uit 10 x 4st (voor- en achterpand) en 5 x 8 st. ( mouwen). Dat is samen 80 st. Wat klopt er niet?

18.02.2024 - 11:31

DROPS Design answered:

Dag Charmaine,

Je meerdert 10x4 steken op de panden en 5x4 (niet 8) steken op de mouwen, waarmee je op 60 meerderingen in totaal komt.

28.02.2024 - 20:58