
Popular categories
Looking for a yarn?


Comments / Questions (69)
![]() Berardocco BERARDOCCO wrote:
Berardocco BERARDOCCO wrote:
Toujours aussi beaux vos petits modeles merci
11.03.2022 - 07:26
![]() Sabine Motti wrote:
Sabine Motti wrote:
Liebes Drops-Team! "Das erste Knopfloch in der ersten Hin-Reihe nach der Halsblende einarbeiten. Dann die nächsten 4 Knopflöcher im Abstand von ca. 5 cm dazwischen einarbeiten." Das kann kaum für alle Größen gelten aufgrund der unterschiedlichen Längen der Jacken. Habe ich etwas missverstanden? Dank vorab!
26.11.2021 - 18:48DROPS Design answered:
Liebe Frau Motti, es wird für jede Große gleich aber dann wird der niedrige Knopfloch wird bei ber 1. Größe niedriger als in die letzte Größe sein. Viel Spaß beim stricken!
29.11.2021 - 07:26
![]() Tatasimone wrote:
Tatasimone wrote:
Bonjour Je souhaite faire le modèle 33-26 mais je rencontre quelques difficultés. J'ai du mal à comprendre le point fantaisie et quand je veux regarder la vidéo correspondante, celle-ci est prévue pour une personne gauchère (je suis droitière). D'autre part, je ne comprends pas quand faire les augmentations. Je remercie toutes les personnes qui auront la gentillesse de bien vouloir me répondre. Tatasimone
04.06.2021 - 16:17DROPS Design answered:
Bonjour Tatasimone, lorsque vous regardez la vidéo, regardez l'endroit où se trouve le fil, pas la main qui le tient (c'est la méthode continentale qui est utilisée ici) et suivez les indications du diagramme. Vous augmenterez avec 1 jeté (= dernier symbole de la légende) tricoté torse au rang suivant - aux rangs 1, 3 et 5 de A.1A, A.1B et rang 5 de A.1C. Bon tricot!
04.06.2021 - 16:48
![]() Valérie wrote:
Valérie wrote:
Bonjour. Après la mise en attente des manches je ne trouve pas les explications (avec les fils marqueurs) pour la taille 1 mois pour arriver à 110m du dos et devant. Les explications ne sont que pour 12/18 mois, 2 ans. Un grand merci
16.03.2021 - 13:57DROPS Design answered:
Bonjour Valérie, j'ai ajouté un espace pour délimiter les paragraphes pour les augmentations du raglan, continuez maintenant avec le paragraphe commençant par Continuer en jersey en allers et retours avec 5 mailles de bordure devant au point mousse de chaque côté. Après 2 rangs, augmenter pour le RAGLAN au rang suivant sur l'endroit – voir ci-dessus. Augmenter ainsi 2 (3) fois au total tous les 4 rangs (c'est-à-dire tous les 2 rangs sur l'endroit)..... Bon tricot!
16.03.2021 - 14:39
![]() Alexandra wrote:
Alexandra wrote:
Bonjour! Est-ce que le modèle du pull peut se tricoter avec des aiguilles droites et est-ce que ça change les explications? Pouvez-vous publier s'il vous plait plus de modèles avec des aiguilles droites comme avant??? il y a trop de modèles avec des aiguilles circulaires!!!!!!! Merci
17.02.2021 - 09:41DROPS Design answered:
Bonjour Alexandra, cette leçon explique comment adapter un modèle sur aiguilles droites, vous pourrez tricoter le gilet sur aiguilles droites, mais pour les manches, il sera peut être plus facile d'utiliser des doubles pointes ou une circulaire. Votre magasin saura vous aider et vous conseiller, même par mail ou téléphone. Bon tricot!
17.02.2021 - 13:44
![]() Kaye Bird wrote:
Kaye Bird wrote:
Still unable to print this pattern
03.01.2021 - 04:43DROPS Design answered:
Dear Mrs Bird, have you checked your printer's settings? You should be able to print it either on a virtual printer or on a real one clicking on the button "print" - but also check that your browser allow pop up. Happy knitting!
04.01.2021 - 16:04
![]() Kaye Bird wrote:
Kaye Bird wrote:
Is there a free pdf pattern for the stroll in the park
02.01.2021 - 07:51DROPS Design answered:
Dear Kaye. All of the patterns in this website are free. To get the pdf, you should click on print and then, in your computer’s printing screen, select save as pdf. Happy knitting!
02.01.2021 - 13:01
![]() Cristina Linares wrote:
Cristina Linares wrote:
Se puede hacer el modelo baby33-26 con dos agujas el lugar de las circulares? Gracias. Saludos.
01.12.2020 - 17:08DROPS Design answered:
Hola Cristina! Como adaptar un patrón para agujas circulares y tejerlo con agujas rectas encontreras en el video AQUI. Buen trabajo!
02.12.2020 - 10:06
![]() Britt Matisen wrote:
Britt Matisen wrote:
Hei. Er det mulig å få oppskrift på denne babyjakken i dame str. ?
24.10.2020 - 19:01DROPS Design answered:
Hei Britt. Ta en titt på jakken i DROPS 179-1, samme teknikk. God Fornøyelse!
25.10.2020 - 20:56
![]() Maria wrote:
Maria wrote:
W instrukcji do szortów jest napisane, żeby mierzyć długość spodni od rzędu nabierania oczek - ale długość spodni jest inna z przodu a inna z tyłu - ze względu na podwyższenie tyłu. Gdzie mierzyć w takim razie?
20.10.2020 - 22:17DROPS Design answered:
Witaj Mario, należny zawsze mierzyć wzdłuż przodu. Pozdrawiamy!
21.10.2020 - 10:11
|
||||||||||||||||
Stroll in the Park#strollintheparkset |
||||||||||||||||
 |
 |
|||||||||||||||
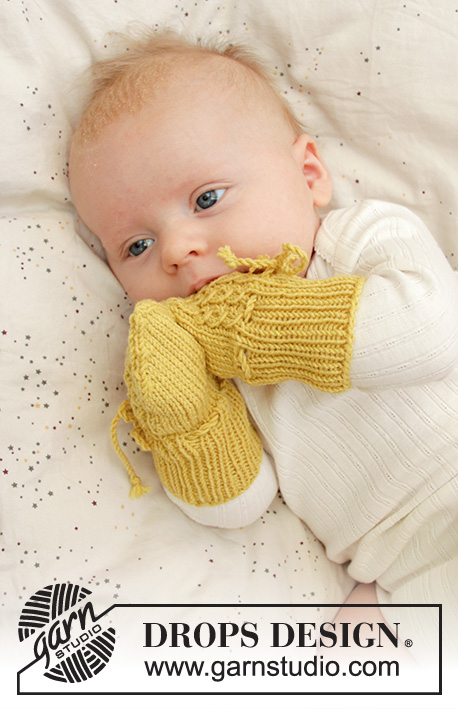
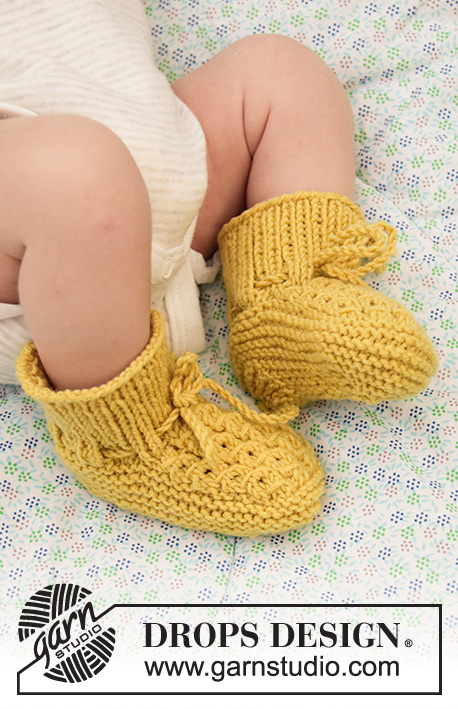
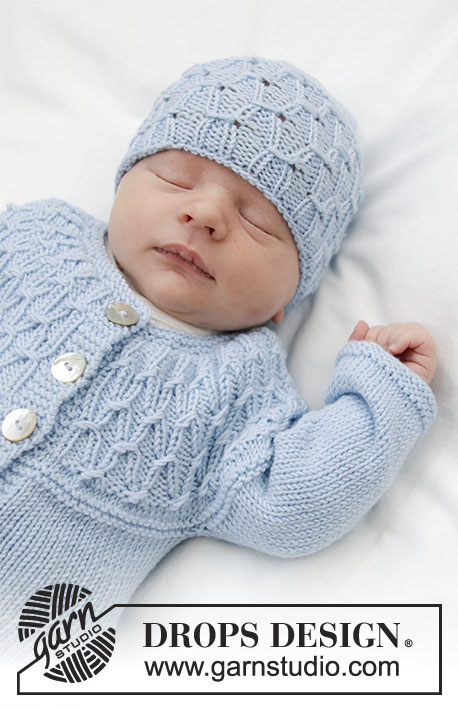
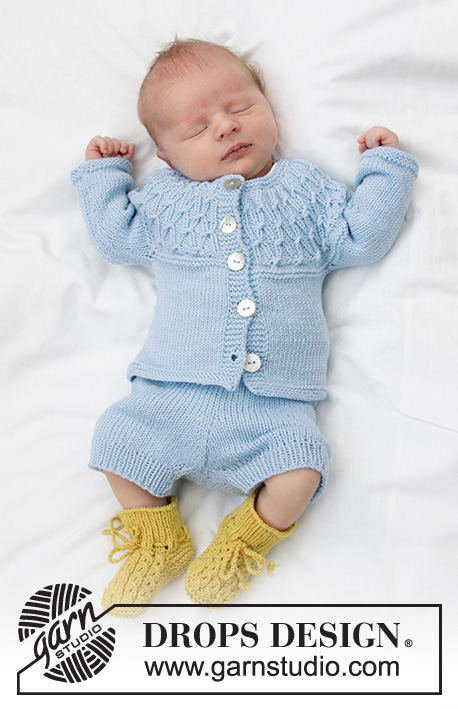
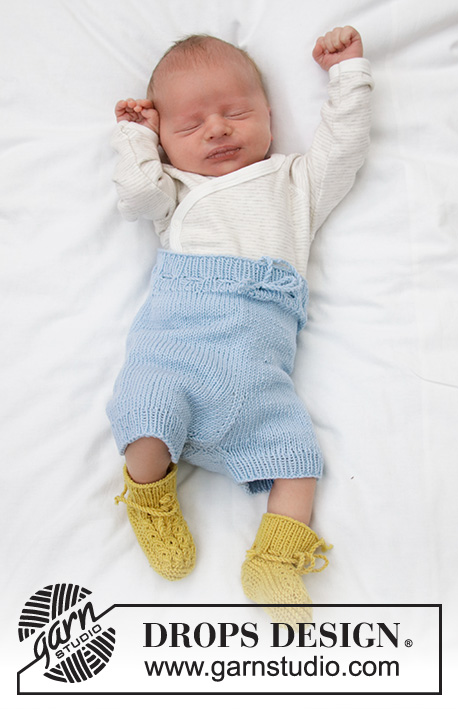
Jacket for baby with round yoke and textured pattern, knitted top down. Shorts for baby with ties and rib. Piece is knitted in DROPS BabyMerino or DROPS Alpaca. Size: Premature to 2 years
DROPS Baby 33-26 |
||||||||||||||||
|
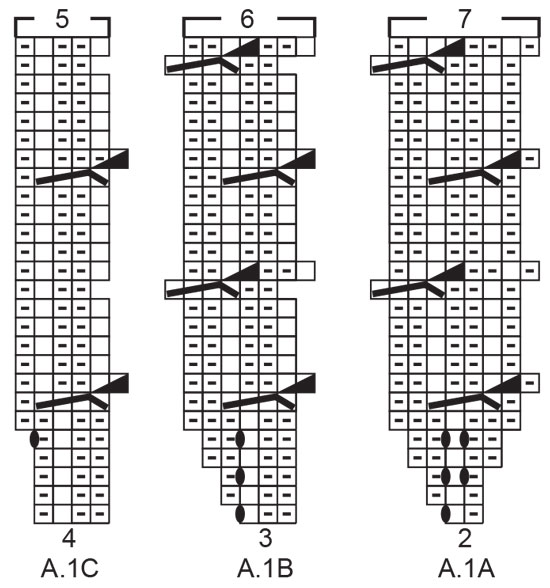
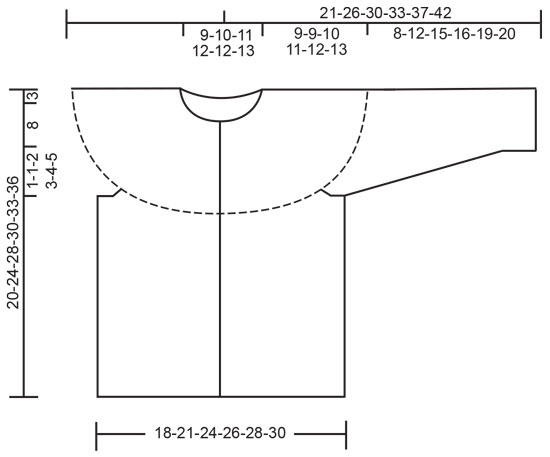
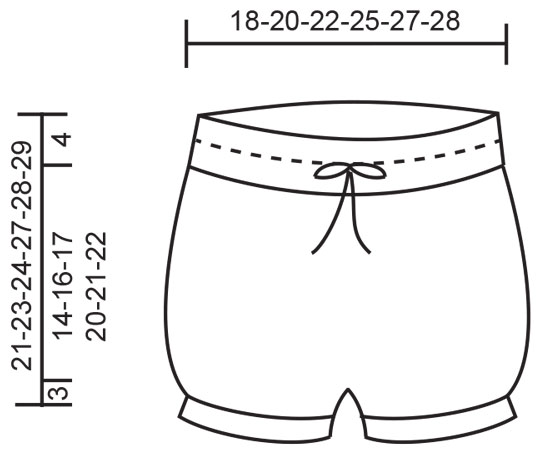
---------------------------------------------------------- EXPLANATION FOR THE PATTERN: ---------------------------------------------------------- INFORMATION FOR PATTERN: GARTER STITCH (back and forth): 1 ridge = knit 2 rows. RIDGE/GARTER STITCH (worked in the round): 1 ridge = 2 rounds. Knit 1 round and purl 1 round. PATTERN: See diagram A.1. Diagrams show all rows in pattern seen from the right side. INCREASE TIP (evenly on jacket): To calculate how to increase evenly, use the total number of stitches on row (e.g. 68 stitches), minus bands (e.g. 10 stitches) and divide the remaining stitches by number of increases to be done (e.g. 11) = 5.2. In this example increase after alternately approx. every 5th stitch by making 1 yarn over. On next row work yarn overs twisted to avoid holes Do not increase over bands. RAGLAN (applies to size 12/18 months - 2 years): Increase for raglan on each side of the 4 marker threads in every transition between body and sleeves (= 8 stitches increased on every increase row). All increases are done from the right side! Work until 1 stitch remains before marker thread, make 1 yarn over, knit 2 (marker thread is in the middle of these 2 stitches), make 1 yarn over (= 2 stitches increased). On next row (wrong side) purl yarn overs twisted to avoid holes. DECREASE TIP (applies to mid under sleeve on jacket and on inside of legs on shorts): Begin 3 stitches before marker and knit 2 together, knit 2 (marker is between these 2 stitches), slip 1 stitch knitwise, knit 1, pass slipped stitch over stitch worked (= 2 stitches decreased). BUTTONHOLES: Decrease for buttonholes on right band (when garment is worn). 1 buttonhole = work from right side until 3 stitches remain on needle, make 1 yarn over, knit 2 together and finish by knitting 1. On next row (wrong side) knit the yarn over to make a hole. Decrease for first buttonhole on first row from right side after neck edge. Then decrease the next 4 buttonholes approx. 5 cm apart. INCREASE TIP (applies mid front and mid back on shorts): Work until 1 stitch remains before marker thread, make 1 yarn over, knit 2 (marker thread is in the middle of these 2 stitches), make 1 yarn over (= 2 stitches increased). On next round knit yarn overs twisted to avoid holes. ---------------------------------------------------------- BEGIN PIECE FOR JACKET HERE: ---------------------------------------------------------- JACKET - SHORT OVERVIEW OF THE PIECE: Work yoke and body back and forth on circular needle from mid front, work top down. Work sleeves in the round on double pointed needles, top down. NECK EDGE: Cast on (68) 72-78-82-84 (86) stitches (including 5 band stitches in each side towards mid front) on circular needle size 2.5 mm with Baby Merino or Alpaca. Work 2 ridges in GARTER STITCH - see explanation above. Knit 1 row from right side while increasing (11) 16-16-18-19 (20) stitches evenly - read INCREASE TIP and decrease for BUTTONHOLES on right band - see explanation above = (79) 88-94-100-103 (106) stitches. Purl 1 row from wrong side (knit bands). Switch to circular needle size 3 mm and work yoke as explained below. YOKE: Work first row as follows from right side: 5 band stitches in garter stitch, A.1A (= 2 stitches), work A.1B until 9 stitches remain on row (= (21) 24-26-28-29 (30) repetitions of 3 stitches), work A.1C (= 4 stitch) and finish with 5 band stitches in garter stitch. Continue pattern like this and increase as shown in diagrams. REMEMBER THE KNITTING TENSION! When A.1 has been worked vertically, there are (148) 166-178-190-196 (202) stitches on row and piece measures approx. 7 cm from cast-on edge. Work 2 rows in stocking stitch with 5 band stitches in garter stitch in each side and increase AT THE SAME TIME (10) 16-20-24-14 (12) stitches evenly on first row = (158) 182-198-214-210 (214 stitches. Work 2 ridges in GARTER STITCH - see explanation above. Then work as explained in the different sizes. PREMATURE, 0/1 MONTHS, 1/3 MONTHS + 6/9 MONTHS: Continue with stocking stitch and 5 band stitches in garter stitch in each side towards mid front until piece measures (9) 9-10-11 cm from cast-on edge mid front. Work next row as follows in stocking stitch with 5 band stitches in garter stitch in each side: Work(25) 28-31-33 stitches (= front piece), slip the next (34) 40-42-46 stitches on 1 stitch holder for sleeve, cast on (4) 4-6-6 new stitches on row (= in the side under sleeve), work (40) 46-52-56 stitches as before (= back piece), slip the next (34) 40-42-46 stitches on 1 stitch holder for sleeve, cast on (4) 4-6-6 new stitches on row (= in the side under sleeve) and work the (25) 28-31-33 stitches (= front piece). Then work body as explained below. NOW MEASURE THE PIECE FROM HERE! 12/18 MONTHS, 2 YEARS: Insert 4 marker threads in piece (without working stitches) as follows: Insert first marker thread after the first 33 (34) stitches (= front piece), insert 2nd marker thread after the next 44 (44) stitches (= sleeve), insert 3rd marker thread after the next 56 (58) stitches (= back piece), and insert 4th marker thread after the next 44-44 stitches (= sleeve). 33 (34) stitches remain on row after last marker thread (= front piece). Continue in stocking stitch back and forth with 5 band stitches in garter stitch in each side towards mid front. When 2 rows have been worked, increase for RAGLAN on next row from right side - see explanation above. Increase like this every 4th row (i.e. every other row from right side) 2 (3) times in total. After last increase for raglan there are 226 (238) stitches on needle. Work until piece measures 12 (13) cm from cast-on edge. Work next row as follows in stocking stitch with 5 band stitches in garter stitch in each side: Work 35 (37) stitches (= front piece), slip the next 48 (50) stitches on 1 stitch holder for sleeve, cast on 8 (8) new stitches on row (= in the side under sleeve), work 60 (64) stitches as before (= back piece), slip the next 48 (50) stitches on 1 stitch holder for sleeve, cast on 8 (8) new stitches on row (= in the side under sleeve) and work the remaining 35 (37) stitches (= front piece). Then work body as explained below. NOW MEASURE THE PIECE FROM HERE! BODY: = (98) 110-126-134-146 (154) stitches. Continue back and forth in stocking stitch with 5 band stitches in garter stitch in each side towards mid front. When piece measures (7) 11-14-15-17 (19) cm from division switch to circular needle size 2.5 mm. Work 3 ridges back and forth over all stitches. Switch back to circular needle size 3 mm. Loosely cast off by knitting from right side. Jacket measures approx. (20) 24-28-30-33 (36) cm from shoulder and down. SLEEVE: Slip the (34) 40-42-46-48 (50) stitches from stitch holder in one side of piece on double pointed needles size 3 mm and pick in addition up 1 stitch in each of the (4) 4-6-6-8 (8) new stitches cast on under sleeve = (38) 44-48-52-56 (58) stitches. Insert 1 marker thread in the middle of the (4) 4-6-6-8 (8) stitches under sleeve and move the marker thread upwards when working. Work in stocking stitch in the round. When piece measures 2 cm from division, decrease 2 stitches mid under sleeve - read DECREASE TIP. Decrease like this every (3) 2-2-1½-1½ (1½) cm (2) 4-6-7-9 (9) times in total = (34) 36-36-38-38 (40) stitches. Work until piece measures (7) 11-14-15-18 (19) cm from division. Switch to double pointed needles size 2.5 mm. Work 3 ridges in GARTER STITCH in the round - see explanation above. Switch back to double pointed needles size 3 mm and loosely cast off by knitting. Sleeve measures approx. (8) 12-15-16-19 (20) cm from division. Work the other sleeve the same way. ASSEMBLY: Sew the buttons on to the left band. ---------------------------------------------------------- BEGIN PIECE FOR SHORTS HERE: ---------------------------------------------------------- SHORTS - SHORT OVERVIEW OF THE PIECE: Worked in the round on circular needles/double pointed needles, top down. Cast on (96) 106-116-132-144 (152) stitches on circular needle size 2.5 mm with Baby Merino or Alpaca. Knit 1 round. Then work rib in the round = knit 1/ purl 1. When rib measures 2½ cm, work a round with eyelet holes for tie as follows: * Knit 1, purl 1, make 1 yarn over, purl 2 together *, work from *-* the entire round (= (24) 26-29-33-36 (38) holes on round). Then continue rib = knit 1/purl 1 until piece measures 4 cm from cast-on edge. Switch to circular needle size 3 mm, knit 1 round while decreasing (10) 10-10-12-14 (18) stitches evenly - read DECREASE TIP-1 = (86) 96-106-120-130 (134) stitches. Now work an elevation at the back of shorts as explained below. ELEVATION AT THE BACK: To get a better fit work the shorts higher at the back than at the front. This is done by working short rows back and forth as follows: Insert 1 marker at beginning of round = mid back. Work from right side and knit 8 past marker, turn, tighten yarn and purl 16 stitches back. Turn, tighten yarn and knit 24, turn, tighten yarn and purl 32. Turn, tighten yarn and knit 40, turn, tighten yarn and purl 48. Turn piece, tighten yarn and knit until mid back. SHORTS: Continue in the round in stocking stitch over all stitches. REMEMBER THE KNITTING TENSION! When shorts measures (14) 16-17-20-21 (22) cm from cast-on edge, insert 1 marker thread mid front and 1 marker thread mid back. On next round increase 1 stitch on each side of both marker threads – read INCREASE TIP (= 4 stitches increased). Increase like this every other round 6 times in total = (110) 120-130-144-154 (158) stitches. Now divide for legs at both marker threads. Slip half the stitches on a stitch holder or extra needle and work leg over the remaining stitches as explained below. The piece measures (18) 20-21-24-25 (26) cm from cast-on edge mid front. NOW MEASURE THE PIECE FROM HERE! LEG: = (55) 60-65-72-77 (79) stitches. Distribute the stitches on double pointed needles size 3 mm and work in stocking stitch in the round. AT THE SAME TIME after 1 round, decrease 2 stitches on inside of leg - read DECREASE TIP. Decrease like this every other round (2) 2-2-2-3 (3) times in total = (51) 56-61-68-71 (73) stitches. Switch to double pointed needles size 2.5 mm. Knit 1 round while increasing (5) 6-7-8-9 (9) stitches evenly = (56) 62-68-76-80 (82) stitches. Work rib in the round = knit 1/purl 1 for 2 cm. Loosely cast off stitches with knit over knit and purl over purl. Work the other leg the same way. TWINED STRING FOR TIE: Cut 2 lengths of 3 metres each. Twine the strands tog until they resist, fold the string double so that it twines again. Make a knot at each end. Thread tie up and down in row with eyelet holes on shorts, make a bow mid front. |
||||||||||||||||
Diagram explanations |
||||||||||||||||
|
||||||||||||||||
 |
||||||||||||||||
 |
||||||||||||||||
 |
||||||||||||||||
Have you finished this pattern?Tag your pictures with #dropspattern #strollintheparkset or submit them to the #dropsfan gallery. Do you need help with this pattern?You'll find 35 tutorial videos, a Comments/Questions area and more by visiting the pattern on garnstudio.com. © 1982-2026 DROPS Design A/S. We reserve all rights. This document, including all its sub-sections, has copyrights. Read more about what you can do with our patterns at the bottom of each pattern on our site. |
||||||||||||||||


With over 40 years in knitting and crochet design, DROPS Design offers one of the most extensive collections of free patterns on the internet - translated to 17 languages. As of today we count 324 catalogues and 12290 patterns translated into English (UK/cm). 12290
We work hard to bring you the best knitting and crochet have to offer, inspiration and advice as well as great quality yarns at incredible prices! Would you like to use our patterns for other than personal use? You can read what you are allowed to do in the Copyright text at the bottom of all our patterns. Happy crafting!
Post a comment to pattern DROPS Baby 33-26
We would love to hear what you have to say about this pattern!
If you want to leave a question, please make sure you select the correct category in the form below, to speed up the answering process. Required fields are marked *.