
Popular categories
Looking for a yarn?


Comments / Questions (91)
![]() Bitte wrote:
Bitte wrote:
Jag har en fråga ang rättelse av mönstret. Var i oket ska rättelsen ang maskantalet vara? Jag har inte lyckats lista ut det. Uppdaterad online: 21.01.2019 Rättelse - OK: = 144 (152-164-172-180-188-196) maskor.
12.02.2022 - 16:32DROPS Design answered:
Hej Bitte. Texten i mönstret är redan rättad så följ bara beskrivningen så blir det rätt. (Det är här det har rättats: " När arbetet mäter 11 (13-16-19-22-25-28) cm från delningen, ökas det 14 (14-14-14-14-13-14) maskor på nästa varv från rätsidan (det ökas inte över framkanterna) = 144 (152-164-172-180-188-196) maskor. ") Mvh DROPS Design
14.02.2022 - 12:23
![]() Bitte wrote:
Bitte wrote:
Uppdaterad online: 21.01.2019 Rättelse - OK: = 144 (152-164-172-180-188-196) maskor. Byt till rundsticka 3. Var i mönstret till oket ska det nya maskantalet stå? Jag har räknat igenom maskantalet till oket i mönstret och kan inte lista ut det. Med de siffror som finns i det ursprungliga mönstret verkar mönstret stämma, men eftersom ni gjort en rättelse så är det väl inte så.
12.02.2022 - 15:53
![]() Chris wrote:
Chris wrote:
Hi Ive bought the wool for the little missy cardigan but im struggling to read the diagram. im used to colour work but i don't understand the increases and although ive tried it several times i cannot achieve the correct number of stitches please help me x
25.01.2022 - 17:01DROPS Design answered:
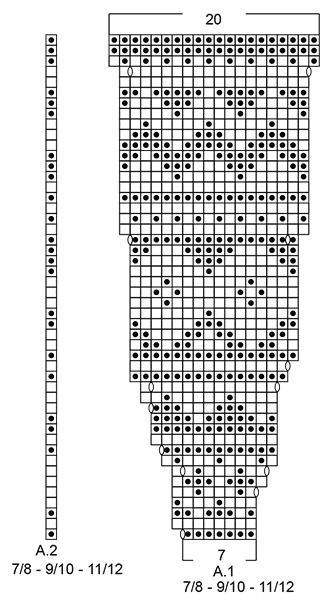
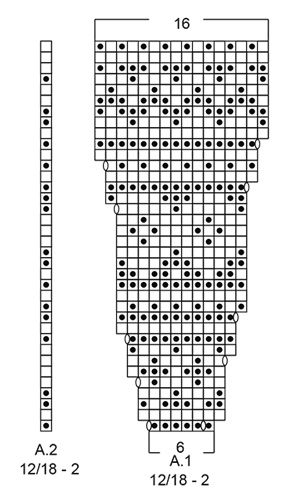
Dear Chris, have you read this lesson explaining how to read diagrams? You will read A.1 and A.2 bottom up, starting with 6 or 7 sts in each A.1(see size) and repeat A.1 a total of 11, 12 or 13 times (see size) ending with A.2 (to make the pattern symmetrical. From WS work A.2 then repeat A.1 reading from the left towards the right. To increase, work yarn overs just as shown in the diagram and work these yarn overs twisted on next row to avoid holes. When A.1-A.2 are done, there are 16, 19 or 20 sts in each A.1. Happy knitting!
26.01.2022 - 08:41
![]() Liis wrote:
Liis wrote:
Küsimus kõige väiksema A1 skeemi kohta. Tänu viienda rea lõpule(A1+A2) on kohe 6. Rea alguses peale ripskude läbikudumiseks koos õhksilmusega kolm valget silmust. 6. Rea skeemis on ainult üks valge enne sinisega alustamist ja hetkel ei lähe mul siis sinine enam mustriga kokku. Kas 6. Rea alguses peaks peale ripskude olema kaks valget silmust ja tegemist on veaga?
02.01.2022 - 21:07DROPS Design answered:
Tere Liis! 6. rida on tagasirida, st. kõigepealt kootakse skeemi A.2 1 silmus, siis jätkatakse skeemiga A.1. Skeemil on kasvatatud silmused juba näidatud järgmise rea mustris. Head kudumist!
07.01.2022 - 21:58
![]() Marianne wrote:
Marianne wrote:
Hallo Ich habe begonnen die Little Missy Jacket in der kleinsten Grösse zu stricken. Bei der Passe angelangt komme ich nicht weiter! Am Ende der Halsblende habe ich 7 M verteilt abgenommen und habe nun 77 M. Beginnt die Zunahme wirklich erst in der 12. Reihe, wenn ich nach dem Diagramm A1 gehe? Lieben Dank für die schnelle Antwort!
15.10.2021 - 17:10DROPS Design answered:
Liebe Marianne, Diagramme lesen Sie von unten nach oben, dh bei der 1. Reihe A.1 wird über 6 Maschen gestrickt und bei der 1. Reihe gibt es schon 2 Umschläge = am Ende 1. Reihe A.1 sind es 8 M in jedem A.1. Rückreihen lesen Sie dann so: A.2 stricken, dann A.1 von links nach rechts lesen und wiederholen - hier lesen Sie mehr. Viel Spaß beim stricken!
18.10.2021 - 08:18
![]() Susan wrote:
Susan wrote:
Looking for how many balls or weight of wool needed for 18 mth/2 year , or 3/4 year size . Looks like a beautiful pattern
29.08.2021 - 17:00DROPS Design answered:
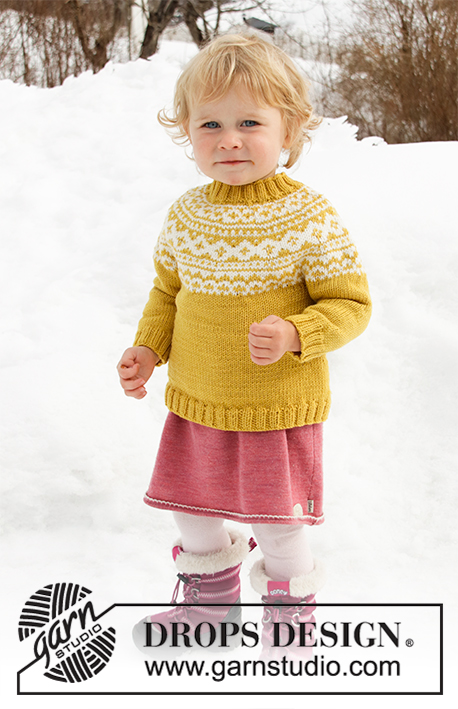
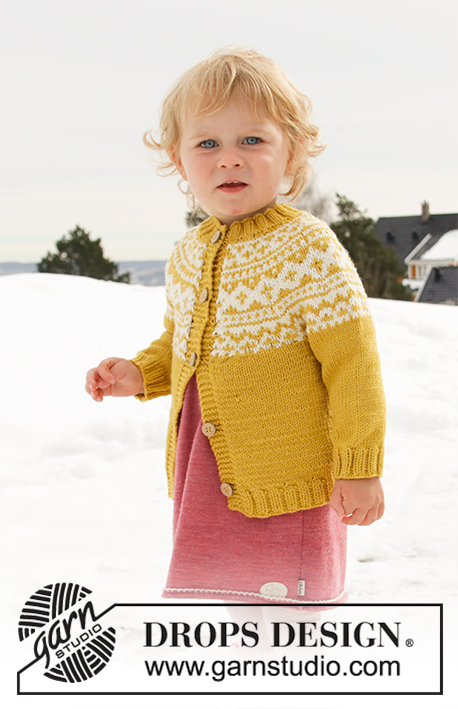
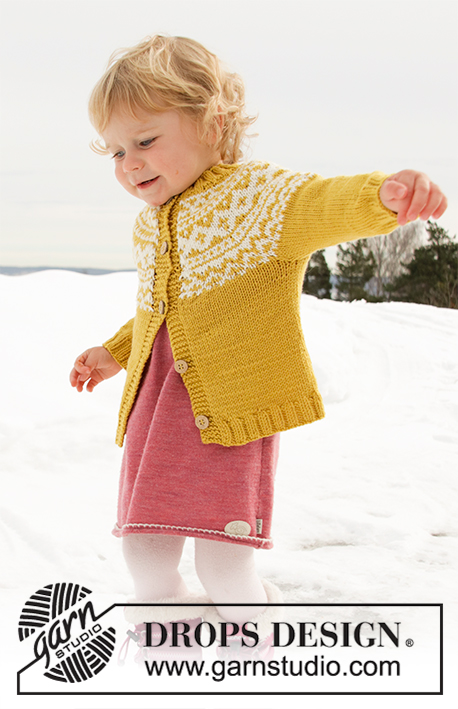
Dear Susan, the necessary amount of yarn is listed in the beginning of the pattern, right next to the picture. You will need 4 balls of yello DROPS Lima and 2 balls of off white DROPS Lima yarn to make this cardigan. Happy Stitching!
29.08.2021 - 20:31
![]() Alice wrote:
Alice wrote:
Guten Tag, ich habe eine Frage zu Drops Lima. Ich habe ein Höschen gestrickt, die Größe passte zur Anleitung und zur Maschenprobe! Dann habe ich es handgewaschen, gemäß Etikett, und flach getrocknet. Danach war das ganze Strickstück ausgeleiert! Die Bündchen waren gar nicht mehr elastisch! Was war falsch?? Was kann künftig tun, damit meine Sachen ihre Größe behalten? Vergrößerung "einrechnen" bringt ja nichts, wenn es nicht mehr elastisch ist danach. Vielen Dank!!
06.08.2021 - 15:36DROPS Design answered:
Liebe Alice, beachten Sie, daß Sie die die Pflegehinweise auf der Farbkarte sowie auf der Banderole folgen, Hier lesen Sie noch mehr Tipps zur Garnpflege, Ihr DROPS Laden kann Ihnen noch gerne damit weiterhelfen, auch telefonisch oder per E-Mail. Viel Spaß beim stricken!
06.08.2021 - 15:58
![]() Ann Persson wrote:
Ann Persson wrote:
Hej. Undrar om de 5 framkantsmaskorna i var sida ingår i antalet maskor som ska läggas upp? T ex ska jag lägga upp 92 maskor (inklusive 5 framkantsmaskor i var sida). Vad menas, 92 maskor + 10 till eller ingår framkantsmaskorna i de 92?
25.02.2021 - 21:45DROPS Design answered:
Hej Ann, jo det stemmer, inklusive betyder at de indgår i det antal masker du lägger upp. God fornøjelse!
26.02.2021 - 08:14
![]() Christina Andersson wrote:
Christina Andersson wrote:
Hej! Jag är ganska ovan med mönsterstickning. När det gäller Little miss jacket koftan (med knappar) undrar jag om man efter att ha avslutat 1 :a varvet med A1 + A2 sedan ska börja med A2 på varv 2 och sen A1. Eller ska A2 bara stickas i slutet på alla varv? mvh Christina
04.01.2021 - 22:13DROPS Design answered:
Hej Christina Ja det stämmer att du på varv 2 börjar med A.2 och sedan stickar A.1. Kom ihåg att du på avigsidan läser diagrammen från vänster till höger. Lycka till! Mvh DROPS Design
05.01.2021 - 08:31
![]() Sanne Norman Nielsen wrote:
Sanne Norman Nielsen wrote:
Jeg har spørgsmål til størrelsesforhold: Jeg skal strikke Little Missy Jacket DROPS Design: Model li-012-bn - der står at størrelsen modsvarer barnets højde- mit barnebarn er 110 cm høj og 4 år (snart 5 år). Så jeg forstår det som at jeg skal vælge str. 3/4 år - men er i tvivl fordi hun snart bliver 5 år - så jeg skal gå efter at hun er 110 cm og altså passer til str. 3/4 år?
14.10.2020 - 10:22DROPS Design answered:
Hej Sanne. Storlek 110/116 motsvarar 5/6 år så jag hade valt den storleken. Mvh DROPS Design
14.10.2020 - 11:43
|
||||||||||
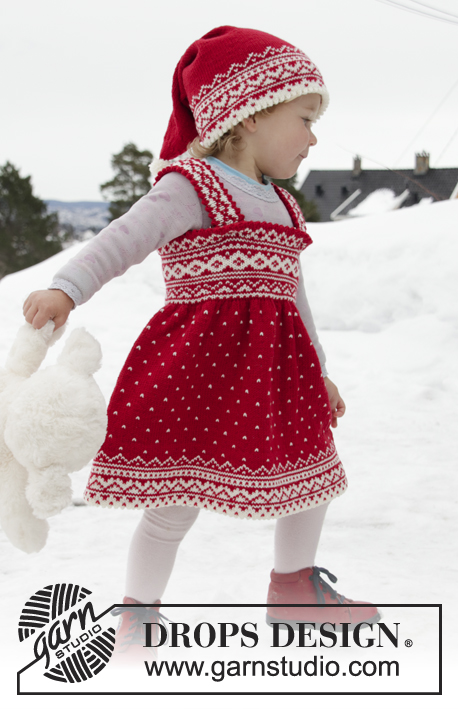
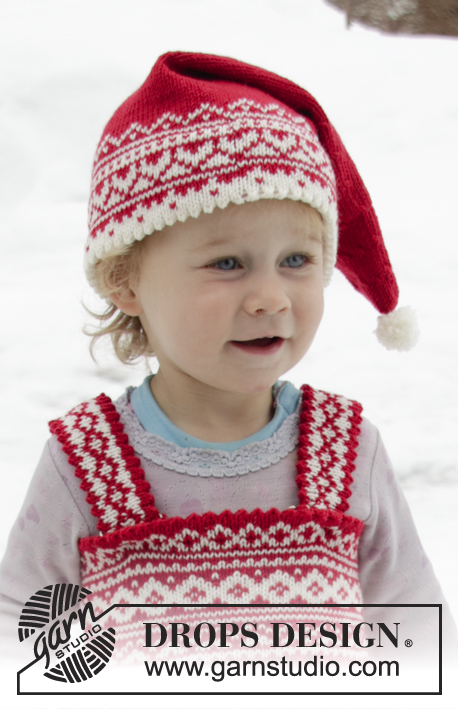
Little Missy Jacket#littlemissyjacket |
||||||||||
 |
 |
|||||||||
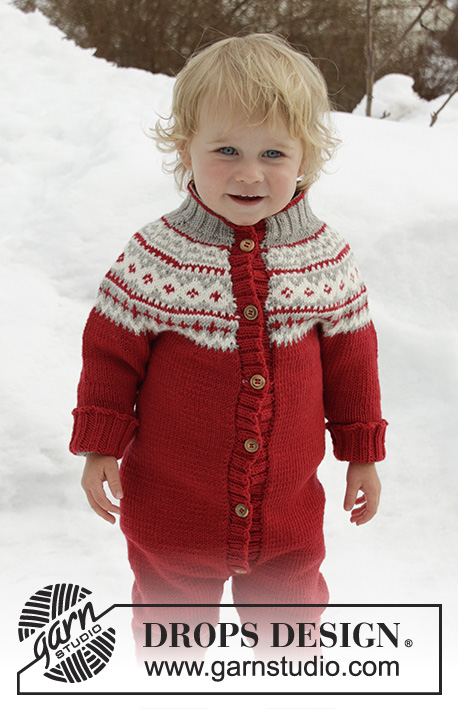
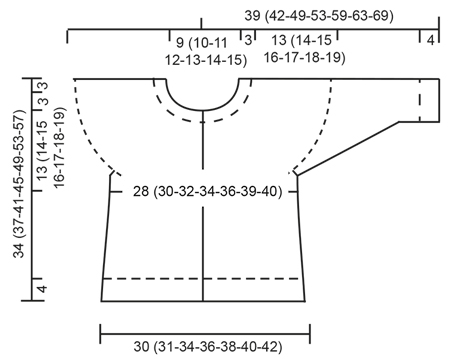
Knitted jacket for babies and children with round yoke in DROPS Lima. The piece is worked top down with Nordic pattern. Sizes 12 months – 12 years.
DROPS Children 32-8 |
||||||||||
|
------------------------------------------------------- EXPLANATIONS FOR THE PATTERN: ------------------------------------------------------- RIDGE/GARTER STITCH (worked back and forth): 1 ridge = Knit 2 rows. PATTERN: See diagrams A.1 and A.2. Choose diagram for your size. The whole pattern is worked in stocking stitch. KNITTING TIP (for bands): The whole of the band is worked in goldenrod. In other words, use 1 ball for each band where needed (i.e. on the rows where goldenrod is not used in the pattern). Change strands between band and yoke (to avoid strand-changes on outside of band). When changing strands, twist the two strands together so that the stitches stay together. DECREASE/INCREASE TIP: To work out how to decrease/increase evenly, count the total number of stitches on the needle (e.g. 84 stitches), minus the bands (= 74 stitches) and divide the remaining stitches by the number of decreases/increases to be made (e.g. 7) = 10.57. In this example, decrease by knitting together alternately each 9th and 10th stitch and each 10th and 11th stitch (approx.); increase by making 1 yarn over after alternately each 10th and each 11th stitch (approx.). The yarn overs are worked twisted on the next row to avoid holes – NOTE: Do not decrease/increase over the bands. INCREASE TIP (for sides of body): Increase 1 stitch on each side of the marker thread as follows: Start 2 stitches before the marker thread, make 1 yarn over, knit 4 (the marker thread sits in the middle of these 4 stitches), make 1 yarn over (= 2 stitches increased). Increase like this at both marker threads (= 4 stitches increased). On the next row work the yarn overs twisted to avoid holes. DECREASE TIP (for mid under sleeve): Decrease 1 stitch on each side of the marker thread as follows: Start 3 stitches before the marker thread, knit 2 together, knit 2 (the marker thread sits in the middle of these 2 stitches), slip 1 stitch as if to knit, knit 1 and pass the slipped stitch over the knitted stitch (= 2 stitches decreased). ELEVATION (back of neck): Skip this section if you do not want an elevation. The first row is worked as follows from the right side. Knit until there are 8 (8-8-10-10-12-12) stitches left on row, turn, tighten strand and purl until there are 8 (8-8-10-10-12-12) stitches left in the other side, turn, tighten strand and knit until there are 16 (16-16-18-18-20-20) stitches left on row, turn, tighten strand and purl until there are 16 (16-16-18-18-20-20) stitches left on other side. Continue by working 8 stitches less each time you turn 2 more times in each side, turn, tighten strand and knit to end of row, then purl 1 row from the wrong side (bands worked in garter stitch). BUTTONHOLES: Work buttonholes on right band (when the garment is worn). 1 buttonhole = start from the wrong side and knit together the 2nd and 3rd stitch from the edge, make 1 yarn over. On the next row knit the yarn over to leave a hole. The first buttonhole is worked when the neck measures approx. 1½-2 cm, the next 4 (5-5-5-6-6-7) buttonholes are then worked after approx. every 6 (6-6½-7-6½-7-7) cm. ------------------------------------------------------- START THE PIECE HERE: ------------------------------------------------------- JACKET - SHORT OVERVIEW OF THE PIECE: The piece is worked top down. The yoke is worked first, then it is divided for sleeves and body. The body is continued back and forth. The sleeves are worked in the round with double pointed needles. NECK: Cast on 84 (88-92-96-100-108-112) stitches (including 5 band stitches in each side towards mid front) with circular needle size 3 mm and goldenrod. Purl 1 row from the wrong side with 5 band stitches in GARTER STITCH – read description above, in each side. The next row is worked as follows from the right side: 5 band stitches in garter stitch, * knit 2, purl 2 *, work from *-* until there are 7 stitches left, finish with knit 2 and 5 band stitches in garter stitch. Continue this rib for 3 cm – remember BUTTONHOLES on right band – read description above and finish after 1 row from the right side. YOKE: Change to circular needle size 4 mm. Purl 1 row from the right side with 5 band stitches in garter stitch in each side and decrease 7 (5-4-1-5-6-10) stitches evenly on row – read DECREASE/INCREASE TIP (purl 2 stitches together = 1 stitch decreased) = 77 (83-88-95-95-102-102) stitches. You can now work an elevation in back of neck so that the yoke is slightly higher at the back. This elevation can be left out; the neck will then be the same front and back – work ELEVATION – read description above or continue working. The next row is worked as follows from the right side: 5 band stitches in garter stitch, work pattern according to A.1 until there are 6 stitches left on row – Note: Choose diagram for your size (= 11 (12-11-12-12-13-13) repeats of 6 (6-7-7-7-7-7) stitches), work A.2 over the next stitch and finish with 5 band stitches in garter stitch. Continue this pattern and increase as shown in the diagram – read KNITTING TIP and REMEMBER THE KNITTING TENSION! When A.1 and A.2 have been completed there are 187 (203-220-239-251-271-271) stitches on the row. Continue with stocking stitch with 5 band stitches in garter stitch in each side in golden rod. On the next row from the right side increase 7 (7-10-7-3-0-11) stitches evenly on row (do not increase over bands) = 194 (210-230-246-254-271-282) stitches. When the piece measures 13 (14-15-16-17-18-19) cm mid front (measured without the neck), divide the piece as follows: Work 29 (31-34-36-38-40-42) stitches as before (= front piece), place the next 42 (46-50-54-54-58-60) stitches on 1 thread for sleeve (without working them), cast on 6 new stitches on the needle, work 52 (56-62-66-70-75-78) stitches (= back piece), place the next 42 (46-50-54-54-58-60) stitches on 1 thread for sleeve (without working them), cast on 6 new stitches on the needle and work the remaining 29 (31-34-36-38-40-42) stitches as before (= front piece) = 122 (130-142-150-158-167-174) stitches. BODY: Insert 1 marker thread 32 (34-37-39-41-43-45) stitches in from each side (= 58 (62-68-72-76-81-84) stitches between marker threads on back piece). THE PIECE IS NOW MEASURED FROM HERE! Continue back and forth with stocking stitch and 5 band stitches in garter stitch in each side towards mid front – remember BUTTONHOLES on band. When the piece measures 3 cm from where body and sleeves were divided, increase on each side of both marker threads – read INCREASE TIP. Repeat the increase when the piece measures 8 cm from where body and sleeves were divided = 130 (138-150-158-166-175-182) stitches. When the piece measures 11 (13-16-19-22-25-28) cm from where body and sleeves were divided, increase 14 (14-14-14-14-13-14) stitches on next row from the right side (do not increase over the bands) = 144 (152-164-172-180-188-196) stitches. Change to needle size 3 mm. The next row is worked as follows from the right side: 5 band stitches in garter stitch, * knit 2, purl 2 *, work from *-* until there are 7 stitches left, finish with knit 2 and 5 band stitches in garter stitch. Continue this rib for 4 cm, then cast off with garter stitch over garter stitch, knit over knit and purl over purl. The whole jacket measures approx. 34 (37-41-45-49-53-57) cm, measured from the shoulder. SLEEVE: Place the stitches from the one thread on double pointed needles size 4 mm and knit up 1 stitch in each of the 6 stitches cast on under the sleeve = 48 (52-56-60-60-64-66) stitches. Insert 1 marker thread in the middle of these 6 stitches (= mid under sleeve). THE PIECE IS NOW MEASURED FROM HERE! Work stocking stitch in the round with goldenrod. When the sleeve measures 1 cm from where sleeve and body were divided, decrease 2 stitches mid under sleeve – read DECREASE TIP. Decrease like this every 2 (2½-2½-2½-3½-3½-3½) cm a total of 6 (6-8-8-8-8-9) times = 36 (40-40-44-44-48-48) stitches. When the sleeve measures 14 (16-21-24-28-31-35) cm from where sleeve and body were divided, change to double pointed needles size 3 mm and work rib in the round (= knit 2 / purl 2) for 4 cm or to desired length. Then cast off with knit over knit and purl over purl. The sleeve measures a total of approx. 18 (20-25-28-32-35-39) cm from where sleeve and body were divided. Work the other sleeve in the same way. ASSEMBLY: Sew buttons onto left band. |
||||||||||
Diagram explanations |
||||||||||
|
||||||||||
 |
||||||||||
 |
||||||||||
 |
||||||||||
 |
||||||||||
Have you finished this pattern?Tag your pictures with #dropspattern #littlemissyjacket or submit them to the #dropsfan gallery. Do you need help with this pattern?You'll find 34 tutorial videos, a Comments/Questions area and more by visiting the pattern on garnstudio.com. © 1982-2026 DROPS Design A/S. We reserve all rights. This document, including all its sub-sections, has copyrights. Read more about what you can do with our patterns at the bottom of each pattern on our site. |
||||||||||


With over 40 years in knitting and crochet design, DROPS Design offers one of the most extensive collections of free patterns on the internet - translated to 17 languages. As of today we count 324 catalogues and 12290 patterns translated into English (UK/cm). 12290
We work hard to bring you the best knitting and crochet have to offer, inspiration and advice as well as great quality yarns at incredible prices! Would you like to use our patterns for other than personal use? You can read what you are allowed to do in the Copyright text at the bottom of all our patterns. Happy crafting!
Post a comment to pattern DROPS Children 32-8
We would love to hear what you have to say about this pattern!
If you want to leave a question, please make sure you select the correct category in the form below, to speed up the answering process. Required fields are marked *.