
Popular categories
Looking for a yarn?


Megjegyzések / Kérdések (11)
![]() Claudine írta:
Claudine írta:
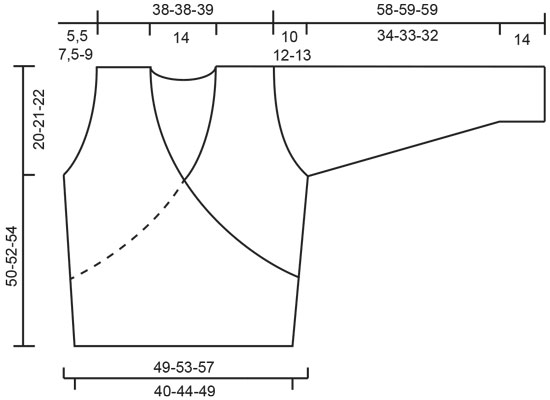
I have issues with the top right & left front with extra stitches and cannot do the assembly correctly. Reading the comments below I agree the increases should be decreases. I am about to frog both tops of the front pieces.
03.01.2025 - 18:32A DROPS Design válasza:
Dear Claudine, the pattern is correct; these increases are only for the neck which is raised kind of like a lapel, as seen in the picture. If you have a different thread or gauge than that of the pattern the resulting effect may be too loose and it will fall instead of staying straight. Happy knitting!
05.01.2025 - 19:33
![]() DROPS Design írta:
DROPS Design írta:
Molly, your are right that the shawl collar piece that goes around the neck will have a height measure of approx 5 inch. This drapes up along your neck, and you fold the upper edge only. Depending on which yarn you are using the collar might drape differently. In SilkeTweed which is very drapey and crisp this works beautifully. SilkeTweed used in this design holds it's shape and doesn't "fall" down.
17.04.2009 - 18:10
![]() Molly írta:
Molly írta:
Correction to my last comment: The gauge for this project is more like 6 sts per inch (which is what I'm getting) so that 32-34 stitch collar is over 5 inches in width (height).
17.04.2009 - 08:31
![]() Molly írta:
Molly írta:
If 9 stitches is 1 inch in Silke-Tweed (and that is what I'm getting) then the collar, which is 33 stitches, is over 3.5 inches before the 2 thread part. This does seem quite tall-- does it scrunch up behind under the more rigid 2 thread detail? Is it possible there is a detail picture of the back of the collar? Or perhaps a clearer close-up of the collar on the existing picture? I've done the front right panel and, other than my back collar questions, it looks like the picture.
17.04.2009 - 05:56
![]() DROPS Design írta:
DROPS Design írta:
The inc for collar is also made at the center front edge. Pattern is edited.
14.04.2009 - 19:27
![]() Molly írta:
Molly írta:
Could you clarify this: "At the same time when the piece measures 32-33-34 cm [12-5/8" - 13" - 13-3/8"] inc 1 st at the center front 8-9-10 times every 7-6-6 rows = 60-61-63 sts." Elsewhere in the pattern it says specifically "center front edge" yet the instruction above says only "center front." Does that mean the increases should no longer be on the edge? That I should put them in the middle, like a bust dart?
14.04.2009 - 18:05
![]() Karen írta:
Karen írta:
We did post a reply on the 11 November 2006, please check further down this page. As we said in our reply, 66-11 is a 5-year-old pattern and no errors have been found to date. Also we have double checked the translation and this follows the original pattern. It may be that the photo doesn't reflect the true shape/design of the cardigan, and if you want a different look, your suggestions seem a good idea. Again if the instructions
05.01.2007 - 10:16
![]() MKelly írta:
MKelly írta:
Hi this is the 2nd time that I've written to you regarding 66-11 but noone has emailed me back and I don't see any corrections posted. I have knit this pattern and found numerous errors in it. A novice knitter or even an intermediate knitter would not be able to maneuver this pattern. The front has errors where it says" When piece measures 13" inc.1 st. at the center front 9 times. This should be a decrease not an increas as by the time you get to the collar you have a big lapel shape. It needs to be consistently decreasing at the front to give the v shaping needed. Not increasing and getting larger. The way the collar is described makes absolutely no sense whatso ever if the instructions for the front are not changed. It only will work if the front decreases to end with only the 28 st at the shoulder. As well knitting 2.75 " for the collar is too long and will not stand up as shown in the picture on the website. 35 stitches is not enough for the collar either. I used 95 sts.on a smaller (2.25) needle and double yarn and it then had the length and weith needed to stand up. I also made it 1.5 " instead of 2.75.There is no shaping included in this pattern to allow for the gradual sloping from the front edge to the stand up collar so that it is incorporated smoothly. The sleeves work fine until the underarm decrease of 3 st. either side of marker, but then it says to just knit back and forthe which is not adequate instruction because it doesn't say for how long. also it moves directly to the cap shaping and if I had not knit before I would end up with a 6" arm opening when a 9" arm opening to fit the body is needed. I ended up at the underarm decrease shaping it myself aas for the arm shaping on the body and then added 6 extra rows and then the cap shaping then it worked out a novice would be unable to figure all this out. In the end this is going to be fine but it is a painful pattern and I think there needs to be corrections made.
30.12.2006 - 19:54
![]() karen írta:
karen írta:
Hi Ya Ya, The Scandinavian version of this pattern is 5 years old and no errors have been found or noted to date. I've checked the translation against the original pattern and Frederikka's translation is word perfect and the instructions in full accordance with the original pattern. The jacket is meant to have a collar/lapel. You increase 9 sts for the collar which in Silketweed amounts to just over 1 inch (the width of the collar on front pieces) and continue over 33 sts for the collar to be sewn tog at the back. Silketweed is a rather rugged quality and the collar will "stand" rather than fall when you have completed the edge in 2 threads and folded it double. I hope this helps. If you don't get the desired look by following the pattern, your alternative sounds a good idea. Kind regards Karen
19.11.2006 - 23:34
![]() Ya Ya írta:
Ya Ya írta:
I am writing regarding pattern 66-11 the wrap around cardigan in Silke Tweed. There is an error in the pattern for the left and right fronts. Where the pattern reads,"At the same time when the piece measures 13 " inc. 1 st. at the centre front 9 times every 6 rows. This adds far too much material which then actually crosses over at the top instead of angling back towards the shoulder as it shows in the picture and the diagram.As well the next section tells us to leave 33 st on the needle for the collar and knit it an additional 2.75 " When the project is knit in this exact fashion it ends up being huge at the front with a lapel effect. I have since ripped it out and am now doing dec. every 6 rows instead of increases and will continue this until I reach 28 st. and will then put the front and back together and do a 3 needle bind off of the 28sts. to form the shoulder instead of casting off and then sewing it together. I then plan to pick up the cast off 28 sts. on the back for the neck and pick up enough stitches to begin making a collar that looks like the picture using short rows to achieve this. Then I will pick up the stitches all the way around the front and knit in reverse stockinette stitch the last 5 rows. If You have already found the errors and have a correction sheet for this would you please send it to me. I would appreciate hearing back from you either way regarding this pattern. Thanks so much have a good day....Ya Ya
17.11.2006 - 05:42
|
|
Kathmandu |
|
|
|
|
Drops átkötős kardigán
DROPS 66-11 |
|
|
KÖTÉSPRÓBA: 23 szem X 30 sor a nagyobb kötőtűvel harisnyakötéssel = 10 x 10 cm BORDÁS MINTA: *1 sima, 1 fordított.* Ismételjük a *-* közötti részt. MINTA: Ismételjük a következő 6 sort: *3 sor harisnyakötéssel, 1 szál zöld színű fonallal, 3 sor fordított harisnyakötéssel a nagyobb kötőtűn 1 szál zöld és 1 szál fűzöld színű fonallal.* Ismételjük a *-* közötti részt. Jobb eleje: A kezdéshez szedjünk fel 94-104-114 szemet a kisebb körkötőtűre, az teve színű fonallal. Kössük a bordás mintát 7 cm-ig - olvassuk el a fenti magyarázatot. Váltsunk a nagyobb kötőtűkre, kössünk harisnyakötéssel minden szemen, és szaporítsunk 1 szemet az oldalánál 10-10-10 alkalommal, 7-7-8 soronként, és 1 szemet az eleje közepénél 2-2-2 alkalommal, 7-7-8 soronként. Amikor a darabunk kb (98-108-118 szemünk van a kötőtűn), kezdjük el az eleje szélének a kialakítását (az oldalánál folytatjuk a szaporításokat): láncoljunk le minden 2. sorban 8 szemet 2-2-2 alkalommal, 2 szemet 6-9-12 alkalommal, 1 szemet alkalommal, majd minden 4. sorban: 1 szemet 2-2-2 alkalommal = 65-70-75 szem. Amikor a darabunk 30-31-32 cm-es, a karöltők a kialakításához láncoljunk le szemeket minden második sorban a következő módon: 3 szemet 1-2-3 alkalommal, 2 szemet 3-3-4 alkalommal, 1 szemet 4-6-5 alkalommal. UGYANAKKOR, amikor a darabunk 32-33-34 cm-es, szaporítsunk 1 szemet az eleje közepének szélénél,7-6-6 soronként összesen 8-9-10 alkalommal = 60-61-63 szem. Amikor a darabunk 50-52-54 cm-es, a külső oldalától, a vállak kialakításához láncoljunk le 28-28-29 szemet = 32-33-34 szem marad a kötőtűn. Folytassuk ezeken a szemeken a gallér kialakításához, harisnyakötéssel, 7 cm-ig, majd láncoljunk le minden szemet. Bal eleje: Úgy kezdjük és készítjük, mint a bal jobb elejét, de annak tükörképeként: HÁTA: A kezdéshez szedjünk fel 94-104-114 szemet a kisebb körkötőtűre, az teve színű fonallal. Kössünk 7 cm-t bordás mintával. Váltsunk a nagyobb kéthegyű kötőtűkre és harisnyakötésre, mindkét oldalon szap 1 szemet 10-10-10 alkalommal 7-7-8 soronként = 114-124-134 szem. Amikor a darabunk 30-31-32 cm-es a hátához hasonló módon láncoljunk le szemeket a karöltő kialakításához = 88-88-90 szem. Amikor a darabunk 49-51-53 cm cm-es láncoljuk le a középső 28-28-28 szemet a nyakkivágás kialakításához és a két vállrészt külön-külön fejezzük be. A köv sorban a nyakkivágás mellett, mindkét oldalon láncoljunk le 2 szemet. = 28-28-29 szem maradt mindkét vállhoz. Amikor a darabunk 50-52-54 cm-es láncoljuk le a szemeket. Ujja: A kezdéshez szedjünk fel 58-60-62 szemet a zöld színű fonalból a kisebb kéthegyű kötőtűkészletre, csatlakoztassuk a kört, tegyünk jelölőt a kör kezdetéhez. Kössünk 4 sort lustakötéssel, majd kössünk a mintával amíg a darabunk kb 14-14-14 cm-es lesz. Váltsunk a nagyobb kéthegyű kötőtűkre, és kössünk harisnyakötéssel a teljes méretig. Ugyanakkor a minta után a jelölő mindkét oldalán szap 1 szemet 13-15-16 alkalommal: Az S méretben: minden 8. sorban. Az M méretben: méretben: felváltva minden 6. és 7. sorban. Az L méretben: minden 6. sorban. = 84-90-94 szem. Amikor a darabunk 48-47-46 cm-es a jelölő mindkét oldalán láncoljunk le 3-3-3 szemet és a darab hátralévő részét oda-vissza kötve fejezzük be. Az ujja felső ívének kialakításához mindkét oldalon láncoljunk le szemeket: 3 szemet 1-1-1 alkalommal, 2 szemet 2-2-2 alkalommal, 1 szemet 7-10-12 alkalommal, 2 szemet 2-2-2 alkalommal, és 3 szemet 2-2-2 alkalommal. Láncoljuk le a megmaradt szemeket. A darabunk körülbelül 58-59-59 cm-es. ÖSSZEÁLLÍTÁS: Varrjuk össze a vállvarrásokat. A nagyobb kötőtűkkel és a zöld színű fonallal, a SZO felől szedjünk fel kb 140-160 szemet a jobb eleje szélén a háta közepéig. Váltsunk 1 szál zöld + 1 szál fűzöld színű fonalra, kössünk 5 sort fordított harisnyakötéssel, majd láncoljuk le a szemeket. Ism a bal eleje darabon. A háta közepén varrjuk össze a gallért kötést utánzó Kitchener öltéssel. Hajtsuk be a gomboláspántot félbe a FO felé, és apró öltésekkel varrjuk le. Varrjuk össze a test oldalvarrásait, de a bord minta fölött, hagyjunk nyitva kb 4 cm-t (az övnek). A nyílást varrjuk körbe gomblyuk-öltéssel, megerősítésként. Varrjuk be a két ujját a karöltőkbe. ÖV: Szedjünk fel kb 19 szemet a kisebb kötőtűkre a zöld színű fonallal a jobb eleje szélén (a bord mintánál nem szedünk fel szemeket). Kössünk a bord mintával, mindkét szélen 1 szélszemet lustakötéssel, Amikor a pánt 3, 6 és 9 cm-es a jelölő mindkét oldalán fogyasszunk egy-egy szemet (a szélszemen belül) = 13 szem. Kössünk tovább, amíg a pánt Kb 70 cm-es lesz, A mintának megfelelően lazán láncoljuk le a szemeket. Ugyanígy szedjünk fel szemeket és kössünk pántot a bal elején. |
|
 |
|
Elkészítette ezt a mintát?Akkor adja a képeihez a #dropspattern tageket, vagy küldje be a képet a #dropsfan galériába. Segítségre van szüksége a modell elkészítéséhez? 19 tutorial videót találhat, és egy kérdés/felelek részt, és még többet, ha a mintát megkeresi a garnstudio.com oldalán. © 1982-2026 DROPS Design A/S. Minden jog fenntartca. Ez a documentim, az összes részével védelem alatt áll. A weboldalunkon többet olvashat arról, hogy mit tehet és mit nem a mintáinkkal. |


Több mint 40 év tapasztalattal a kötés és horgolásminták tervezésében a DROPS Design az ingyenes minták egyik legszélesebb körű gyűjtemnyét kínálja az Interneten, 17 nyelvre fordítva. A mai nappal 324 katalógust 12290 mintát tudunk számon tartani a mintákból 12268 -t fordítottunk le magyarra (európai mértékegységekkel).
keményen dolgozunk azon, hogy a kötés és a horgolás világából a legjobbat hozzuk el, remek fonalakkal, hihetetlen árakon. Ha mintáinkat nemcsak személyes használatra szeretné használni, minden minta alján a Copyright szövegben olvashat arról, mit tehet s mit nem. Sikeres kézimunkázást!
Post a comment to pattern DROPS 66-11
Szívesen vesszük, ha megosztja velünk gondolatait erről a mintáról.
Ha kérdést szeretne feltenni, ügyeljen arra, hogy a megfelelő kategóriát válassza ki, így fegyorsíthatja a válaszadás folyamatát. Það verður að merkja við svæði merktri með *.