
Popular categories
Looking for a yarn?


Comments / Questions (58)
![]() N Colleen wrote:
N Colleen wrote:
Adorable! Thank you.
26.10.2025 - 12:13
![]() Viola wrote:
Viola wrote:
Buongiorno, quanti gomitoli di lana servono per ogni colore per due maglioni, uno taglia 3-4 anni e l'altro taglia 5-6? Grazie
04.10.2025 - 21:08DROPS Design answered:
Hi, Viola, you can find the amount needed for all sizes above the pattern, size 3/4 is the 3rd number for each yarn color and size 5/6 is the 4th number. Happy knitting!
31.10.2025 - 13:10
![]() Gerda Overkämping wrote:
Gerda Overkämping wrote:
Hallo,ich habe die Größe 11/12 gestrickt.Habe jetzt die Passe fertig und hab jetzt nur 240 Maschen und 12 Rapporte auf der Nadel.Wie kann das sein?
29.12.2024 - 22:00DROPS Design answered:
Liebe Frau Overkämping, in 11/12 beginnt A.1 mit 7 Maschen (13 Mal 7 Maschen sind 91 Maschen) und es werden 13 Maschen zugenommen, so sind es 20 Maschen in jedem A.1 x 13 Rapporte in der Runde = 260 Maschen. Viel Spaß beim Stricken!
02.01.2025 - 14:27
![]() Iryna Shcherban wrote:
Iryna Shcherban wrote:
Hallo! Ich brauche Ihren Rat oder Hilfe, bitte) Wie kann ich die Größe 146/152 bis nächste Größe 158/164 ändern/berechnen? Es sieht so aus, dass mein Sohn schon 158/164 braucht. Und er will unbedingt gerade diesen Pulli. Ich habe schon DROPS MERINO EXTA FINE bestellt. Vielen Dank im Voraus!
09.11.2024 - 20:49DROPS Design answered:
Liebe Frau Shcherban, hier finden Sie Pullover in dieser Grösse und diese Maschenprobe, das kann Ihnen helfen, die Anleitung für die gewünschte Grösse anzupassen; Viel Spaß beim Stricken!
11.11.2024 - 08:43
![]() Sicot wrote:
Sicot wrote:
Bonjour, Je sais que je ne suis pas douée mais impossible comprendre les explication ça sera peut-être plus facile je j en écris plus. Empiècement tricoter A1 voir diagramme approprié à la taille moi c est 3/4 ans (=11 12-11-12-12-13-13) motif ifs de 6 (6-7-7-7-7-7) mailles). Continuer ainsi en augmentant comme indiqué dans le diagramme. Après avoir vu plusieurs personnes personnes ne sais faire. Merci de m aider cordialement
07.09.2024 - 22:07DROPS Design answered:
Bonjour Mme Sicot, en taille 3/4 ans, vous avez 77 mailles avant de tricoter le diagramme, vous tricotez ainsi 11 fois les 7 mailles de A.1 et augmentez 12 mailles dans chaque A.1 comme indiqué, quand A.1 est terminé, vous avez ainsi 19 mailles dans chaque A.1 x 11 fois en largeur = vous avez 209 mailles au total. Bon tricot!
09.09.2024 - 10:17
![]() Barbara Lovie wrote:
Barbara Lovie wrote:
I want to add a photo can anyone tell me how I do this?
10.08.2024 - 14:38DROPS Design answered:
Dear Barbara, you can't add photos to your questions. If you have a photo of a complete project that you wish to share with other knitters you can follow the instructions in the following link to add your post to our #dropsfan gallery: https://www.garnstudio.com/dropsfan-gallery.php?show=form&cid=19. Happy knitting!
11.08.2024 - 23:50
![]() Sicot wrote:
Sicot wrote:
Bonjour, je veux faire le pull little Red Nose 12/18 mois.je n arrive pas à comprendre le schéma. Le pull se fait de haut en bas, jamais je n en ai fais de cette façon. Quand je regarde le schéma au dessus du col il y a 2 rangées de chiffres, sur le coté c est pareils je ne vois pas à quoi ils correspondent. À quel moment je fais les augmentations pour les manches ainsi que les dessins. Je vous remercie de m apporter votre aide. Cordialement.
09.02.2024 - 13:57DROPS Design answered:
Bonjour Mme Sicot, les nombres dans le schéma correspondent aux mesures prises à plat pour chaque taille, ce modèle est décliné en 7 tailles, on a donc 7 nombres pour chaque mesure. Dans cette leçon, nous montrons comment tricoter un pull de haut en bas (avec raglan, mais l'idée reste la même); elle pourra probablement vous aider à comprendre comment on tricote. Le diagramme A.1 se lit de bas en haut, et tous les tours de droite à gauche. Bon tricot!
12.02.2024 - 07:07
![]() Iryna wrote:
Iryna wrote:
Hallo! Ich habe eine Frage: wie ich die Größe 146/152 bis nächste Größe 158/164 ändern kann? Es sieht so aus, dass mein Sohn bald 158/164 braucht. Und er will unbedingt diesen Pulli. Vielen Dank und frohe Weihnachten!
26.12.2023 - 21:10
![]() Loly wrote:
Loly wrote:
Hola de nuevo podría ser que al menguar los 6puntos después del elástico ,el motivo por el cual se queda como un cono gracias de nuevo
27.11.2023 - 21:16DROPS Design answered:
Hola Loly, puede ser que sea al disminuir los puntos; en ese caso prueba a disminuir menos puntos para el cuerpo, y ajustar el cuerpo posteriormente con el nuevo número de puntos.
03.12.2023 - 23:17
![]() Margret Snyers wrote:
Margret Snyers wrote:
Hallo ich stricke gerade diesen Pullover bin bald fertig,nur noch die Ärmel juhu...jetzt soll ich zusätzlich ( je) 1 Masche aus den 8 M. Unter dem Arm angeschlagenen Maschen auffassen, wo und wann mache ich das müssen noch Maschen übrig bleiben? Zum zunähen? Wie fasse ich die 8 Maschen auf?
26.11.2023 - 18:07DROPS Design answered:
Liebe Frau Snyers, schauen Sie mal in dieser Lektion: ab Bild 17 zeigen wir wie die Maschen vom Ärml gestrickt werden, beim 18B wie diese Maschen aufgefassen werden. Viel Spaß beim stricken!
27.11.2023 - 09:47
|
|||||||||||||
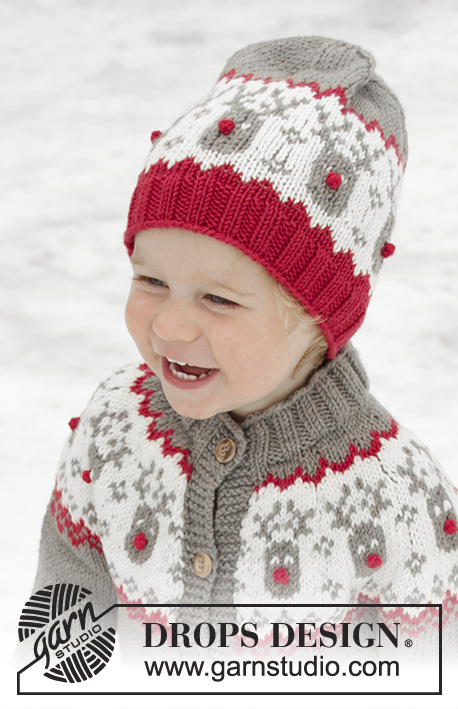
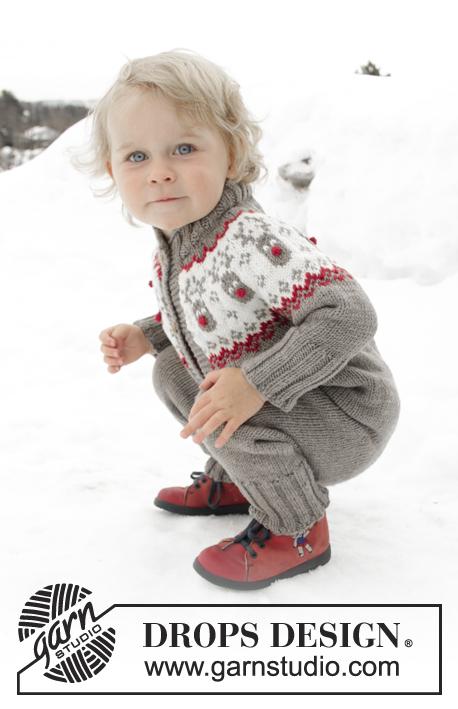
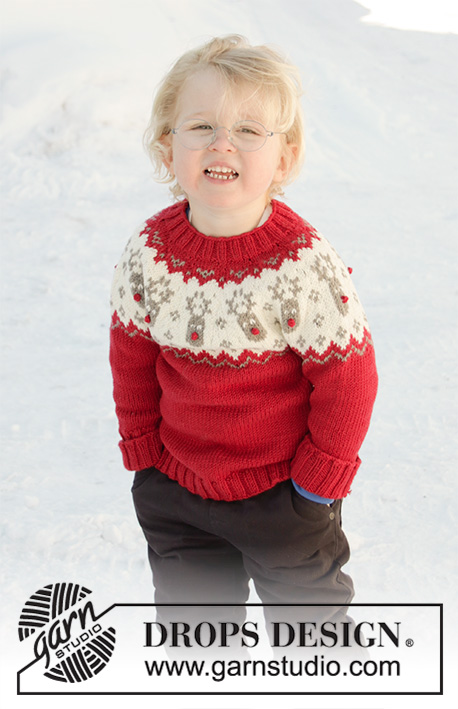
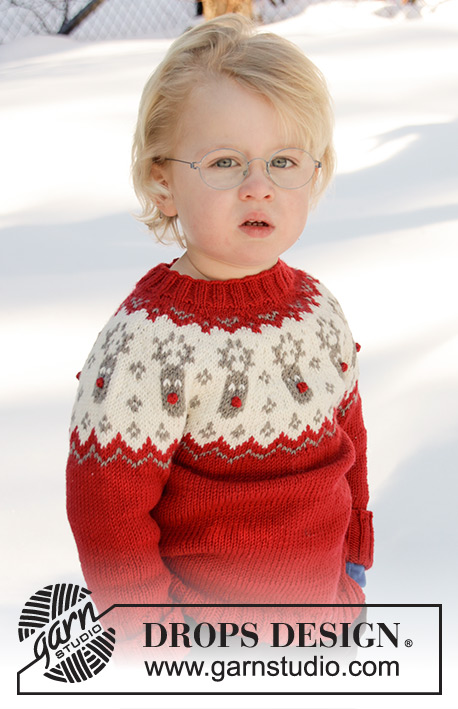
Little Red Nose#littlerednosesweater |
|||||||||||||
 |
 |
||||||||||||
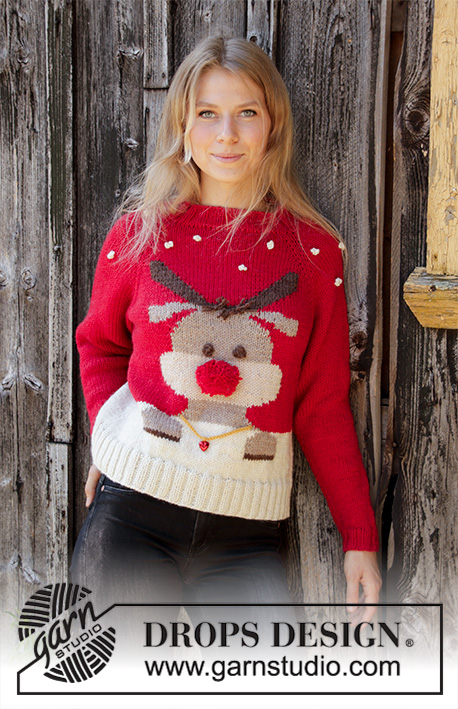
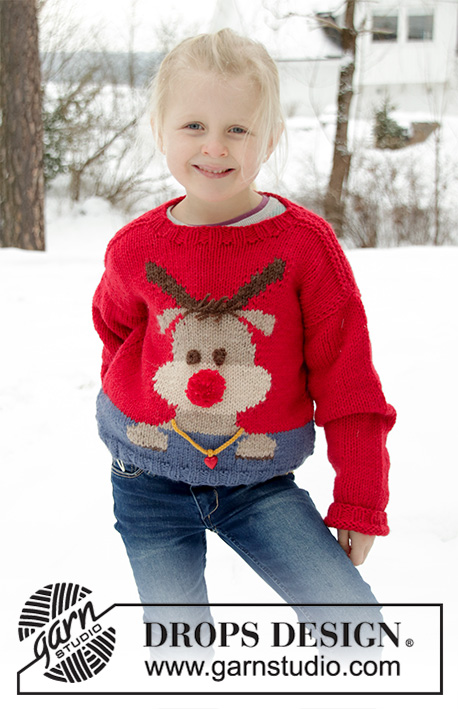
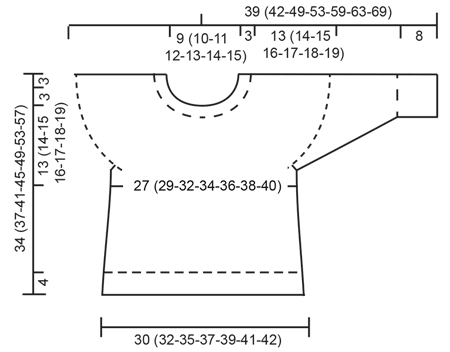
Knitted Christmas jumper for babies and children with round yoke in DROPS Merino Extra Fine. The piece is worked top down with Nordic pattern. Sizes 12 months – 12 years.
DROPS Children 32-10 |
|||||||||||||
|
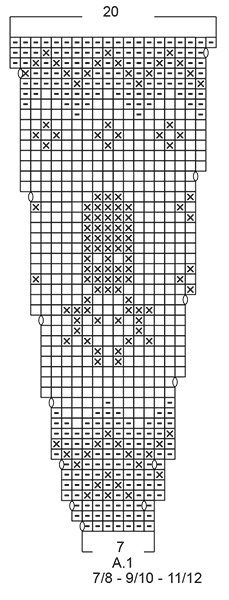
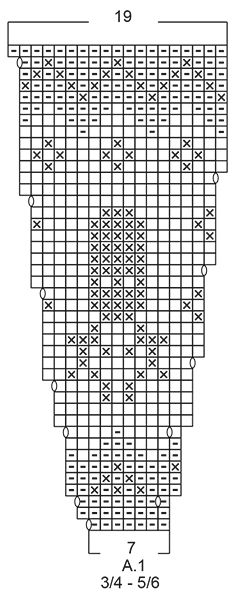
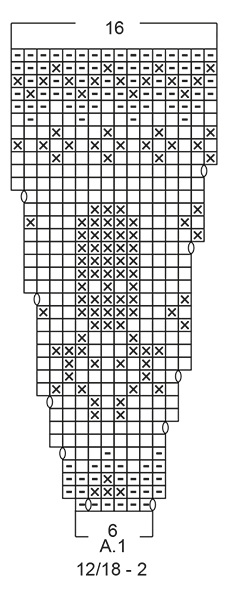
EXPLANATIONS FOR THE PATTERN: ------------------------------------------------------- PATTERN: See diagram A.1. Choose diagram for your size. The whole pattern is worked in stocking stitch. DECREASE/INCREASE TIP: To work out when to decrease/increase on the round, count the total number of stitches on the needle (e.g. 72 stitches) and divide by the number of decreases/increases to be made (e.g. 6) = 12. In this example, decrease by working together each 11th and 12th stitch, or increase after each 12th stitch by making 1 yarn over (the yarn overs are worked twisted on the next row to avoid holes). INCREASE TIP (for sides of body): Increase 1 stitch on each side of marker thread as follows: Start 2 stitches before marker thread, make 1 yarn over, work 4 stitches (marker thread sits in the middle of these 4 stitches), make 1 yarn over (= 2 stitches increased). On the next round work the yarn overs twisted to avoid holes. DECREASE TIP (for mid under sleeves): Decrease 1 stitch on each side of the marker thread as follows: Start 3 stitches before the marker thread, knit 2 together, knit 2 (marker thread sits between these 2 stitches), slip 1 stitch as if to knit, knit 1 and pass the slipped stitch over the knitted stitch (= 2 stitches decreased). ELEVATION (back of neck): Skip this section if you do not want an elevation. SIZE 12/18 MONTHS (2-5/6-7/8) YEARS: place 1 marker between 2 stitches mid-front (after 33 (36-42-42) stitches). SIZE (3/4-9/10-11/12) YEARS: place 1 marker in the stitch mid-front (in stitch 39-46-46) Knit until there are 8 (8-8-10-10-12-12) stitches left before the marker, turn, tighten strand and purl until there are 8 (8-8-10-10-12-12) stitches left on the other side, turn, tighten strand and knit until there are 16 (16-16-18-18-20-20) stitches left, turn, tighten strand and purl until there are 16 (16-16-18-18-20-20) stitches left on other side. Continue by working 8 stitches less each time you turn, 2 more times in each side, turn, tighten strand and knit to mid-back. ------------------------------------------------------- START THE PIECE HERE : ------------------------------------------------------- JUMPER - SHORT OVERVIEW OF THE PIECE: The piece is worked in the round, top down. A yoke is worked first, then divided for body and sleeves. The round starts approx. mid back. Body is worked in the round with circular needle. Sleeves are worked in the round with double pointed needles. NECK: Cast on 72 (76-80-84-88-96-100) stitches with red and double pointed needles/short circular needle size 3 mm (in the 2 smallest sizes you need to cast on and work with double pointed needles until you have enough stitches to use a circular needle; the other sizes can be cast on and worked with circular needle). Knit 1 round. Then work rib (= knit 2 / purl 2). Continue this rib for 3 cm. YOKE: Change to double pointed needles/short circular needle size 4 mm. Knit 1 round and decrease 6 (4-3-0-4-5-9) stitches evenly on round – read DECREASE/INCREASE TIP = 66 (72-77-84-84-91-91) stitches. You can now work an elevation in back of neck so that the yoke is slightly higher at the back. This elevation can be left out; the neck will then be the same front and back – work ELEVATION – read description above or continue working. Work pattern A.1 - NOTE: Choose diagram for your size (= 11 (12-11-12-12-13-13) repeats of 6 (6-7-7-7-7-7) stitches). Continue this pattern and increase as shown in diagram. REMEMBER THE KNITTING TENSION! When A.1 has been completed there are 176 (192-209-228-240-260-260) stitches on the needle. Continue with stocking stitch and red. On the next round increase 7 (7-10-7-3-0-11) stitches evenly on round = 183 (199-219-235-243-260-271) stitches. When the piece measures 13 (14-15-16-17-18-19) cm mid front (measured without neck), divide the piece as follows: Work 25 (27-30-32-34-36-38) stitches, place the next 42 (46-50-54-54-58-60) stitches on 1 thread for sleeve (without working them), cast on 8 stitches on the needle, work 49 (53-59-63-67-72-75) stitches, place the next 42 (46-50-54-54-58-60) stitches on 1 thread for sleeve (without working them), cast on 8 stitches on the needle and work the remaining 25 (27-30-32-34-36-38) stitches as before = 115 (123-135-143-151-160-167) stitches. BODY: Insert 1 marker thread in the middle of the 8 stitches cast on under each of the sleeves (= 57 (61-67-71-75-80-83) stitches between marker threads on the front piece). THE PIECE IS NOW MEASURED FROM HERE! When the piece measures 3 cm from where body and sleeves were divided, increase on each side of both marker threads – read INCREASE TIP. Repeat this increase when the piece measures 6 and 9 cm from where body and sleeves were divided = 127 (135-147-155-163-172-179) stitches. When the piece measures 11 (13-16-19-22-25-28) cm from where body and sleeves were divided, increase 9 (9-9-9-9-8-9) stitches evenly on the next round = 136 (144-156-164-172-180-188) stitches. Change to needles size 3 mm and work rib (= knit 2 / purl 2) for 4 cm. Then cast off with knit over knit and purl over purl. The whole jumper measures approx. 34 (37-41-45-49-53-57) cm, measured from shoulder. SLEEVE: Place the stitches from the one thread on double pointed needles size 4 mm and knit up 1 stitch in each of the 8 stitches cast on under the sleeve = 50 (54-58-62-62-66-68) stitches. Insert 1 marker thread in the middle of these 8 stitches (= mid under sleeve). THE PIECE IS NOW MEASURED FROM HERE! Work stocking stitch in the round with red. When the sleeve measures 1 cm from where body and sleeve were divided, decrease 2 stitches mid under sleeve – read DECREASE TIP. Decrease like this every 1½ (2-2-2½-3-3½-3½) cm a total of 6 (6-8-8-8-8-9) times = 38 (42-42-46-46-50-50) stitches. When the sleeve measures 10 (12-17-20-24-27-31) cm from where body and sleeve were divided, decrease 2 stitches evenly on round = 36 (40-40-44-44-48-48) stitches. Change to double pointed needles size 3 mm and work rib in the round (= knit 2 / purl 2) for 8 cm or to desired length. On the next round increase all purl 2 to purl 3 = 45 (50-50-55-55-60-60) stitches. Then cast off with knit over knit and purl over purl.. The sleeve measures a total of approx. 18 (20-25-28-32-35-39) cm from where body and sleeve were divided. Work the other sleeve in the same way. NOSES: Crochet with red and hook size 3 mm as follows: Work 4 chain stitches and 1 treble crochet in the 4th chain stitch from the hook, cut and fasten the strand. Work 1 nose for each reindeer (= 11 (12-11-12-12-13-13) noses). Tie the noses to each reindeer and fasten the strands. |
|||||||||||||
Diagram explanations |
|||||||||||||
|
|||||||||||||
 |
|||||||||||||
 |
|||||||||||||
 |
|||||||||||||
 |
|||||||||||||
Have you finished this pattern?Tag your pictures with #dropspattern #littlerednosesweater or submit them to the #dropsfan gallery. Do you need help with this pattern?You'll find 32 tutorial videos, a Comments/Questions area and more by visiting the pattern on garnstudio.com. © 1982-2026 DROPS Design A/S. We reserve all rights. This document, including all its sub-sections, has copyrights. Read more about what you can do with our patterns at the bottom of each pattern on our site. |
|||||||||||||


With over 40 years in knitting and crochet design, DROPS Design offers one of the most extensive collections of free patterns on the internet - translated to 17 languages. As of today we count 325 catalogues and 12298 patterns translated into English (UK/cm).
We work hard to bring you the best knitting and crochet have to offer, inspiration and advice as well as great quality yarns at incredible prices! Would you like to use our patterns for other than personal use? You can read what you are allowed to do in the Copyright text at the bottom of all our patterns. Happy crafting!
Post a comment to pattern DROPS Children 32-10
We would love to hear what you have to say about this pattern!
If you want to leave a question, please make sure you select the correct category in the form below, to speed up the answering process. Required fields are marked *.