
Popular categories
Looking for a yarn?


|
|||||||||||||
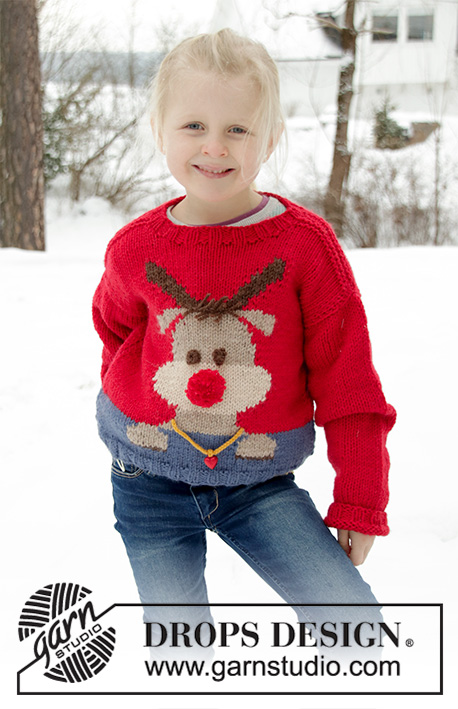
Little Red Nose |
|||||||||||||
 |
 |
||||||||||||
Knitted Christmas jumper for babies and children with round yoke in DROPS Merino Extra Fine. The piece is worked top down with Nordic pattern. Sizes 12 months – 12 years.
DROPS Children 32-10 |
|||||||||||||
|
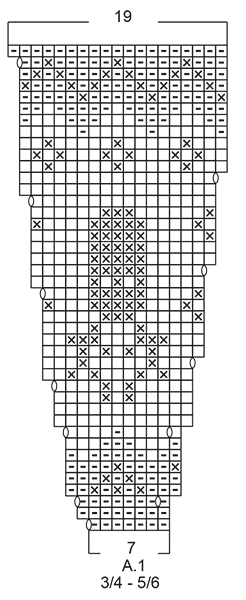
EXPLANATIONS FOR THE PATTERN: ------------------------------------------------------- PATTERN: See diagram A.1. Choose diagram for your size. The whole pattern is worked in stocking stitch. DECREASE/INCREASE TIP: To work out when to decrease/increase on the round, count the total number of stitches on the needle (e.g. 72 stitches) and divide by the number of decreases/increases to be made (e.g. 6) = 12. In this example, decrease by working together each 11th and 12th stitch, or increase after each 12th stitch by making 1 yarn over (the yarn overs are worked twisted on the next row to avoid holes). INCREASE TIP (for sides of body): Increase 1 stitch on each side of marker thread as follows: Start 2 stitches before marker thread, make 1 yarn over, work 4 stitches (marker thread sits in the middle of these 4 stitches), make 1 yarn over (= 2 stitches increased). On the next round work the yarn overs twisted to avoid holes. DECREASE TIP (for mid under sleeves): Decrease 1 stitch on each side of the marker thread as follows: Start 3 stitches before the marker thread, knit 2 together, knit 2 (marker thread sits between these 2 stitches), slip 1 stitch as if to knit, knit 1 and pass the slipped stitch over the knitted stitch (= 2 stitches decreased). ELEVATION (back of neck): Skip this section if you do not want an elevation. SIZE 12/18 MONTHS (2-5/6-7/8) YEARS: place 1 marker between 2 stitches mid-front (after 33 (36-42-42) stitches). SIZE (3/4-9/10-11/12) YEARS: place 1 marker in the stitch mid-front (in stitch 39-46-46) Knit until there are 8 (8-8-10-10-12-12) stitches left before the marker, turn, tighten strand and purl until there are 8 (8-8-10-10-12-12) stitches left on the other side, turn, tighten strand and knit until there are 16 (16-16-18-18-20-20) stitches left, turn, tighten strand and purl until there are 16 (16-16-18-18-20-20) stitches left on other side. Continue by working 8 stitches less each time you turn, 2 more times in each side, turn, tighten strand and knit to mid-back. ------------------------------------------------------- START THE PIECE HERE : ------------------------------------------------------- JUMPER - SHORT OVERVIEW OF THE PIECE: The piece is worked in the round, top down. A yoke is worked first, then divided for body and sleeves. The round starts approx. mid back. Body is worked in the round with circular needle. Sleeves are worked in the round with double pointed needles. NECK: Cast on 72 (76-80-84-88-96-100) stitches with red and double pointed needles/short circular needle size 3 mm (in the 2 smallest sizes you need to cast on and work with double pointed needles until you have enough stitches to use a circular needle; the other sizes can be cast on and worked with circular needle). Knit 1 round. Then work rib (= knit 2 / purl 2). Continue this rib for 3 cm. YOKE: Change to double pointed needles/short circular needle size 4 mm. Knit 1 round and decrease 6 (4-3-0-4-5-9) stitches evenly on round – read DECREASE/INCREASE TIP = 66 (72-77-84-84-91-91) stitches. You can now work an elevation in back of neck so that the yoke is slightly higher at the back. This elevation can be left out; the neck will then be the same front and back – work ELEVATION – read description above or continue working. Work pattern A.1 - NOTE: Choose diagram for your size (= 11 (12-11-12-12-13-13) repeats of 6 (6-7-7-7-7-7) stitches). Continue this pattern and increase as shown in diagram. REMEMBER THE KNITTING TENSION! When A.1 has been completed there are 176 (192-209-228-240-260-260) stitches on the needle. Continue with stocking stitch and red. On the next round increase 7 (7-10-7-3-0-11) stitches evenly on round = 183 (199-219-235-243-260-271) stitches. When the piece measures 13 (14-15-16-17-18-19) cm mid front (measured without neck), divide the piece as follows: Work 25 (27-30-32-34-36-38) stitches, place the next 42 (46-50-54-54-58-60) stitches on 1 thread for sleeve (without working them), cast on 8 stitches on the needle, work 49 (53-59-63-67-72-75) stitches, place the next 42 (46-50-54-54-58-60) stitches on 1 thread for sleeve (without working them), cast on 8 stitches on the needle and work the remaining 25 (27-30-32-34-36-38) stitches as before = 115 (123-135-143-151-160-167) stitches. BODY: Insert 1 marker thread in the middle of the 8 stitches cast on under each of the sleeves (= 57 (61-67-71-75-80-83) stitches between marker threads on the front piece). THE PIECE IS NOW MEASURED FROM HERE! When the piece measures 3 cm from where body and sleeves were divided, increase on each side of both marker threads – read INCREASE TIP. Repeat this increase when the piece measures 6 and 9 cm from where body and sleeves were divided = 127 (135-147-155-163-172-179) stitches. When the piece measures 11 (13-16-19-22-25-28) cm from where body and sleeves were divided, increase 9 (9-9-9-9-8-9) stitches evenly on the next round = 136 (144-156-164-172-180-188) stitches. Change to needles size 3 mm and work rib (= knit 2 / purl 2) for 4 cm. Then cast off with knit over knit and purl over purl. The whole jumper measures approx. 34 (37-41-45-49-53-57) cm, measured from shoulder. SLEEVE: Place the stitches from the one thread on double pointed needles size 4 mm and knit up 1 stitch in each of the 8 stitches cast on under the sleeve = 50 (54-58-62-62-66-68) stitches. Insert 1 marker thread in the middle of these 8 stitches (= mid under sleeve). THE PIECE IS NOW MEASURED FROM HERE! Work stocking stitch in the round with red. When the sleeve measures 1 cm from where body and sleeve were divided, decrease 2 stitches mid under sleeve – read DECREASE TIP. Decrease like this every 1½ (2-2-2½-3-3½-3½) cm a total of 6 (6-8-8-8-8-9) times = 38 (42-42-46-46-50-50) stitches. When the sleeve measures 10 (12-17-20-24-27-31) cm from where body and sleeve were divided, decrease 2 stitches evenly on round = 36 (40-40-44-44-48-48) stitches. Change to double pointed needles size 3 mm and work rib in the round (= knit 2 / purl 2) for 8 cm or to desired length. On the next round increase all purl 2 to purl 3 = 45 (50-50-55-55-60-60) stitches. Then cast off with knit over knit and purl over purl.. The sleeve measures a total of approx. 18 (20-25-28-32-35-39) cm from where body and sleeve were divided. Work the other sleeve in the same way. NOSES: Crochet with red and hook size 3 mm as follows: Work 4 chain stitches and 1 treble crochet in the 4th chain stitch from the hook, cut and fasten the strand. Work 1 nose for each reindeer (= 11 (12-11-12-12-13-13) noses). Tie the noses to each reindeer and fasten the strands. |
|||||||||||||
Diagram explanations |
|||||||||||||
|
|||||||||||||

|
|||||||||||||
|
|||||||||||||

|
|||||||||||||

|
|||||||||||||
|
Have you made this or any other of our designs? Tag your pictures in social media with #dropsdesign so we can see them! Do you need help with this pattern?You'll find tutorial videos, a Comments/Questions area and more by visiting the pattern on garnstudio.com. © 1982-2024 DROPS Design A/S. We reserve all rights. This document, including all its sub-sections, has copyrights. Read more about what you can do with our patterns at the bottom of each pattern on our site. |
|||||||||||||


With over 40 years in knitting and crochet design, DROPS Design offers one of the most extensive collections of free patterns on the internet - translated to 17 languages. As of today we count 304 catalogues and 11422 patterns - 11422 of which are translated into English (UK/cm).
We work hard to bring you the best knitting and crochet have to offer, inspiration and advice as well as great quality yarns at incredible prices! Would you like to use our patterns for other than personal use? You can read what you are allowed to do in the Copyright text at the bottom of all our patterns. Happy crafting!
Comments / Questions (52)
Hei. Jeg strikker 9/10 år. Og er helt på slutten av A1 men får ikke sikk-sakk til å stemme når det er en økning der. (øking er på linje 4 når du ser på diagrammet og problemet blir på linje 3). Det er 3 røde masker mellom hver bortsett fra den ene der blir det 4. Og da stemmer ikke det med brun trå, det blir en rød glippe... Stemmer dette eller er det noe jeg gjør galt?
08.10.2021 - 17:48DROPS Design answered:
Hei Silje. Ja, det blir 3 røde masker 2 ganger og 4 røde masker 1 gang (i 1 rapport av A.1) for å få maskeantallet / økningene til å stemme. Dette skal jevne seg ut når alle økninger er gjort i diagrammet. mvh DROPS design
11.10.2021 - 10:17Hello, on this pattern elevation description different , little boy hard to understand . Do you have video of exaple description for this elevation?
16.09.2021 - 08:44DROPS Design answered:
Dear Jukka, if you scroll down to the bottom of the pattern, below the shcematic drawing you can find all the relevant videos for this pattern, including THIS about hpw to knit an elevation to the back of a sweater. Happy Knitting!
17.09.2021 - 02:24Bezieht sich die Länge der Nadeln, 40 und 60 , auf die Gesamtlänge inklusive Spitzen oder auf die Seillänge? Vielen Dank schon mal für die Antwort! Viele Grüße Andrea
17.03.2021 - 18:22DROPS Design answered:
Liebe Andrea, die Länge ist von einer Spitze zu den anderen gemessen. Viel Spaß beim stricken!
18.03.2021 - 08:55Hei. Strikker 3/4 år og skal nå dele til armer. Men A1 er ikke ferdig. Skal mønsteret fortsette under armen?
16.01.2021 - 12:38DROPS Design answered:
Hei Heidi. Om strikkefastheten i høyden stemmer skal A.1 være akkurat ferdig før det deles til ermene. A.1 = 42 pinner. Iflg strikkefastheten er 28 pinner 10 cm, 42 pinner(A.1) = 15 cm + 3 cm vrangbord = 18 cm. Om du har mye igjen av A.1 kan bærestykket bli for lang når det tas på. mvh DROPS design
25.01.2021 - 14:55Estoy siguiendo el patron pero me gustaria modoficarlo y ponerle una abertura lateral en el cuello con dos botones.Como puedo modificar eñ patron para hacer ese cambio con aguja corcular?
06.12.2020 - 22:34DROPS Design answered:
Hola Maria, tienes que trabajar la orilla del escote y el canesu de ida y vuelta con aguja circular. Toma como ejemplo el patron DROPS BABY 36-14. Buen trabajo!
07.12.2020 - 08:16Is there a mitt pattern to match? Toddler size??
06.12.2020 - 03:04DROPS Design answered:
Dear Debbie, no, there isn't, since the pattern is too big for it. You can check our Christmas Workshop for all the Christmas themed garments. Happy knitting!
06.12.2020 - 16:38Just to add to my last comment for size 2 ,I cast on 80 stitches then decreased to 77 after the rib, then started the chart and ended up with 102 stitches after I knitted all the yo’s and my colour work didn’t line up, is 102 stitches after row 2 in the chart correct? Just wondering what I’m doing wrong?
03.12.2020 - 23:54DROPS Design answered:
Dear Debbie, 80 sts decreased to 77 stitches are for size 3/4 years, but it will go the same way as in previous answer: in this size repeat A.1 a total of 11 times in the round = 7 sts x 11 = 77 sts on first round. You increase 1 stitch on first round = 8 sts x 11 = 88 sts after 2nd round. You will increase 2 sts on 3rd round = 10 sts x 11 = 110 sts. and so on. Adding markers can help you to check number of sts on every round. Happy knitting!
04.12.2020 - 08:01I’m knitting the size 2 chart A.1 size 2 and after I finish knitting all the yo after row 2 I have 102 stitches, is this the correct stitch count? Because the colours don’t line up ?? Thank you.
03.12.2020 - 23:33DROPS Design answered:
Dear Debbie, in size 2 years there are 72 sts on needle and you repeat A.1 a total of 12 times in the round. On first round, you have to increase with 2 YOs in each A.1 = 12x2 inc + 72= you should have 96 sts after first round = 12 repeats 8 sts each. Add a marker after each repeat in width, this might help you to check your number of sts in each repeat after each round. Happy knitting!
04.12.2020 - 07:56When I work the increases at the yoke could u please tell me how many increases I should have per row until the end of the chart for a total of 209 for size 2 thank you.
03.12.2020 - 01:35DROPS Design answered:
Dear Debbie, in size 2 years (= 2nd size, 1st in the brackets), you will repeat the 6 sts in A.1 a total of 12 times in the round (= you start with 6 sts x 12 = 72 sts). Increase in A.1 as shown in diagram (= with a yarn over worked twisted on next round). When A.1 is done, there are 16 sts in each A.1 x 12 repeats in the round = 192 sts on needle. Increase then 7 sts evenly = 199 sts.
03.12.2020 - 09:05Is there an adult women pattern version of this design and size 4xl 5xl
25.11.2020 - 09:21DROPS Design answered:
Dear Tonie, you can see the adult version of this raindeer sweater HERE. Happy Knitting!
25.11.2020 - 13:02