
Popular categories
Looking for a yarn?


Comments / Questions (91)
![]() Gith Finnsson wrote:
Gith Finnsson wrote:
När jag ska börja öka maskor vid oket så får jag det inte att gå ihop med diagramet vid själva ökningen. Det passar inte ihop. Jag ska börja öka 2 maskor innan markeringen och då är jag inne på kanten med 5 räta maskor, enligt diagrammet så ska det vara 6 maskor innan markering för ökning, enligt ökningstipset så blir det 4 maskor, Läser jag helt galet?
19.02.2025 - 09:15DROPS Design answered:
Hej Gith. Du ska bara öka enligt ökningarna i diagrammet på oket. Där det står "ÖKNINGSTIPS (gäller i sidorna på fram- och bakstycket)" där du gör ökning (omslag) 2 maskor innan markören osv gäller senare i sidorna under "FRAM- OCH BAKSTYCKE". Mvh DROPS Design
19.02.2025 - 11:07
![]() Sophie Blazy wrote:
Sophie Blazy wrote:
Bonjour, Je tricote le modèle en 12-18 mois et je bloque sur le rang 5 du motif. De quelle couleur doit être fait le jeté ? J’ai essayé les deux mais le motif ne marche pas au rang 6…. Merci de votre aide !
23.12.2024 - 10:08DROPS Design answered:
Bonjour Mme Blazy, faites les jetés avec le coloris principal du rang, ainsi au 5ème rang, faites-les en naturel, et tricotez-les torse en naturel au rang suivant sur l'envers. Pour bien suivre l'évolution du diagramme, vous pouvez placer un marqueur entre chaque A.1, il sera ainsi plus facile de bien suivre le motif comme dans le diagramme exactement. Bon tricot!
02.01.2025 - 10:30
![]() Pier Tegel wrote:
Pier Tegel wrote:
Thank you for all your help! I have another question from the pattern Little Missy Jacket Can you explain the following? finish after 1 row from the right side
15.11.2024 - 23:06DROPS Design answered:
Dear Pier, it means that you will work a 3cm rib but, when calculating when to stop, ensure that the last row of the rib that has been worked is from the right side. Happy knitting!
17.11.2024 - 20:48
![]() Pier Tegel wrote:
Pier Tegel wrote:
Do I cast on 96 plus 5 and 5? NECK: Cast on 84 (88-92-96-100-108-112) stitches (including 5 band stitches in each side towards mid front) with circular needle
15.11.2024 - 04:04DROPS Design answered:
Hi Pier, No, the 96 cast-on stitches include the bands (10 band stitches + 86 stitches on the neck) Happy knitting!
15.11.2024 - 06:44
![]() Ariel McGowan wrote:
Ariel McGowan wrote:
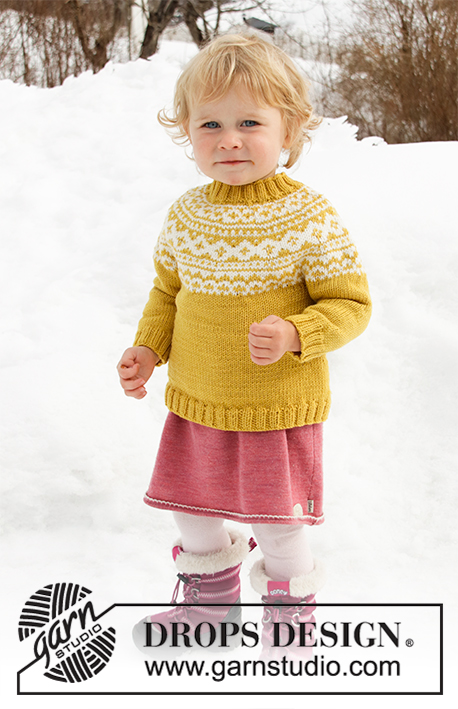
My question is which color is the design and which is the background? The goldenrod or the white?
28.10.2024 - 18:56DROPS Design answered:
Dear Ariel, you can see colours goldenrod and off white indicated in the charts. Goldenrod is the main colour used for the piece, while off white is only used in the chart. Happy knitting!
03.11.2024 - 12:37
![]() Ariel McGowan wrote:
Ariel McGowan wrote:
My question is for the design, is the goldenrod supposed to stand out, or the white? Which should I emphasize? I am so confused
28.10.2024 - 04:53DROPS Design answered:
Dear Mrs McGowan, not sure what you mean with "stranding out"; see diagram text to know how to work the stranded pattern, ie sometimes there will be more stitches with goldendrod and sometimes more stitches with off white. Happy knitting!
28.10.2024 - 10:06
![]() Jannie Kruijswijk wrote:
Jannie Kruijswijk wrote:
Graag wil ik het vestje Little MissyJacket breien in maat 92/98, maar met de wol drops fabel. Moet ik een maat groter breien omdat deze wol dunner is en hoeveel bollen wol moet ik kopen?
07.10.2024 - 19:04DROPS Design answered:
Dag Jannie,
Het beste is om een garen te vinden die in dezelfde groep valt en dus ongeveer de zelfde stekenverhouding heeft. Als je breit met een andere garendikte heeft dit ook effect op de stof en hoe het model valt. Je kunt een proeflapje maken om daarna te berekenen welke maat je zou kunnen breien. De hoeveelheid garen kun je berekenen aan de hand van de totaal benodigde looplengte voor de maat die jaat breien.
08.10.2024 - 20:56
![]() Alison wrote:
Alison wrote:
Hi there, I’m wondering where there’s a row with only one single colour used, whether I should carry the other colour along the back so it’s ready to use on the next row, or whether I should cut the yarn and rejoin on next row of that colour? Many thanks!
07.09.2024 - 09:18DROPS Design answered:
Dear Alison, you can simply move it towards the beginning of this colour in the pattern of the next row (not carry it, but skip and take it towards the next row). Otherwise, you could cut the thread or, before working, make smaller balls of the pattern colour so that you can start with one or another ball depending on the side you are working the pattern on. Happy knitting!
08.09.2024 - 19:12
![]() Keesha wrote:
Keesha wrote:
I’m stuck on row 5 of the diagram for age 2. I did the yarn overs in the white yarn but when you get to the end of the row is it knit 1 or yarn over, because that would give 3 stitches in white yarn and that doesn’t match the start of the row? Thank you
18.08.2024 - 07:55DROPS Design answered:
Dear Keesha, you start with 5 stitches in goldenrod (band stitches) then work A.1 and repeat the whole row. The last stitch of A.1 is a yarn over in white. Then you knit the A.2 stitch, also in white and 5 band stitches in goldenrod. There is no mistake, the white yarn over is barely noticeable, so it will look like 2 stitches. It won't mess the pattern when you have the whole piece knitted. Happy knitting!
18.08.2024 - 23:12
![]() Sigrid Paechnatz wrote:
Sigrid Paechnatz wrote:
Hallo ich habe ein Problem bei den Zunahmen in der Passe.Wenn ich diese durchführe während ich in einer Reihe die Farbe wechseln muss passt das Muster nicht mehr zur Vorreihe.Zum Beispiel bei A.1 ,12/18 in Reihe 5 und 7.Wenn in einer Reihe nur eine Farbe gestrickt wird ist es ja kein Problem zuzunehmen,aber hier komme ich nicht weiter.In Reihe 5 z.B soll ich alle 8 Maschen eine Masche zunehmen,oder mache ich was falsch?Danke!
27.07.2024 - 17:15DROPS Design answered:
Liebe Frau Paechnatz, setzen Sie Markierer zwischen jedem Diagram/A.1 und zwichen den Markierern stricken Sie dann einfach das Diagram genauso wie gezeichenet, so sollte das Muster weiter gestrickt werden. bei der 5. Reihe nehmen Sie 1 M am ende von jedem A.1, diese Masche wird dann die letzte Masche in gelb bei der nächsten Reihe sein. Viel Spaß beim Stricken!
29.07.2024 - 11:38
|
||||||||||
Little Missy Jacket#littlemissyjacket |
||||||||||
 |
 |
|||||||||
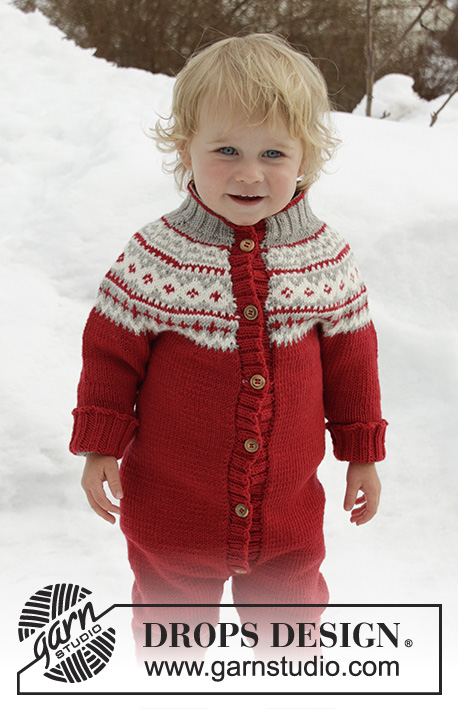
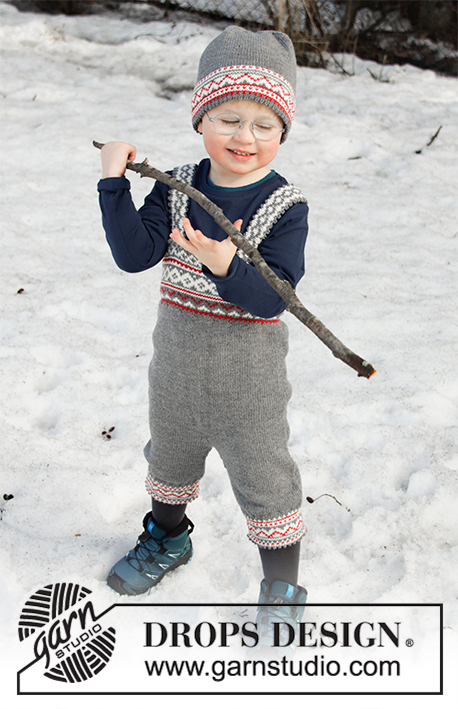
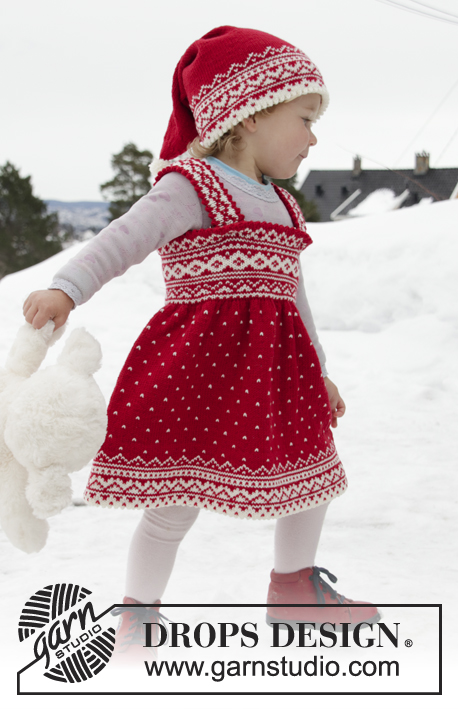
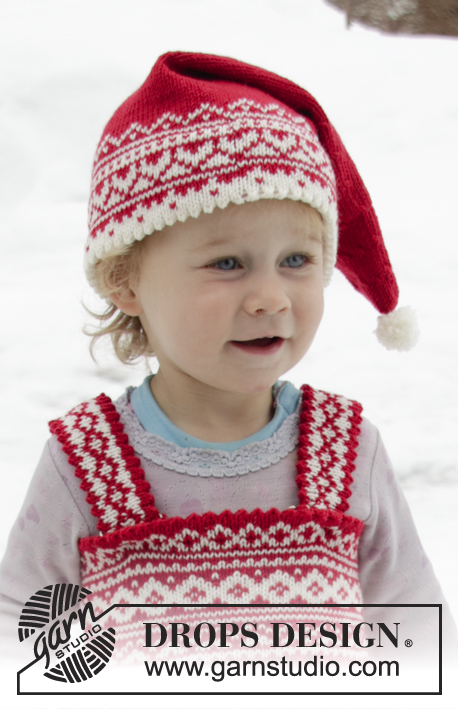
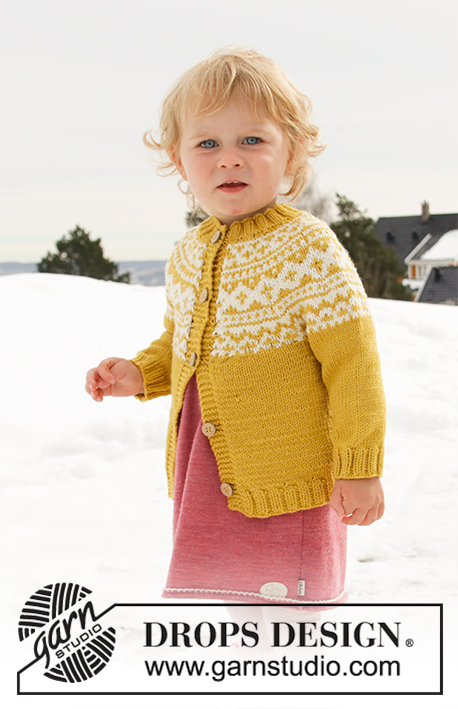
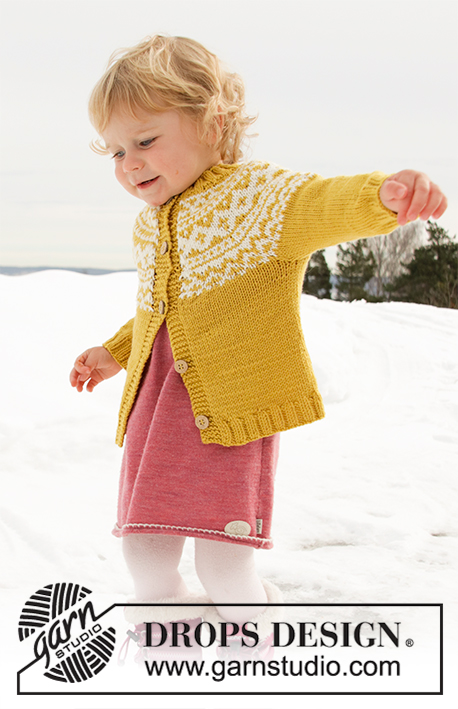
Knitted jacket for babies and children with round yoke in DROPS Lima. The piece is worked top down with Nordic pattern. Sizes 12 months – 12 years.
DROPS Children 32-8 |
||||||||||
|
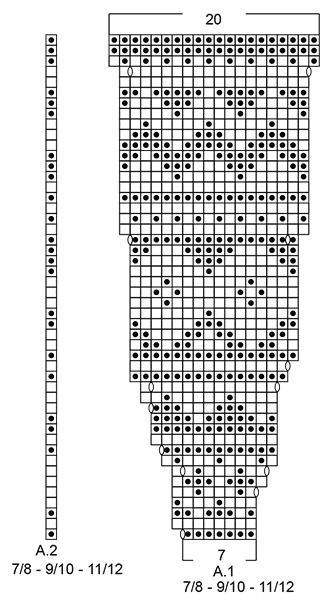
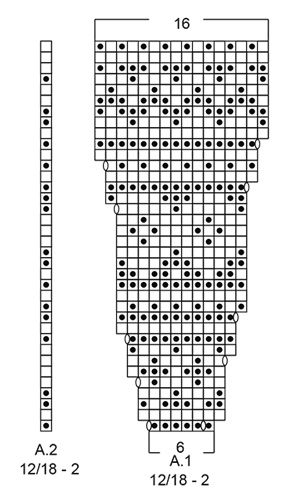
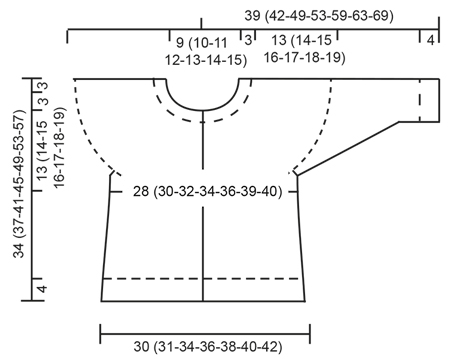
------------------------------------------------------- EXPLANATIONS FOR THE PATTERN: ------------------------------------------------------- RIDGE/GARTER STITCH (worked back and forth): 1 ridge = Knit 2 rows. PATTERN: See diagrams A.1 and A.2. Choose diagram for your size. The whole pattern is worked in stocking stitch. KNITTING TIP (for bands): The whole of the band is worked in goldenrod. In other words, use 1 ball for each band where needed (i.e. on the rows where goldenrod is not used in the pattern). Change strands between band and yoke (to avoid strand-changes on outside of band). When changing strands, twist the two strands together so that the stitches stay together. DECREASE/INCREASE TIP: To work out how to decrease/increase evenly, count the total number of stitches on the needle (e.g. 84 stitches), minus the bands (= 74 stitches) and divide the remaining stitches by the number of decreases/increases to be made (e.g. 7) = 10.57. In this example, decrease by knitting together alternately each 9th and 10th stitch and each 10th and 11th stitch (approx.); increase by making 1 yarn over after alternately each 10th and each 11th stitch (approx.). The yarn overs are worked twisted on the next row to avoid holes – NOTE: Do not decrease/increase over the bands. INCREASE TIP (for sides of body): Increase 1 stitch on each side of the marker thread as follows: Start 2 stitches before the marker thread, make 1 yarn over, knit 4 (the marker thread sits in the middle of these 4 stitches), make 1 yarn over (= 2 stitches increased). Increase like this at both marker threads (= 4 stitches increased). On the next row work the yarn overs twisted to avoid holes. DECREASE TIP (for mid under sleeve): Decrease 1 stitch on each side of the marker thread as follows: Start 3 stitches before the marker thread, knit 2 together, knit 2 (the marker thread sits in the middle of these 2 stitches), slip 1 stitch as if to knit, knit 1 and pass the slipped stitch over the knitted stitch (= 2 stitches decreased). ELEVATION (back of neck): Skip this section if you do not want an elevation. The first row is worked as follows from the right side. Knit until there are 8 (8-8-10-10-12-12) stitches left on row, turn, tighten strand and purl until there are 8 (8-8-10-10-12-12) stitches left in the other side, turn, tighten strand and knit until there are 16 (16-16-18-18-20-20) stitches left on row, turn, tighten strand and purl until there are 16 (16-16-18-18-20-20) stitches left on other side. Continue by working 8 stitches less each time you turn 2 more times in each side, turn, tighten strand and knit to end of row, then purl 1 row from the wrong side (bands worked in garter stitch). BUTTONHOLES: Work buttonholes on right band (when the garment is worn). 1 buttonhole = start from the wrong side and knit together the 2nd and 3rd stitch from the edge, make 1 yarn over. On the next row knit the yarn over to leave a hole. The first buttonhole is worked when the neck measures approx. 1½-2 cm, the next 4 (5-5-5-6-6-7) buttonholes are then worked after approx. every 6 (6-6½-7-6½-7-7) cm. ------------------------------------------------------- START THE PIECE HERE: ------------------------------------------------------- JACKET - SHORT OVERVIEW OF THE PIECE: The piece is worked top down. The yoke is worked first, then it is divided for sleeves and body. The body is continued back and forth. The sleeves are worked in the round with double pointed needles. NECK: Cast on 84 (88-92-96-100-108-112) stitches (including 5 band stitches in each side towards mid front) with circular needle size 3 mm and goldenrod. Purl 1 row from the wrong side with 5 band stitches in GARTER STITCH – read description above, in each side. The next row is worked as follows from the right side: 5 band stitches in garter stitch, * knit 2, purl 2 *, work from *-* until there are 7 stitches left, finish with knit 2 and 5 band stitches in garter stitch. Continue this rib for 3 cm – remember BUTTONHOLES on right band – read description above and finish after 1 row from the right side. YOKE: Change to circular needle size 4 mm. Purl 1 row from the right side with 5 band stitches in garter stitch in each side and decrease 7 (5-4-1-5-6-10) stitches evenly on row – read DECREASE/INCREASE TIP (purl 2 stitches together = 1 stitch decreased) = 77 (83-88-95-95-102-102) stitches. You can now work an elevation in back of neck so that the yoke is slightly higher at the back. This elevation can be left out; the neck will then be the same front and back – work ELEVATION – read description above or continue working. The next row is worked as follows from the right side: 5 band stitches in garter stitch, work pattern according to A.1 until there are 6 stitches left on row – Note: Choose diagram for your size (= 11 (12-11-12-12-13-13) repeats of 6 (6-7-7-7-7-7) stitches), work A.2 over the next stitch and finish with 5 band stitches in garter stitch. Continue this pattern and increase as shown in the diagram – read KNITTING TIP and REMEMBER THE KNITTING TENSION! When A.1 and A.2 have been completed there are 187 (203-220-239-251-271-271) stitches on the row. Continue with stocking stitch with 5 band stitches in garter stitch in each side in golden rod. On the next row from the right side increase 7 (7-10-7-3-0-11) stitches evenly on row (do not increase over bands) = 194 (210-230-246-254-271-282) stitches. When the piece measures 13 (14-15-16-17-18-19) cm mid front (measured without the neck), divide the piece as follows: Work 29 (31-34-36-38-40-42) stitches as before (= front piece), place the next 42 (46-50-54-54-58-60) stitches on 1 thread for sleeve (without working them), cast on 6 new stitches on the needle, work 52 (56-62-66-70-75-78) stitches (= back piece), place the next 42 (46-50-54-54-58-60) stitches on 1 thread for sleeve (without working them), cast on 6 new stitches on the needle and work the remaining 29 (31-34-36-38-40-42) stitches as before (= front piece) = 122 (130-142-150-158-167-174) stitches. BODY: Insert 1 marker thread 32 (34-37-39-41-43-45) stitches in from each side (= 58 (62-68-72-76-81-84) stitches between marker threads on back piece). THE PIECE IS NOW MEASURED FROM HERE! Continue back and forth with stocking stitch and 5 band stitches in garter stitch in each side towards mid front – remember BUTTONHOLES on band. When the piece measures 3 cm from where body and sleeves were divided, increase on each side of both marker threads – read INCREASE TIP. Repeat the increase when the piece measures 8 cm from where body and sleeves were divided = 130 (138-150-158-166-175-182) stitches. When the piece measures 11 (13-16-19-22-25-28) cm from where body and sleeves were divided, increase 14 (14-14-14-14-13-14) stitches on next row from the right side (do not increase over the bands) = 144 (152-164-172-180-188-196) stitches. Change to needle size 3 mm. The next row is worked as follows from the right side: 5 band stitches in garter stitch, * knit 2, purl 2 *, work from *-* until there are 7 stitches left, finish with knit 2 and 5 band stitches in garter stitch. Continue this rib for 4 cm, then cast off with garter stitch over garter stitch, knit over knit and purl over purl. The whole jacket measures approx. 34 (37-41-45-49-53-57) cm, measured from the shoulder. SLEEVE: Place the stitches from the one thread on double pointed needles size 4 mm and knit up 1 stitch in each of the 6 stitches cast on under the sleeve = 48 (52-56-60-60-64-66) stitches. Insert 1 marker thread in the middle of these 6 stitches (= mid under sleeve). THE PIECE IS NOW MEASURED FROM HERE! Work stocking stitch in the round with goldenrod. When the sleeve measures 1 cm from where sleeve and body were divided, decrease 2 stitches mid under sleeve – read DECREASE TIP. Decrease like this every 2 (2½-2½-2½-3½-3½-3½) cm a total of 6 (6-8-8-8-8-9) times = 36 (40-40-44-44-48-48) stitches. When the sleeve measures 14 (16-21-24-28-31-35) cm from where sleeve and body were divided, change to double pointed needles size 3 mm and work rib in the round (= knit 2 / purl 2) for 4 cm or to desired length. Then cast off with knit over knit and purl over purl. The sleeve measures a total of approx. 18 (20-25-28-32-35-39) cm from where sleeve and body were divided. Work the other sleeve in the same way. ASSEMBLY: Sew buttons onto left band. |
||||||||||
Diagram explanations |
||||||||||
|
||||||||||
 |
||||||||||
 |
||||||||||
 |
||||||||||
 |
||||||||||
Have you finished this pattern?Tag your pictures with #dropspattern #littlemissyjacket or submit them to the #dropsfan gallery. Do you need help with this pattern?You'll find 34 tutorial videos, a Comments/Questions area and more by visiting the pattern on garnstudio.com. © 1982-2026 DROPS Design A/S. We reserve all rights. This document, including all its sub-sections, has copyrights. Read more about what you can do with our patterns at the bottom of each pattern on our site. |
||||||||||


With over 40 years in knitting and crochet design, DROPS Design offers one of the most extensive collections of free patterns on the internet - translated to 17 languages. As of today we count 325 catalogues and 12291 patterns translated into English (UK/cm).
We work hard to bring you the best knitting and crochet have to offer, inspiration and advice as well as great quality yarns at incredible prices! Would you like to use our patterns for other than personal use? You can read what you are allowed to do in the Copyright text at the bottom of all our patterns. Happy crafting!
Post a comment to pattern DROPS Children 32-8
We would love to hear what you have to say about this pattern!
If you want to leave a question, please make sure you select the correct category in the form below, to speed up the answering process. Required fields are marked *.