DROPS Baby Merino
DROPS Baby Merino
100% Wool
from 3.50 £ /50g
Get the yarn to make this pattern from 14.00£.

The yarn cost is calculated from the pattern’s smallest size and the yarn’s cheapest product type. Looking for an even better price? You might find it on the DROPS Deals!

DROPS Super Sale

Miss Cookie

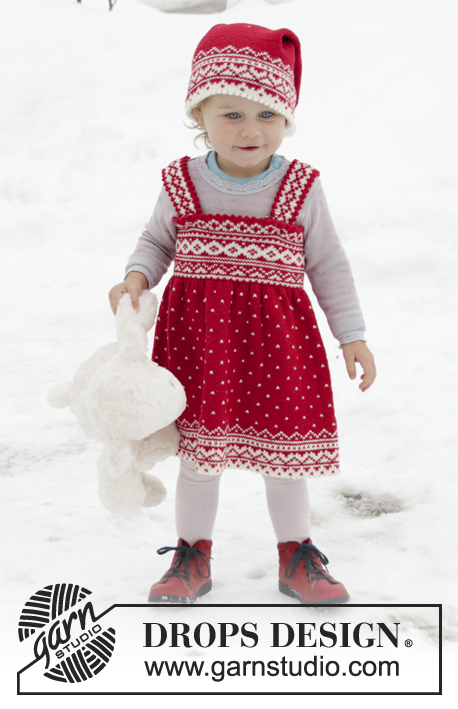
Knitted dress for babies and children in DROPS BabyMerino. The piece is worked top down with Nordic pattern. Sizes 6 months – 6 years.

DROPS Children 32-2
DROPS Design: Pattern no bm-012-bn
Yarn group A
-----------------------------------------------------------

Sizes: 6/9 - 12/18 months (2 - 3/4 - 5/6) years
Sizes equivalent to approx. height of child in cm:
68/74 - 80/86 (92 - 98/104 - 110/116)
Materials:
DROPS BABYMERINO from Garnstudio (belongs to yarn group A)
150-200 (200-200-250) g colour 16, red
50-50 (100-100-100) g colour 02, off white

-------------------------------------------------------
ACCESSORIES FOR THE PIECE:

KNITTING TENSION:
24 stitches in width and 32 rows in height with stocking stitch = 10 x 10 cm.

NEEDLES:
DROPS CIRCULAR NEEDLE SIZE 3 MM: length 40 cm and 80 cm.
The needle size is only a guide. If you have too many stitches on 10 cm, change to a larger needle size. If you have too few stitches on 10 cm, change to a smaller needle size.

-------------------------------------------------------

Alternative Yarn – See how to change yarns here
Yarn Groups A to F – Use the same pattern and change the yarn here
Yarn usage using an alternative yarn – Use our yarn converter here

-------------------------------------------------------

DROPS Baby Merino
DROPS Baby Merino
100% Wool
from 3.50 £ /50g
Get the yarn to make this pattern from 14.00£.

The yarn cost is calculated from the pattern’s smallest size and the yarn’s cheapest product type. Looking for an even better price? You might find it on the DROPS Deals!

DROPS Super Sale

SAVE 30% on 6 cotton favourites!
Valid until 12.04.2024

Pattern instructions

NOTE: This pattern is written in British English. All measurements in charts are in cm. For conversion from cm to inches - click here. There are different terms for crocheting in British and American English. If this pattern includes crochet, click for "crochet terms" here. For this pattern in American English, please click here.
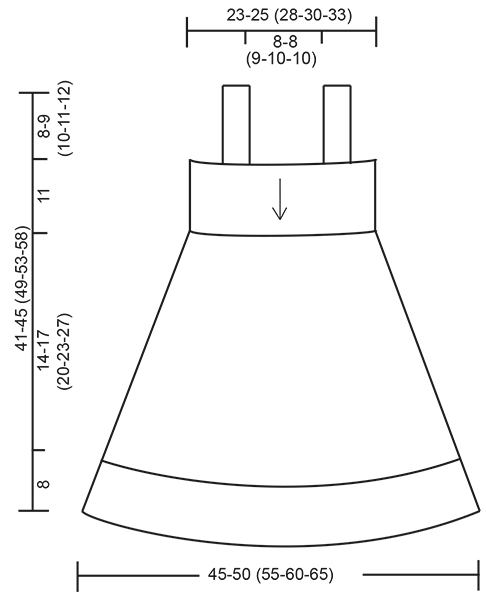
EXPLANATIONS FOR THE PATTERN:

-------------------------------------------------------

RIDGE/GARTER STITCH (worked back and forth):
1 ridge = Knit 2 rows.

PATTERN:
See diagrams A.1 to A.5. The pattern is worked in stocking stitch.

-------------------------------------------------------

START THE PIECE HERE:

-------------------------------------------------------

DRESS - SHORT OVERVIEW OF THE PIECE:
The piece is worked in the round, top down. You first work a belt with lining and pattern, then the skirt is worked downwards. You work a lining at bottom of skirt with pattern. The braces are worked back and forth (sideways) and sewn on to finish.

LINING (for belt):
Cast on 108-120 (132-144-156) stitches with circular needle size 3 mm and red. Work stocking stitch in the round. When the piece measures 10 cm, work the next round as follows: * Knit 2 together, 1 yarn over *, work from *-* to end of round (= folding edge). The yarn overs are not worked twisted on the next round - there will be holes. REMEMBER THE KNITTING TENSION!

BELT:
Then work A.1 (= 12 stitches) over all stitches (= 9-10 (11-12-13) times in width). When A.1 has been worked 1 time in height, the belt measures approx. 11 cm and the piece a total of 22 cm (including lining).

SKIRT:
THE PIECE IS NOW MEASURED FROM HERE!
Work with red as follows: * knit 1, 1 yarn over *, work from *-* to end of round = 216-240 (264-288-312) stitches. The yarn overs are not worked twisted on the next round - there will be holes.
Work A.2 (= 8 stitches) over all stitches (= 27-30 (33-36-39) times in width).
When the skirt measures 14-17 (20-23-27) cm and the piece a total of 36-39 (42-45-49) cm (including lining) - there is now approx. 8 cm left to finished length (you can continue to desired length) - work A.3 over all stitches (= 18-20 (22-24-26) times in width). When A.3 has been worked 1 time in height, the skirt measures approx. 22-25 (28-31-35) cm and the piece a total of 44-47 (50-53-57) cm (including lining).

LINING (bottom edge):
Work with off white as follows: * knit 2 together, 1 yarn over *, work from *-* to end of round (= folding edge). THE PIECE IS NOW MEASURED FROM HERE! The yarn overs are not worked twisted on next round, there will be holes. Work A.4 (= 12 stitches) over all stitches (= 18-20 (22-24-26) times in width). When A.4 has been worked 1 time in height, continue working in red. Work until the lining measures 8 cm from the folding edge, and then cast off. The piece measures a total of approx. 52-55 (58-61-65) cm (including both linings).

ASSEMBLY:
Fold lining at the top of the dress down on the wrong side of the belt and sew down with red. Do the same at the bottom of the skirt.

BRACES:
The braces measure approx. 27-28 (30-32-35) cm in length when finished; there is 5 cm extra in each side so that the braces can be adjusted as the child grows. You can cast on more/fewer stitches if you would like longer/shorter braces (the number of stitches must be divisible by 4 + 2).
Cast on 66-70 (74-78-86) stitches (including 1 edge stitch in each side) with circular needle size 3 mm and red. The braces are worked back and forth in stocking stitch. Work 6 rows stocking stitch with 1 edge stitch in GARTER STITCH – see description above, in each side of the piece.
On the next row from the right side work 1 edge stitch in garter stitch, * knit 2 together, 1 yarn over * , work from *-* until there is 1 stitch left and finish with 1 edge stitch in garter stitch (= folding edge). Then work A.5 (= 4 stitches) with 1 edge stitch in garter stitch in each side (edge stitches are worked in same colour as the first/last stitch in A.5, first row worked from the wrong side – do not work the yarn overs twisted). When A.5 has been worked 1 time in height, work a folding edge in red from the right side as follows: Work 1 edge stitch in garter stitch, * knit 2 together, 1 yarn over *, work from *-* until there is 1 stitch left and finish with 1 edge stitch in garter stitch. Work approx. 7 rows with red (do not work the yarn overs twisted), fold the lining down and make sure that it does not tighten the brace; work more rows if necessary. Cast off. Sew cast-on edge to cast-off edge in outermost loop of outermost stitch. Work 1 more brace.

ASSEMBLY:
Sew the braces onto lining at top (i.e. on wrong side of belt) with neat stitches approx. 5 cm down on each side, with approx. 8-8 (9-10-10) cm between each braces mid front and mid back.

Diagram

symbols = red
symbols = off white
symbols = knitting direction
diagram
diagram
diagram
Do you have a question? See a list of frequently asked questions (FAQ)

Knitting tension is what determines the final measurements of your work, and is usually measured per 10 x 10 cm. It is provided like so: number of stitches in width x number of rows in height - eg: 19 stitches x 26 rows = 10 x 10 cm.

The knitting tension is very individual; some people knit/crochet loosely while others work tightly. You adjust the knitting tension with the needle size, which is why the suggested needle size is only meant as a guide! You need to adjust this (up or down) to ensure that YOUR knitting tension matches the knitting tension provided in the pattern. If you work with a different knitting tension than provided you will have a different yarn consumption, and your work will have different measurements than what the pattern suggests.

The knitting tension also determines which yarns can replace each other. As long as you achieve the same knitting tension you can replace one yarn with another.

See DROPS lesson: How to measure your tension/gauge

See DROPS video: How to make a gauge tension swatch

The required amount of yarn is provided in grams, eg: 450 g. To calculate how many balls you’ll need you first need to know how many grams are in 1 ball (25g, 50g or 100g). This information is available if you click on the individual yarn quality on our pages. Divide the amount required with the amount of each ball. For example, if each ball is 50g (the most common amount), the calculation will be as follows: 450 / 50 = 9 balls.

The important thing when changing from one yarn to another is that the knitting/crochet tension remains the same. This is so that the measurements of the finished piece will be the same as on the sketch provided. It is easier to achieve the same knitting tension using yarns from the same yarn group. It is also possible to work with multiple strands of a thinner yarn to achieve the knitting tension of a thicker one. Please try our yarn converter. We recommend you to always work a test swatch.

Please NOTE: when changing yarn the garment might have a different look and feel to the garment in the photo, due to individual properties and qualities of each yarn.

See DROPS lesson: Can I use a different yarn than the one mentioned in the pattern?

All our yarns are categorised into yarn groups (from A to F) according to thickness and knitting tension – group A contains the thinnest yarns and group F the thickest. This makes it easier for you to find alternative yarns to our patterns, should you wish to switch yarn. All yarns within the same group have a similar knitting tension and can easily replace each other. However, different yarn qualities have different structures and properties which will give the finished work a unique look and feel.

Click here for an overview of the yarns in each yarn group

At the top of all our patterns you’ll find a link to our yarn calculator, which is a helpful tool should you wish to use a different yarn than suggested. By filling in the yarn quality you wish to replace, the amount (in your size) and number of strands, the calculator will present good alternative yarns with the same knitting tension. Additionally it will tell you how much you’ll require in the new qualities and whether you’ll need to work with multiple strands. Most skeins are 50g (some are 25g or 100g).

If the pattern is worked with multiple colours, every colour will have to be calculated separately. Similarly, if the pattern is worked with several strands of different yarns (for example 1 strand Alpaca and 1 strand Kid-Silk) you will have to find alternatives for each, individually.

Click here to see our yarn calculator

Since different yarns have different qualities and textures we have chosen to keep the original yarn in our patterns. However, you can easily find options among our available qualities by using our yarn calculator, or simply pick a yarn from the same yarn group.

It is possible that some retailers still have discontinued yarns in stock, or that someone has a few skeins at home that they would like to find patterns for.

The yarn calculator will provide both alternative yarn as well as required amount in the new quality.

If you think it's hard to decide what size to make, it can be a good idea to measure a garment you own already and like the size of. Then you can pick the size by comparing those measures with the ones available in the pattern's size chart.

You'll find the size chart at the bottom of the pattern.

See DROPS lesson: How to read size chart

The needle size provided in the pattern serves only as a guide, the important thing is to follow the knitting tension. And since knitting tension is very individual, you will have to adjust the needle size to ensure that YOUR tension is the same as in the pattern – maybe you’ll have to adjust 1, or even 2 needle sizes, up or down to achieve the correct tension. For this, we recommend that you work test swatches.

Should you work with a different knitting tension than the one provided, the measurements of the finished garment might deviate from the measurement sketch.

See DROPS lesson: How to measure your tension/gauge

See DROPS video: How to make a tension/gauge swatch

Working a garment top-down provides more flexibility and room for personal adjustment. For example it is easier to try the garment on while working, as well as making adjustments to length of yoke and shoulder caps.

The instructions are carefully explaining every step, in the correct order. Diagrams are adjusted to the knitting direction and are worked as usual.

The diagram depicts all rows/rounds, and every stitch seen from the right side. It is read from bottom to top, from right to left. 1 square = 1 stitch.

When working back and forth, every other row is worked from the right side and every other row is worked from the wrong side. When working from the wrong side, the diagram will have to be worked reversed: from left to right, knit stitches are purled, purl stitches are knit etc.

When working in the round every round is worked from the right side and the diagram are worked from right to left on all rounds.

See DROPS lesson: How to read knitting diagrams

The diagram depicts all rows/rounds, and every stitch seen from the right side. It is worked from bottom to top, from right to left.

When working back and forth every other row is worked from the right side: from right to left and every other row is worked from the wrong side: from left to right.

When working in the round, every row in the diagram are worked from the right side, from right to left.

When working a circular diagram you start in the middle and work your way outwards, counter clockwise, row by row.

The rows usually start with a given number of chain stitches (equivalent to the height of the following stitch), this will either be depicted in the diagram or explained in the pattern.

See DROPS lesson: How to read crochet diagrams

Instructions for working several diagrams after each other on the same row/round, will often be written like so: “work A.1, A.2, A.3 a total of 0-0-2-3-4 times". This means you work A.1 once, then A.2 is worked once, and A.3 is repeated (in width) the number of times provided for your size – in this case like so: S = 0 times, M = 0 times, L=2 times, XL= 3 times and XXL = 4 times.

The diagrams are worked as usual: begin with the first row in A.1, then work the first row in A.2 etc.

See DROPS lesson: How to read knitting diagrams

See DROPS lesson: How to read crochet diagrams

The total width of the garment (from wrist-to-wrist) will be larger in the larger sizes, despite the actual sleeves being shorter. The larger sizes have longer sleeve caps and wider shoulders, so there will be a good fit in all sizes.

The measurement sketch/schematic drawing provides information regarding the full length of the garment. If it’s a jumper or a jacket the length is measured from the highest point on the shoulder closest to the neckline, and straight down to the bottom of the garment. It is NOT measured from the tip of shoulder. Similarly, the length of yoke is measured from the highest point on the shoulder and down to where yoke is split into body and sleeves.

On a jacket measures are never taken along bands, unless specifically stated. Always measure inside band stitches when measuring the length.

See DROPS lesson: How to read a schematic drawing

Diagrams are often repeated on the round or in height. 1 repeat is the diagram the way it appears in the pattern. If it says to work 5 repeats of A.1 in the round, then you work A.1 a total of 5 times after/next to each other in the round. If it says to work 2 repeats of A.1 vertically/in height you work the entire diagram once, then begin again at the start and work the entire diagram one more time.

Chain stitches are slightly narrower than other stitches and to avoid working the cast-on edge too tight, we simply chain more stitches to begin with. The stitch count will be adjusted on the following row to fit the pattern and measurement sketch.

The rib edge is more elastic and will contract slightly compared to, for example, stocking stitch. By increasing before the rib edge, you avoid a visible difference in width between the rib edge and the rest of the body.

It’s very easy to cast off too tightly, and by making yarn overs while casting off (and simultaneously casting these off) you avoid a too tight cast off edge.

See DROPS video: How to bind off with yarn overs (yo)

To achieve an even increase (or decrease) you can increase on, for example: every 3rd and 4th row alternately, like so: work 2 rows and increase on the 3rd row, work 3 rows and increase on the 4th. Repeat this until the increase is complete.

See DROPS lesson: Increase or decrease 1 st on every 3rd and 4th row alternately

Should you prefer to work in the round instead of back and forth, you may of course adjust the pattern. You’ll need to add steeks mid-front (usually 5 stitches), and follow the instructions. When you would normally turn and work from the wrong side, simply work across the steek and continue in the round. At the end you’ll cut the piece open, pick up stitches to work bands, and cover the cut edges.

See DROPS video: How to knit steeks and cut open

Should you prefer to work back and forth instead of in the round, you may of course adjust the pattern so you work the pieces separately and then assemble them at the end. Divide the stitches for the body in 2, add 1 edge stitch in each side (for sewing) and work the front and back pieces separately.

See DROPS lesson: Can I adapt a pattern for circular needles into straight needles?

Pattern repeats can vary slightly in the different sizes, in order to get the correct proportions. If you’re not working the exact same size as the garment in the photo, yours might deviate slightly. This has been carefully developed and adjusted so that the complete impression of the garment is the same in all sizes.

Make sure to follow instructions and diagrams for your size!

If you have found a pattern you like which is available in women’s size it’s not very difficult to convert it to men’s size. The biggest difference will be the length of sleeves and body. Start working on the women size that you think would fit across the chest. The additional length will be worked right before you cast off for the armhole/sleeve cap. If the pattern is worked top-down you can add the length right after the armhole or before the first decrease on sleeve.

Regarding additional yarn amount, this will depend on how much length you add, but it is better with a skein too many than too few.

All yarns will have excess fibres (from production) that might come off as lint or shedding. Brushed yarns (ie hairier yarns) have more of these loose, excess fibres, causing more shedding.

Shedding also depends on what is worn under or over the garment, and whether this pulls at the yarn fibres. It’s therefore not possible to guarantee that there will be no shedding

Below are some tips on how to get the best result when working with hairier yarns:

1. When the garment is finished (before you wash it) shake it vigorously so the looser hairs come off. NOTE: do NOT use a lint roller, brush or any method that pulls at the yarn.

2. Place the garment in a plastic bag and put it in your freezer - the temperature will cause the fibres to become less attached to each other, and excess fibres will come off easier.

3. Leave in the freezer for a few hours before taking it out and shaking it again.

4. Wash the garment according to the instructions on the yarn label.

Pilling is a natural process that happens to even the most exclusive of fibers. It's a natural sign of wear and tear that is hard to avoid, and that is most visible in high friction areas of your garment like a sweater's arms and cuffs.

You can make your garment look as new by removing the pilling, using a fabric comb or a pill/lint remover.

Still can't find the answer you need? Then scroll down and leave your question so one of our experts can try to help you. This will be done normally within 5 to 10 working days.
In the meantime, you can read the questions and answers that others have left to this pattern or join the DROPS Workshop on Facebook to get help from fellow knitters/crocheters!

You might also like...

Miss Cookie

Grethe, Norway

Post a comment to pattern DROPS Children 32-2

We would love to hear what you have to say about this pattern!

If you want to leave a question, please make sure you select the correct category in the form below, to speed up the answering process. Required fields are marked *.

Comments / Questions (34)

country flag Jessica wrote:

Ser ut til at mønster A.3 muligens er opp ned på siden deres. kan det stemme? Begynte å strikke og merket noe ble veldig rart undeveis.. fikk det ikke til å stemme helt med mønsteret på bildene..

11.04.2023 - 21:06

DROPS Design answered:

Hei Jessica. Diagrammet er riktig vei. Kjolen strikkes ovenfra og ned, og husk at man leser et strikkediagram motsatt av slik man normalt leser: Fra høyre mot venstre, nedenfra og opp. Du begynner altså nederst i det høyre hjørnet, og jobber deg mot venstre og oppover. Les evnt under Tips&Hjelp - DROPS Leksjoner - Les en oppskrift - Hvordan lese strikkediagrammer. mvh DROPS Design

17.04.2023 - 13:00

country flag Oddny Bjerkset wrote:

Hei!\\r\\nHar dere oppskrift på lue som er avbildet sammen med skjørtet DROPS Children 32-2?

22.07.2022 - 10:33

country flag Joanna Kraśko wrote:

Kiedy używam drutów 40cm a Kiedy 80cm?

01.09.2021 - 21:31

DROPS Design answered:

Witaj Joanno, jak masz mniej oczek to używasz krótszych, jak więcej to dłuższych. Pozdrawiamy!

01.09.2021 - 21:58

country flag Yajaira Rivas Ibarguen wrote:

Como hago para adquirir los moldes de los patrones que ustedes manejan

15.07.2021 - 07:55

DROPS Design answered:

Hola Yajaira, los patrones se pueden imprimir gratuitamente desde la página web, clickando al botón imprimir bajo la foto. También puedes guardarlo en pdf desde la ventana de configuración de impresión de tu ordenador.

19.07.2021 - 20:11

country flag Karin Lund Madsen wrote:

Hej Jeg vil gerne spørge, hvor jeg finder opskriften på nissehuen til børne julekjolen model bn-012-bn? Jeg har opskriften på kjolen. På forhånd tak for hjælpen. Venlig hilsen Karin Lund Madsen

18.01.2021 - 08:46

DROPS Design answered:

Hei Karin. Oppskrift til nisseluen finner du under DROPS Children 32-1. God Fornøyelse!

18.01.2021 - 15:20

country flag Julie wrote:

When stitching the belt down do you do it above or below the holes, I’m not sure which looks best?

06.01.2021 - 20:19

DROPS Design answered:

Dear Julie, this video shows how to fold along such a eyelet row - the folding row is the row worked with K2 tog, YO and will make a picot edge when folded. Happy knitting!

07.01.2021 - 10:09

country flag Jeannette Van Velzen wrote:

Maar watvoor soort steekjes? Ik neem aan dat een stiksteek niet werkt. Kun je eenzelfde soort steek gebruiken als wanneer je twee delen van een breiwerk aan elkaar zet? En een halve draad gebruiken om het geheel niet te bol te laten worden?

06.12.2020 - 15:39

DROPS Design answered:

Dag Jeannette,

Je zet het aan de binnenkant vast met naald en draad (dus niet met de naaimachine) zodat je geen steken van de naad aan de goede kant ziet. Je neemt steeds kleine lusjes op van de binnenkant van het werk en van de rand van de tailleband en naait ze met kleine steekjes vast.

11.12.2020 - 14:06

country flag Jeannette Van Velzen wrote:

Hebben jullie een voorbeeld/video hoe ik de “voering” netjes kan vastzetten? En is het handig om het werk eerst te blokken voor dat doe?

05.12.2020 - 13:01

DROPS Design answered:

Dag Jeannette,

De 'voering' (of tailleband) zet je met kleine, onzichtbare steekjes vast aan de binnenkant van het werk. Zorg ervoor dat de naad rekbaar blijft. Je kunt naderhand het werk blocken.

06.12.2020 - 13:44

country flag Emma wrote:

Bonjour, je suis en train de faire la robe et je m’interroge sur l’ourlet bas de la jupe. Si j’ai bien compris après avoir fait le picot il faut faire le diagramme A4. Pourquoi faut-il faire le motif A4 si après on fait l’ourlet au niveau des picots (= les picots font le motif du bas de la jupe comme pour le haut) le motif va se retrouver à l’envers ??? Merci pour votre retour. Emma

27.11.2020 - 19:12

DROPS Design answered:

Bonjour Emma, c'est une petite "coquetterie", ainsi le jacquard sera visible aussi sur le bas de la jupe ,sur l'envers. Bon tricot!

30.11.2020 - 10:50

country flag Ellinor Mæland wrote:

Hvordan øker man fra belte til skjørt?

24.09.2020 - 20:31

DROPS Design answered:

Hei Ellinor. Når beltet er ferdigstrikket, strikker du 1 omgang der du øker med kast. Slik står det i oppskriften: Strikk med rød slik: * 1 rett, 1 kast *, strikk fra *-* over alle maskene = 216-240 (264-288-312) masker. Kastene strikkes vridd på neste omgang, det skal ikke bli hull. Du har da økt til dobbelt så mange masker som beltet. God Fornøyelse!

28.09.2020 - 10:38