
Popular categories
Looking for a yarn?


Comments / Questions (58)
![]() Tamar wrote:
Tamar wrote:
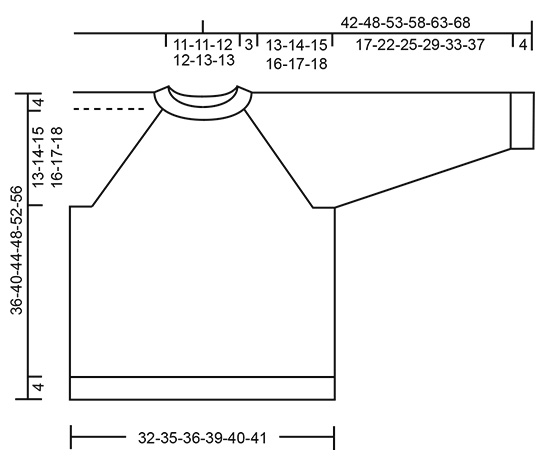
Sleeves - cast 30 stitches, after the ribbing is complete, it says “knit one round while DECREASING 4 stitches (for size 3-4) = 26 stitches left, then knit till measures 6cm. Looking at the diagram, it seems to me I need to INCREASE, NOT DECREASE. please advise. Thanks
26.07.2019 - 12:41DROPS Design answered:
Dear Tamar, to avoid ribbing being too tight with smaller needle, you cast on more stitches, then you will have to decrease on first round with larger needles to avoid the sleeve being to large. You will then increase mid under sleeve. Happy knitting!
06.08.2019 - 10:24
![]() Gisele wrote:
Gisele wrote:
The pattern states that we will end up with 72 stitches after all the raglan decreases. But if we are decreasing a total of 9 times it will be a total of 36 stitches in decreases only and will end up with many more stitches than 72. Or am I reading this wrong? Also it says decrease for the raglan every fourth round and every other round. How does that work? Do we fit the every other round decreases in between the every fourth round? Thank you for your help.
15.07.2019 - 01:52DROPS Design answered:
Hi Gisele, There are 8 decreases on each decrease-round - 2 at each marker thread in the transitions between body and sleeves. You start by decreasing every 4 th round the number of times stated for your size, then every 2nd round; so not at the same time.. I hope this helps and happy knitting!
15.07.2019 - 10:44
![]() Olivine87 wrote:
Olivine87 wrote:
J'ai une question sur la formation du raglan. Quand je dois diminuer avant le marqueur, je dois tricoter 2 mailles ensemble à l'endroit puis une maille endroit. Il ne reste plus que 2 mailles endroits avant le marqueur. Au tour précédent la diminution, elles étaient tricotées à l'envers. Est ce que pour le tour suivant la diminution, je continue à l'endroit où bien je les tricote de nouveau à l'envers ?
11.05.2019 - 16:36DROPS Design answered:
Bonjour Olivine87, vous commencez à diminuer pour le raglan quand il reste 3 m avant le marqueur, vous tricotez ensuite 2 m ens à l'end puis la maille avant le marqueur, celle après le marqueur et diminuez ensuite encore 1 maille. Les 2 m du raglan (celles avec le marqueur de chaque côté) se tricotent en jersey endroit, tout comme les diminutions. Bon tricot!
13.05.2019 - 08:59
![]() Birgitta Hermansson wrote:
Birgitta Hermansson wrote:
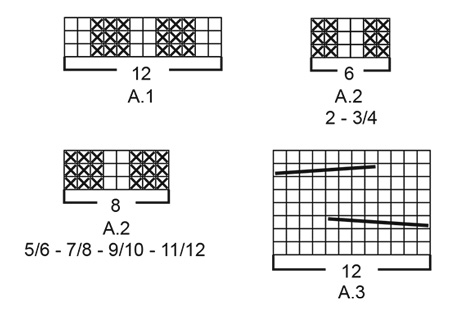
Ska jag sticka mönstret A3 varje varv ( göra flätstickningen) eller ska jag sticka vanliga räta över räta i några varv emellan?
17.02.2019 - 16:15DROPS Design answered:
Du ska sticka enligt diagrammet, börja nederst och upprepa de 8 varven.
18.02.2019 - 17:46
![]() Cecile wrote:
Cecile wrote:
Bonjour, Je tente de faire la taille 2 ans avec le fil NEPAL qui est une équivalence. J'ai monté les 132 mailles de l'encolure et commencé les côtes. D'après le diagramme, l'encolure fait 11 cm de large, de mon côté j'ai plutôt 27-28 cm. Est-ce normal ? Me suis-je trompée quelque part ? Merci pour votre aide.
09.01.2019 - 14:27DROPS Design answered:
Bonjour Cécile, avez-vous vérifié votre échantillon? Vous devez avoir, même en Nepal - 25 m x 19 rangs en jersey = 10 x 10 cm avec les aiguilles 6 et 17 m x 22 rangs jersey = 10 x 10 cm en jersey avec les aiguilles 5. Les côtes et les torsades vont resserrer l'ouvrage au fur et à mesure - les mesures de l'encolure sont prises ouvrage posé à plat, dans les mailles du départ, il y a celles de l'épaule également (= les 4 cm en haut à gauche du diagramme). Si votre échantillon est juste et que vous conservez la même tension, vous devriez avoir les mêmes mesures que dans le schéma. Bon tricot!
09.01.2019 - 16:33
![]() Luciana Cimini wrote:
Luciana Cimini wrote:
Buongiorno, vorrei sapere se questa maglia puo' essere lavorata con i ferri diritti, grazie e buon anno
30.12.2018 - 12:01DROPS Design answered:
Buongiorno Luciana. Può lavorare con i ferri dritti, davanti e dietro separatamente. Deve avviare metà delle maglie indicate, aggiungendo però 1 maglia di margine da ciascun lato per la cucitura. Per le maniche è sufficiente avviare 1 m in più da ciascun lato per la cucitura. Le indicazioni per lo sprone sono per i ferri circolari. In base alla sua esperienza, può proseguire i singoli pezzi separatamente e cucire insieme alla fine. Buon lavoro!
30.12.2018 - 12:31
![]() Nepveu wrote:
Nepveu wrote:
J\'aimerai utiliser des aiguilles droites pour un modèle 12 ans
03.12.2018 - 16:16DROPS Design answered:
Bonjour Mme Nepveu, vous trouverez ici toutes les informations utiles pour adapter un modèle sur aiguilles droites. Bon tricot!
03.12.2018 - 16:25
![]() Loredana wrote:
Loredana wrote:
Vorrei fare questo modello per una bambina di tre anni ma utilizzando ferri 3.4/4, come posso calcolare le misure. Grazie
17.11.2018 - 09:41DROPS Design answered:
Buongiorno Loredana, per un aiuto così personalizzato può rivolgersi al suo rivenditore DROPS di fiducia. Buon lavoro!
17.11.2018 - 12:06
![]() Line wrote:
Line wrote:
Diagrammet A3 viser at man skal flytte 8 masker ved snoningen. Men forklaringen til diagrammet siger, at man kun skal flytte fire og strikke fire. Hvilket betyder at der så er fire masker, jeg ikke ved hvad jeg skal stille op med. Jeg forstår med andre ord ikke hvordan snoningen skal laves. Jeg kender kun til snoninger hvor halvdelen flyttes og ikke en tredjedel. Er der ikke en fejl i opskriften?
19.10.2018 - 13:38DROPS Design answered:
Hej Line, jo du ser at snoningen går over 8 masker, det vil sige at 3.pind (1.snoning) strikkes således fra retsiden: sæt 4 m på snoningspind foran arbejdet, strik de 4 næste masker, strik de 4 masker fra snoningspinden og til sidst de sidste 4 masker i diagrammet som strikkes ret. God fornøjelse!
30.10.2018 - 09:36
![]() Giancarla Coco wrote:
Giancarla Coco wrote:
Ho una curiosita':che significato ha il simbolo del diamante che compare nella foto del catalogo.Grazie se vorrete rispondere.
11.10.2018 - 14:46DROPS Design answered:
Buongiorno Giancarla. Il diamante indica i modelli che sono riportati nella home page del sito, in corrispondenza delle catecogie: bambini, donna, maglioni e così via. Buon lavoro!
11.10.2018 - 16:23
|
|||||||||||||
Ylva#ylvasweater |
|||||||||||||
 |
 |
||||||||||||
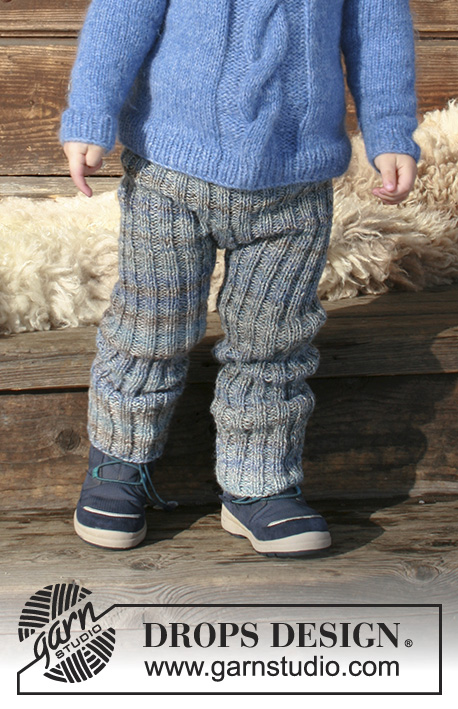
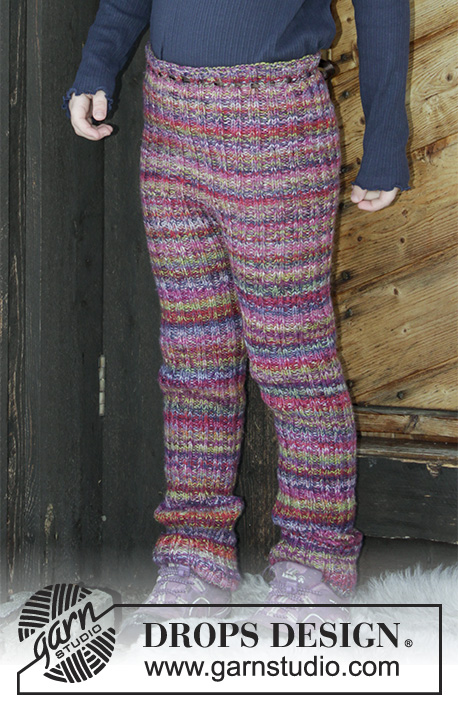
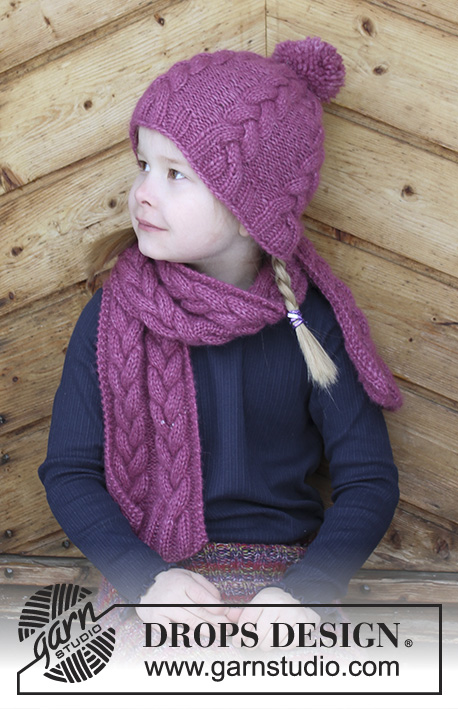
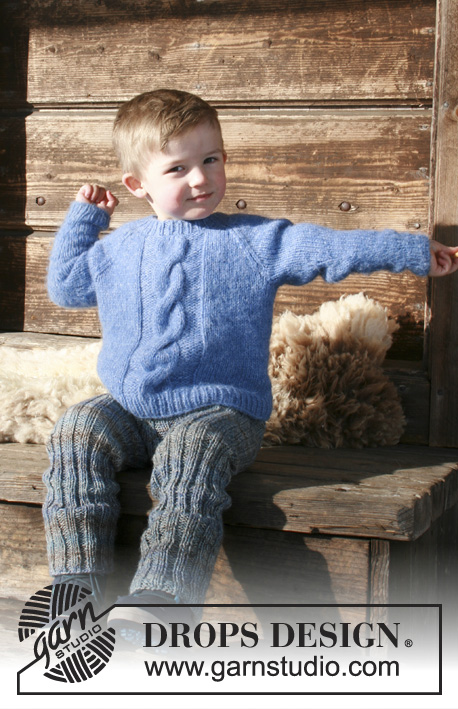
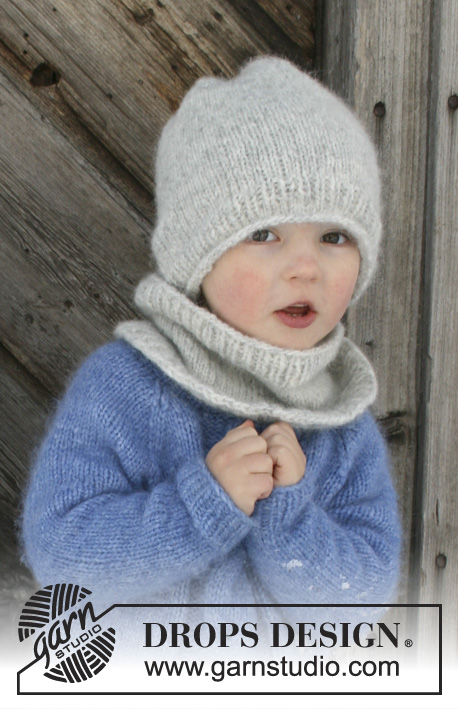
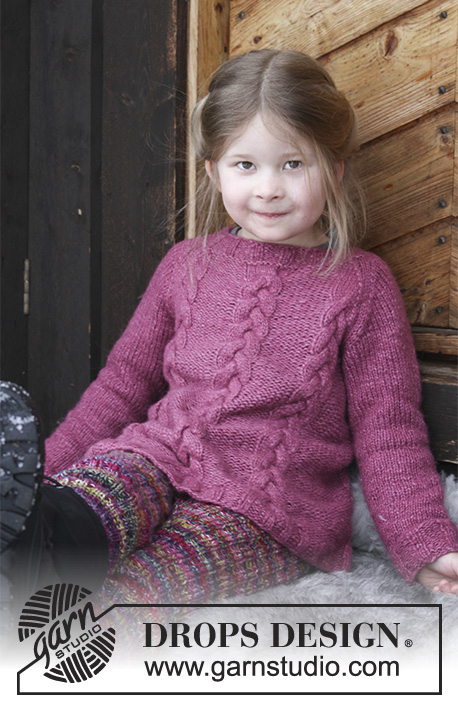
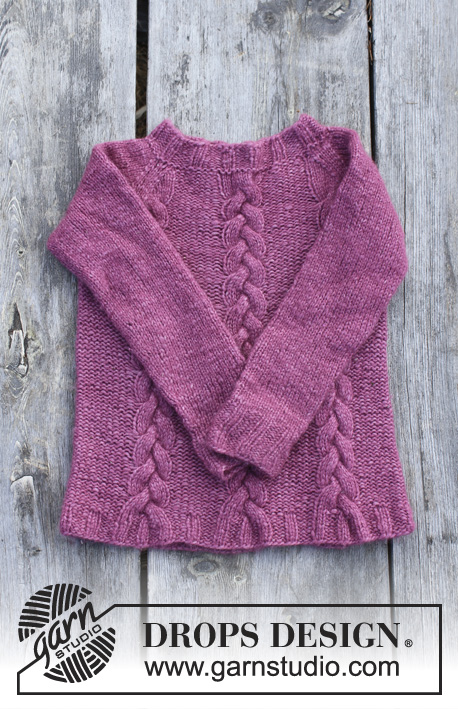
Knitted jumper with cables and raglan for kids. Size 2 - 12 years Piece is knitted in DROPS Air.
DROPS Children 30-3 |
|||||||||||||
|
INFORMATION FOR PATTERN: GARTER STITCH (worked in the round): 1 ridge = 2 rounds. Knit 1 round and purl 1 round. PATTERN: See diagrams A.1, A.2 and A.3. Choose diagram for your size in A.2. INCREASE TIP: Increase as follows mid under sleeve - beg 1 stitch before marker: Make 1 yarn over, knit 2 (marker is between these 2 stitches), make 1 yarn over. On next round knit yarn overs twisted to avoid holes. RAGLAN: Decrease 2 stitches in every transition between body and sleeves. Begin 3 stitches before marker thread: Knit 2 together, knit 2 (marker thread is between these stitches), slip 1 stitch knitwise, knit 1, pass slipped stitch over stitch worked. KNITTING TIP: If knitting tension is incorrect in height and the knitting is too tight, the yoke will be too short and the armholes too small. This can be adjusted by working 1 extra round without decrease evenly spaced between decrease ---------------------------------------------------------- BODY: Worked in the round on circular needle, bottom up. Cast on 132-142-150-150-150-160 stitches on circular needle size 5 mm with Air. Knit 1 round, then work rib as follows: SIZE 2 years: Knit 1, purl 3, knit 2, purl 3, A.1 (= 12 stitches), A.2 (= 6 stitches), A.1, A.2. A.1, * purl 3, knit 2 *, work from *-* over the next 15 stitches, purl 3, A.1, A.2, A.1, A.2, A.1, purl 3, knit 2, purl 3, knit 1. SIZE 3/4 - 5/6 - 7/8 - 9/10 years: Purl 1, knit 2, purl 3, knit 2, purl 3, A.1 (= 12 stitches), A.2 (= 6-8-8-8 stitches), A.1, A.2, A.1, * purl 3, knit 2 *, work from *-* over the next 20 stitches, purl 3, A.1, A.2, A.1, A.2, A.1, purl 3, knit 2, purl 3, knit 2, purl 2. SIZE 11/12 years: Knit 1, purl 3, knit 2, purl 3, knit 2, purl 3, A.1 (= 12 stitches), A.2 (= 8 stitches), A.1, A.2, A.1, * purl 3, knit 2 *, work from *-* over the next 25 stitches, purl 3, A.1, A.2, A.1, A.2, A.1, purl 3, knit 2, purl 3, knit 2, purl 3, knit 1. ALL SIZES: Continue with rib like this for 4 cm. Switch to circular needle size 6 mm. Then work as follows: Purl the first 9-11-11-11-11-14 stitches, A.3 (= 12 stitches), purl 6-6-8-8-8-8, A.3, purl 6-6-8-8-8-8, A.3, purl the next 18-23-23-23-23-28 stitches, A.3, purl 6-6-8-8-8-8, A.3, purl 6-6-8-8-8-8, A.3, purl over the last 9-12-12-12-12-14 stitches. On next round adjust number of stitches over the 18-23-23-23-23-28 stitches purl in each side to 18-22-20-24-26-28 stitches = 132-140-144-152-156-160 stitches. Insert 1 marker thread in each side, in the middle of purl stitches (= 66-70-72-76-78-80 stitches on back piece and front piece). Continue with A.3 and purl as before upwards. REMEMBER THE KNITTING TENSION! When piece measures 20-23-26-29-32-35 cm, cast off 6 stitches in each side for armholes (cast off 3 stitches on each side of both marker treads). There are 60-64-66-70-72-74 stitches on back piece and front piece. Put piece aside and work the sleeves. SLEEVE: Work in the round on double pointed needles, switch to short circular needle when needed. Cast on 30-30-30-35-35-35 stitches on double pointed needles size 5 mm with Air. Knit 1 round, then work rib = knit 2/purl 3. When piece measures 4 cm, switch to double pointed needles size 6 mm. Knit 1 round while decreasing 4-4-4-7-7-5 stitches evenly = 26-26-26-28-28-30 stitches. Insert 1 marker at beginning of round (= mid under sleeve). Then work in stocking stitch. When piece measures 6 cm, increase 2 stitches mid under sleeve - read INCREASE TIP. Increase like this every 3-3½-3½-4½-4½-5 cm 5-6-7-6-7-7 times in total = 36-38-40-40-42-44 stitches. When piece measures 21-26-29-33-37-41 cm, cast off 6 stitches mid under sleeve (cast off 3 stitches on each side of marker thread) = 30-32-34-34-36-38 stitches. Put piece aside and knit another sleeve. YOKE: Slip sleeves on to same circular needle as body where armholes were cast off = 180-192-200-208-216-224 stitches. Insert a marker thread in all transitions between sleeves and body (= 4 marker threads). Continue with pattern as before and decrease for RAGLAN - see explanation above. Decrease every 4th round 5-5-6-5-5-6 times and every other round 4-5-5-6-6-6 times = 9-10-11-11-11-12 times in total. When there are not enough stitches in each side towards the raglan lines to make the cables in A.3, decrease 6 stitches in A.3 in each side by knitting 2 by 2 stitches together. On last decrease for raglan decrease 6 stitches the same way over the two middle repetitions of A.3. After all decreases are done, 72-76-76-84-92-92 stitches remain on round. Knit 1 round over all stitches while decreasing 12-16-16-19-22-22 stitches evenly = 60-60-60-65-70-70 stitches. Work 1 ridge in GARTER STITCH - see explanation above. Then work rib = knit 2/purl 3 for 3-3-3-4-4-4 cm. Cast off stitches with knit over knit and purl over purl. ASSEMBLY: Sew the opening under the sleeves. |
|||||||||||||
Diagram explanations |
|||||||||||||
|
|||||||||||||
 |
|||||||||||||
 |
|||||||||||||
Have you finished this pattern?Tag your pictures with #dropspattern #ylvasweater or submit them to the #dropsfan gallery. Do you need help with this pattern?You'll find 30 tutorial videos, a Comments/Questions area and more by visiting the pattern on garnstudio.com. © 1982-2026 DROPS Design A/S. We reserve all rights. This document, including all its sub-sections, has copyrights. Read more about what you can do with our patterns at the bottom of each pattern on our site. |
|||||||||||||


With over 40 years in knitting and crochet design, DROPS Design offers one of the most extensive collections of free patterns on the internet - translated to 17 languages. As of today we count 325 catalogues and 12298 patterns translated into English (UK/cm).
We work hard to bring you the best knitting and crochet have to offer, inspiration and advice as well as great quality yarns at incredible prices! Would you like to use our patterns for other than personal use? You can read what you are allowed to do in the Copyright text at the bottom of all our patterns. Happy crafting!
Post a comment to pattern DROPS Children 30-3
We would love to hear what you have to say about this pattern!
If you want to leave a question, please make sure you select the correct category in the form below, to speed up the answering process. Required fields are marked *.