
Popular categories
Looking for a yarn?


Comments / Questions (9)
![]() Emma Katrine wrote:
Emma Katrine wrote:
Hej 😊 Jeg er i gang med at strikke denne cardigan, og er nået til Pil-2, hvor jeg skal tage 24 masker ud. På denne pind er der samtidig farve-mønster, og jeg kan ikke finde ud af, hvordan jeg tilføjer masker uden at det kommer til at forstyrre mønsteret? Det er som om den grønne maske kommer til at ligge forkert. Hvordan tager man ud på en pind, hvor der er farve-mønster?
04.03.2026 - 06:49DROPS Design answered:
Hei Emma. Selv om du øker på en mønsterpinne og det blir flere masker på den ene siden av X (mosegrønn) enn den andre siden, vil arbeidet vide seg ut/strekke seg, slik at det vil ikke bli noe særlig synlig på det ferdige plagget. Man tar ut på "vanlig" måte (økes ved å lage 1 kast om pinnen, på neste pinne strikkes kastene vridd slik at det ikke blir hull). mvh DROPS Design
23.03.2026 - 13:14
![]() Patti Buchanan wrote:
Patti Buchanan wrote:
I am beginning the yoke and have 75 stitches. The pattern indicates that A1 is worked over 72 stitches plus I need 2 edge stitches....that totals 74 therefore why 75 stitches?
31.07.2023 - 15:48DROPS Design answered:
Dear Patti, you work 1 edge stitch, A.1 over 72 stitches, plus work the first stitch of A.1 and another edge stitch. In total you have 75 stitches. Happy knitting!
31.07.2023 - 18:41
![]() Veronica wrote:
Veronica wrote:
Når blir denne oppskriften lagt ut?
29.09.2020 - 17:30DROPS Design answered:
Hej Veronica, det varer ikke længe nu :)
30.09.2020 - 11:50
![]() Martina Herold wrote:
Martina Herold wrote:
Das wird mein Projekt :)
21.08.2020 - 11:21
![]() Bodin Ghislaine wrote:
Bodin Ghislaine wrote:
J aime beaucoup
17.06.2020 - 07:39
![]() Susana wrote:
Susana wrote:
Muito bonita!
11.06.2020 - 14:20
![]() Heike wrote:
Heike wrote:
Kann es kaum erwarten damit an zufangen.
10.06.2020 - 21:02
![]() Grażyna wrote:
Grażyna wrote:
Ładny żakard, w miarę prosty, myślę że sobie z nim poradzę. Kolory też piękne
05.06.2020 - 11:19
![]() Yvonne Smeijsters wrote:
Yvonne Smeijsters wrote:
Zou zo aan dit vest willen beginnen om hem op tijd af te hebben voor de winter
05.06.2020 - 07:11
|
|||||||||||||
Colours of Winter Jacket#coloursofwinterjacket |
|||||||||||||
 |
 |
||||||||||||
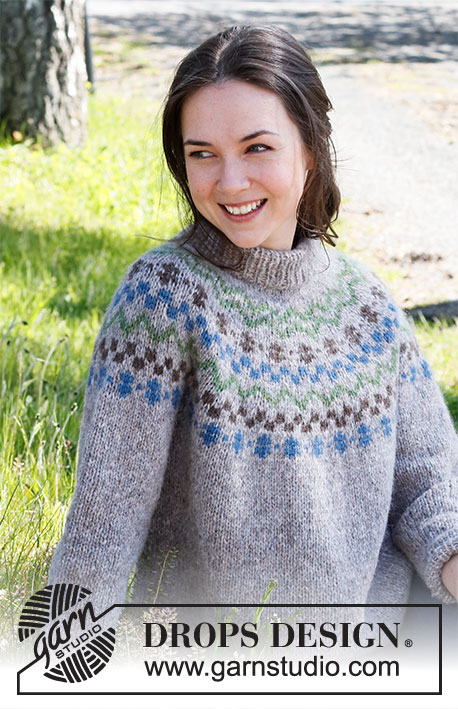
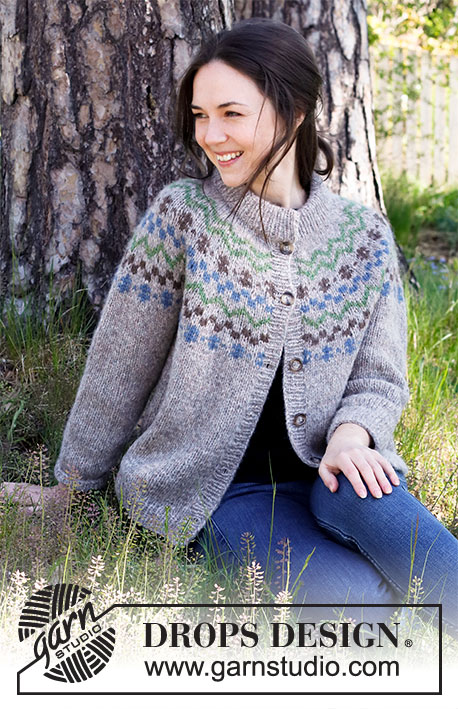
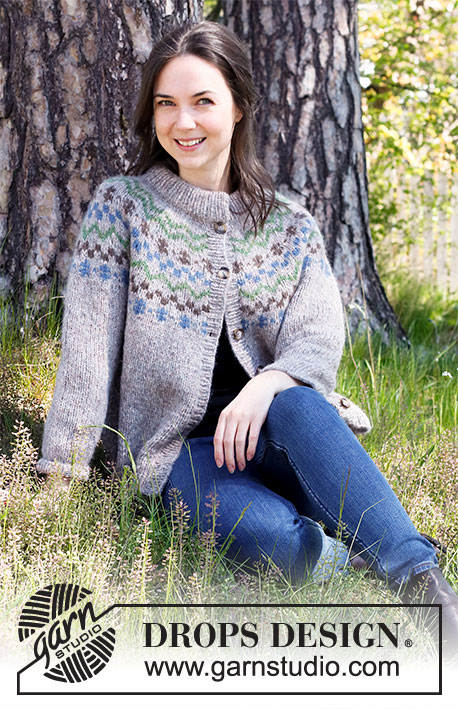
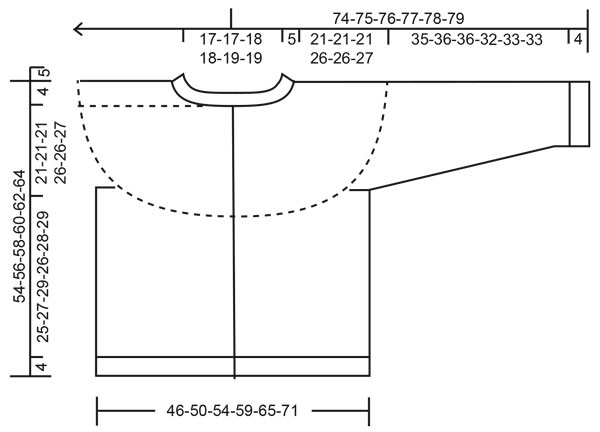
Knitted jacket in DROPS Air. The piece is worked top down with round yoke and Nordic pattern. Sizes S - XXXL.
DROPS 215-14 |
|||||||||||||
|
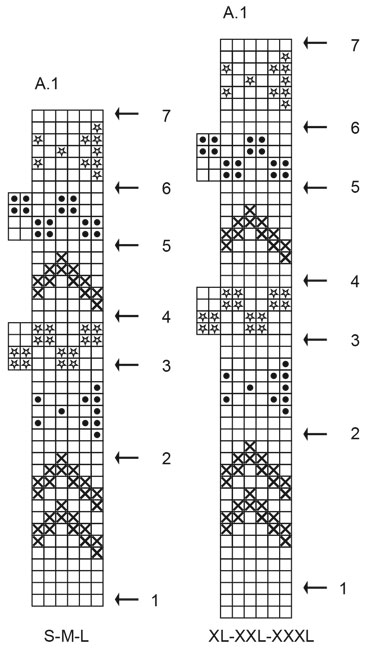
------------------------------------------------------- EXPLANATIONS FOR THE PATTERN: ------------------------------------------------------- RIDGE/GARTER STITCH (worked back and forth): Knit all rows. 1 ridge in height = Knit 2 rows. INCREASE TIP (evenly spaced): To work out how to increase evenly, count the total number of stitches on the needle (e.g. 121 stitches) minus the edge stitches (e.g. 2 stitches) and divide the remaining stitches by the number of increases to be made (e.g. 44) = 2.7. In this example, increase by making 1 yarn over after alternately each 2nd and 3rd stitch (do not increase over the edge stitches). On the next row work the yarn overs twisted to avoid holes. PATTERN: See diagram A.1. The whole pattern is worked in stockinette stitch. See diagram for your size. KNITTING TIP: To avoid the knitting gauge becoming tighter when working pattern, it is important the strands at the back are not tight. Use a larger size needle when working pattern if this is a problem. DECREASE TIP (for mid under sleeve): Start 3 stitches before the marker thread, knit 2 together, knit 2 (marker thread sits between these 2 stitches), slip 1 stitch as if to knit, knit 1 and pass the slipped stitch over the knitted stitch (= 2 stitches decreased). BINDING-OFF TIP: To avoid the bind-off edge being tight you can bind off with a larger size needle. If the edge is still tight, make 1 yarn over after approx. each 8th stitch at the same time as binding off and the yarn overs are bind off as normal stitches. BUTTONHOLES: Work 6-6-6-7-7-7 buttonholes on the right band. 1 buttonhole = Work 2 stitches together and make 1 yarn over. On the next row knit the yarn over to leave a hole. The bottom buttonhole is approx. 4 cm = 1½" from the bottom edge and the top buttonhole just below the neck. The other 5-5-5-6-6-6 buttonholes are positioned evenly between them, with approx. 7-8 cm = 2¾"-3⅛" between each one. ------------------------------------------------------- START THE PIECE HERE: ------------------------------------------------------- JACKET – SHORT OVERVIEW OF THE PIECE: The neck and yoke are worked back and forth with circular needle from mid front and top down. The yoke is divided for body and sleeves and the body continued back and forth. The sleeves are worked in the round with short circular needle/double pointed needles, top down. The bands are worked to finish. NECK: Cast on 87-93-93-99-99-105 stitches with circular needle size 4.5 mm = US 7 and beige. Purl 1 row (= wrong side). The next row is worked as follows from the right side: 1 edge stitch in GARTER STITCH – read description above, * knit 1, purl 1 *, work from *-* until there are 2 stitches left, knit 1 and 1 edge stitch in garter stitch. When the neck measures 10 cm = 4" in all sizes change to circular needle size 5.5 mm = US 9. The next row is worked as follows from the right side: Bind off the first 6 stitches (the bands are sewn here later) and knit the remaining stitches. Turn and bind off the first 6 stitches = 75-81-81-87-87-93 stitches on the needle. Purl until there is 1 stitch left and finish with 1 edge stitch in garter stitch. Insert 1 marker on the row; the yoke is measured from here! YOKE: Read KNITTING TIP! The first row is worked as follows from the right side: 1 edge stitch in garter stitch, work A.1 over the next 72-78-78-84-84-90 stitches (= 12-13-13-14-14-15 repeats of 6 stitches), work the first stitch in A.1 and 1 edge stitch in garter stitch. Continue this pattern. REMEMBER THE KNITTING GAUGE! AT THE SAME TIME on each row marked with an arrow in A.1, increase stitches evenly as described below: Arrow-1: Increase 30-30-36-36-36-42 stitches evenly spaced = 105-111-117-123-123-135 stitches (there is now room for 17-18-19-20-20-22 repeats of A.1 with 6 stitches; remember the first stitch in A.1 at the end of the row). Arrow-2: Increase 24-30-30-36-36-42 stitches evenly spaced = 129-141-147-159-159-177 stitches (there is now room for 21-23-24-26-26-29 repeats of A.1 with 6 stitches). Arrow-3: Increase 27-23-25-37-37-43 stitches evenly spaced = 156-164-172-196-196-220 stitches (there is now room for 19-20-21-24-24-27 repeats of A.1 with 8 stitches and the first 2 stitches in A.1 are worked before the edge stitch at the end of the row). Arrow-4: Increase 21-25-23-29-35-41 stitches evenly spaced = 177-189-195-225-231-261 stitches (there is now room for 29-31-32-37-38-43 repeats of A.1 with 6 stitches). Arrow-5: Increase 27-23-25-27-37-39 stitches evenly spaced = 204-212-220-252-268-300 stitches (there is now room for 25-26-27-31-33-37 repeats of A.1 with 8 stitches and the first 2 stitches in A.1 are worked before the edge stitch at the end of the row). Arrow-6: Increase 21-19-23-27-29-21 stitches evenly spaced = 225-231-243-279-297-321 stitches (there is now room for 37-38-40-46-49-53 repeats of A.1 with 6 stitches). Arrow-7: Increase 5-15-19-15-13-17 stitches evenly spaced = 230-246-262-294-310-338 stitches. Continue with beige until the piece measures 21-21-21-26-26-27 cm = 8¼"-8¼"-8¼"-10¼"-10¼"-10⅝" from the marker on the neck. Now divide the yoke for the body and sleeves working from the right side as follows: Work the first 35-38-40-44-48-53 stitches as before (= front piece), place the next 46-48-52-60-60-64 stitches on 1 thread for the sleeve, cast on 6-6-8-8-10-10 new stitches on the needle (= in side under sleeve), work 68-74-78-86-94-104 stitches as before (= back piece), place the next 46-48-52-60-60-64 stitches on 1 thread for the sleeve, cast on 6-6-8-8-10-10 new stitches on the needle (= in side under sleeve) and work the remaining 35-38-40-44-48-53 stitches as before (= front piece). Body and sleeves are finished separately. THE PIECE IS NOW MEASURED FROM HERE! BODY: = 150-162-174-190-210-230 stitches. Continue with stockinette stitch, beige and 1 edge stitch in garter stitch on each side until the piece measures 25-27-29-26-28-29 cm = 9¾"-10⅝"-11⅜"-10¼"-11"-11⅜" from the division (there is approx. 4 cm = 1½" left to finished length; you can try the jacket on and work to desired length). Change to circular needle size 4.5 mm = US 7 and knit 1 row from the right side, where you increase 7-7-9-9-11-11 stitches evenly spaced = 157-169-183-199-221-241 stitches The next row is worked as follows from the wrong side: 1 edge stitch in garter stitch, * purl 1, knit 1 *, work from *-* until there are 2 stitches left on the row, purl 1 and finish with 1 edge stitch in garter stitch. Continue this rib for 4 cm = 1½". Bind off with knit over knit and purl over purl – read BINDING OFF TIP! The jacket measures approx. 54-56-58-60-62-64 cm = 21¼"-22"-22¾"-23⅝"-24⅜"-25¼" from the shoulder down. SLEEVE: Place the 46-48-52-60-60-64 stitches from the thread on the one side of the piece on short circular needle/double pointed needles size 5.5 mm = US 9 and knit up 1 stitch in each of the 6-6-8-8-10-10 stitches cast on under the sleeve = 52-54-60-68-70-74 stitches. Insert a marker thread in the middle of the 6-6-8-8-10-10 stitches under the sleeve. Allow the thread to follow your work onwards; it will be used when decreasing under the sleeve. Work stockinette stitch in the round, with beige. When the piece measures 3 cm = 1⅛" start to decrease under the sleeve - read DECREASE TIP. Decrease like this every 5-4½-3½-2-2½-2 cm = 2"-1⅝"-1¼"-¾"-1"-¾" a total of 6-7-8-12-11-13 times = 40-40-44-44-48-48 stitches. When the sleeve measures 31-32-32-28-29-29 cm = 12¼"-12½"-12½"-11"-11⅜"-11⅜" from the division, change to double pointed needles size 4.5 mm = US 7. Work rib (knit 1 / purl 1) for 4 cm = 1½". Bind off with knit over knit and purl over purl. The sleeve measures approx. 35-36-36-32-33-33 cm = 13¾"-14¼"-14¼"-12½"-13"-13". Work the other sleeve in the same way. ASSEMBLY: Fold the neck double to the inside and sew down. Sew the sides of the neck together mid front. To avoid the neck being tight and rolling outwards, it is important that the seam is elastic. LEFT BAND (when the garment is worn): Knit up from the right side (with circular needle size 4.5 mm = US 7 and beige) approx. 95-99-103-107-111-113 stitches, inside the 1 edge stitch all the way down the left front piece (the number of stitches should be divisible by 2+ 1). Work rib as follows (row 1 = wrong side): 1 edge stitch in garter stitch, * purl 1, knit 1 *, work from *-* until there are 2 stitches left on the row, purl 1 and 1 edge stitch in garter stitch. Continue this rib for 3 cm = 1⅛" – adjust so the band is as wide as the 6 bind off stitches on the neck. Bind off with knit over knit and purl over purl. RIGHT BAND (when the garment is worn): Work in the same way as the left band, but after 1-1½ cm = ⅜"-½" work 6-6-6-7-7-7 BUTTONHOLES evenly spaced – read description above. ASSEMBLY: Sew the bands neatly to the neck with the seam to the wrong side. Sew the buttons onto the left band. |
|||||||||||||
Diagram explanations |
|||||||||||||
|
|||||||||||||
 |
|||||||||||||
 |
|||||||||||||
Have you finished this pattern?Tag your pictures with #dropspattern #coloursofwinterjacket or submit them to the #dropsfan gallery. Do you need help with this pattern?You'll find 34 tutorial videos, a Comments/Questions area and more by visiting the pattern on garnstudio.com. © 1982-2026 DROPS Design A/S. We reserve all rights. This document, including all its sub-sections, has copyrights. Read more about what you can do with our patterns at the bottom of each pattern on our site. |
|||||||||||||


With over 40 years in knitting and crochet design, DROPS Design offers one of the most extensive collections of free patterns on the internet - translated to 17 languages. As of today we count 324 catalogs and 12290 patterns - 12280 of which are translated into English (US/in).
We work hard to bring you the best knitting and crochet have to offer, inspiration and advice as well as great quality yarns at incredible prices! Would you like to use our patterns for other than personal use? You can read what you are allowed to do in the Copyright text at the bottom of all our patterns. Happy crafting!
Post a comment to pattern DROPS 215-14
We would love to hear what you have to say about this pattern!
If you want to leave a question, please make sure you select the correct category in the form below, to speed up the answering process. Required fields are marked *.