
Popular categories
Looking for a yarn?


Comments / Questions (15)
![]() Alexandra wrote:
Alexandra wrote:
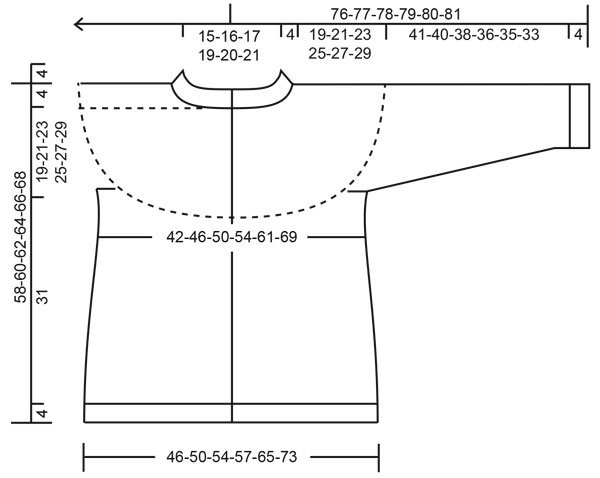
Hi, can I just check that the neckband in rib should be 9cm? this seems a really large band (larger than the model in the picture- and the diagram appears to show that the neckband would be 4cm. thanks!
18.10.2021 - 18:59DROPS Design answered:
Dear Alexandra, neckband should be 9 cm, you will fold it double afterwards to get a folded edge (= approx. 4 cm) - see under ASSEMBLY and last picture. Happy knitting!
19.10.2021 - 08:19
![]() Evelin Goldmann wrote:
Evelin Goldmann wrote:
Habe dieses Muster gestrickt. Es sieht einfach traumhaft aus. Bei einer Jacke haut es leider nicht immer mit den Reihen in einer Farbe hin, dass diese Farbe wieder aufgenommen werden kann. Man müsste hier abschneiden und den Faden wieder neu beginnen. Aber man kann ja improvisieren.
08.02.2021 - 15:13
![]() Cindy wrote:
Cindy wrote:
Kann man diese Jacke auch in Runden mit einem steek stricken? Wenn ja was muss ich beachten? Vielen Dank!
12.01.2021 - 14:28DROPS Design answered:
Liebe Cindy, ja wahrscheinlich können Sie nach dem Bündchen/Hals mit Steek stricken - dieses Video kann Ihnen sicher mithelfen. Viel Spaß beim stricken!
12.01.2021 - 16:06
![]() Maria Estrella wrote:
Maria Estrella wrote:
Spain Preciosa! Me encanta!
17.06.2020 - 19:33
![]() Claudia Dominguez wrote:
Claudia Dominguez wrote:
Absolutely love it
05.06.2020 - 13:21
|
|||||||||||||
Love Links Jacket#lovelinksjacket |
|||||||||||||
 |
 |
||||||||||||
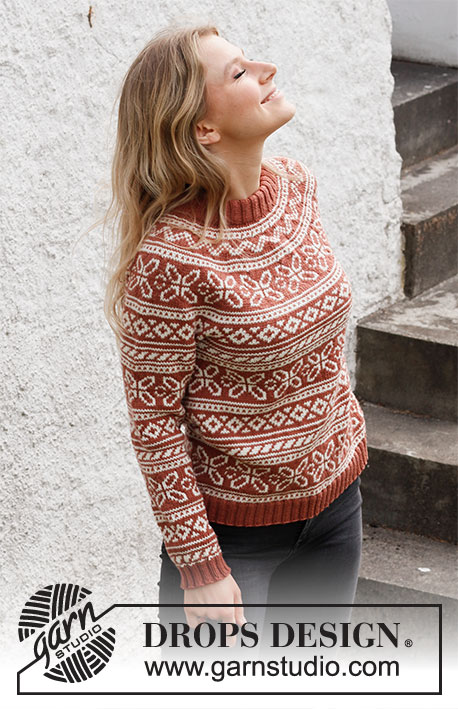
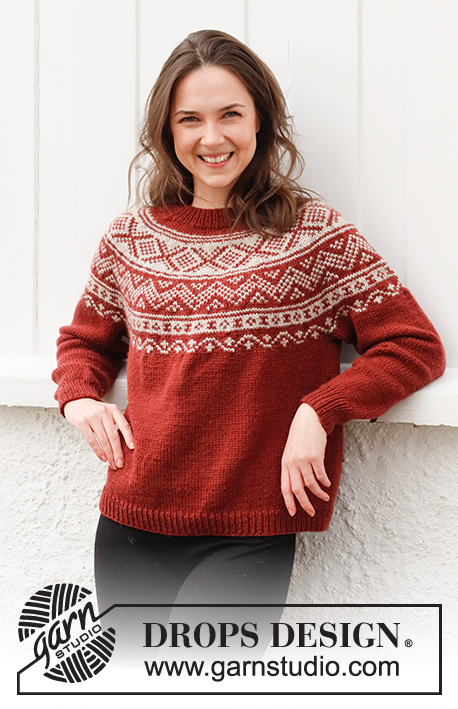
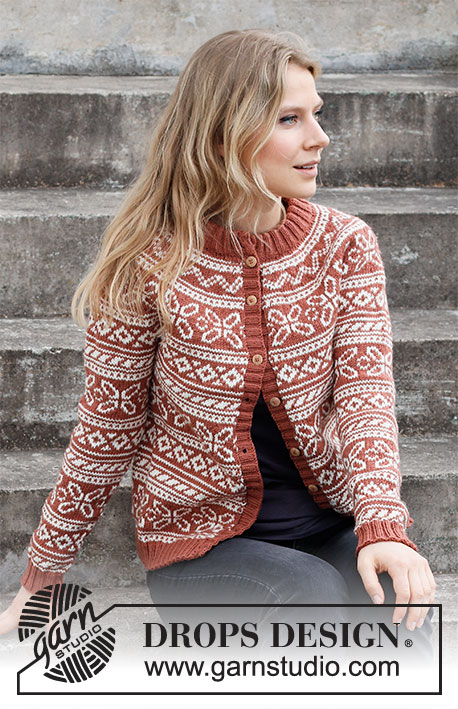
Knitted jacket in DROPS Merino Extra Fine. Piece is knitted top down with double neck edge, round yoke and Nordic pattern. Size XS–XXL.
DROPS 217-18 |
|||||||||||||
|
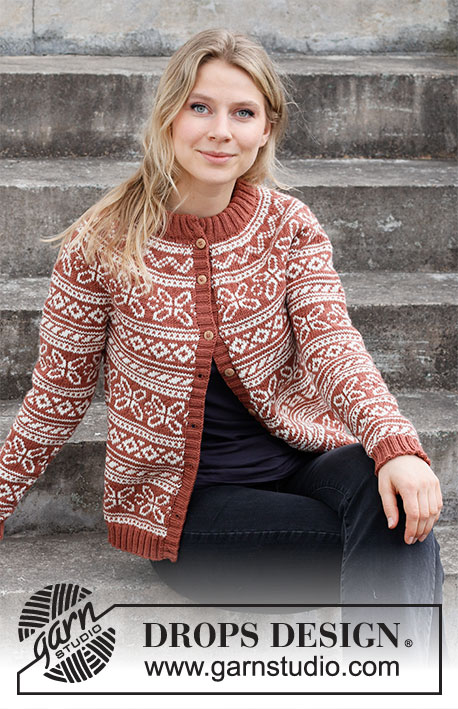
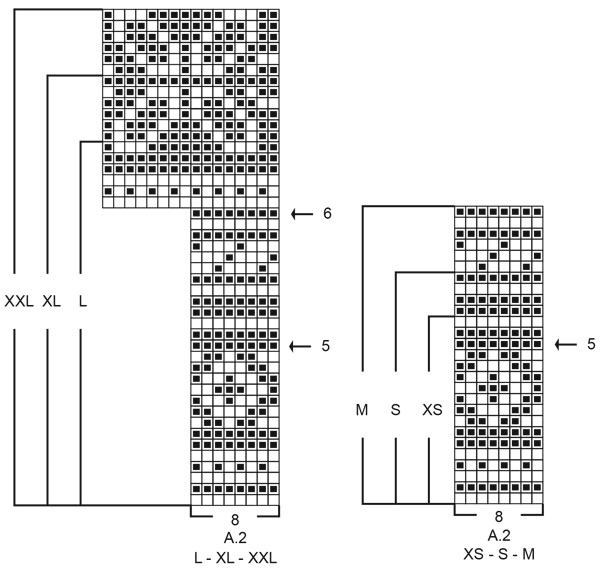
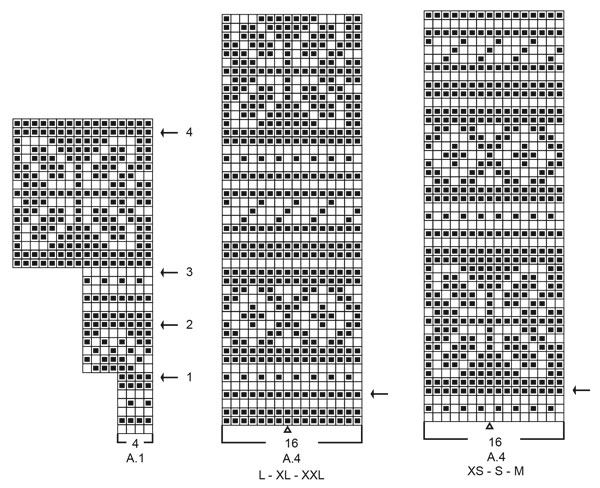
------------------------------------------------------- EXPLANATION FOR THE PATTERN: ------------------------------------------------------- GARTER STITCH (back and forth): Knit all rows. 1 ridge vertically = knit 2 rows. KNITTING TIP: To avoid the knitting gauge to tighten when working pattern, it is important not to tighten the strands on back side of piece. Switch to a higher needle number when working pattern if the pattern is somewhat tight. If the knitting gauge is too tight vertically, the garment will be too short and the armhole will be too small - this can be adjusted by working 1 row more evenly in the sections with one color. If the knitting gauge is too loose vertically, the garment will be too long and the armhole too big, this can be adjusted by working 1 row less in the sections with one color. INCREASE TIP: All increases are done from the right side. To calculate how to increase evenly, use the total number of stitches on row (e.g. 104 stitches) minus edge stitches (e.g. 2 stitches) and divide the remaining 102 stitches by number of increases to be done (e.g. 27) = 3.8. In this example increase by making 1 yarn over after approx. every 4th stitch. On next row (wrong side) purl yarn overs twisted to avoid holes. PATTERN: See diagrams A.1 to A.4. Choose diagram for your size (applies to A.2, A.3 and A.4). Work the entire pattern in stockinette stitch. DECREASE TIP (applies to mid under sleeves): Begin 2 stitches before stitch with marker, knit 2 together, knit 1 (stitch with marker), knit 2 twisted together (= 2 stitches decreased). BIND-OFF TIP: To avoid a tight bind-off edge you may use a larger needle size. If this also is too tight, work a 1 yarn over after approx. every 8th stitch while binding off (bind off yarn overs as regular stitches). BUTTONHOLES: Decrease for buttonholes on right band. Place bottom buttonhole approx. 2 cm = ¾" from bottom edge and place top buttonhole in transition between neck edge and yoke. Adjust placement to decrease in purl sections (seen from right side). 1 BUTTONHOLE = purl 2 together, then make 1 yarn over. On next row (wrong side) knit the yarn over to make a hole. ------------------------------------------------------- START THE PIECE HERE: ------------------------------------------------------- JACKET - SHORT OVERVIEW OF THE PIECE: Work double neck edge and yoke back and forth on circular needle from mid front, top down. When neck edge is done, bind off band stitches, and continue with 1 edge stitch in garter stitch in each side. Now divide yoke for body and sleeves. Work body back and forth on circular needle from mid front, top down. Work sleeves in the round on double pointed needles/short circular needle, top down. Work bands at the end. DOUBLE NECK EDGE: Cast on 116-120-124-132-136-144 stitches (including 6 band stitches in each side towards mid front) on circular needle size 3 mm = US 2,5 with cedar. Purl 1 row (= wrong side). Work next row as follows from right side: 1 edge stitch in GARTER STITCH – read explanation above, * knit 2, purl 2 *, work from *-* until 3 stitches remain, knit 2, and finish with 1 edge stitch in garter stitch. Continue rib like this for 9 cm = 3½". When rib has been finished, work next row as follows from right side: Bind off the first 6 stitches (= band), knit over the next 104-108-112-120-124-132 stitches and increase at the same time 27-31-35-35-39-47 stitches evenly over these stitches – read INCREASE TIP, then work rib as before over the remaining 6 stitches. Turn piece, bind off the first 6 stitches (= band) and purl the rest of row (purl yarn over twisted) = 131-139-147-155-163-179 stitches on row including 1 edge stitch in each side. Insert 1 marker inside edge stitch mid front. Work yoke as explained below, measure yoke from this marker. YOKE: Switch to circular needle size 4 mm = US 6. Read all of the following section on yoke before working and read KNITTING TIP! Work first row as follows from right side: 1 edge stitch in garter stitch, work A.1 until 2 stitches remain on row (= 32-34-36-38-40-44 repetitions of 4 stitches), work first stitch in A.1 so that pattern begins and ends the same way in each side towards mid front, and finish with 1 edge stitch in garter stitch. Continue pattern like this with 1 edge stitch in garter stitch in each side towards mid front (work edge stitches with the color cedar). When A.1 has been worked vertically, work A.2 the same way. REMEMBER THE KNITTING GAUGE! AT THE SAME TIME on every row marked with arrow in A.1 and A.2, increase stitches evenly as explained below - remember INCREASE TIP: Arrow-1: Increase 32-32-32-32-40-40 stitches evenly = 163-171-179-187-203-219 stitches (there is now room for 20-21-22-23-25-27 repetitions A.1 of 8 stitches). Arrow-2: Increase 32-40-40-40-40-48 stitches evenly = 195-211-219-227-243-267 stitches (there is now room for 24-26-27-28-30-33 repetitions A.1 of 8 stitches). Arrow-3: Increase 32-32-40-48-48-40 stitches evenly = 227-243-259-275-291-307 stitches (there is now room for 14-15-16-17-18-19 repetitions A.1 of 16 stitches). Arrow-4: Increase 32-32-32-32-40-48 stitches evenly = 259-275-291-307-331-355 stitches (there is now room for 32-34-36-38-41-44 repetitions A.2 of 8 stitches). Arrow-5: Increase 32-32-32-24-32-32 stitches evenly = 291-307-323-331-363-387 stitches (there is now room for 36-38-40-41-45-48 repetitions A.2 of 8 stitches). Increases in size XS, S and M are now done. Arrow-6: Increase 24-24-32 stitches evenly (only applies to sizes L, XL and XXL) = 291-307-323-355-387-419 stitches (there is now room for 22-24-26 repetitions A.1 of 16 stitches in the 3 largest sizes). The increases in size L, XL and XXL are done. Then work until last row in A.2 remains in your size. Piece measures approx. 19-21-23-25-27-29 cm = 7½"-8¼"-9"-9¾"-10⅝"-11⅜" from marker mid front. Now divide yoke for body and sleeves, i.e. work next row as follows from right side: Work 1 edge stitch in garter stitch, work 40-44-46-50-56-64 stitches in stockinette stitch as shown in last row in A.2 (= front piece), slip the next 64-64-68-76-80-80 stitches on 1 stitch holder for sleeve, cast on 8-8-12-12-16-16 new stitches on needle (= in the side under sleeve), work 81-89-93-101-113-129 stitches as shown in last row in A.2 (= back piece), slip the next 64-64-68-76-80-80 stitches on 1 stitch holder for sleeve, cast on 8-8-12-12-16-16 new stitches on needle (= in the side under sleeve) and work the remaining 40-44-46-50-56-64 stitches as shown in A.2, and finish with 1 edge stitch in garter stitch (= front piece). Finish body and sleeves separately. NOW MEASURE PIECE FROM HERE! BODY: = 179-195-211-227-259-291 stitches. Work first row as follows from wrong side: XS, S, L and XL: Work 1 edge stitch in garter stitch, work first stitch in A.3 (seen from right side), work A.3 until 1 stitch remains on row (= 22-24-14-16 repetitions of 8-8-16-16 stitches), and finish with 1 edge stitch in garter stitch. NOTE! Read diagram from left to right when working from wrong side. Continue pattern back and forth so that pattern border from yoke is finished. When A.3 has been worked vertically, work next row as follows from wrong side: 1 edge stitch in garter stitch, work first stitch in A.4 (seen from right side), work A.4 until 1 stitch remains on row (= 11-12-14-16 repetitions of 16 stitches), and finish with 1 edge stitch in garter stitch. Then work as explained below ALL SIZES. M and XXL: Work 1 edge stitch in garter stitch, work first stitch in A.4 (seen from right side), work A.4 until 1 stitch remains on row (= 13-18 repetitions of 16 stitches), and finish with 1 edge stitch in garter stitch. NOTE! Read diagram from left to right when working from wrong side. Then work as explained below ALL SIZES. ALL SIZES: Continue A.4 with 1 edge stitch in garter stitch in each side. Repeat A.4 vertically as far as you can before rib begins at the bottom of body. AT THE SAME TIME on row marked with arrow in A.4 increase 16 stitches evenly in all sizes = 195-211-227-243-275-307 stitches (this increase is only done first time A.4 is worked vertically, and there is now room for 12-13-14-15-17-19 repetitions A.4 of 16 stitches). Work until piece measures approx. 31 cm = 12¼" from division in all sizes – finish pattern nicely after a whole pattern border. Approx. 4 cm = 1½" remain until finished measurements, try the jacket on and work until desired length. Knit 1 row from right side with cedar while increasing 57-61-65-73-81-93 stitches evenly = 252-272-292-316-356-400 stitches. NOTE! Increase stitches to avoid the rib from contracting when working the piece together. Switch to circular needle size 3 mm = US 2,5 and work first row from wrong side as follows: 1 edge stitch in garter stitch, * purl 2, knit 2 *, repeat from *-* until 3 stitches remain on needle, purl 2, and finish with 1 edge stitch in garter stitch. Continue rib like this for 4 cm = 1½". Bind off stitches with knit over knit and purl over purl - read BIND OFF TIP! Jacket measures approx. 58-60-62-64-66-68 cm = 22¾"-23⅝"-24⅜"-25¼"-26"-26¾" from shoulder and down. SLEEVE: Slip the 64-64-68-76-80-80 stitches from stitch holder in one side of piece on double pointed needles or a short circular needle size 4 mm = US 6 and pick in addition up 1 stitch in each of the 8-8-12-12-16-16 new stitches cast on under sleeve = 72-72-80-88-96-96 stitches. Insert 1 marker in the middle of the 8-8-12-12-16-16 stitches cast on under sleeve, i.e. insert marker in first stitch after the middle, count 35-35-39-43-47-47 stitches, insert 1 marker in next stitch (= middle stitch). 35-35-39-43-47-47 stitches remain on round after last marker. Move markers upwards when working. Marker mid under sleeve is used later when decreasing stitches under sleeve and marker mid on top of sleeve should be used to count where to begin pattern. Work last round in A.2 to finish A.2 the same way as on body - make sure that pattern fits over stitches from yoke. Read the rest of sleeve before continuing! XS, S, L and XL: Work A.3 in the round to finish repetition from yoke vertically but adjust to continue pattern nicely over stitches from yoke. When A.3 has been worked, work A.4 in the round the same way - count outwards from the middle so that middle stitch in A.4 fit with stitch with marker mid on top of sleeve. Repeat A.4 vertically. Then work as explained below ALL SIZES. M and XXL: When last round in A.2 has been worked, work A.4 in the round - count outwards from the middle so that middle stitch in A.4 fit with stitch with marker mid on top of sleeve. Repeat A.4 vertically. Then work as explained below ALL SIZES. ALL SIZES: AT THE SAME TIME when sleeve measures 3 cm = 1⅛" from division in all sizes, decrease 2 stitches mid under sleeve - read DECREASE TIP. Decrease like this every 2½-3-2-1½-1½-1½ cm = 1"-1⅛"-¾"-½"-½"-½" 14-12-16-18-20-20 times in total = 44-48-48-52-56-56 stitches. Work until sleeve measures approx. 41-40-38-36-35-33 cm = 16⅛"-15¾"-15"-14¼"-13¾"-13" from division – finish pattern nicely after a whole pattern border. Approx. 4 cm = 1½" remains until finished measurements. Try the jacket and work to desired length. NOTE! Shorter measurements in the larger sizes because of wider neck and longer yoke. Knit 1 round with cedar while increasing 4 stitches evenly in all sizes = 48-52-52-56-60-60 stitches. Switch to double pointed needles size 3 mm = US 2,5. Work rib in the round = knit 2/purl 2 for 4 cm = 1½". Bind off with knit over knit and purl over purl - remember BIND-OFF TIP. Sleeve measures approx. 45-44-42-40-39-37 cm = 17¾"-17¼"-16½"-15¾"-15¼"-14½" from division. Work the other sleeve the same way. LEFT BAND: Pick up stitches along left front piece on circular needle size 3 mm = US 2,5 with cedar, i.e. begin straight below neck edge and pick up inside 1 edge stitch in garter stitch as follows: Pick up approx. 120-124-128-136-140-144 stitches (equals approx. 25 stitches per 10 cm = 1½" along the edge - number of stitches should be divisible by 4). Work next row as follows from wrong side: 1 edge stitch in garter stitch, * purl 2, knit 2 *, repeat from *-* until 3 stitches remain on needle, purl 2, and finish with 1 edge stitch in garter stitch. Continue rib like this for 2½ = 1" to 3 cm = 1⅛", then bind off with knit over knit and purl over purl. RIGHT BAND: Work band the same way along right front piece but begin at the bottom of front piece and continue up to neck edge. When band measures approx. 1 = ⅜" to 1½ cm = ½", decrease for 8-8-8-9-9-9 BUTTONHOLES evenly – read explanation above. Then continue band until it measure the same as left band. Bind off stitches with knit over knit and purl over purl. ASSEMBLY: Sew band to neck edge inside 1 edge stitch with seam in towards wrong side of garment. Fold rib at the top of neck double in towards wrong side of garment. Fasten rib but to avoid a tight neck edge and avoiding the edge to tip outwards, it is important to make the seam elastic. Sew together opening mid front with small stitches. Sew the buttons on to the left band. |
|||||||||||||
Diagram explanations |
|||||||||||||
|
|||||||||||||
 |
|||||||||||||
 |
|||||||||||||
 |
|||||||||||||
 |
|||||||||||||
Have you finished this pattern?Tag your pictures with #dropspattern #lovelinksjacket or submit them to the #dropsfan gallery. Do you need help with this pattern?You'll find 30 tutorial videos, a Comments/Questions area and more by visiting the pattern on garnstudio.com. © 1982-2026 DROPS Design A/S. We reserve all rights. This document, including all its sub-sections, has copyrights. Read more about what you can do with our patterns at the bottom of each pattern on our site. |
|||||||||||||


With over 40 years in knitting and crochet design, DROPS Design offers one of the most extensive collections of free patterns on the internet - translated to 17 languages. As of today we count 324 catalogs and 12290 patterns - 12280 of which are translated into English (US/in).
We work hard to bring you the best knitting and crochet have to offer, inspiration and advice as well as great quality yarns at incredible prices! Would you like to use our patterns for other than personal use? You can read what you are allowed to do in the Copyright text at the bottom of all our patterns. Happy crafting!
Post a comment to pattern DROPS 217-18
We would love to hear what you have to say about this pattern!
If you want to leave a question, please make sure you select the correct category in the form below, to speed up the answering process. Required fields are marked *.