
Popular categories
Looking for a yarn?


Comments / Questions (24)
![]() Marga wrote:
Marga wrote:
Ik brei maat xl. Bij de hals staat “ Voeg 1 markeerdraad in na de eerste 24-26-27-28-29-30 steken (= ongeveer midden voor).“ Wanneer je 88 steken hebt opgezet, hoe kan het dan dat je “ ongeveer middenvoor “ hebt na de eerste 28 steken? Is mv dan niet na 44 steken?
14.11.2024 - 00:04DROPS Design answered:
Dag Marga,
Je hebt steken over het voorpand, steken over het achterpand, maar ook steken over beide schouders. Waar je de markeerdraad voor midden voor plaatst is om straks de lengte afmetingen vanaf te meten.
04.12.2024 - 21:26
![]() Birte Reiss Axelsen wrote:
Birte Reiss Axelsen wrote:
Skal striberne være 2 + 1? jeg synes på modellen det ser ud til at det er 2 + 2. Er det en fejl?
06.11.2024 - 19:10DROPS Design answered:
Hej Birte, Det bestemmer du selv :) Vi har lavet dem 2+1 :)
07.11.2024 - 10:59
![]() Christine wrote:
Christine wrote:
Bonjour, je commence mon tricot avec le col en côtes pour 8 cm. Quand je regarde le patron ou la photo, la forme du col est en trapèze et non cylindrique. Est-ce que je dois augmenter mon nombre de mailles initiales avant d'arriver au "yoke"? et est-ce que le début du "yoke" est toujours en côtes ou en point jersey?
10.06.2023 - 12:48DROPS Design answered:
Bonjour Christine, tricotez les 8 cm de côtes du col, puis tricotez l'empiècement comme indiqué (en jersey en suivant A.1). Cette forme trapèze se formera automatiquement à la fin. Bon tricot!
12.06.2023 - 09:34
![]() Ingrid Van Den Bosch wrote:
Ingrid Van Den Bosch wrote:
Bonjour, si je comprend bien, je dois faire 2 augmentations (2 jetés) toutes les 4 mailles pour commencer les augmentations (2 augmentations par motif de 4 mailles) ? Merci
09.01.2023 - 09:31DROPS Design answered:
Bonjour Mme Van Den Bosch, si vous parlez des diagrammes, suivez bien le diagramme approprié à votre taille en tricotant ainsi: *1 m end, 1 jeté, 1 m end, 1 jeté, 2 m end*, et répétez de *-* tout le tour pour le 1er rang de A.1. bon tricot!
09.01.2023 - 11:00
![]() Christa Böckmann wrote:
Christa Böckmann wrote:
Es geht um das Modell 213-13 Frage 1. mir ist die strickfolge des Diagramm für die Passe nicht klar genug erklärt. Frage 2. Warum zunehnahmen ab unterer Ärmelmitte ? Der Arm wird doch nach unter enger....
31.10.2022 - 11:29DROPS Design answered:
Liebe Frau Böckmann, bei der Passe strickt und nimmt man zu wie im Diagram gezeichnet, dh A.1 stricken Sie 18 bis 24 Mal (siehe Größe) in der Runde hier lesen Sie mehr über Diagramme; der Pullover hat Puffärmel, so wird es am Anfang der Ärmel zuerst abgenommen dann zugenommen - siehe ÄRMEL. Viel Spaß beim stricken!
31.10.2022 - 13:17
![]() Kitt Helen Dahle wrote:
Kitt Helen Dahle wrote:
Hei Finnes det flere hvite Drops Air med innfarging7F8636? Da skal jeg ha 2 nøster. Ellers blir det for stor fargeforskjell. Jeg strikker pattern php?id=9719&cid=1. Hilsen Kitt Dahle
19.08.2022 - 17:52DROPS Design answered:
Hei Kitt Helen. Vi selger bare kilovis til butikker. Men ta kontakt med en butikk / en nettbutikk og hør om de har denne innfargingen. Du finner alle butikker under: Finn en butikk! Ellers så anbefaler jeg deg å bruke diverse sosiale medier for håndarbeid (f.eks DROPS Workshop), der er det mange brukere som hjelper hverandre med etterlysning av garn og partinr. mvh DROPS design
22.08.2022 - 11:39
![]() Shar wrote:
Shar wrote:
Hello. I am not understanding the diagram A. 1, work A.1 in the round (= 18-20-21-22-23-24 repeats of 4 stitches). What 4 stitches do I repeat ?
02.02.2022 - 16:21DROPS Design answered:
Hi Shar, diagram A.1 starts with 4 stitches. You will repeat the diagram 18-20-21-22-23-24 times in the round (number of repetion depends on your size). How to read knitting diagrams you will find HERE. Happy knitting!
02.02.2022 - 18:24
![]() Isabelle Francesconi wrote:
Isabelle Francesconi wrote:
Bonjour, Merci pour votre réponse. Oui, j\'ai bien compris votre explication. Ceci dit, je fais la taille M et le marueur du col ne correspond pas au milieu du devant. A 27 mailles (après le début du tour), le marqueur ne se trouve pas au milieu. Est-ce normal ? Mais, j\'ai pu continuer mon tricot, donc je pense que ca va. Merci encore. Bonne journée, Isabelle
31.01.2022 - 17:26DROPS Design answered:
Bonjour Isabelle, les tours commencent au début de la manche, pas au milieu dos, ce marqueur après la 27ème maille est juste "approximativement" au milieu devant, vous allez ensuite mesurer l'empiècement à partir de ce rang, en posant l'ouvrage à plat, comme vous commencez par la manche droite (en rond, de haut en bas), le devant sera juste après la manche, vous tricotez ensuite l'autre manche et le dos en entier (vous aurez donc plus de mailles après le marqueur jusqu'au début du tour). Bonne continuation!
31.01.2022 - 17:56
![]() Francesconi Isabelle wrote:
Francesconi Isabelle wrote:
Suite de mon message.... De plus, le marqueur , du coup ,'est pas au milieu du devant, mais un peu sur le côté, pourquoi ? Ou il faut juste le placer après 27 mailles (?) et ne pas tricoter avec lui ? C'est juste pour mesurer l'ouvrage ? Merci beaucoup de votre réponse Bien cordialement, Isabelle
30.01.2022 - 10:03DROPS Design answered:
Bonjour Isabelle, est-ce que la réponse précédente pourrait vous aider à comprendre? Si ce n'est pas le cas, n'hésitez pas à nous le dire, merci!
31.01.2022 - 09:41
![]() Isabelle Francesconi wrote:
Isabelle Francesconi wrote:
Je ne comprends pas pourquoi on ne peut pas se servir du marqueur qui indique chaque debut de tour. Pour le col. Je ne comprends pas le marqueur après les 27 premières mailles. Il faut les tricoter ou non ? Pouvez-vous reexpliquer svp ?
30.01.2022 - 00:24DROPS Design answered:
Bonjour Mme Francesconi, le marqueur qui indique le changement de tour va suivre l'ouvrage, le marqueur que l'on place après le col sert de repère pour mesurer l'empiècement, celui-ci ne doit pas bouger, il doit se trouver à environ 27 mailles (en taille L) du début du tour, ceci correspondant au milieu du devant du pull, c'est ici que vous allez mesurer la hauteur de l'empiècement plus tard. Ne tricotez pas ces mailles pour placer le marqueur, comptez simplement ces mailles pour le mettre au bon endroit. Bon tricot!
31.01.2022 - 09:24
|
|||||||
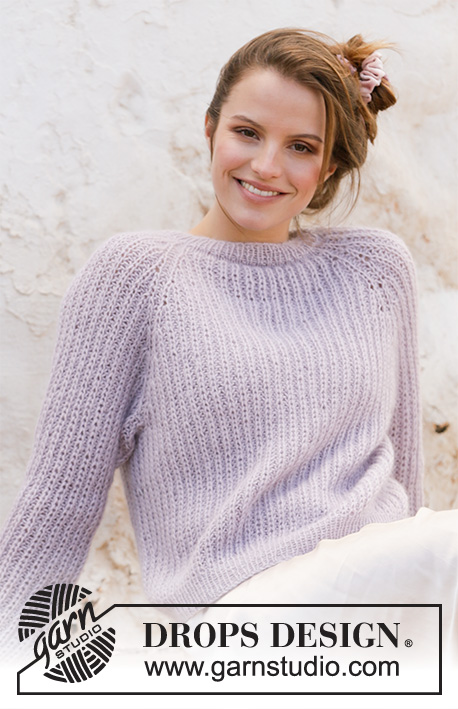
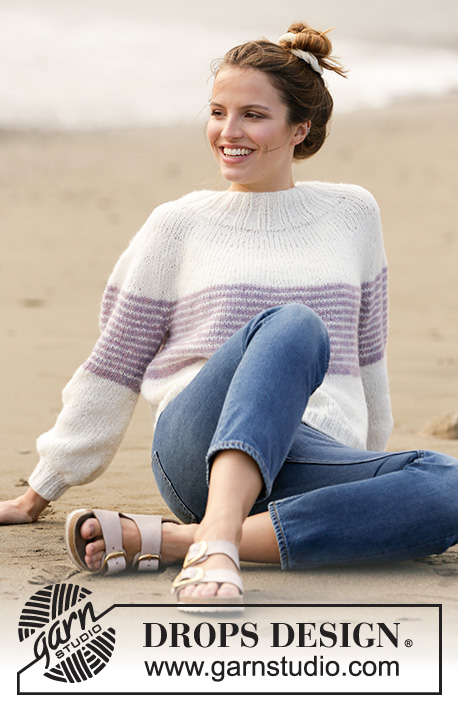
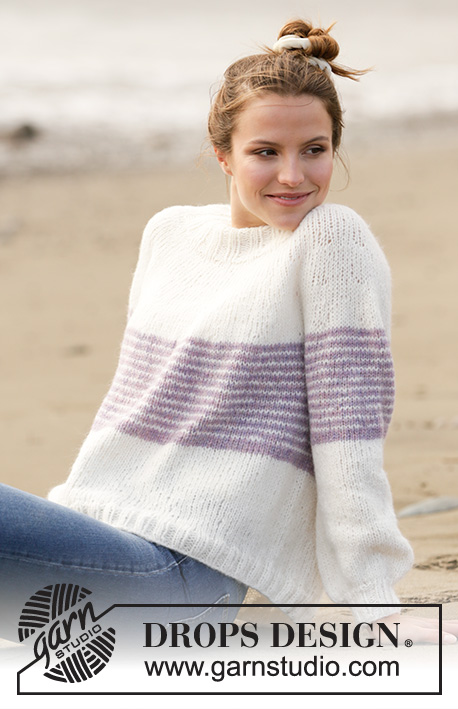
Caught in the Middle#caughtinthemiddlesweater |
|||||||
 |
 |
||||||
Knitted sweater in DROPS Air. The piece is worked top down with round yoke and stripes. Sizes S - XXXL.
DROPS 213-13 |
|||||||
|
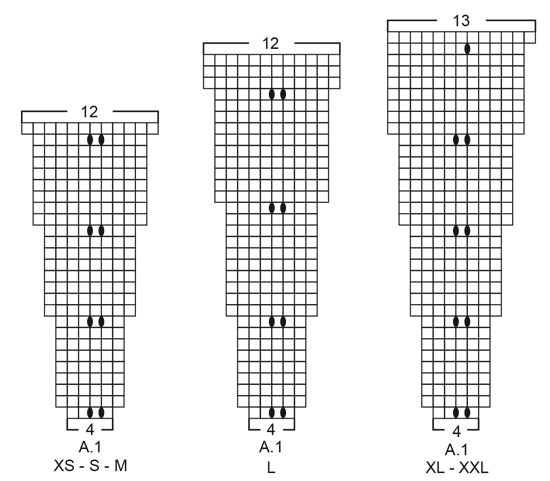
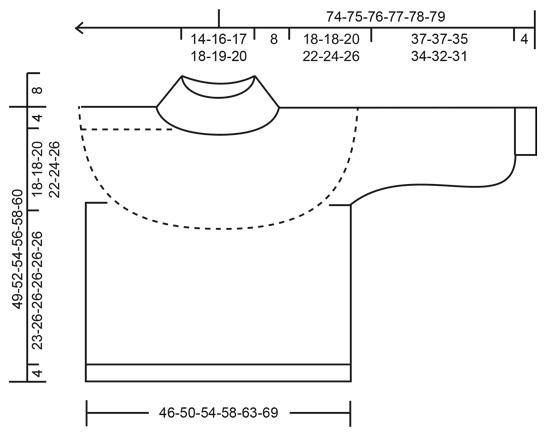
------------------------------------------------------- EXPLANATIONS FOR THE PATTERN: ------------------------------------------------------- PATTERN (for increases on yoke): See diagram A.1. Choose diagram for your size. INCREASE/DECREASE TIP (evenly spaced): To work out how to increase/decrease evenly, count the total number of stitches on needle (e.g. 216 stitches) and divide by the number of increases/decreases to be made (e.g. 4) = 54. In this example, increase by making 1 yarn over after each 54th stitch. On the next row knit the yarn overs twisted to avoid holes. When decreasing, knit each 53rd and 54th stitch together. STRIPES: * Work 2 rounds of stockinette stitch with purple haze, 1 round of stockinette stitch with off-white *, work from *-* for 15-15-17-17-18-18 cm = 6"-6"-6¾"-6¾"-7"-7", then work 4 rounds with purple haze. The striped section measures a total of approx. 17-17-19-19-20-20 cm = 6¾"-6¾"-7½"-7½"-8"-8" in height DECREASE TIP (mid under sleeves): Decrease 1 stitch on each side of the marker thread as follows: Work until there are 3 stitches left before the marker thread, knit 2 together, knit 2 (marker thread sits between these 2 stitches), slip 1 stitch as if to knit, knit 1 and pass the slipped stitch over the knitted stitch = 2 stitches decreased. INCREASE TIP (for mid under sleeves): Increase 1 stitch on each side of the marker thread as follows: Work 1 stitch before the marker thread, 1 yarn over, knit 2 (marker thread sits between these 2 stitches), 1 yarn over. On the next round knit the yarn overs twisted to avoid holes. BINDING-OFF TIP: To avoid the bind-off edge being tight you can bind off with a larger size needle. If the edge is still tight, make 1 yarn over after approx. each 4th stitch at the same time as binding off; the yarn overs are bind off as normal stitches. ------------------------------------------------------- START THE PIECE HERE: ------------------------------------------------------- SWEATER – SHORT OVERVIEW OF THE PIECE: The neck and yoke are worked in the round with circular needle, top down. The yoke is divided for body and sleeves. The body is continued in the round with circular needle. The sleeves are worked in the round with double pointed needles/short circular needle, top down. NECK: Cast on 72-80-84-88-92-96 stitches with short circular needle size 4 mm = US 6 and off-white. Knit 1 round, then work rib in the round (= knit 2 / purl 2) for 8 cm = 3⅛". Knit 1 round. Insert 1 marker after the first 24-26-27-28-29-30 stitches (= approx. mid front). Then work the yoke as described below – the yoke is measured from the marker! YOKE: Change to circular needle size 5.5 mm = US 9 and work A.1 in the round (= 18-20-21-22-23-24 repeats of 4 stitches). Increase as shown in the diagram. REMEMBER THE KNITTING GAUGE! When A.1 has been completed there are 216-240-252-264-299-312 stitches on the needle and the piece measures approx. 13-13-13-16-17-17 cm = 5⅛"-5⅛"-5⅛"-6¼"-6¾"-6¾" from the marker on the neck. Continue with stockinette stitch and off-white (without increasing) until the piece measures 13-13-14-16-17-19 cm = 5⅛"-5⅛"-5½"-6¼"-6¾"-7½" from the marker in the neck. Then work STRIPES – read description above. AT THE SAME TIME when the piece measures 14-14-15-17-19-19 cm = 5½"-5½"-6"-6¾"-7½"-7½" from the marker on the neck, increase 4-0-4-8-5-8 stitches evenly spaced on the round – read INCREASE/DECREASE TIP = 220-240-256-272-304-320 stitches. When the piece measures 18-18-20-22-24-26 cm = 7"-7"-8"-8¾"-9½"-10¼" from the marker on the neck, divide the yoke for the body and sleeves on the next round as follows: Place the first 42-46-48-52-60-60 stitches on 1 thread for the sleeve, cast on 6-6-6-8-8-10 new stitches on the needle (= in side under sleeve), work 68-74-80-84-92-100 stitches as before (= front piece), place the next 42-46-48-52-60-60 stitches on 1 thread for the sleeve, cast on 6-6-6-8-8-10 new stitches on the needle (= in side under sleeve) and work the remaining 68-74-80-84-92-100 stitches as before (= back piece). Cut the strands. Body and sleeves are finished separately. THE PIECE IS NOW MEASURED FROM HERE! BODY: = 148-160-172-184-200-220 stitches. Start the round in the middle of the 6-6-6-8-8-10 stitches cast on under the one sleeve and continue in the round with stripes as described above. When the stripes are finished continue with stockinette stitch and off-white. Work until the piece measures 23-26-26-26-26-26 cm = 9"-10¼"-10¼"-10¼"-10¼"-10¼" from the division (there is approx. 4 cm = 1½" left to finished length; you can try the sweater on and work to desired length). Change to circular needle size 4 mm = US 6. Knit 1 round where you increase 28-32-32-36-40-44 stitches evenly spaced – remember INCREASE/DECREASE TIP = 176-192-204-220-240-264 stitches. Work rib in the round (= knit 2 / purl 2) for 4 cm = 1½". Bind off with knit over knit and purl over purl – read BINDING-OFF TIP! The sweater measures approx. 49-52-54-56-58-60 cm = 19¼"-20½"-21¼"-22"-22¾"-23⅝" from the shoulder down. SLEEVES: Place the 42-46-48-52-60-60 stitches from the thread on the one side of the piece on double pointed needles/short circular needle size 5.5 mm = US 9 and knit up 1 stitch in each of the 6-6-6-8-8-10 stitches cast on under the sleeves = 48-52-54-60-68-70 stitches. Insert 1 marker thread in the middle of the new stitches mid under sleeve. Continue in the round with stripes as on the body. When the stripes are finished, continue with stockinette stitch and off-white. AT THE SAME TIME when the sleeve measures 3-3-3-2-2-2 cm = 1⅛"-1⅛"-1⅛"-¾"-¾"-¾" from the division, decrease 2 stitches mid under the sleeve – read DECREASE TIP. Decrease like this every 6-3-3-2-1-1 cm = 2⅜"-1⅛"-1⅛"-¾"-⅜"-⅜" a total of 2-3-3-5-8-8 times = 44-46-48-50-52-54 stitches. Continue working until the sleeve measures 14 cm = 5½" from the division in all sizes. Now increase 2 stitches mid under sleeve – read INCREASE TIP. Increase like this every 2½-2½-2-2-1½-1½ cm = ⅞"-⅞"-¾"-¾"-½"-½" a total of 7-7-6-6-6-6 times = 58-60-60-62-64-66 stitches. Work until the sleeve measures 37-37-35-34-32-31 cm = 14½"-14½"-13¾"-13⅜"-12½"-12¼" from the division (there is approx. 4 cm = 1½" left to finished length; you can try the sweater on and work to desired length). NOTE: Shorter measurements in larger sizes due to wider neck and longer yoke. Knit 1 round where you decrease 26-28-24-26-24-26 stitches evenly spaced = 32-32-36-36-40-40 stitches. Change to double pointed needles size 4 mm = US 6 and work rib (= knit 2 / purl 2) for 4 cm = 1½". Bind off with knit over knit and purl over purl – remember BINDING-OFF TIP! The sleeve measures approx. 41-41-39-38-36-35 cm = 16⅛"-16⅛"-15¼"-15"-14¼"-13¾" from the division. Work the other sleeve in the same way. |
|||||||
Diagram explanations |
|||||||
|
|||||||
 |
|||||||
 |
|||||||
Have you finished this pattern?Tag your pictures with #dropspattern #caughtinthemiddlesweater or submit them to the #dropsfan gallery. Do you need help with this pattern?You'll find 25 tutorial videos, a Comments/Questions area and more by visiting the pattern on garnstudio.com. © 1982-2026 DROPS Design A/S. We reserve all rights. This document, including all its sub-sections, has copyrights. Read more about what you can do with our patterns at the bottom of each pattern on our site. |
|||||||


With over 40 years in knitting and crochet design, DROPS Design offers one of the most extensive collections of free patterns on the internet - translated to 17 languages. As of today we count 324 catalogs and 12290 patterns - 12280 of which are translated into English (US/in).
We work hard to bring you the best knitting and crochet have to offer, inspiration and advice as well as great quality yarns at incredible prices! Would you like to use our patterns for other than personal use? You can read what you are allowed to do in the Copyright text at the bottom of all our patterns. Happy crafting!
Post a comment to pattern DROPS 213-13
We would love to hear what you have to say about this pattern!
If you want to leave a question, please make sure you select the correct category in the form below, to speed up the answering process. Required fields are marked *.