
Popular categories
Looking for a yarn?


Comments / Questions (27)
![]() Pia Maibrit Johansen wrote:
Pia Maibrit Johansen wrote:
Str. L. For og bagstykke: . Jeg har nu 238 m. på p. Diagrammerne A.1 og A.3 er strikket færdig. Næste omg.* strik21m glatstrik,strik A.4 =( 24 masker), fortsæt A.2 som før over de 29 masker. Jeg kan ikke finde A.2 som skal give 29 masker ???? Kan i hjælpe. Mvh. Maibrit
12.07.2021 - 23:33DROPS Design answered:
Hej Pia, jo A.2 består som tidliger af A+B+C ialt 29 masker :)
14.07.2021 - 10:06
![]() MARTY Christiane wrote:
MARTY Christiane wrote:
Je voudrais connaître la longueur du câble pour tricoter le dos et le devant de ce modèle. Ainsi que la longueur du câble pour les manches car je vais tricoter pour la première fois avec ce type d'aiguilles. Merci
20.04.2021 - 09:57DROPS Design answered:
Bonjour Mme Marty, pour le dos/le devant, vous allez utiliser une aiguille circulaire de 80 cm en 3 et 4; vous tricoterez d'abord en rond, puis en allers et retours; la petite aiguille circulaire de 40 cm pourra être utilisée pour les manches, après les augmentations et pour le col. Bon tricot!
20.04.2021 - 13:11
![]() Anne wrote:
Anne wrote:
Starting round 3 (after A.1 and A.3 are done), do I start with the first row or the third row of A.4 and A.5, and continue with the third row of A.2?
27.03.2021 - 15:04DROPS Design answered:
Hi Anne, You continue A.2 from round 3, but A.4 and A.4 are begun from round 1. Happy knitting!
29.03.2021 - 07:57
![]() Margaret wrote:
Margaret wrote:
In the key for the lace diagram, the instructions for the circle between 2 stitches say that we need to make 2 yarn overs and then on the next round/row we need to drop one yarn over off and work the other yarn over in st stitch. When we work the second yarn over in the next row, do we work the yarn over so as to create a hole or do we work the yarn over twisted to avoid a hole? Thanks
08.12.2020 - 01:31DROPS Design answered:
Hi Margaret, The 2nd yarn over is worked to leave a hole (so not twisted). Happy knitting!
08.12.2020 - 07:02
![]() Wietske wrote:
Wietske wrote:
Het prachtige garen van Drop is binnen, maar bij het lezen van het patroon begrijp ik iets niet. In het patroon staat op een gegeven moment “ga verder met 2A” Maar er is geen teltekening 2 A. wel de tekening A.2A. , A.2B , A.2C, dus geen alleen 2A, of moet dit A.2A zijn?
27.10.2020 - 15:33DROPS Design answered:
Dag Wietske,
Er staat ga verder met A.2 zoals hiervoor, waarmee wordt bedoeld dat je alle patronen binnen A.2 (dus A.2a, A.2b en A2c) breit zoals een stukje daarboven beschreven)
27.10.2020 - 22:47
![]() Muriel wrote:
Muriel wrote:
Bonjour, Je n'arrive pas à faire les diagrammes A2a et A2c à partir du rang 3. A2a : le rang 2 se termine avec 8 mailles et il en faudrait 9 pour réaliser le rang 3 ??? A2c : le rang 2 se termine avec 7 mailles alors qu'il n'en faut que 6 pour le rang 3 ??? Merci d'avance pour vos explications
20.10.2020 - 08:41DROPS Design answered:
Bonjour Muriel, aux rangs 1, 3, 5, et 7, tricotez les 2 dernières maille de A.2 A avec la 1ère m du 1er A.2B (= cette maille devient la première maille de A.2B), à la fin de A.2B, tricotez les 2 dernières mailles avec la 1ère m du A.2B suivant (= cette maille est maintenant la première maille du A.2B suivant/ de A.2C. Bon tricot!
20.10.2020 - 11:00
![]() Wietske Holverda wrote:
Wietske Holverda wrote:
De beschrijving van de jumper is voor rondbreien. Vanwege mijn handicap is dat voor mij niet mogelijk. Hoe kan ik het pratroon zo veranderen dat ik het op 2 naalden kan breien. (met uitzondering van de hals) Bij voorbaat mijn dank.
17.10.2020 - 14:22DROPS Design answered:
Dag Wietske,
Om een patroon aan te passen zodat je deze met rechte naalden kunt breien hebben we een instructie geschreven. Deze vind je hier.
21.10.2020 - 12:02
![]() Maritha Thoresson wrote:
Maritha Thoresson wrote:
Jag undrar på diagram A1 och A3 ska man sticka räta över räta och aviga över aviga eller ska man förskjuta maskorna tacksam för svar.
20.07.2020 - 11:21DROPS Design answered:
Hej Maritha, i A.1 tager du ud i 3 glatstrikkede masker så du får 6 glatstrikkede på næste pind. De andre vrangmasker skal strikkes over vrangmaskerne ifølge diagrammet. God fornøjelse!
31.07.2020 - 09:45
![]() Catherine wrote:
Catherine wrote:
I am working on size XL. When it comes to the sleeve part, I have 38 stitches remain before final cast off instead of 36 stitches as of the pattern, I.e 2 stitches in difference. I checked the other sizes also encounter the same 2 -stitch difference. I do not know where I miscounted. Please help. Thank you very much.
06.07.2020 - 12:15DROPS Design answered:
Dear Catherine, you are right, pattern will be updated, you are supposed to have 38 sts in size XL (and not 36). Thanks for your feeback, happy knitting!
07.07.2020 - 09:32
![]() Sandra wrote:
Sandra wrote:
Vielen Dank für die schnelle Antwort, jetzt hab ich es auch verstanden und kann wieder weiterstricken:) ganz tolle Anleitung wie gewohnt
29.05.2020 - 10:22
|
|||||||||||||||||||||||||||||||
Summer's Waltz#summerswaltzsweater |
|||||||||||||||||||||||||||||||
 |
 |
||||||||||||||||||||||||||||||
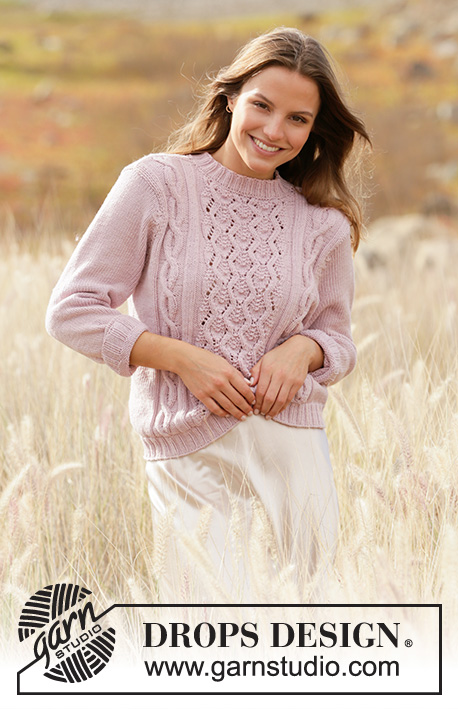
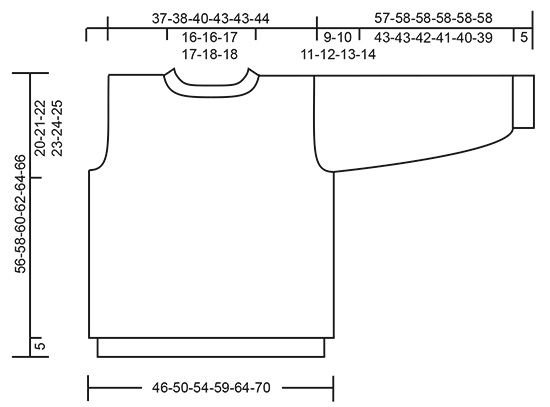
Knitted sweater in DROPS Merino Extra Fine. Piece is knitted with cables and lace pattern. Size: S - XXXL
DROPS 212-30 |
|||||||||||||||||||||||||||||||
|
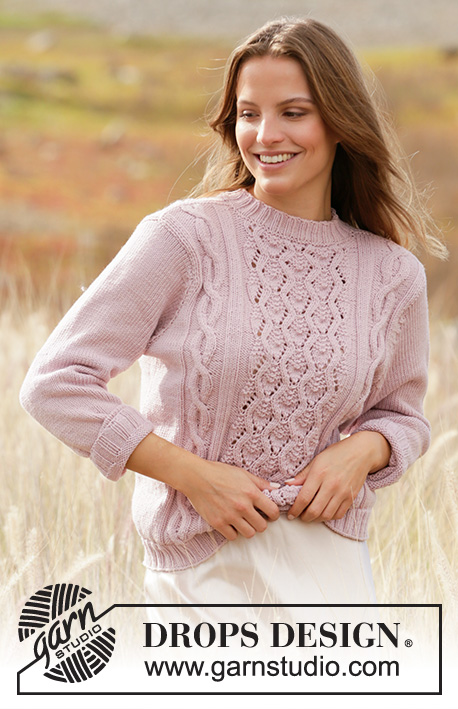
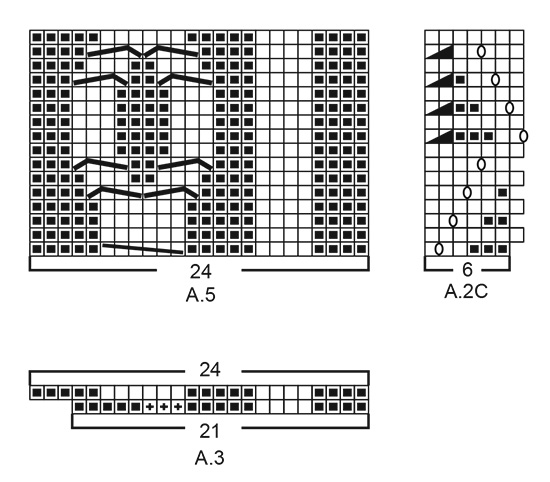
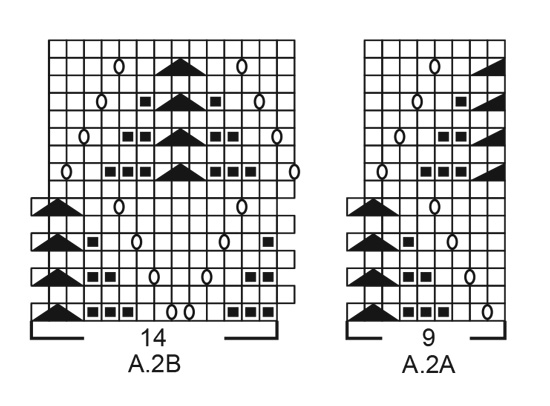
---------------------------------------------------------- EXPLANATION FOR THE PATTERN: ---------------------------------------------------------- PATTERN: See diagrams A.1 to A.5. Diagrams show all rows in pattern seen from the right side. INCREASE TIP (applies to mid under sleeves): Work until 1 stitch remains before marker thread, make 1 yarn over, knit 2 (marker thread is between these 2 stitches), make 1 yarn over (= 2 stitches increased). On next round knit yarn overs twisted to avoid holes. Then work the new stitches in stockinette stitch. DECREASE TIP (applies to sleeve cap): All decreases are done from the right side! Decrease 2 stitches in each side on sleeve cap at the same time cable stitches as follows: CABLE TOWARDS THE RIGHT AND DECREASE AT THE SAME TIME 2 STITCHES: Begin directly after the 2 first stitch on row, slip 3 stitches on cable needle behind piece, knit 1, knit the 3 stitches from cable needle twisted together (= 2 stitches decreased). CABLE TOWARDS THE LEFT AND DECREASE AT THE SAME TIME 2 STITCHES: Work until 6 stitches remain on row, slip 1 stitch on cable needle in front of piece, knit 3 together, knit 1 from cable needle (= 2 stitches decreased), and knit the last 2 stitches. BIND-OFF TIP: To avoid a tight bind-off edge you may use a larger needle size. If this also is too tight, work a 1 yarn over after approx. every 4th stitch while binding off (bind off yarn overs as regular stitches). ---------------------------------------------------------- START THE PIECE HERE: ---------------------------------------------------------- SWEATER - SHORT OVERVIEW OF THE PIECE: Work body in the round on circular needle from the bottom and up to armholes, then work front and back piece back and forth on circular needle separately until finished measurements. Work sleeves in the round on double pointed needles/a short circular needle, from the bottom and up to sleeve cap, then work sleeve cap back and forth on circular needle until finished measurements. Sew garment together on shoulder and sew sleeves in before finishing with a neck edge. BODY: Cast on 196-212-228-248-272-296 stitches on circular needle size 3 mm = US 2,5 with Merino Extra Fine. Knit 1 round. Then work rib in the round (= knit 2/purl 2) for 5 cm = 2". Knit 1 round while decreasing 2 stitches evenly = 194-210-226-246-270-294 stitches. Knit 1 round without increases. Switch to circular needle size 4 mm = US 6. Work next round as follows: * Work 13-17-21-19-25-31 stitches in stockinette stitch, work A.1 (= 21 stitches increased to 24 stitches), work A.2A (= 9 stitches), work A.2B over the next 14-14-14-28-28-28 stitches (= 1-1-1-2-2-2 repetitions of 14 stitches), work A.2C (= 6 stitches), work A.3 (= 21 stitches increased to 24 stitches), work 13-17-21-19-25-31 stitches in stockinette stitch, and insert 1 marker thread before next stitch (= in the side of body) *, work from *-* one more time. There are now 206-222-238-258-282-306 stitches on needle. Work next round the same way as diagrams show. A.1 and A.3 are now done. Move the marker threads upwards when working; they are used to bind off for armholes later. Work next round as follows: * Work 13-17-21-19-25-31 stitches in stockinette stitch, work A.4 (= 24 stitches), continue A.2 as before over the next 29-29-29-43-43-43 stitches, work A.5 (= 24 stitches), work 13-17-21-19-25-31 stitches in stockinette stitch *, work from *-* one more time. Continue pattern like this. REMEMBER THE KNITTING GAUGE! When piece measures 36-37-38-39-40-41 cm = 14¼"-14½"-15"-15¼"-15¾"-16⅛", bind off for armholes, i.e. work next round as follows: Bind off 3 stitches, work as before until 3 stitches remain before marker thread, bind off 6 stitches, work as before until 3 stitches remain before next marker thread, and bind off the remaining 3 stitches. Cut the yarn. Finish front and back piece back and forth on circular needle separately. BACK PIECE: = 97-105-113-123-135-147 stitches. Continue pattern as before and bind off for armhole by binding off at the beginning of every row as follows: Bind off 3 stitches 0-0-0-0-1-2 times in each side, 2 stitches 2-2-3-3-4-5 times in each side and 1 stitch 3-6-6-7-8-8 times in each side = 83-85-89-97-97-99 stitches. Continue to work until piece measures 54-56-58-60-62-64 cm = 21¼"-22"-22¾"-23⅝"-24⅜"-25¼". On next row bind off the middle 31-31-33-33-35-35 stitches for neck, and finish each shoulder separately. Continue pattern as before and bind off 1 stitch on next row from the neck = 25-26-27-31-30-31 stitches remain on shoulder. When piece measures 55-57-59-61-63-65 cm = 21⅝"-22½"-23¼"-24"-24¾"-25½", decrease 3 stitches evenly over stitches in cable (this is done on a row from right side) = 22-23-24-28-27-28 stitches remain on shoulder. Knit 1 row from wrong side. Bind off knitting from right side. Work the other shoulder the same way. Back piece measures approx. 56-58-60-62-64-66 cm = 22"-22¾"-23⅝"-24⅜"-25¼"-26" from shoulder and down. FRONT PIECE: = 97-105-113-123-135-147 stitches. Continue pattern as before and bind off for armhole by binding off at the beginning of every row as follows: Bind off 3 stitches 0-0-0-0-1-2 times in each side, 2 stitches 2-2-3-3-4-5 times in each side and 1 stitch 3-6-6-7-8-8 times in each side = 83-85-89-97-97-99 stitches. Continue to work until piece measures 50-52-54-55-57-59 cm = 19¾"-20½"-21¼"-21⅝"-22½"-23¼". On next row slip the middle 17-17-19-19-21-21 stitches on 1 stitch holder for neck, and finish each shoulder separately. Continue pattern as before and bind off for neck at the beginning of every row from neck as follows: Bind off 2 stitches 3 times and 1 stitch 2 times = 25-26-27-31-30-31 stitches remain on shoulder. When piece measures 55-57-59-61-63-65 cm = 21⅝"-22½"-23¼"-24"-24¾"-25½", decrease 3 stitches evenly over stitches in cable (this is done on a row from right side) = 22-23-24-28-27-28 stitches remain on shoulder. Knit 1 row from wrong side. Bind off knitting from right side. Work the other shoulder the same way. SLEEVES: Cast on 44-44-48-48-52-52 stitches on double pointed needles size 3 mm = US 2,5 with Merino Extra Fine. Knit 1 round. Then work rib in the round (= knit 2/purl 2) for 5 cm = 2". Switch to double pointed needles size 4 mm = US 6. Insert 1 marker thread at beginning of round. Move the marker thread upwards when working; it is used for increase mid under sleeve. Knit 1 round while increasing 0-2-0-2-0-2 stitches evenly = 44-46-48-50-52-54 stitches. Work in stockinette stitch in the round. When piece measures 9-6-9-6-9-6 cm = 3½"-2⅜"-3½"-2⅜"-3½"-2⅜", increase 2 stitches mid under sleeve - read INCREASE TIP. Increase like this every 2½-2½-2-2-1½-1½ cm = ⅞"-⅞"-¾"-¾"-½"-½" 15-17-18-20-22-24 times in total = 74-80-84-90-96-102 stitches. Continue to work until sleeve measures 48-48-47-46-45-44 cm = 19"-19"-18½"-18"-17¾"-17¼". Now decrease for sleeve cap, i.e. work next round as follows: Bind off 3 stitches, work in stockinette stitch until 3 stitches remain, and bind off the remaining 3 stitches = 68-74-78-84-90-96 stitches remain. Cut the yarn. Then sleeve cap back and forth on circular needle as follows: Begin from wrong side and work 2 rows in stockinette stitch while binding off 3 stitches at the beginning of each of these 2 rows = 62-68-72-78-84-90 stitches remain. Work 3 rows in stockinette stitch without decrease. * Work next row as follows from right side: Work 2 stitches in stockinette stitch, cable towards the right and decrease at the same time 2 stitches - read DECREASE TIP-1, work in stockinette stitch until 6 stitches remain on row, cable towards the left and decrease at the same time 2 stitches - read DECREASE TIP-1, and finish with 2 stitches in stockinette stitch. Work 3 rows in stockinette stitch without decrease *, work from *-* 5-6-6-7-8-8 times in total vertically, but finish last repetition when 1 row stockinette stitch has been worked after a row with cables and decrease. Work 4 rows in stockinette stitch and bind off 3 stitches at the beginning of each of these 4 rows = 30-32-36-38-40-46 stitches remain. Bind off the remaining stitches. Sleeve measures approx. 57-58-58-58-58-58 cm = 22½"-22¾"-22¾"-22¾"-22¾"-22¾" from top and down. Work the other sleeve the same way. ASSEMBLY: Sew shoulder seams inside bind-off edge. Sew in sleeves inside 1 edge stitch. NECK EDGE: Pick up from right side approx. 80 to 90 stitches around the neck (including stitches on stitch holder at the front) on a short circular needle size 3 mm = US 2,5. Purl 1 round. Knit 1 round while increasing evenly to 88-92-96-100-104-108 stitches. Work rib in the round = knit 2/purl 2 for 3 cm = 1⅛". Bind off with knit over knit and purl over purl - read BIND-OFF TIP. |
|||||||||||||||||||||||||||||||
Diagram explanations |
|||||||||||||||||||||||||||||||
|
|||||||||||||||||||||||||||||||
 |
|||||||||||||||||||||||||||||||
 |
|||||||||||||||||||||||||||||||
 |
|||||||||||||||||||||||||||||||
 |
|||||||||||||||||||||||||||||||
Have you finished this pattern?Tag your pictures with #dropspattern #summerswaltzsweater or submit them to the #dropsfan gallery. Do you need help with this pattern?You'll find 32 tutorial videos, a Comments/Questions area and more by visiting the pattern on garnstudio.com. © 1982-2026 DROPS Design A/S. We reserve all rights. This document, including all its sub-sections, has copyrights. Read more about what you can do with our patterns at the bottom of each pattern on our site. |
|||||||||||||||||||||||||||||||


With over 40 years in knitting and crochet design, DROPS Design offers one of the most extensive collections of free patterns on the internet - translated to 17 languages. As of today we count 324 catalogs and 12290 patterns - 12280 of which are translated into English (US/in).
We work hard to bring you the best knitting and crochet have to offer, inspiration and advice as well as great quality yarns at incredible prices! Would you like to use our patterns for other than personal use? You can read what you are allowed to do in the Copyright text at the bottom of all our patterns. Happy crafting!
Post a comment to pattern DROPS 212-30
We would love to hear what you have to say about this pattern!
If you want to leave a question, please make sure you select the correct category in the form below, to speed up the answering process. Required fields are marked *.