
Popular categories
Looking for a yarn?


Comments / Questions (27)
![]() Inke wrote:
Inke wrote:
In iedere 2e naald staan alle steken van A2 als open vierkantje (recht op de goede, averecht op de verkeerde kant). Maar moet ik niet breien zoals ze zich voordoen? Dus als in de eerste naald een dicht vierkantje was (averecht), dan moet het in de volgende naald toch ook averecht (bij rondbreien)? Alvast bedankt, Inke
06.01.2025 - 23:03DROPS Design answered:
Dag Inke,
De open vierkantjes brei je altijd recht aan de goede kant en averecht aan de verkeerde kant. Dit geldt ook voor de steken die op de naald daarvoor averecht zijn gebreid.
08.01.2025 - 13:40
![]() Teston wrote:
Teston wrote:
Apres avoir tricoté A1 et A3 comment doisje les tricoter?? Merci de la réponse
03.01.2023 - 20:41DROPS Design answered:
Bonjour Mme Teston, quand on tricote le 1er rang de A.1 et A.3 on va augmenter 3 mailles dans chaque A.1 et dans chaque A.3. Au 2ème rang, tricotez les mailles comme avant en suivant le 2ème rang des diagrammes pour A.1 et A.3. Au rang suivant, tricotez en jersey avec les diagrammes A.4, A.2 et A.5. Bon tricot!
04.01.2023 - 09:03
![]() Cornelia wrote:
Cornelia wrote:
Ich habe eine Frage zu den doppelten Umschlägen. Müsste der 2. Umschlag nicht, sobald in Reihen (nach den Armlochabnahmen) glatt links gestrickt werden?
03.10.2022 - 20:14DROPS Design answered:
Liebe Cornelia, ja genau, der 2. Umschlag strickt man glatt rechts, dh rechts in Hin-Reihen und links in Rück-Reihen. Viel Spaß beim stricken!
04.10.2022 - 07:49
![]() Kaisu wrote:
Kaisu wrote:
Mistä muodostuu "jatka seuraavilla 29 silmukalla piirroksen A2 mukaan"? Puran nyt kolmannen kerran...
21.01.2022 - 06:06
![]() M E Van Dijk wrote:
M E Van Dijk wrote:
Dit is werkelijk een prachtig patroon. ,maar de beschrijving klopt niet. Nadat er twee toeren zijn gebreid, (de A1, A2A, A2B,A2C, A3, moet je volgens het patroon A4, serie 2, en A5 breien De A4 en A5 vanaf toer 1. Dan is het motief van de 2 serie af, maar niet van A4 en A5.Het motief van de A4 en A5 is niet in balans. Met vriendelijke groet, Marlies van Dijk
30.12.2021 - 13:26DROPS Design answered:
Dag M E Van Dijk,
A4 en A5 worden aan de zijkanten gebreid, naast het middengebied met kabels en ze hoeven niet perse tegelijkertijd klaar te zijn in de hoogte. Als A.2 klaar is in de hoogte begin je opnieuw met A.2 in de hoogte en als A.4 en A.5 klaar zijn in de hoogte, begin je ook een nieuwe herhaling in de hoogte, maar dit hoeft dus niet tegelijkertijd.
06.01.2022 - 10:26
![]() Rita wrote:
Rita wrote:
Beste lezer Als er staat ga verder in A2 betekent dat verder gaan in de derde naald? A4 en A5 beginnen nul in naald 1
09.12.2021 - 14:43
![]() Joke Boev wrote:
Joke Boev wrote:
Ík heb de vraag verkeerd vermeld. Je begint met 19 st dan 24 steken dan moet je eigenlijk verder met 2A en daar staat dat je over 43 steken moet breien maar je heeft er 45 steken nodig want dat patroon bestaat uit 9 steken moet ik soms steken bij maken gr
19.11.2021 - 19:59DROPS Design answered:
Dag Joke,
Je breit inderdaad eerst 19 steken en dan brei je A.1 over de volgende 21 steken. In A.1 zitten meerderingen verwerkt, dus als je A.1 hebt gebreid, zijn de 21 steken gemeerderd naar 24 steken.
Een stuk verderop in dezelfde paragraaf staat inderdaad dat je A.2 over de volgende 43 steken moet breien. Dit doe je als volgt: brei 1 keer A.2A in de breedte, brei 2 keer A.2B in de breedte, brei 1 keer A.2C in de breedte.
23.11.2021 - 12:34
![]() Joke Boevé wrote:
Joke Boevé wrote:
Ik heb 19 st gebreid en toen 4a en nu moet ik 43 steken breien van 2a maar dat klopt niet je moet daar 45 steken hebben dus ik kom 2 steken tekort wat moet ik doen bedankt
19.11.2021 - 17:22
![]() Meike Rubbert wrote:
Meike Rubbert wrote:
Guten Tag, Es gibt gegensätzliche Aussagen in der Anleitung : direkt nach dem Bündchen sollen Maschen zugenommen werden, aber für die entsprechenden Größen werden weniger Maschen, als angeschlagen, angegeben. Demnach müsste ich 2 Maschen abnehmen.... Aber das kann ja nicht richtig sein. Wie viele Maschen muss man in der ersten Reihe nach dem Bündchen zunehmen? Liebe Grüße Meike Rubbert
20.09.2021 - 18:58DROPS Design answered:
Liebe Frau Rubbert, so ist es richtig, damit die Bündchen nicht zu eng werden, schlägt man genauso viele Maschen mit den kleineren Nadeln (wegen Bündchen braucht man auch mehr Maschen um die richtige Breite zu bekommen); und dann wird es abgenommen, damit die Maschananzahl die gewünschte Breite passt. Viel Spaß beim stricken!
21.09.2021 - 08:43
![]() Wietske Holverda wrote:
Wietske Holverda wrote:
Dit is werkelijk een prachtig patroon. ,maar de beschrijving klopt niet. Nadat er twee toeren zijn gebreid, (de A1, A2A, A2B,A2C, A3, moet je volgens het patroon A4, serie 2, en A5 breien De A4 en A5 vanaf toer 1. Dan is het motief van de 2 serie af, maar niet van A4 en A5.Het motief van de A4 en A5 is niet in balans. Het aantal tr. tussen de 3/3 en de 1/3 kabel is niet gelijk. Oplossing: Uit het midden 2 toeren weg en onder er 2 erbij, zoals de laatste toer. 1ste keer met tr. 3 beginnen
25.08.2021 - 16:07
|
|||||||||||||||||||||||||||||||
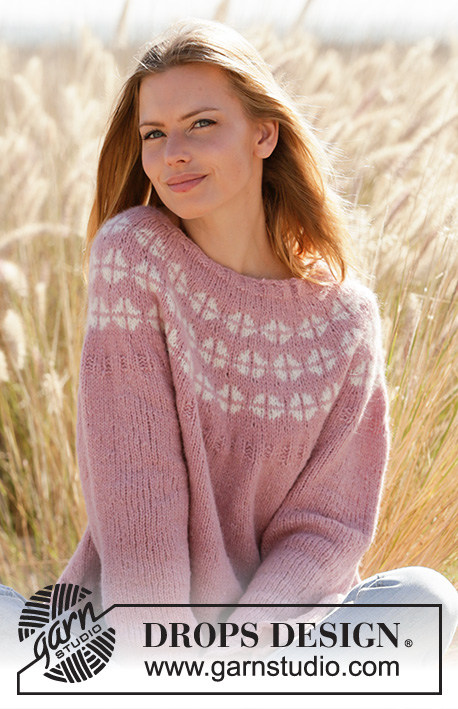
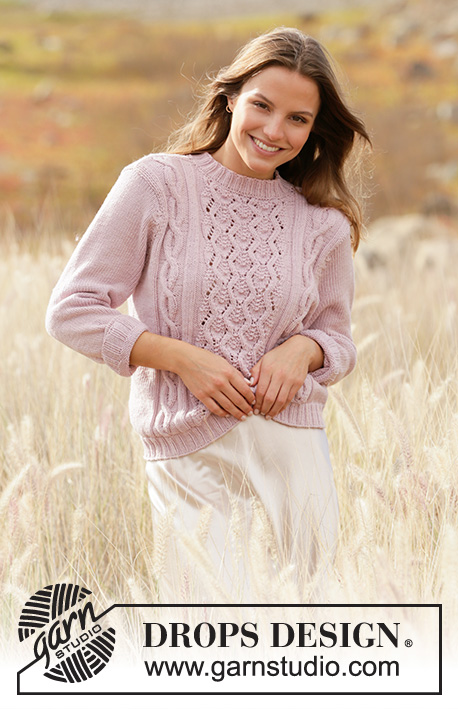
Summer's Waltz#summerswaltzsweater |
|||||||||||||||||||||||||||||||
 |
 |
||||||||||||||||||||||||||||||
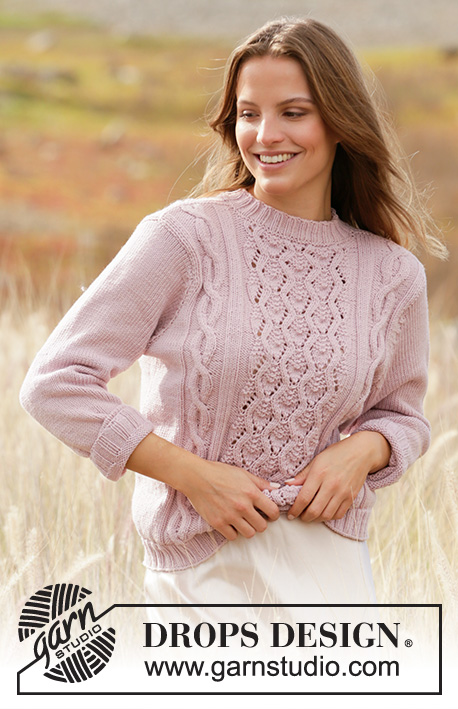
Knitted jumper in DROPS Merino Extra Fine. Piece is knitted with cables and lace pattern. Size: S - XXXL
DROPS 212-30 |
|||||||||||||||||||||||||||||||
|
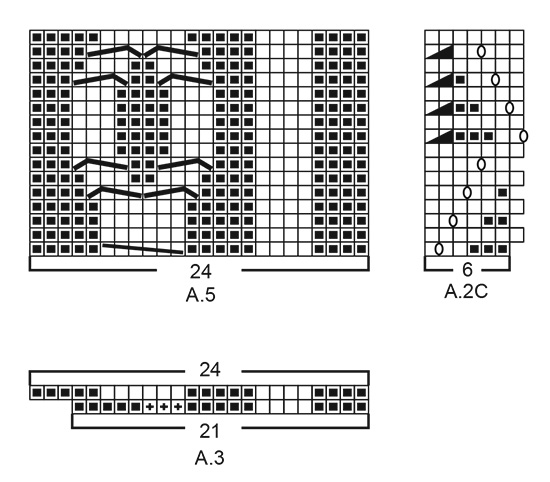
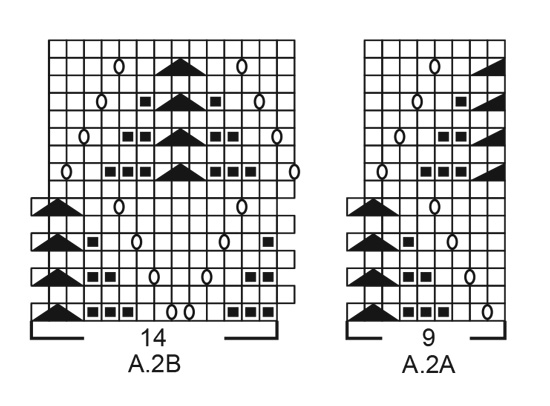
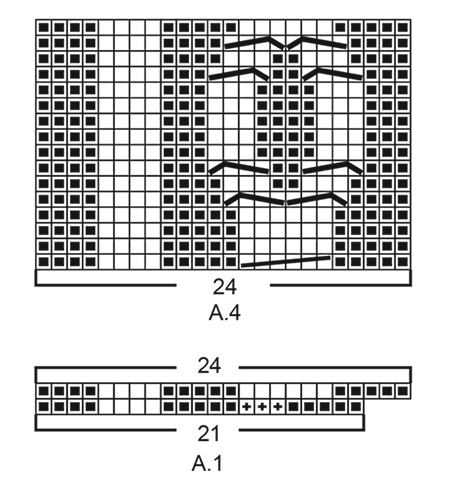
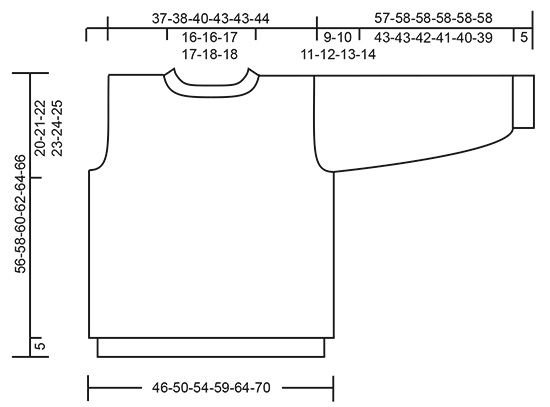
---------------------------------------------------------- EXPLANATION FOR THE PATTERN: ---------------------------------------------------------- PATTERN: See diagrams A.1 to A.5. Diagrams show all rows in pattern seen from the right side. INCREASE TIP (applies to mid under sleeves): Work until 1 stitch remains before marker thread, make 1 yarn over, knit 2 (marker thread is between these 2 stitches), make 1 yarn over (= 2 stitches increased). On next round knit yarn overs twisted to avoid holes. Then work the new stitches in stocking stitch. DECREASE TIP (applies to sleeve cap): All decreases are done from the right side! Decrease 2 stitches in each side on sleeve cap at the same time cable stitches as follows: CABLE TOWARDS THE RIGHT AND DECREASE AT THE SAME TIME 2 STITCHES: Begin directly after the 2 first stitch on row, slip 3 stitches on cable needle behind piece, knit 1, knit the 3 stitches from cable needle twisted together (= 2 stitches decreased). CABLE TOWARDS THE LEFT AND DECREASE AT THE SAME TIME 2 STITCHES: Work until 6 stitches remain on row, slip 1 stitch on cable needle in front of piece, knit 3 together, knit 1 from cable needle (= 2 stitches decreased), and knit the last 2 stitches. CAST-OFF TIP: To avoid a tight cast-off edge you may use a larger needle size. If this also is too tight, work a 1 yarn over after approx. every 4th stitch while casting off (cast off yarn overs as regular stitches). ---------------------------------------------------------- START THE PIECE HERE: ---------------------------------------------------------- JUMPER - SHORT OVERVIEW OF THE PIECE: Work body in the round on circular needle from the bottom and up to armholes, then work front and back piece back and forth on circular needle separately until finished measurements. Work sleeves in the round on double pointed needles/a short circular needle, from the bottom and up to sleeve cap, then work sleeve cap back and forth on circular needle until finished measurements. Sew garment together on shoulder and sew sleeves in before finishing with a neck edge. BODY: Cast on 196-212-228-248-272-296 stitches on circular needle size 3 mm with Merino Extra Fine. Knit 1 round. Then work rib in the round (= knit 2/purl 2) for 5 cm. Knit 1 round while decreasing 2 stitches evenly = 194-210-226-246-270-294 stitches. Knit 1 round without increases. Switch to circular needle size 4 mm. Work next round as follows: * Work 13-17-21-19-25-31 stitches in stocking stitch, work A.1 (= 21 stitches increased to 24 stitches), work A.2A (= 9 stitches), work A.2B over the next 14-14-14-28-28-28 stitches (= 1-1-1-2-2-2 repetitions of 14 stitches), work A.2C (= 6 stitches), work A.3 (= 21 stitches increased to 24 stitches), work 13-17-21-19-25-31 stitches in stocking stitch, and insert 1 marker thread before next stitch (= in the side of body) *, work from *-* one more time. There are now 206-222-238-258-282-306 stitches on needle. Work next round the same way as diagrams show. A.1 and A.3 are now done. Move the marker threads upwards when working; they are used to cast off for armholes later. Work next round as follows: * Work 13-17-21-19-25-31 stitches in stocking stitch, work A.4 (= 24 stitches), continue A.2 as before over the next 29-29-29-43-43-43 stitches, work A.5 (= 24 stitches), work 13-17-21-19-25-31 stitches in stocking stitch *, work from *-* one more time. Continue pattern like this. REMEMBER THE KNITTING TENSION! When piece measures 36-37-38-39-40-41 cm, cast off for armholes, i.e. work next round as follows: Cast off 3 stitches, work as before until 3 stitches remain before marker thread, cast off 6 stitches, work as before until 3 stitches remain before next marker thread, and cast off the remaining 3 stitches. Cut the yarn. Finish front and back piece back and forth on circular needle separately. BACK PIECE: = 97-105-113-123-135-147 stitches. Continue pattern as before and cast off for armhole by casting off at the beginning of every row as follows: Cast off 3 stitches 0-0-0-0-1-2 times in each side, 2 stitches 2-2-3-3-4-5 times in each side and 1 stitch 3-6-6-7-8-8 times in each side = 83-85-89-97-97-99 stitches. Continue to work until piece measures 54-56-58-60-62-64 cm. On next row cast off the middle 31-31-33-33-35-35 stitches for neck, and finish each shoulder separately. Continue pattern as before and cast off 1 stitch on next row from the neck = 25-26-27-31-30-31 stitches remain on shoulder. When piece measures 55-57-59-61-63-65 cm, decrease 3 stitches evenly over stitches in cable (this is done on a row from right side) = 22-23-24-28-27-28 stitches remain on shoulder. Knit 1 row from wrong side. Cast off knitting from right side. Work the other shoulder the same way. Back piece measures approx. 56-58-60-62-64-66 cm from shoulder and down. FRONT PIECE: = 97-105-113-123-135-147 stitches. Continue pattern as before and cast off for armhole by casting off at the beginning of every row as follows: Cast off 3 stitches 0-0-0-0-1-2 times in each side, 2 stitches 2-2-3-3-4-5 times in each side and 1 stitch 3-6-6-7-8-8 times in each side = 83-85-89-97-97-99 stitches. Continue to work until piece measures 50-52-54-55-57-59 cm. On next row slip the middle 17-17-19-19-21-21 stitches on 1 stitch holder for neck, and finish each shoulder separately. Continue pattern as before and cast off for neck at the beginning of every row from neck as follows: Cast off 2 stitches 3 times and 1 stitch 2 times = 25-26-27-31-30-31 stitches remain on shoulder. When piece measures 55-57-59-61-63-65 cm, decrease 3 stitches evenly over stitches in cable (this is done on a row from right side) = 22-23-24-28-27-28 stitches remain on shoulder. Knit 1 row from wrong side. Cast off knitting from right side. Work the other shoulder the same way. SLEEVES: Cast on 44-44-48-48-52-52 stitches on double pointed needles size 3 mm with Merino Extra Fine. Knit 1 round. Then work rib in the round (= knit 2/purl 2) for 5 cm. Switch to double pointed needles size 4 mm. Insert 1 marker thread at beginning of round. Move the marker thread upwards when working; it is used for increase mid under sleeve. Knit 1 round while increasing 0-2-0-2-0-2 stitches evenly = 44-46-48-50-52-54 stitches. Work in stocking stitch in the round. When piece measures 9-6-9-6-9-6 cm, increase 2 stitches mid under sleeve - read INCREASE TIP. Increase like this every 2½-2½-2-2-1½-1½ cm 15-17-18-20-22-24 times in total = 74-80-84-90-96-102 stitches. Continue to work until sleeve measures 48-48-47-46-45-44 cm. Now decrease for sleeve cap, i.e. work next round as follows: Cast off 3 stitches, work in stocking stitch until 3 stitches remain, and cast off the remaining 3 stitches = 68-74-78-84-90-96 stitches remain. Cut the yarn. Then sleeve cap back and forth on circular needle as follows: Begin from wrong side and work 2 rows in stocking stitch while casting off 3 stitches at the beginning of each of these 2 rows = 62-68-72-78-84-90 stitches remain. Work 3 rows in stocking stitch without decrease. * Work next row as follows from right side: Work 2 stitches in stocking stitch, cable towards the right and decrease at the same time 2 stitches - read DECREASE TIP-1, work in stocking stitch until 6 stitches remain on row, cable towards the left and decrease at the same time 2 stitches - read DECREASE TIP-1, and finish with 2 stitches in stocking stitch. Work 3 rows in stocking stitch without decrease *, work from *-* 5-6-6-7-8-8 times in total vertically, but finish last repetition when 1 row stocking stitch has been worked after a row with cables and decrease. Work 4 rows in stocking stitch and cast off 3 stitches at the beginning of each of these 4 rows = 30-32-36-38-40-46 stitches remain. Cast off the remaining stitches. Sleeve measures approx. 57-58-58-58-58-58 cm from top and down. Work the other sleeve the same way. ASSEMBLY: Sew shoulder seams inside cast-off edge. Sew in sleeves inside 1 edge stitch. NECK EDGE: Pick up from right side approx. 80 to 90 stitches around the neck (including stitches on stitch holder at the front) on a short circular needle size 3 mm. Purl 1 round. Knit 1 round while increasing evenly to 88-92-96-100-104-108 stitches. Work rib in the round = knit 2/purl 2 for 3 cm. Cast off with knit over knit and purl over purl - read CAST-OFF TIP. |
|||||||||||||||||||||||||||||||
Diagram explanations |
|||||||||||||||||||||||||||||||
|
|||||||||||||||||||||||||||||||
|
|||||||||||||||||||||||||||||||
|
|||||||||||||||||||||||||||||||
|
|||||||||||||||||||||||||||||||
|
|||||||||||||||||||||||||||||||
Have you finished this pattern?Tag your pictures with #dropspattern #summerswaltzsweater or submit them to the #dropsfan gallery. Do you need help with this pattern?You'll find 33 tutorial videos, a Comments/Questions area and more by visiting the pattern on garnstudio.com. © 1982-2025 DROPS Design A/S. We reserve all rights. This document, including all its sub-sections, has copyrights. Read more about what you can do with our patterns at the bottom of each pattern on our site. |
|||||||||||||||||||||||||||||||


With over 40 years in knitting and crochet design, DROPS Design offers one of the most extensive collections of free patterns on the internet - translated to 17 languages. As of today we count 314 catalogues and 11821 patterns translated into English (UK/cm).
We work hard to bring you the best knitting and crochet have to offer, inspiration and advice as well as great quality yarns at incredible prices! Would you like to use our patterns for other than personal use? You can read what you are allowed to do in the Copyright text at the bottom of all our patterns. Happy crafting!
Post a comment to pattern DROPS 212-30
We would love to hear what you have to say about this pattern!
If you want to leave a question, please make sure you select the correct category in the form below, to speed up the answering process. Required fields are marked *.