
Popular categories
Looking for a yarn?


Comments / Questions (136)
![]() Corinne wrote:
Corinne wrote:
Drops 210-18 Concernant le point principal c’est du point mousse et concernant les cotes points fantaisie ? Pouvez vous confirmer svp
20.02.2026 - 17:18DROPS Design answered:
Bonjour Corinne, les côtes se tricotent en suivant les diagrammes A.1A et A.1B, ce sont des côtes alternant (1 m jersey = 1ère maille de A.1A / A.1B) et 1 m point mousse (2ème m de A.1A). Bon tricot!
23.02.2026 - 07:34
![]() Kathleen Gallagher wrote:
Kathleen Gallagher wrote:
Patron 210-18 Bonjour! Les mesures indiquées pour l'encolure (16-16-17-17-18) incluent-elles le tricot du col qui mesurera 3.5cm à 4 cm? Je me pose la même question pour les devants: les mesures de largeur indiquées (37-42-45-49-54-61) incluent-elles les bordures? Merci et bonne fin de journée!
16.02.2026 - 16:39DROPS Design answered:
Bonjour Mme Gallagher, dans ce modèle, la largeur indiquée pour l'encolure est sans le col (c'est la largeur correspondant au nombre de mailles rabattues pour l'encolure dos). De même, la largeur en bas du gilet correspond à la largeur du gilet mesuré à plat. Découvrez ici comment lire les mesures des schémas. Bon tricot!
17.02.2026 - 15:17
![]() Torild Lossius wrote:
Torild Lossius wrote:
Har strikket den, men ble ikke fornøyd med ermene. Nå strikker jeg en ny, men denne gangen vil jeg strikke raglanfelling. Går det greit med maskeantallet som er på ermene?
12.02.2026 - 16:54DROPS Design answered:
Hei Torild. Design avd. har dessverre ikke muligheten til å skrive om en oppskrift / sjekke og evnt regne om en allerede publisert oppskrift. Anbefaler deg til å ta en titt på en lignende oppskrift med raglan og sjekke maskeantallet og evnt gjøre forandringer. mvh DROPS Design
13.02.2026 - 07:56
![]() Marjolaine Vaillancourt wrote:
Marjolaine Vaillancourt wrote:
Pour ce modèle, j’aimerais la manche au poignet plus longue, j’ai fais grandeur 217 mailles,comment je dois procéder pour les augmentations. Merci
10.02.2026 - 18:41
![]() Marjolaine Vaillancourt wrote:
Marjolaine Vaillancourt wrote:
Pour ce modèle, j’aimerais la manche au poignet plus longue, j’ai fais grandeur 217 mailles,comme je dois procéder pour les augmentations. Merci
10.02.2026 - 18:35DROPS Design answered:
Bonjour Mme Vaillancourt, vous pouvez vous aider d'un modèle similaire avec les manches de la longueur souhaitée, ou bien calculez en fonction de la longueur et de la largeur souhaitée quand augmenter. Bon tricot!
11.02.2026 - 17:08
![]() Marilyne wrote:
Marilyne wrote:
Bonjour, existe t il une explication sans aiguilles circulaires ? Je ne peux tricoter avec, vu ma gestuelle. Bien à vous, Marilyne Rivière
02.02.2026 - 10:34
![]() Marilyne wrote:
Marilyne wrote:
Bonjour, existe t il une explication sans aiguilles circulaires ? Je ne peux tricoter avec, vu ma gestuelle. Bien à vous, Marilyne Rivière
02.02.2026 - 10:30DROPS Design answered:
Bonjour Marilyne, vous trouverez ici quelques astuces pour adapter les explications pour aiguilles droites. Bon tricot!
02.02.2026 - 17:01
![]() Marilyne wrote:
Marilyne wrote:
Bonjour, je ne comprends pas la phrase "tricoter un rang envers " (= envers) Je commence par un rang envers et de ce fait l'endroit et de l'autre côté. Et non du côté du 1er fil sur la droite lorsque l'on monte les mailles? Merci Marilyne
01.02.2026 - 21:25DROPS Design answered:
Bonjour Marilyne, dans ce modèle, le 1er rang tricoté après le montage est un rang sur l'envers, ainsi on tricote d'abord toutes les mailles à l'envers et on a ainsi 1 rang jersey endroit avant de commencer les côtes, sur l'endroit. Bon tricot!
02.02.2026 - 09:12
![]() Bouchard Marjolaine wrote:
Bouchard Marjolaine wrote:
Je ne comprends pas dans les augmentations, tricoter jusqu’à la maille avec le marqueur,faire une jeté,tricoter la maille avec le marqueur au point mousse comme avant, une jeté. Est-ce possible de m’expliquer. Merci
28.01.2026 - 21:20DROPS Design answered:
Bonjour Mme Bouchard, sur les côtés du gilet, vous avez 2 marqueurs, chacun dans une maille point mousse de A.1A, pour augmenter, tricotez jusqu'à cette maille avec le marqueur, faites 1 jeté, tricotez la maille avec le marqueur, faites 1 jeté - vous avez augmenté 2 mailles. Au rang suivant, tricotez les jetés torse pour éviter des trous et incorporez les au point fantaisie du devant/du dos pour que le motif s'élargisse sur les côtés sans "casser" les côtes des devants/du dos. Bon tricot!
29.01.2026 - 09:06
![]() JJ wrote:
JJ wrote:
Ich verstehe das Diagram A.1A nicht. Heisst das, vorne stricke ich links, rechts und auf der Rückseite nur links?
09.12.2025 - 20:21DROPS Design answered:
Liebe Jj, A.1A ist Bündchen (1 Masche Glattrechts (rechts bei den Hinreihen, links bei den Rückreihen), 1 Masche krausrechts (rechts bei den Hin- sowie bei den Rückreihen).). Viel Spaß beim Stricken!
10.12.2025 - 08:00
|
|||||||
City Streets#citystreetscardigan |
|||||||
 |
 |
||||||
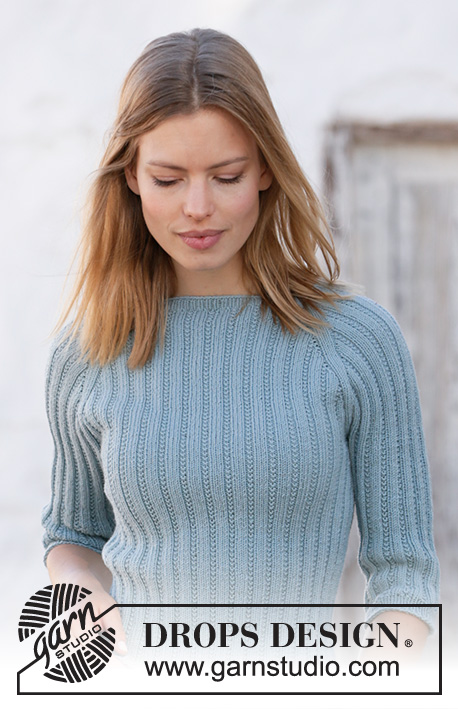
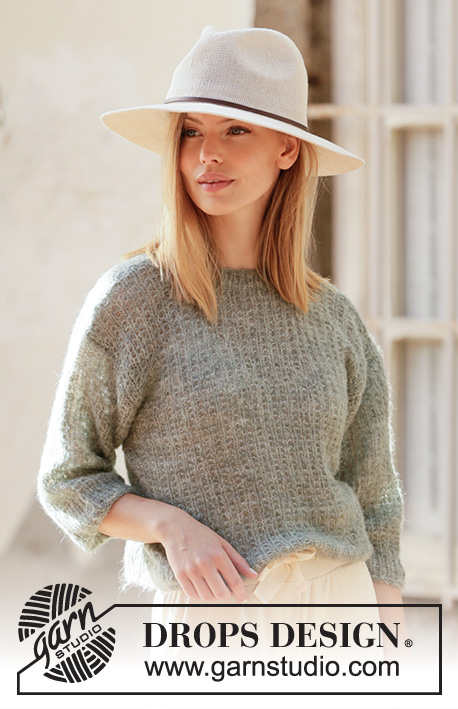
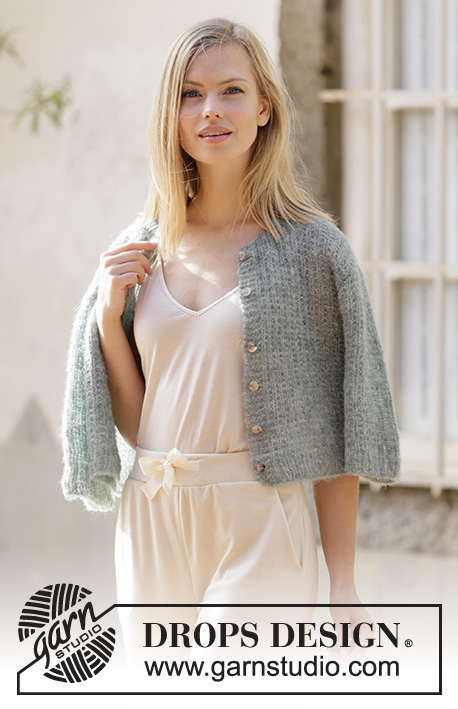
Knitted jacket in DROPS Brushed Alpaca Silk. The piece is worked with textured pattern and short sleeves. Sizes XS - XXL.
DROPS 210-18 |
|||||||
|
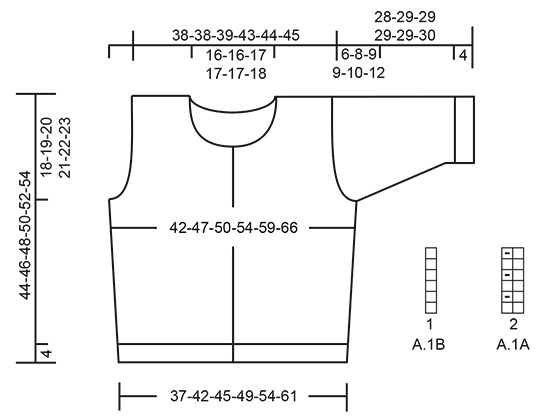
------------------------------------------------------- EXPLANATIONS FOR THE PATTERN: ------------------------------------------------------- RIDGE/GARTER STITCH (worked back and forth): Knit all rows. 1 ridge in height = Knit 2 rows. PATTERN: See diagram A.1. The diagram shows all rows in the pattern seen from the right side. INCREASE TIP (for sides of body and mid under sleeves): All increases are worked from the right side! Work as far as the stitch with the marker, make 1 yarn over, work the stitch with the marker in garter stitch as before, 1 yarn over (= 2 stitches increased at marker). On the next row/round work the yarn overs twisted to avoid holes. The new stitches are worked into A.1 as you go. BUTTONHOLES: Work buttonholes on the right band. 1 BUTTONHOLE = start from the right side and knit together the 3rd and 4th stitch from the edge then make 1 yarn over. On the next row (wrong side) knit the yarn over = hole. Work buttonholes when the piece measures: XS: 2, 8, 14½, 20½, 27 and 34 cm = ¾", 3⅛", 5¾", 8⅛", 10⅝" and 13⅜" S: 2, 8½, 15, 21½, 28 and 35 cm = ¾", 3¼", 6", 8½", 11" and 13¾" M: 2, 9, 16, 23, 30 and 36 cm = ¾", 3½", 6¼", 9", 11¾" and 14¼" L: 2, 9, 16, 23, 30 and 38 cm = ¾", 3½", 6¼", 9 ", 11¾" and 15" XL: 2, 9, 16½, 23½, 31 and 39 cm = ¾", 3½", 6½", 12¼" and 15¼" XXL: 2, 9½, 17, 24½, 32 and 40 cm = ¾", 3¾", 6¾", 9⅝", 12½" and 15¾" NOTE: The last buttonhole is worked on the neck. ------------------------------------------------------- START THE PIECE HERE: ------------------------------------------------------- JACKET – SHORT OVERVIEW OF THE PIECE: The body is worked back and forth with circular needle, bottom up as far as the armholes. You then bind off for armholes and the back and front pieces are finished separately back and forth. The sleeves are worked in the round with double pointed needles/short circular needle, bottom up to the beginning of the sleeve cap. Then the sleeve cap is worked back and forth with circular needle to finish. The piece is sewn together at the shoulders and the sleeves are sewn in. The neck is worked in rib to finish. BODY: Cast on 137-153-163-177-195-217 stitches (including 5 band stitches on each side towards mid front) with circular needle size 4 mm = US 6 and Brushed Alpaca Silk. Purl 1 row (= wrong side). The next row is worked as follows from the right side: Work 5 band stitches in GARTER STITCH – read description above, * knit 1, purl 1 *, work from *-* until there are 6 stitches left on the row, knit 1 and finish with 5 band stitches in garter stitch. Continue this rib for 4 cm = 1½" – remember BUTTONHOLES on the right band – read description above. When the rib is finished, change to circular needle size 5 mm = US 6. Insert 1 marker in the 37th-41st-43rd-47th-51st-57th stitch in from each side (i.e. in a purled stitch seen from the right side). There are 63-71-77-83-93-103 stitches on the back piece between the stitches with markers. The markers should follow upwards in the piece; they will be used when increasing in the sides of the body. The next row is worked as follows from the right side: Work 5 band stitches in garter stitch, A.1A until there are 6 stitches left on the row, A.1B (= 1 stitch) and finish with 5 band stitches in garter stitch. Continue this pattern. REMEMBER THE KNITTING GAUGE! When the piece measures 5 cm = 2", increase 1 stitch on each side of both markers – read INCREASE TIP (= 4 stitches increased). Increase like this every 5-5-6-6-6-7 cm = 2"-2"-2⅜"-2⅜"-2⅜"-2¾" a total of 4 times on each side = 153-169-179-193-211-233 stitches. Continue working without further increases until the piece measures 26-27-28-29-30-31 cm = 10¼"-10⅝"-11"-11⅜"-11¾"-12¼". Now bind off for the armholes on the next row as follows: Work 38-41-43-47-51-57 stitches as before (= front piece), bind off 5-7-7-7-7-7 stitches for the armhole (stitch with marker in the middle of these 5-7-7-7-7-7 stitches), work 67-73-79-85-95-105 stitches as before, bind off 5-7-7-7-7-7 stitches for the armhole and then work the remaining 38-41-43-47-51-57 stitches as before (= front piece). Finish the back and front pieces separately as described below. BACK PIECE: = 67-73-79-85-95-105 stitches. Continue A.1 back and forth as before and bind off for the armholes at the beginning of each row on each side as follows: Bind off 3 stitches 0-0-0-0-1-1 times, 2 stitches 0-1-2-2-2-3 times and 1 stitch 1-2-2-2-3-5 times = 65-65-67-73-75-77 stitches left. When the piece measures 41-43-45-47-49-51 cm = 16⅛"-17"-17¾"-18½"-19¼"-20" bind off the middle 23-23-25-25-25-27 stitches for the neck and each shoulder is finished separately. Continue A.1 and bind off 2 stitches on the next row from the neck = 19-19-19-22-23-23 stitches left on shoulder. Work until there is 1 row left before the piece measures 44-46-48-50-52-54 cm = 17¼"-18"-19"-19¾"-20½"-21¼". Knit 1 row from the wrong side. Then bind off with knit from the right side. Work the other shoulder in the same way. RIGHT FRONT PIECE: = 38-41-43-47-51-57 stitches. Continue A.1 back and forth as before with 5 band stitches in garter stitch towards mid front. AT THE SAME TIME bind off for the armhole at the beginning of each row from the side as follows: Bind off 3 stitches 0-0-0-0-1-1 time, 2 stitches 0-1-2-2-2-3 times and 1 stitch 1-2-2-2-3-5 times. AT THE SAME TIME when the piece measures 32-33-34-36-37-38 cm = 12½"-13"-13⅜"-14¼"-14½"-15", place the outermost 8-8-8-8-8-9 stitches towards mid front on 1 thread for the neck; to avoid cutting the strand work the stitches before placing them on the thread. Continue A.1 and bind off at the beginning of each row from the neck as follows: Bind off 2 stitches 3 times and 1 stitch 4-4-4-5-4-5 times. After all the decreases for armhole and neck have been finished there are 19-19-19-22-23-23 stitches left on the shoulder. Work until there is 1 row left before the piece measures 44-46-48-50-52-54 cm = 17¼"-18"-19"-19¾"-20½"-21¼". Knit 1 row from the wrong side then loosely bind off with knit from the right side. LEFT FRONT PIECE: = 38-41-43-47-51-57 stitches. Continue A.1 back and forth as before with 5 band stitches in garter stitch towards mid front. AT THE SAME TIME bind off for the armhole at the beginning of each row from the side as follows: Bind off 3 stitches 0-0-0-0-1-1 time, 2 stitches 0-1-2-2-2-3 times and 1 stitch 1-2-2-2-3-5 times. AT THE SAME TIME when the piece measures 32-33-34-36-37-38 cm = 17¼"-18"-19"-19¾"-20½"-21¼", place the outermost 8-8-8-8-8-9 stitches mid front on 1 thread for the neck. Continue A.1 and bind off for the neck at the beginning of each row from the neck as follows: Bind off 2 stitches 3 times and 1 stitch 4-4-4-5-4-5 times. After all the decreases for armhole and neck have been finished there are 19-19-19-22-23-23 stitches left on the shoulder. Work until there is 1 row left before the piece measures 44-46-48-50-52-54 cm = 17¼"-18"-19"-19¾"-20½"-21¼". Knit 1 row from the wrong side. Then loosely bind off with knit from the right side. SLEEVE: Cast on 42-46-46-50-52-54 stitches with double pointed needles size 4 mm = US 6 and Brushed Alpaca Silk. Knit 1 round then work rib in the round (= knit 1/ purl 1) for 4 cm = 1½". Change to double pointed needles size 5 mm = US 8 and insert a marker in the last stitch on the round (= 1 purled stitch). Work A.1A in the round with knit over knit and garter stitch over purl. When the piece measures 6-6-6-6-8-8 cm = 2⅜"-2⅜"-2⅜"-2⅜"-3⅛"-3⅛", increase 1 stitch on each side of the stitch with the marker – read INCREASE TIP. Increase like this every 2½-2½-1½-1½-1-1 cm = ⅞"-⅞"-½"-½"-⅜"-⅜" a total of 6-6-8-8-10-10 times = 54-58-62-66-72-74 stitches. Continue working until the sleeve measures 22-21-20-20-19-18 cm = 8¾"-8¼"-8"-8"-7½"-7" but finish the round when there are still 2-3-3-3-3-3 stitches left before the stitch with the marker. NOTE: Shorter measurements in larger sizes due to broader shoulders and longer sleeve cap. On the next round bind off the first 7 stitches, then continue with pattern as before to the end of the round. Now work the sleeve cap back and forth with circular needle as follows: Continue A.1 as before and bind off for the sleeve cap at the beginning of each row on both sides as follows: Bind off 2 stitches 2-3-3-3-3-3 times on each side and 1 stitch 1-2-2-2-2-4 times on each side. Then bind off 2 stitches on each side until the sleeve measures 27-28-28-28-28-29 cm = 10⅝"-11"-11"-11"-11"-11⅜". Bind off 3 stitches 1 time on each side and then bind off the remaining stitches. The sleeve measures approx. 28-29-29-29-29-30 cm = 11"-11⅜"-11⅜"-11⅜"-11⅜"-11¾" from the top down. Work the other sleeve in the same way. ASSEMBLY: Sew the shoulder seams inside the bind-off edge. Sew in the sleeves, inside the 1 edge stitch. NECK: Knit up from the right side approx. 83 to 99 stitches around the neck (including the stitches from the threads in front) with circular needle size 4 mm = US 6 and Brushed Alpaca Silk. Start from the wrong side and work as follows: 5 band stitches in garter stitch, * purl 1, knit 1 *, work from *-* until there are 6 stitches left on the row, purl 1 and finish with 5 band stitches in garter stitch. Continue this rib with knit over knit, purl over purl and garter stitch over garter stitch; remember to work the last buttonhole in the neck. Work until the neck measures 3½ to 4 cm = 1¼" to 1½". Bind off with knit over knit, purl over purl and garter stitch over garter stitch. ASSEMBLY: Sew the buttons onto the left band. |
|||||||
Diagram explanations |
|||||||
|
|||||||
 |
|||||||
Have you finished this pattern?Tag your pictures with #dropspattern #citystreetscardigan or submit them to the #dropsfan gallery. Do you need help with this pattern?You'll find 24 tutorial videos, a Comments/Questions area and more by visiting the pattern on garnstudio.com. © 1982-2026 DROPS Design A/S. We reserve all rights. This document, including all its sub-sections, has copyrights. Read more about what you can do with our patterns at the bottom of each pattern on our site. |
|||||||


With over 40 years in knitting and crochet design, DROPS Design offers one of the most extensive collections of free patterns on the internet - translated to 17 languages. As of today we count 324 catalogs and 12290 patterns - 12280 of which are translated into English (US/in).
We work hard to bring you the best knitting and crochet have to offer, inspiration and advice as well as great quality yarns at incredible prices! Would you like to use our patterns for other than personal use? You can read what you are allowed to do in the Copyright text at the bottom of all our patterns. Happy crafting!
Post a comment to pattern DROPS 210-18
We would love to hear what you have to say about this pattern!
If you want to leave a question, please make sure you select the correct category in the form below, to speed up the answering process. Required fields are marked *.