
Popular categories
Looking for a yarn?


Comments / Questions (120)
![]() Cornelia Walker wrote:
Cornelia Walker wrote:
Bei den Angaben zu den Nadeln steht DROPS RUNDNADELN Nr. 4 und Nr. 5. Ist die Nr. gleichbedeutend mit dem Nadeldurchmesser? D.h. Nr. 4 = 4 mm bzw. Nr. 5 = 5 mm Durchmesser usw.? Ich habe zu DROPS Pro Classic Rundstricknadel Messing folgendes gefunden: 3,50 mm / Größe 4 4,00 mm / Größe 6 4,50 mm / Größe 7 5,00 mm / Größe 8 5,50 mm / Größe 9 6,00 mm / Größe 10 7,00 mm / Größe 10,75 8,00 mm / Größe 11 Größe 5 fehlt hier
26.05.2025 - 15:51DROPS Design answered:
Liebe Frau Walker, im Nadelspitzen-Set DROPS Pro Classic gehören dazu die Größe 5 mm - aber hier brauchen Sie Nadeln Nr 4 und 3, dh 4 mm + 3 mm - mehr lesen Sie hier<.a>. Sollte eine Nadelspitze in Ihrem Set fehlen, bitte Ihr DROPS Laden schreiben. Danke im voraus. Viel Spaß beim Stricken!
26.05.2025 - 16:12
![]() Joanna wrote:
Joanna wrote:
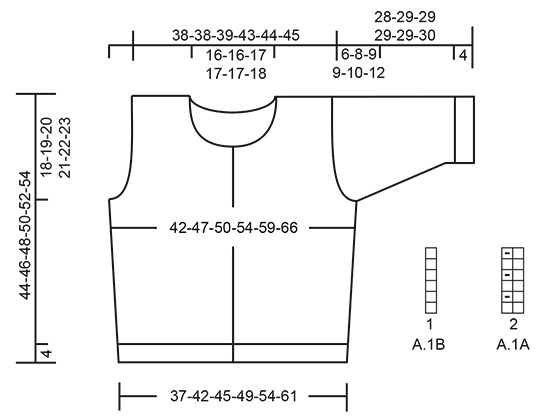
Dzień dobry, gdzie znajdę schemat A.1A i A.1B?\r\nPozdrawiam
27.03.2025 - 20:30DROPS Design answered:
Witaj, schematy A.1A i A.1 B znajdują się na dole wzoru, po prawej stronie schematycznego rysunku swetra. Pozdrawiamy!
28.03.2025 - 08:07
![]() Nagy Ilona wrote:
Nagy Ilona wrote:
Az ujja befejezéshez 3mm kötőtűt ír. Eddig 5-ös kötőtűvel dolgoztunk, miért kell 3-ra váltani? Köszönöm, Ilona
02.03.2025 - 10:42DROPS Design answered:
Kedves Ilona! Köszönjük a megjegyzését, nem kell kötőtűt cserélnie, maradhat a nagyobb a leláncoláshoz, a mintát javítottam. Sikeres kézimunkázást!
06.05.2025 - 12:54
![]() Valérie wrote:
Valérie wrote:
Bonjour, pouvez vous m indiquer la taille que porte le modèle svp? Merci par avance, cordialement Valérie
04.02.2025 - 14:55DROPS Design answered:
Bonjour Valérie, nos modèles portent en général soit une taille S soit une taille M, pour être sûre de la taille à choisir, mesurez un gilet similaire que vous avez et dont vous aimez la forme et comparez ces mesures à celles du schéma, vous pourrez ainsi trouver la taille adéquate - retrouvez plus d'infos ici. Bon tricot!
04.02.2025 - 15:30
![]() CAT wrote:
CAT wrote:
Bonjour je cherche un modèle de cardigan tricoté avec des aiguilles droites !!! je ne sais pas tricoter avec les circulaires, et de bas en haut . de préférence tricot fin Aiguilles 3 ou 3.5 Merci
16.01.2025 - 13:45DROPS Design answered:
Bonjour Cat, vous retrouverez ici nos modèles de gilets & vestes à tricoter sur aiguilles 3 ou 3,5 - échantillon 26 à 23 mailles. Ils sont tous facilement adaptables sur aiguilles droites - cette leçon pourra vous aider si besoin. Bon tricot!
16.01.2025 - 17:43
![]() Helena Niemonen wrote:
Helena Niemonen wrote:
Knapphål: gör 1 omslag först och sticka sedan tredje och fjärde maskan räta tillsammans. Du får snyggare resultat och knapphålen hamnar i mitten av framkanten!
15.01.2025 - 16:58
![]() Marianne wrote:
Marianne wrote:
Ik ben een beetje verward, er wordt eerst verwezen naar een deel dat het \"lijf\" is, daarna een linkervoorpand en rechtervoorpand en achterpand. Ik snap dat niet helemaal? Wat is het lijfje dan in deze context?
28.12.2024 - 20:01
![]() Kirsten wrote:
Kirsten wrote:
Es soll heißen, wenn noch 2 Maschen vor der markierten Masche übrig sind 🤦
27.11.2024 - 17:24
![]() Kirsten wrote:
Kirsten wrote:
Hallo und Entschuldigung, ich habe heute morgen ziemlich unverständlich geschrieben. Ich stricke die Jacke in der Größe XS, bei den Ärmeln steht, stricken bis der Ärmel eine Länge von 22cm hat, dabei die Runde beenden, wenn nicht 2 Maschen vor der markierten Masche übrig sind. Wie stricke ich dann weiter und was passiert mit diesen 2 Maschen? Vielen Dank
27.11.2024 - 17:17DROPS Design answered:
Liebe Kirsten, diese 2 Maschen werden dann abgekettet: bei der nächsten Reihe sollen Sie 7 Maschen abketten: diese 2 Maschen am Ende der Runde + die Masche mit der Markierung in der unteren Mitte + die nächsten 4 Maschen = 7 Maschen, dann stricken Sie diese Hinreihe bis zur Ende, wenden und nun stricken Sie in Hin und Rückreihen, gleichzeitig ketten Sie die Maschen für die Armkugel beidseitig ab. Viel Spaß beim Stricken!
28.11.2024 - 09:43
![]() Kirsten wrote:
Kirsten wrote:
Guten Morgen, ich stricke die Jacke in Größe XS, ich verstehe nicht was es heißt bei einer Länge von 22cm wenn noch 2 Maschen vor der markierten Masche übrig sind. Was passiert mit diesen 2 Maschen? Vielen Dank
27.11.2024 - 10:15
|
|||||||
City Streets#citystreetscardigan |
|||||||
 |
 |
||||||
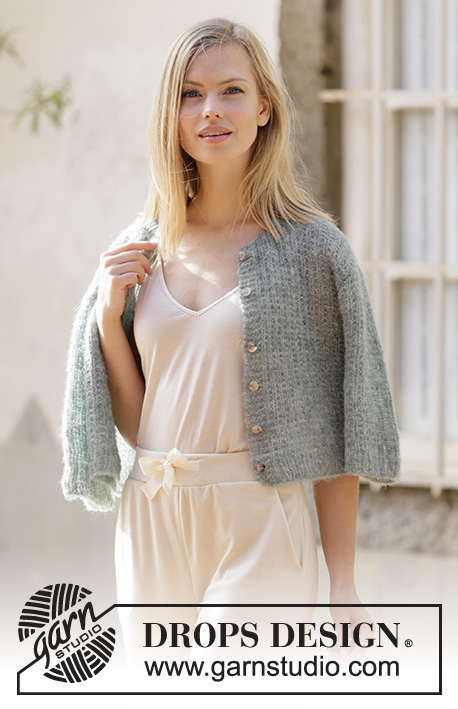
Knitted jacket in DROPS Brushed Alpaca Silk. The piece is worked with textured pattern and short sleeves. Sizes XS - XXL.
DROPS 210-18 |
|||||||
|
------------------------------------------------------- EXPLANATIONS FOR THE PATTERN: ------------------------------------------------------- RIDGE/GARTER STITCH (worked back and forth): Knit all rows. 1 ridge in height = Knit 2 rows. PATTERN: See diagram A.1. The diagram shows all rows in the pattern seen from the right side. INCREASE TIP (for sides of body and mid under sleeves): All increases are worked from the right side! Work as far as the stitch with the marker, make 1 yarn over, work the stitch with the marker in garter stitch as before, 1 yarn over (= 2 stitches increased at marker). On the next row/round work the yarn overs twisted to avoid holes. The new stitches are worked into A.1 as you go. BUTTONHOLES: Work buttonholes on the right band. 1 BUTTONHOLE = start from the right side and knit together the 3rd and 4th stitch from the edge then make 1 yarn over. On the next row (wrong side) knit the yarn over = hole. Work buttonholes when the piece measures: XS: 2, 8, 14½, 20½, 27 and 34 cm S: 2, 8½, 15, 21½, 28 and 35 cm M: 2, 9, 16, 23, 30 and 36 cm L: 2, 9, 16, 23, 30 and 38 cm XL: 2, 9, 16½, 23½, 31 and 39 cm XXL: 2, 9½, 17, 24½, 32 and 40 cm NOTE: The last buttonhole is worked on the neck. ------------------------------------------------------- START THE PIECE HERE: ------------------------------------------------------- JACKET – SHORT OVERVIEW OF THE PIECE: The body is worked back and forth with circular needle, bottom up as far as the armholes. You then cast off for armholes and the back and front pieces are finished separately back and forth. The sleeves are worked in the round with double pointed needles/short circular needle, bottom up to the beginning of the sleeve cap. Then the sleeve cap is worked back and forth with circular needle to finish. The piece is sewn together at the shoulders and the sleeves are sewn in. The neck is worked in rib to finish. BODY: Cast on 137-153-163-177-195-217 stitches (including 5 band stitches on each side towards mid front) with circular needle size 4 mm and Brushed Alpaca Silk. Purl 1 row (= wrong side). The next row is worked as follows from the right side: Work 5 band stitches in GARTER STITCH – read description above, * knit 1, purl 1 *, work from *-* until there are 6 stitches left on the row, knit 1 and finish with 5 band stitches in garter stitch. Continue this rib for 4 cm – remember BUTTONHOLES on the right band – read description above. When the rib is finished, change to circular needle size 5 mm. Insert 1 marker in the 37th-41st-43rd-47th-51st-57th stitch in from each side (i.e. in a purled stitch seen from the right side). There are 63-71-77-83-93-103 stitches on the back piece between the stitches with markers. The markers should follow upwards in the piece; they will be used when increasing in the sides of the body. The next row is worked as follows from the right side: Work 5 band stitches in garter stitch, A.1A until there are 6 stitches left on the row, A.1B (= 1 stitch) and finish with 5 band stitches in garter stitch. Continue this pattern. REMEMBER THE KNITTING TENSION! When the piece measures 5 cm, increase 1 stitch on each side of both markers – read INCREASE TIP (= 4 stitches increased). Increase like this every 5-5-6-6-6-7 cm a total of 4 times on each side = 153-169-179-193-211-233 stitches. Continue working without further increases until the piece measures 26-27-28-29-30-31 cm. Now cast off for the armholes on the next row as follows: Work 38-41-43-47-51-57 stitches as before (= front piece), cast off 5-7-7-7-7-7 stitches for the armhole (stitch with marker in the middle of these 5-7-7-7-7-7 stitches), work 67-73-79-85-95-105 stitches as before, cast off 5-7-7-7-7-7 stitches for the armhole and then work the remaining 38-41-43-47-51-57 stitches as before (= front piece). Finish the back and front pieces separately as described below. BACK PIECE: = 67-73-79-85-95-105 stitches. Continue A.1 back and forth as before and cast off for the armholes at the beginning of each row on each side as follows: Cast off 3 stitches 0-0-0-0-1-1 times, 2 stitches 0-1-2-2-2-3 times and 1 stitch 1-2-2-2-3-5 times = 65-65-67-73-75-77 stitches left. When the piece measures 41-43-45-47-49-51 cm, cast off the middle 23-23-25-25-25-27 stitches for the neck and each shoulder is finished separately. Continue A.1 and cast off 2 stitches on the next row from the neck = 19-19-19-22-23-23 stitches left on shoulder. Work until there is 1 row left before the piece measures 44-46-48-50-52-54 cm. Knit 1 row from the wrong side. Then cast off with knit from the right side. Work the other shoulder in the same way. RIGHT FRONT PIECE: = 38-41-43-47-51-57 stitches. Continue A.1 back and forth as before with 5 band stitches in garter stitch towards mid front. AT THE SAME TIME cast off for the armhole at the beginning of each row from the side as follows: Cast off 3 stitches 0-0-0-0-1-1 time, 2 stitches 0-1-2-2-2-3 times and 1 stitch 1-2-2-2-3-5 times. AT THE SAME TIME when the piece measures 32-33-34-36-37-38 cm, place the outermost 8-8-8-8-8-9 stitches towards mid front on 1 thread for the neck; to avoid cutting the strand work the stitches before placing them on the thread. Continue A.1 and cast off at the beginning of each row from the neck as follows: Cast off 2 stitches 3 times and 1 stitch 4-4-4-5-4-5 times. After all the decreases for armhole and neck have been finished there are 19-19-19-22-23-23 stitches left on the shoulder. Work until there is 1 row left before the piece measures 44-46-48-50-52-54 cm. Knit 1 row from the wrong side then loosely cast off with knit from the right side. LEFT FRONT PIECE: = 38-41-43-47-51-57 stitches. Continue A.1 back and forth as before with 5 band stitches in garter stitch towards mid front. AT THE SAME TIME cast off for the armhole at the beginning of each row from the side as follows: Cast off 3 stitches 0-0-0-0-1-1 time, 2 stitches 0-1-2-2-2-3 times and 1 stitch 1-2-2-2-3-5 times. AT THE SAME TIME when the piece measures 32-33-34-36-37-38 cm, place the outermost 8-8-8-8-8-9 stitches mid front on 1 thread for the neck. Continue A.1 and cast off for the neck at the beginning of each row from the neck as follows: Cast off 2 stitches 3 times and 1 stitch 4-4-4-5-4-5 times. After all the decreases for armhole and neck have been finished there are 19-19-19-22-23-23 stitches left on the shoulder. Work until there is 1 row left before the piece measures 44-46-48-50-52-54 cm. Knit 1 row from the wrong side. Then loosely cast off with knit from the right side. SLEEVE: Cast on 42-46-46-50-52-54 stitches with double pointed needles size 4 mm and Brushed Alpaca Silk. Knit 1 round then work rib in the round (= knit 1/ purl 1) for 4 cm. Change to double pointed needles size 5 mm and insert a marker in the last stitch on the round (= 1 purled stitch). Work A.1A in the round with knit over knit and garter stitch over purl. When the piece measures 6-6-6-6-8-8 cm, increase 1 stitch on each side of the stitch with the marker – read INCREASE TIP. Increase like this every 2½-2½-1½-1½-1-1 cm a total of 6-6-8-8-10-10 times = 54-58-62-66-72-74 stitches. Continue working until the sleeve measures 22-21-20-20-19-18 cm but finish the round when there are still 2-3-3-3-3-3 stitches left before the stitch with the marker. NOTE: Shorter measurements in larger sizes due to broader shoulders and longer sleeve cap. On the next round cast off the first 7 stitches, then continue with pattern as before to the end of the round. Now work the sleeve cap back and forth with circular needle as follows: Continue A.1 as before and cast off for the sleeve cap at the beginning of each row on both sides as follows: Cast off 2 stitches 2-3-3-3-3-3 times on each side and 1 stitch 1-2-2-2-2-4 times on each side. Then cast off 2 stitches on each side until the sleeve measures 27-28-28-28-28-29 cm. Cast off 3 stitches 1 time on each side and then cast off the remaining stitches. The sleeve measures approx. 28-29-29-29-29-30 cm from the top down. Work the other sleeve in the same way. ASSEMBLY: Sew the shoulder seams inside the cast-off edge. Sew in the sleeves, inside the 1 edge stitch. NECK: Knit up from the right side approx. 83 to 99 stitches around the neck (including the stitches from the threads in front) with circular needle size 4 mm and Brushed Alpaca Silk. Start from the wrong side and work as follows: 5 band stitches in garter stitch, * purl 1, knit 1 *, work from *-* until there are 6 stitches left on the row, purl 1 and finish with 5 band stitches in garter stitch. Continue this rib with knit over knit, purl over purl and garter stitch over garter stitch; remember to work the last buttonhole in the neck. Work until the neck measures 3½ to 4 cm. Cast off with knit over knit, purl over purl and garter stitch over garter stitch. ASSEMBLY: Sew the buttons onto the left band. |
|||||||
Diagram explanations |
|||||||
|
|||||||
|
|||||||
Have you finished this pattern?Tag your pictures with #dropspattern #citystreetscardigan or submit them to the #dropsfan gallery. Do you need help with this pattern?You'll find 25 tutorial videos, a Comments/Questions area and more by visiting the pattern on garnstudio.com. © 1982-2025 DROPS Design A/S. We reserve all rights. This document, including all its sub-sections, has copyrights. Read more about what you can do with our patterns at the bottom of each pattern on our site. |
|||||||


With over 40 years in knitting and crochet design, DROPS Design offers one of the most extensive collections of free patterns on the internet - translated to 17 languages. As of today we count 314 catalogues and 11821 patterns translated into English (UK/cm).
We work hard to bring you the best knitting and crochet have to offer, inspiration and advice as well as great quality yarns at incredible prices! Would you like to use our patterns for other than personal use? You can read what you are allowed to do in the Copyright text at the bottom of all our patterns. Happy crafting!
Post a comment to pattern DROPS 210-18
We would love to hear what you have to say about this pattern!
If you want to leave a question, please make sure you select the correct category in the form below, to speed up the answering process. Required fields are marked *.