
Popular categories
Looking for a yarn?


Comments / Questions (35)
![]() Nina wrote:
Nina wrote:
Ich stricke den Pullover in Grösse S. In der Anleitung steht: "wie folgt für die Armausschnitte abketten: 3 Maschen je 0-0-0-0-1-1 x beidseitig". Heisst das für Grösse S, dass ich zwei Reihen ohne Abketten stricken soll, oder entfällt dieser Schritt komplett?
19.02.2026 - 10:48DROPS Design answered:
Hi Nina, you have to skip this point and go directly to the next step. Happy knitting!
08.04.2026 - 15:13
![]() Valerie wrote:
Valerie wrote:
Autre question, toujours pour les manches - Rabattre ensuite 2 mailles de chaque côté jusqu'à ce que la manche mesure 27-28-28-28-28-29 cm. cela veut dire qu'il faut rabattre 4 mailles à chaque rang ? combien de mailles restantes doit on obtenir avant la prochaine consigne ci dessous? - Rabattre ensuite 1 fois 3 mailles de chaque côté et rabattre les mailles restantes. La manche mesure environ 29 cm de haut en bas. merci
03.01.2026 - 12:04DROPS Design answered:
Bonjour Valérie, non vous rabattez bien 2 mailles au début de chaque rang de chaque côté = en début de rang sur l'endroit et en début de rang sur l'envers jusqu'à ce que vous ayez atteint la hauteur requise, veillez juste à bien avoir rabattu le même nombre de mailles de chaque côté. Le nombre de mailles restant dépendra de votre tension en hauteur, ce qui compte ici c'est la hauteur et non le nombre de mailles. Rabattez ensuite encore 3 m au début des 2 rangs suivants; la manche mesure 29 cm au total. Bon tricot!
05.01.2026 - 10:43
![]() Valérie wrote:
Valérie wrote:
Bonjour, pouvez vous éclaircir ces instructions pour les manches. - rabattre pour l'arrondi des manches au début de chaque rang de chaque côté: 3 fois 2 mailles de chaque côté et 2 fois 1 maille de chaque côté. cela fait donc 16 mailles de moins?
03.01.2026 - 12:01DROPS Design answered:
Bonjour Valérie, tout à fait, vous allez rabattre d'abord 2 mailles au début des 3 rangs suivants (soit 3 x 2 m au début de chaque rang sur l'endroit aussi bien que sur l'envers) puis vous rabattrez 1 maille au début des 4 rangs suivants (soit 2 x 1 m de chaque côté) = vous aurez rabattu (3x2 m) + (2x1 m) de chaque côté soit 8 m de chaque côté et 16 m au total. Bon tricot!
05.01.2026 - 10:42
![]() Karin wrote:
Karin wrote:
Hej! Där dstår markering av storlekarna börjar d på extra small..sen där under börjar storlekarna på small..viktigt för migeftrrssom jag har exakt 125 gr som skall räcka tillen storlek medium..så undrar vad som är rätt😁
12.09.2024 - 19:21DROPS Design answered:
Hei Karin. Her har det vært en tastefeil på den svenske siden. Den minste str. er XS og til den går det 125 gram garn (den samme garnmengden som brukes i str. S). Takk for at du gjorde oss oppmerksom på dette, vi oppdaterer siden asap. mvh DROPS Design
16.09.2024 - 13:09
![]() Nicole wrote:
Nicole wrote:
Bonjour, je comprends les jetés et les mailles torse, cependant, si je fais un jeté avant le marqueur et un autre après ce même marqueur, au rang suivant je vais décaler tout mon diagramme A.1 ? Où dois-je faire mes jetés , au rang tricoté en endroit ou au rang une m, endroit et une m. Envers ? Ou les jetés je les tricotes toujours en envers ou toujours en endriit pour garder mon A1 identique et les augmentations des côtés resterons plus ou moins cachées?
13.06.2024 - 11:41DROPS Design answered:
Bonjour Nicole, vous ne devez pas décaler A.1, vous devez incorporer les nouvelles mailles en suivant le diagramme A.1, autrement dit, après la 1ère augmentation, vous aurez 3 m point mousse de chaque côté, après la 2ème augmentation, le motif continuera de nouveau tout le tour, après la 3ème augmentation, vous aurez 3 m point mousse de chaque côté et après la 4ème augmentation, le motif tombera de nouveau juste sur les côtés. Bon tricot!
13.06.2024 - 14:01
![]() Nicole Emond wrote:
Nicole Emond wrote:
2e courriel Est-ce bien si j'ai allongé mon chandail en tricotant 5 cm après les côtes, avant les premières augmentations ? Merci pour votre dévouement !
09.06.2024 - 05:01DROPS Design answered:
Bonjour Mme Emond, comme indiqué ci-dessous, vous pouvez recalculer les augmentations des côtés en vous basant sur la hauteur que vous avez choisi. Vous pouvez vous baser sur un modèle de tension similaire avec la longueur voulue , cela pourra vous inspirer. Bon tricot!
10.06.2024 - 08:05
![]() Nicole Emond wrote:
Nicole Emond wrote:
Bonjour, il est important de Noter que je suis une novice dans le tricot, voilà c'est dit. J'ai trois questions. 1- Le diagramme A-1 c-à-d, 1 rang en endroit et le 2e, une m. Endroit et une m. ENnevers et on répète ces 2 rangs tout le long du tricot ? 2- Après les côtés sur 4 cm, je tricote juste un cm et je commence les augmentations ? 3- Comment faire si je veux allonger un peu mon chandail , de quelques cm ? Merci !!!
09.06.2024 - 04:42DROPS Design answered:
Bonjour Mme Emond, quand on tricote A.1 en rond, on va alterner les 2 rangs comme vous l'indiquez, vous avez ainsi des côtes (1 m jersey, 1 m point mousse), quand vous tricoterez en allers et retours, il faudra suivre les indications des symboles sur l'envers, pour tricoter la m jersey à l'envers et la m point mousse à l'endroit. Effectivement, les augmentations commencent 1 cm après les côtes. En fonction de la longueur à ajouter, calculez éventuellement comment répartir les augmentations sur toute la longueur avant les emmanchures. Bon tricot!
10.06.2024 - 08:04
![]() Nicole Emond wrote:
Nicole Emond wrote:
Bonjour, j'adore ce modèle, mais je ne sais quelle grandeur que je dois tricoter... J'ai 39 pouces à la taille et 36 1/2 pour le tour de poitrine ? Merci
06.06.2024 - 20:21DROPS Design answered:
Bonjour Mme Emond, mesurez un vêtement similaire que vous avez et dont vous aimez la forme et comparez ces mesures à celles du schéma (attention, elles sont en cm); retrouvez plus d'infos sur les tailles ici - convertissez les cm en pouces (ou l'inverse) si besoin ici. Bon tricot!
07.06.2024 - 07:39
![]() Elisabet Ohlsson wrote:
Elisabet Ohlsson wrote:
Ska man borsta tröjan för att Brushed Alpacka silk ska bli jämnt luddig över hela tröjan?
18.01.2024 - 19:11DROPS Design answered:
Hej Elisabeth, nej garnet er børstet og resultatet bliver jämnt luddigt över hela tröjan :)
19.01.2024 - 10:53
![]() Isabelle Calleau wrote:
Isabelle Calleau wrote:
Bonjour, concernant l'aisance du modèle je ne vois pas d'indication sur le patron ? D'après la photo je pense qu'il y a une aisance positive mais de combien ? merci
11.01.2024 - 10:54DROPS Design answered:
Bonjour Mme Calleau, nous n'utilisons pas ce concept, à chacune de trouver l'aisance qu'elle souhaite. Ainsi pour trouver votre taille, choisissez un pull similaire que vous avez et dont vous aimez la forme et comparez ces mesures à celles du schéma. Retrouvez plus d'infos sur les tailles ici. Bon tricot!
11.01.2024 - 15:38
|
|||||||
City Streets Sweater#citystreetssweater |
|||||||
 |
 |
||||||
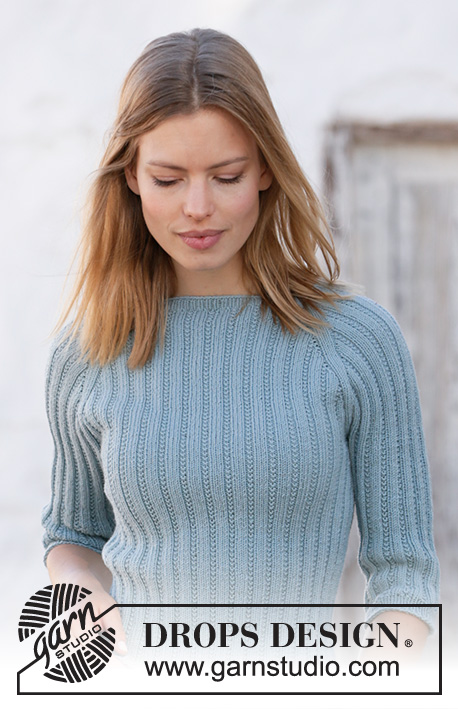
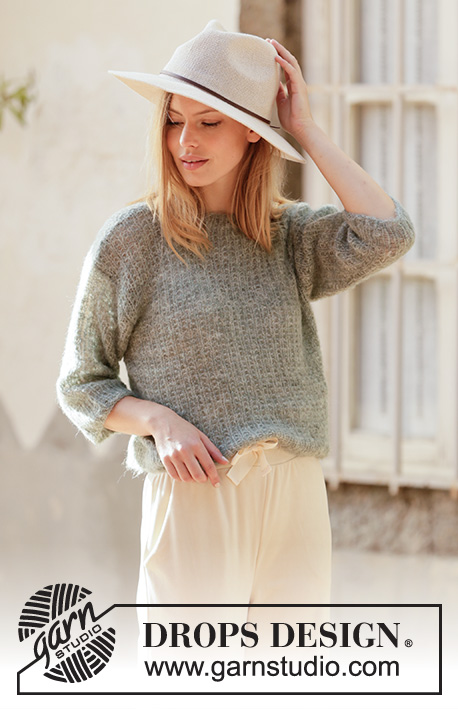
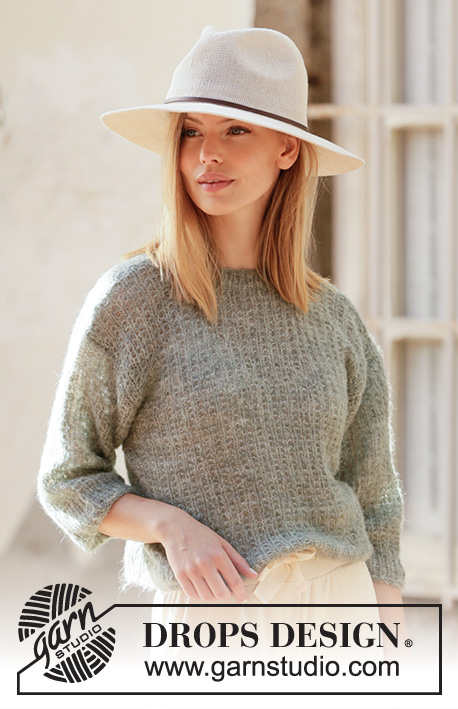
Knitted sweater in DROPS Brushed Alpaca Silk. The piece is worked with textured pattern and short ¾ sleeves. Sizes XS - XXL.
DROPS 210-17 |
|||||||
|
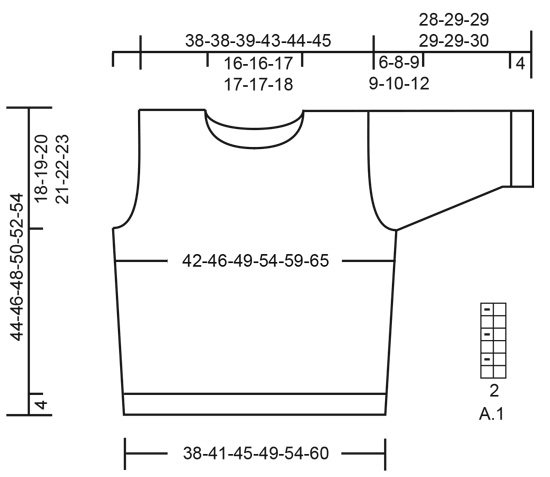
------------------------------------------------------- EXPLANATIONS FOR THE PATTERN: ------------------------------------------------------- PATTERN: See diagram A.1. The diagram shows all rows in the pattern seen from the right side. INCREASE TIP (for sides of body and mid under sleeves): Work as far as the stitch with the marker, make 1 yarn over, work the stitch with the marker in garter stitch as before, 1 yarn over (= 2 stitches increased at marker). On the next round work the yarn overs twisted to avoid holes. The new stitches are worked into A.1 as you go. ------------------------------------------------------- START THE PIECE HERE: ------------------------------------------------------- SWEATER – SHORT OVERVIEW OF THE PIECE: The body is worked in the round with circular needle bottom up, as far as the armholes. Stiches are bind off for the armholes and the front and back pieces are finished back and forth, separately. The sleeves are worked in the round with double pointed needles/short circular needle bottom up, as far as the beginning of the sleeve cap. The sleeve cap is worked back and forth with circular needle. The piece is sewn together at the shoulders and the sleeves are sewn in. The neck is worked in rib to finish. BODY: Cast on 128-140-152-168-184-204 stitches with circular needle size 4 mm = US 6 and Brushed Alpaca Silk. Knit 1 round then work rib in the round (= knit 1/ purl 1) for 4 cm = 1½". When the rib is finished change to circular needle size 5 mm = US 8. Insert 1 marker in the 64th-70th-76th-84th-92nd-102nd stitch on the round and 1 marker in the last stitch on the round – both markers sit in purled stitches. Allow them to follow you work onwards, they will be used when increasing in the sides of the body. Then work A.1 in the round. REMEMBER THE KNITTING GAUGE! When the piece measures 5 cm = 2", increase 1 stitch on each side of both markers – read INCREASE TIP (= 4 stitches increased). Increase like this every 5-5-6-6-6-7 cm = 2"-2"-2⅜"-2⅜"-2⅜"-2¾" a total of 4 times on each side = 144-156-168-184-200-220 stitches. Continue without further increases until the piece measures 26-27-28-29-30-31 cm = 10¼"-10⅝"-11"-11⅜"-11¾"-12¼". Now bind off for the armholes on the next round as follows: Bind off 3 stitches for the armhole, work 65-71-77-85-93-103 stitches as before (= back piece), bind off 7 stitches for the armhole (stitch with marker in the middle of these 7 stitches), work 65-71-77-85-93-103 stitches as before (= front piece) and bind off the remaining 4 stitches for the armhole. Cut the strand. Finish the front and back pieces separately as described below. BACK PIECE: = 65-71-77-85-93-103 stitches. Continue A.1 back and forth and bind off for the armholes at the beginning of each row on both sides as follows: Bind off 3 stitches 0-0-0-0-1-1 times, 2 stitches 0-1-2-2-2-4 times and 1 stitch 0-1-1-2-2-2 times = 65-65-67-73-75-77 stitches left. When the piece measures 41-43-45-47-49-51 cm = 16⅛"-17"-17¾"-18½"-19¼"-20" bind off the middle 23-23-25-25-25-27 stitches for the neck and each shoulder is finished separately. Continue A.1 and bind off 2 stitches on the next row from the neck = 19-19-19-22-23-23 stitches left on the shoulder. Work until there is 1 row left before the piece measures 44-46-48-50-52-54 cm = 17¼"-18"-19"-19¾"-20½"-21¼". Knit 1 row from the wrong side. Then loosely bind off with knit from the right side. Work the other shoulder in the same way. FRONT PIECE: = 65-71-77-85-93-103 stitches. Continue A.1 back and forth and bind off for the armholes at the beginning of each row on both sides as follows: Bind off 3 stitches 0-0-0-0-1-1 time, 2 stitches 0-1-2-2-2-4 times and 1 stitch 0-1-1-2-2-2 times = 65-65-67-73-75-77 stitches left. Continue working until the piece measures 38-39-40-42-43-44 cm = 15"-15¼"-15¾"-16½"-17"-17¼". Now place the middle 15 stitches on 1 thread for the neck and each shoulder is finished separately. Continue A.1 and bind off for the neck at the beginning of each row from the neck as follows: Bind off 2 stitches 2 times and 1 stitch 2-2-3-3-3-4 times = 19-19-19-22-23-23 stitches left on the shoulder. Work until there is 1 row left before the piece measures 44-46-48-50-52-54 cm = 17¼"-18"-19"-19¾"-20½"-21¼". Knit 1 row from the wrong side. Then loosely bind off with knit from the right side. Work the other shoulder in the same way. SLEEVE: Cast on 42-46-46-50-52-54 stitches with double pointed needles size 4 mm = US 6 and Brushed Alpaca Silk. Knit 1 round then work rib in the round (= knit 1/ purl 1) for 4 cm = 1½". Change to double pointed needles size 5 mm = US 8 and insert a marker in the last stitch on the round (= 1 purled stitch). Work A.1 in the round with knit over knit and garter stitch over purl. When the piece measures 6-6-6-6-8-8 cm = 2⅜"-2⅜"-2⅜"-2⅜"-3⅛"-3⅛", increase 1 stitch on each side of the stitch with the marker – read INCREASE TIP. Increase like this every 2½-2½-1½-1½-1-1 cm = ⅞"-⅞"-½"-½"-⅜"-⅜" a total of 6-6-8-8-10-10 times = 54-58-62-66-72-74 stitches. Continue working until the sleeve measures 22-21-20-20-19-18 cm = 8¾"-8¼"-8"-8"-7½"-7" but finish the round when there are still 3 stitches left before the stitch with the marker. NOTE: Shorter measurements in larger sizes due to broader shoulders and longer sleeve cap. On the next round bind off the first 7 stitches, then continue with pattern as before to the end of the round. Now work the sleeve cap back and forth with circular needle as follows: Continue A.1 as before and bind off for the sleeve cap at the beginning of each row on both sides as follows: Bind off 2 stitches 2-3-3-3-3-3 times on each side and 1 stitch 1-2-2-2-2-4 times on each side. Then bind off 2 stitches on each side until the sleeve measures 27-28-28-28-28-29 cm = 10⅝"-11"-11"-11"-11"-11⅜". Bind off 3 stitches 1 time on each side and then bind off the remaining stitches. The sleeve measures approx. 28-29-29-29-29-30 cm = 11"-11⅜"-11⅜"-11⅜"-11⅜"-11¾" from the top down. Work the other sleeve in the same way. ASSEMBLY: Sew the shoulder seams inside the bind-off edge. Sew in the sleeves inside the 1 edge stitch. NECK: Start from the right side on the one shoulder and knit up approx. 64 to 78 stitches around the neck (including the stitches from the threads in front) with circular needle size 4 mm = US 6 and Brushed Alpaca Silk. Work rib in the round (= knit 1 / purl 1) and match the rib with knit over knit and purl over garter stitch over the stitches on the thread mid front. Work until the neck measures 3½ to 4 cm = 1¼"-1½". Bind off with knit over knit, purl over purl and garter stitch over garter stitch. |
|||||||
Diagram explanations |
|||||||
|
|||||||
 |
|||||||
Have you finished this pattern?Tag your pictures with #dropspattern #citystreetssweater or submit them to the #dropsfan gallery. Do you need help with this pattern?You'll find 26 tutorial videos, a Comments/Questions area and more by visiting the pattern on garnstudio.com. © 1982-2026 DROPS Design A/S. We reserve all rights. This document, including all its sub-sections, has copyrights. Read more about what you can do with our patterns at the bottom of each pattern on our site. |
|||||||


With over 40 years in knitting and crochet design, DROPS Design offers one of the most extensive collections of free patterns on the internet - translated to 17 languages. As of today we count 324 catalogs and 12290 patterns - 12280 of which are translated into English (US/in).
We work hard to bring you the best knitting and crochet have to offer, inspiration and advice as well as great quality yarns at incredible prices! Would you like to use our patterns for other than personal use? You can read what you are allowed to do in the Copyright text at the bottom of all our patterns. Happy crafting!
Post a comment to pattern DROPS 210-17
We would love to hear what you have to say about this pattern!
If you want to leave a question, please make sure you select the correct category in the form below, to speed up the answering process. Required fields are marked *.