DROPS Children 49 · Lots of new kid designs!
Product image DROPS Air yarn
DROPS Air
65% Alpaca, 28% Polyamide, 7% Wool
from 6.20 $ /50g
Get the yarn to make this pattern from 24.80$.

The yarn cost is calculated from the pattern’s smallest size and the yarn’s cheapest product type. Looking for an even better price? You might find it on the DROPS Deals!

DROPS AW2425

Mountain Moraine

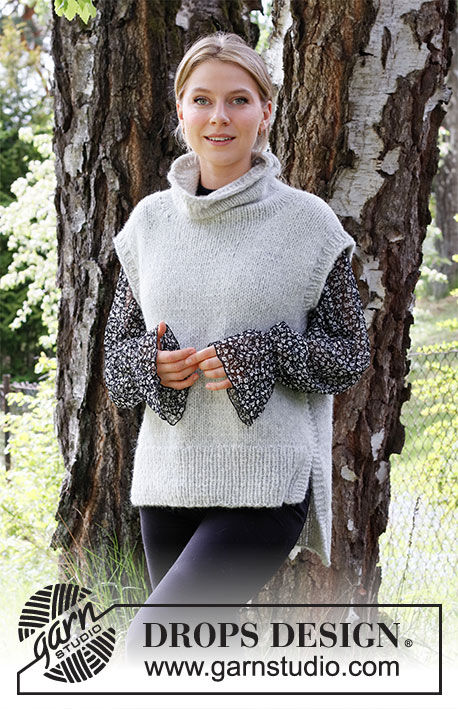
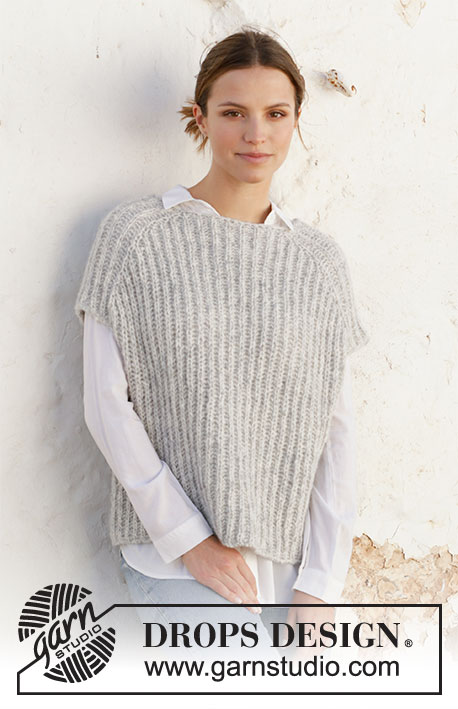
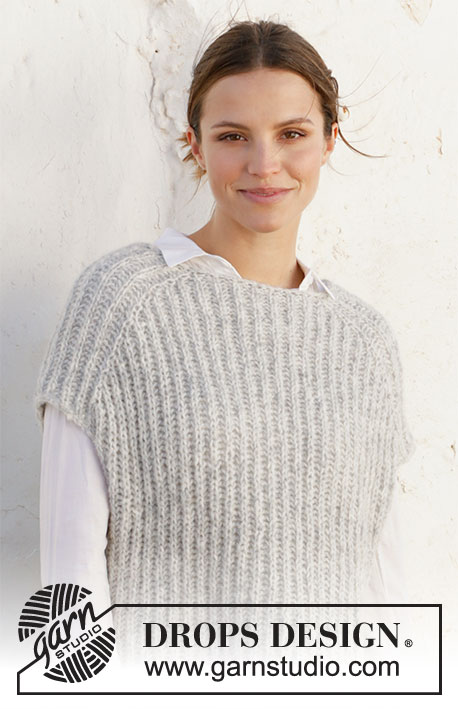
Knitted vest in DROPS Air. The piece is worked top down with English rib. Sizes XS - XXL.

Highlight Size:
DROPS 210-4

#mountainmorainevest

DROPS Design: Pattern no ai-259
Yarn group C or A + A
-------------------------------------------------------

SIZES:
XS - S - M - L - XL – XXL

Finished measurements:
Chest measurements: 102-110-112-124-130-142 cm = 40"-43⅜"-44"-48¾"-51¼"-55¾"
Full length: 53-55-57-59-61-63 cm = 21"-21⅝"-22½"-23¼"-24"-24¾"

All measurements in charts are in cm.

MATERIALS:
DROPS AIR from Garnstudio (belongs to yarn group C)
200-200-250-250-300-300 g color 03, pearl grey

KNITTING GAUGE:
11 stitches in width and 32 rows in height with English rib = 10 x 10 cm = 4" x 4".

NEEDLES:
DROPS CIRCULAR NEEDLE SIZE 7 MM = US 10,75: Length 40 cm = 16" and 80 cm = 32" for English rib.
DROPS CIRCULAR NEEDLE SIZE 6 MM = US 10: Length 40 cm = 16" for neck.
Needle size is only a guide. If you get too many stitches on 10 cm = 4", change to a larger needle size. If you get too few stitches on 10 cm = 4", change to a smaller needle size.

-------------------------------------------------------

Alternative Yarn – See how to change yarns here
Yarn Groups A to F – Use the same pattern and change the yarn here
Yarn usage using an alternative yarn – Use our yarn converter here

-------------------------------------------------------

You might also like...

Product image DROPS Air
DROPS Air
65% Alpaca, 28% Polyamide, 7% Wool
from 6.20 $ /50g
Get the yarn to make this pattern from 24.80$.

The yarn cost is calculated from the pattern’s smallest size and the yarn’s cheapest product type. Looking for an even better price? You might find it on the DROPS Deals!

Pattern instructions

NOTE: This pattern is written in American English. All measurements in charts are in cm. Convert from inches to cm here. There are different terms for crocheting in American and British English. If this pattern includes crochet, convert "crochet terms" here. See this pattern in British English here.
-------------------------------------------------------

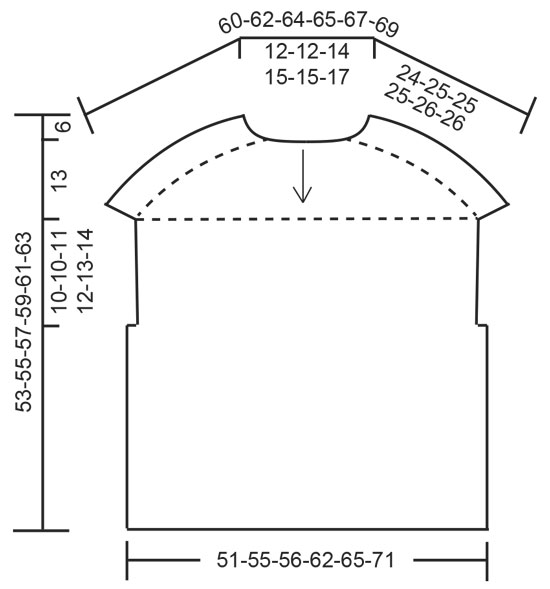
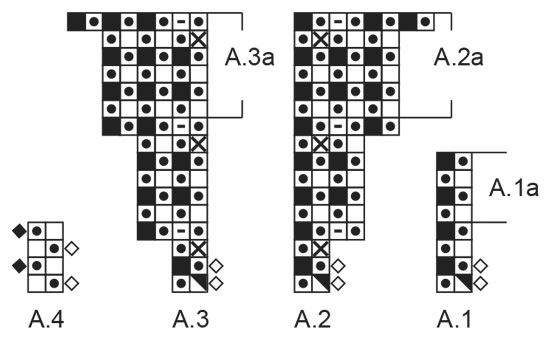
EXPLANATIONS FOR THE PATTERN:

-------------------------------------------------------

RIDGE/GARTER STITCH (worked back and forth):
Knit all rows.
1 ridge in height = Knit 2 rows.

PATTERN:
See diagrams A.1 to A.4 (worked with English rib).

DECREASE TIP (evenly spaced):
To work out how to decrease evenly, count the total number of stitches on needle (e.g. 62 stitches) and divide by number of decreases to be made (e.g. 10) = 6.2.
In this example decrease by purling each 5th and 6th stitch together.

-------------------------------------------------------

START THE PIECE HERE:

-------------------------------------------------------

VEST – SHORT OVERVIEW OF THE PIECE:
The neck and yoke are worked in the round with circular needle from mid back, top down. Stiches are increased for the shoulders before the piece is divided and the front and pieces worked separately as far as the bottom of the armholes. The pieces are rejoined and the body continued in the round.

NECK:
Cast on 62-62-66-70-70-74 stitches with circular needle size 6 mm = US 10 and Air. Purl 1 round, purl 1 more round and decrease 10 stitches evenly spaced – read DECREASE TIP = 52-52-56-60-60-64 stitches.
Purl 1 round. Change to circular needle size 7 mm = US 10,75.

YOKE:
Work pattern as follows: A.1 (= 2 stitches) over the first 6-6-6-8-8-8 stitches (= half back piece), A.2 (= 2 stitches), A.1 over 12 stitches, A.3 (= 2 stitches = shoulder), A.1 over 10-10-12-14-14-16 stitches (= front piece), A.2 over 2 stitches, A.1 over 12 stitches, A.3 over 2 stitches (= shoulder) and A.1 over the last 4-4-6-6-6-8 stitches (= half back piece). REMEMBER THE KNITTING GAUGE!
When A.1 has been completed 1 time in height, repeat A.1a onwards.
When A.2 and A.3 have been completed 1 time in height, repeat A.2a and A.3a onwards; i.e. continue to increase every 6th round, the increased stitches are worked in English rib.
When A.2a and A.3a have been worked a total of 8-9-9-10-11-12 times in height there are 132-140-144-156-164-176 stitches on the needle. Work A.1a over all stitches until the piece measures 24-25-25-25-26-26 cm = 9½"-9¾"-9¾"-9¾"-10¼"-10¼" at the longest point (i.e. measured along the shoulder); adjust so the next round is purled.
Now divide the piece for front and back pieces and the shoulder stitches are bind off as follows:
Work 26-28-28-32-34-36 stitches in English rib, 1 stitch in GARTER STITCH – read description above (= half back piece), bind off the next 13 stitches (yarn overs are bind off as separate stitches), 1 stitch in garter stitch, work 51-55-57-63-67-73 stitches in English rib, 1 stitch in garter stitch (= front piece), bind off the next 13 stitches (yarn overs are bind off as separate stitches), work 1 stitch in garter stitch and English rib over the last 25-27-29-31-33-37 stitches.
Cut the strand.
Now continue the armholes and back piece, working back and forth.
Allow the other stitches to remain on the needle.

BACK PIECE:
= 53-57-59-65-69-75 stitches.
Work as follows from the right side: 1 stitch in garter stitch, A.4 (= 2 stitches) until there is 1 stitch left (i.e. the English rib pattern starts and ends with 1 purled English rib stitch) and finish with 1 stitch in garter stitch.
Continue this pattern back and forth for 10-10-11-12-13-14 cm = 4"-4"-4⅜"-4¾"-5⅛"-5½", measured along the garter stitch; make sure the last row is from the wrong side. Allow the stitches to remain on the needle and work the front piece.

FRONT PIECE:
Work the 53-57-59-65-69-75 stitches on the front piece in the same way as the back piece.

BODY:
Work A.1a over the front piece (i.e. the garter stitches on each side become knitted English rib stitches), cast on 3 stitches, work A.1a over the back piece and cast on 3 stitches at the end of the row = 112-120-124-136-144-156 stitches.
Now work A.1a in the round over all the stitches. On the first round work the 3 cast-on stitches under each sleeve without yarn overs.
When the piece measures 47-49-51-53-55-57 cm = 18½"-19¼"-20"-21"-21⅝"-22½" (measured from the neck) bind off with knit; yarn overs are bind off as separate stitches (to avoid the bind-off edge being tight).

Diagram

All measurements in charts are in cm.

knit<br />
= knit
work from right side<br />
= work from right side
work from wrong side<br />
= work from wrong side
make 1 yarn over, slip 1 stitch onto the right needle as if to purl<br />
= make 1 yarn over, slip 1 stitch onto the right needle as if to purl
knit yarn over and stitch together<br />
= knit yarn over and stitch together
purl yarn over and stitch together<br />
= purl yarn over and stitch together
work 3 stitches in knitted stitch and yarn over as follows: knit the yarn over and knitted stitch together but do not slip them from the needle, make 1 yarn over right needle and knit the yarn over and stitch together 1 more time, slip the knitted stitch and yarn over that was knitted in off the left needle = 3 stitches<br />
= work 3 stitches in knitted stitch and yarn over as follows: knit the yarn over and knitted stitch together but do not slip them from the needle, make 1 yarn over right needle and knit the yarn over and stitch together 1 more time, slip the knitted stitch and yarn over that was knitted in off the left needle = 3 stitches
purl = purl
knitting direction<br />
= knitting direction
Diagram for DROPS 210-4
Do you have a question? See a list of frequently asked questions (FAQ)

Knitting tension is what determines the final measurements of your work, and is usually measured per 10 x 10 cm. It is provided like so: number of stitches in width x number of rows in height - eg: 19 stitches x 26 rows = 10 x 10 cm.

The knitting tension is very individual; some people knit/crochet loosely while others work tightly. You adjust the knitting tension with the needle size, which is why the suggested needle size only serve as a guide! You need to adjust this (up or down) to ensure that YOUR knitting tension matches the knitting tension provided in the pattern. If you work with a different knitting tension than provided you will have a different yarn consumption, and your work will have different measurements than what the pattern suggests.

The knitting tension also determines which yarns can replace each other. As long as you achieve the same knitting tension you can replace one yarn with another.

See DROPS lesson: How to measure your tension/gauge

See DROPS video: How to make a gauge tension swatch

The required amount of yarn is provided in grams, eg: 450 g. To calculate how many balls you’ll need you first need to know how many grams are in 1 ball (25g, 50g or 100g). This information is available if you click on the individual yarn quality on our pages. Divide the amount required with the amount of each ball. For example, if each ball is 50g (the most common amount), the calculation will be as follows: 450 / 50 = 9 balls.

The important thing when changing from one yarn to another is that the knitting/crochet tension remains the same. This is so that the measurements of the finished piece will be the same as on the sketch provided. It is easier to achieve the same knitting tension using yarns from the same yarn group. It is also possible to work with multiple strands of a thinner yarn to achieve the knitting tension of a thicker one. Please try our yarn converter. We recommend you to always work a test swatch.

Please NOTE: when changing yarn the garment might have a different look and feel to the garment in the photo, due to individual properties and qualities of each yarn.

See DROPS lesson: Can I use a different yarn than the one mentioned in the pattern?

All our yarns are categorised into yarn groups (from A to F) according to thickness and knitting tension – group A contains the thinnest yarns and group F the thickest. This makes it easier for you to find alternative yarns to our patterns, should you wish to switch yarn. All yarns within the same group have a similar knitting tension and can easily replace each other. However, different yarn qualities have different structures and properties which will give the finished work a unique look and feel.

Click here for an overview of the yarns in each yarn group

At the top of all our patterns you’ll find a link to our yarn converter, which is a helpful tool should you wish to use a different yarn than suggested. By filling in the yarn quality you wish to replace, the amount (in your size) and number of strands, the converter will present good alternative yarns with the same knitting tension. Additionally it will tell you how much you’ll require in the new qualities and whether you’ll need to work with multiple strands. Most skeins are 50g (some are 25g or 100g).

If the pattern is worked with multiple colours, every colour will have to be converted separately. Similarly, if the pattern is worked with several strands of different yarns (for example 1 strand Alpaca and 1 strand Kid-Silk) you will have to find alternatives for each, individually.

Click here to see our yarn converter

Since different yarns have different qualities and textures we have chosen to keep the original yarn in our patterns. However, you can easily find options among our available qualities by using our yarn converter, or simply pick a yarn from the same yarn group.

It is possible that some retailers still have discontinued yarns in stock, or that someone has a few skeins at home that they would like to find patterns for.  

The yarn converter will provide both alternative yarn as well as required amount in the new quality.

If you think it's hard to decide what size to make, it can be a good idea to measure a garment you own already and like the size of. Then you can pick the size by comparing those measures with the ones available in the pattern's size chart.

You'll find the size chart at the bottom of the pattern.

See DROPS lesson: How to read size chart

The needle size provided in the pattern serves only as a guide, the important thing is to follow the knitting tension. And since knitting tension is very individual, you will have to adjust the needle size to ensure that YOUR tension is the same as in the pattern – maybe you’ll have to adjust 1, or even 2 needle sizes, up or down to achieve the correct tension. For this, we recommend that you work test swatches.

Should you work with a different knitting tension than the one provided, the measurements of the finished garment might deviate from the measurement sketch.

See DROPS lesson: How to measure your tension/gauge

See DROPS video: How to make a gauge tension swatch

Working a garment top-down provides more flexibility and room for personal adjustment. For example it is easier to try the garment on while working, as well as making adjustments to length of yoke and shoulder caps.

The instructions are carefully explaining every step, in the correct order. Diagrams are adjusted to the knitting direction and are worked as usual.

The diagram depicts all rows/rounds, and every stitch seen from the right side. It is read from bottom to top, from right to left. 1 square = 1 stitch.

When working back and forth, every other row is worked from the right side and every other row is worked from the wrong side. When working from the wrong side, the diagram will have to be worked reversed: from left to right, knit stitches are purled, purl stitches are knit etc.

When working in the round every round is worked from the right side and the diagram are worked from right to left on all rounds.

See DROPS lesson: How to read knitting diagrams

The diagram depicts all rows/rounds, and every stitch seen from the right side. It is worked from bottom to top, from right to left.

When working back and forth every other row is worked from the right side: from right to left and every other row is worked from the wrong side: from left to right.

When working in the round, every row in the diagram are worked from the right side, from right to left.

When working a circular diagram you start in the middle and work your way outwards, counter clockwise, row by row.

The rows usually start with a given number of chain stitches (equivalent to the height of the following stitch), this will either be depicted in the diagram or explained in the pattern.

See DROPS lesson: How to read crochet diagrams

Instructions for working several diagrams after each other on the same row/round, will often be written like so: “work A.1, A.2, A.3 a total of 0-0-2-3-4 times". This means you work A.1 once, then A.2 is worked once, and A.3 is repeated (in width) the number of times provided for your size – in this case like so: S = 0 times, M = 0 times, L=2 times, XL= 3 times and XXL = 4 times.

The diagrams are worked as usual: begin with the first row in A.1, then work the first row in A.2 etc.

See DROPS lesson: How to read knitting diagrams

See DROPS lesson: How to read crochet diagrams

The total width of the garment (from wrist-to-wrist) will be larger in the larger sizes, despite the actual sleeves being shorter. The larger sizes have longer sleeve caps and wider shoulders, so there will be a good fit in all sizes.

The measurement sketch/schematic drawing provides information regarding the full length of the garment. If it’s a jumper or a jacket the length is measured from the highest point on the shoulder (usually closest to the neckline), and straight down to the bottom of the garment. It is NOT measured from the tip of shoulder. Similarly, the length of yoke is measured from the highest point on the shoulder and down to where yoke is split into body and sleeves.

See DROPS lesson: How to read a schematic drawing

Diagrams are often repeated on the round or in height. 1 repeat is the diagram the way it appears in the pattern. If it says to work 5 repeats of A.1 in the round, then you work A.1 a total of 5 times after/next to each other in the round. If it says to work 2 repeats of A.1 vertically/in height you work the entire diagram once, then begin again at the start and work the entire diagram one more time.

Chain stitches are slightly narrower than other stitches and to avoid working the cast-on edge too tight, we simply chain more stitches to begin with. The stitch count will be adjusted on the following row to fit the pattern and measurement sketch.

The rib edge is more elastic and will contract slightly compared to, for example, stocking stitch. By increasing before the rib edge, you avoid a visible difference in width between the rib edge and the rest of the body.

It’s very easy to cast off too tightly, and by making yarn overs while casting off (and simultaneously casting these off) you avoid a too tight cast off edge.

See DROPS video: How to bind off with yarn overs (yo)

To achieve an even increase (or decrease) you can increase on, for example: every 3rd and 4th row alternately, like so: work 2 rows and increase on the 3rd row, work 3 rows and increase on the 4th. Repeat this until the increase is complete.

See DROPS lesson: Increase or decrease 1 st on every 3rd and 4th row alternately

Should you prefer to work in the round instead of back and forth, you may of course adjust the pattern. You’ll need to add steeks mid-front (usually 5 stitches), and follow the instructions. When you would normally turn and work from the wrong side, simply work across the steek and continue in the round. At the end you’ll cut the piece open, pick up stitches to work bands, and cover the cut edges.

See DROPS video: How to knit steeks and cut open

Should you prefer to work back and forth instead of in the round, you may of course adjust the pattern so you work the pieces separately and then assemble them at the end. Divide the stitches for the body in 2, add 1 edge stitch in each side (for sewing) and work the front and back pieces separately.

See DROPS lesson: Can I adapt a pattern for circular needles into straight needles?

Pattern repeats can vary slightly in the different sizes, in order to get the correct proportions. If you’re not working the exact same size as the garment in the photo, yours might deviate slightly. This has been carefully developed and adjusted so that the complete impression of the garment is the same in all sizes.

Make sure to follow instructions and diagrams for your size!

If you have found a pattern you like which is available in women’s size it’s not very difficult to convert it to men’s size. The biggest difference will be the length of sleeves and body. Start working on the women size that you think would fit across the chest. The additional length will be worked right before you cast off for the armhole/sleeve cap. If the pattern is worked top-down you can add the length right after the armhole or before the first decrease on sleeve.

Regarding additional yarn amount, this will depend on how much length you add, but it is better with a skein too many than too few.

All yarns will have excess fibres (from production) that might come off as lint or shedding. Brushed yarns (ie hairier yarns) have more of these loose, excess fibres, causing more shedding.

Shedding also depends on what is worn under or over the garment, and whether this pulls at the yarn fibres. It’s therefore not possible to guarantee that there will be no shedding

Below are some tips on how to get the best result when working with hairier yarns:

1. When the garment is finished (before you wash it) shake it vigorously so the looser hairs come off. NOTE: do NOT use a lint roller, brush or any method that pulls at the yarn.

2. Place the garment in a plastic bag and put it in your freezer - the temperature will cause the fibres to become less attached to each other, and excess fibres will come off easier.

3. Leave in the freezer for a few hours before taking it out and shaking it again.

4. Wash the garment according to the instructions on the yarn label.

Pilling is a natural process that happens to even the most exclusive of fibers. It's a natural sign of wear and tear that is hard to avoid, and that is most visible in high friction areas of your garment like a sweater's arms and cuffs.

You can make your garment look as new by removing the pilling, using a fabric comb or a pill/lint remover.

Still can't find the answer you need? Then scroll down and leave your question so one of our experts can try to help you. This will be done normally within 5 to 10 working days.
In the meantime, you can read the questions and answers that others have left to this pattern or join the DROPS Workshop on Facebook to get help from fellow knitters/crocheters!

Post a comment to pattern DROPS 210-4

We would love to hear what you have to say about this pattern!

If you want to leave a question, please make sure you select the correct category in the form below, to speed up the answering process. Required fields are marked *.

Comments / Questions (174)

country flag Murphy-ashton wrote:

On the first video i thought it was the smaller size, but there is only 36 stitches on it instead of the 52. The yoke starts off with A1(=2stitches) over the first 8 stitches. dosen't that mean you are repeating the A1 pattern 8 times for the extra large pattern?

15.03.2025 - 16:32

country flag Jean Murphy-Ashton wrote:

I am not hearing your video on the start of your pattern. I can watch it but no volume. I am not familiar with the English ribbing so it is difficult to start the project.

05.03.2025 - 14:59

DROPS Design answered:

Dear Mrs Murphy-Ashton, Our videos do not have sound. We are a worldwide company and our videos are watched by people speaking endless of different languages and many do not understand English. So since there is not a given language for us to use, we instead have written instructions to accompany the video, and then there is no sound to disturb while watching. Remember to follow diagram at the same time as you are watching the video. Happy knitting!

05.03.2025 - 15:47

country flag Stephanie Kruse wrote:

Sorry - should say 'shown' on the diagram

24.02.2025 - 15:31

country flag Stephanie Kruse wrote:

Thanks for your response. This is my question - I want to knit the large size but my head is bigger than the neck holes how on the diagram 30cm (as is my neck 34cm)

24.02.2025 - 15:30

DROPS Design answered:

Dear Mrs Kruse, the measurements in chart are taken flat, from side to side, so that the measurements for neck (12 to 17 cm) is matching the width of neck when piece is laying flat, not the circumference of the head. The total number of stitches includes both neck width but also shoulders. Should your tension be correct, then just cast on the number of stitches as explained for your size, make sure that your cast on edge is elastic enough for a better comfort. Happy knitting!

26.02.2025 - 10:05

country flag Stephanie wrote:

Hi I am trying to ask a question about this pattern but keep getting an error message saying I have included forbidden words or links. There are no links but I don't know which forbidden words I should not be using. I have 75 characters left and have taken out all special characters. Thank you

23.02.2025 - 18:03

DROPS Design answered:

Dear Stephanie, since we don't know your message we don't know which words are giving you trouble. Could you try indicating your question in other terms, maybe? What section of the pattern are you having trouble with? Do you think there is a mistake or do you have trouble with some explanation and want us to explain it further? Happy knitting!

23.02.2025 - 23:10

country flag Annette Kohn wrote:

Salve, non riesco a completare lo sprone del modello; tra i vari video avevo visto un'immagine del lavoro con le indicazioni esatte delle ripetizioni degli schemi con etichette accanto al lavoro, non so se sul vostro sito o su facebook, purtroppo non lo trovo più; potete indirizzarmi sul video di riferimento per favore? Grazie

11.02.2025 - 19:26

DROPS Design answered:

Buonasera Annette, se fa riferimento ai video disponibili per il modello, li può trovare sotto il titolo di fianco alla foto. Buon lavoro!

13.02.2025 - 22:31

country flag Anna-Stina wrote:

Hej. Jag har påbörjat ett flertal gånger men känner nu att de är för svårt för mig och önskar hjälp att hitta ett lättare och enklare mönster på en väst. Mvh A

05.01.2025 - 10:27

country flag Anna-Stina wrote:

Hej. Jag har påbörjat ett flertal gånger men känner nu att de är för svårt för mig och önskar hjälp att hitta ett lättare och enklare mönster på en väst. Mvh A

05.01.2025 - 10:25

country flag Toril Strandvik wrote:

Hei. Har begynt å strikke vesten men raglanfellingen blir ikke riktig . Strikker etter oppskriften men når jeg kommer litt ut i strikketøyet stemmmer ikke raglanfellingene. Det må være feil i oppskriften.

26.12.2024 - 10:01

DROPS Design answered:

Hei Toril. Fint om du oppgir hvilken str. du strikker og mer nøyaktig hvor i oppskriften du er, så kan vi hjelpe deg så godt vi kan. Har du sett på hjelpevideoene til denne vesten? Klikk på Videoer til høyre/eller under bildet. Skal ikke være noe feil med denne oppskriften. mvh DROPS Design

03.01.2025 - 10:43

country flag Jill Crawford wrote:

Explain purl yarn over and stitch together.

05.11.2024 - 23:42

DROPS Design answered:

Dear Mrs Crawford; in this video we show how to work the first rounds of this pattern following diagrams, it should then help you to understand how to purl the purled (slipped) stitch and yarn over together. Happy knitting!

06.11.2024 - 08:46