
Popular categories
Looking for a yarn?


Comments / Questions (41)
![]() Livert wrote:
Livert wrote:
Hvilken farge er silver fox? Kan ikke finne den?
07.07.2021 - 11:32DROPS Design answered:
Hej, den har fået et nyt navn, Frostet orkidé og har samme nummer 82 som tidligere :)
07.07.2021 - 13:59
![]() Louizanne wrote:
Louizanne wrote:
Bonjour, Je suis perdue dans la séparation des devants et du dos. Je suis sur une taille S. Je dois tricoter les 47 mailles du 1er devant, glisser les 61 mailles suivantes sur un fil en attente, monter 8 mailles, en tricoter 85 (dos) en glisser à nouveau 61, en monter 8 & tricoter les 47 dernières mailles. J'avoue ne pas comprendre : sur le rang retour, je dois rapprocher les mailles des devants/dos que je tricote (celles qui entourent les mailles en attente), C'est ça ?
26.04.2021 - 12:46DROPS Design answered:
Bonjour Louizanne, cette leçon montre comment tricoter un pull de haut en bas et, notamment à partir de la photo 9) comment tricoter le rang de division des manches: vous glissez les mailles des manches en attente (photos 10+13), vous montez les mailles sous la manche (photos 11 +14); au rang suivant, vous tricotez les mailles du devant, celles sous la manche, celles du dos, celles sous la 2ème manche et celle du devant. Celles des manches ne seront reprises que plus tard, quand le bas du gilet sera terminé. Bon tricot!
26.04.2021 - 12:57
![]() Henna wrote:
Henna wrote:
Hei, Piirrokset eivät näy ohjeessa.
24.04.2021 - 18:11DROPS Design answered:
Nyt piirrokset aukeavat.
05.05.2021 - 17:00
![]() Nel wrote:
Nel wrote:
Betreft patroon r - 766. Na het meerderen in het telpatroon van A1 en A2 voor maat S heb ik het aantal steken voor maat ES. Ik ben wel begonnen met 133 steken. Maar nu 233 ipv 253 op het eind. Is dit een vaker voorkomend probleem of gewoon een fout van mij.
15.02.2021 - 14:59DROPS Design answered:
Dag Nel,
In telpatroon A.2 ga je van 5 naar 10 steken, dus per herhaling 5 steken gemeerderd. Je hebt 24 herhalingen van A.2, dus dan kom je op 120 steken er bij, dus in totaal heb je dan 253 (133 + 120).
16.02.2021 - 14:37
![]() Lola wrote:
Lola wrote:
Entschuldigung, aber meine Frage hat sich doch noch nicht erübrigt, mein letzter Kommentar war natürlich ein Denkfehler, so dass die ursprüngliche Frage bleibt: nach den 5 Randma. fange ich die Reihe mit 2 re Ma. an, ende die Reihe vor den letzten 5 Randma. allerdings mit 3 Ma (die dann durch die zwei Zunahmen zu 5 re Ma. werden). Ich verstehe das nicht.
11.01.2021 - 07:16DROPS Design answered:
Liebe Lola, Ihre Frage wurde unseren Designteam weitergeleitet und die wird das überarbeiten - eine Korrektur erfolgt sicher bald, danke im voraus für Ihr Verständnis. Viel Spaß beim stricken!
12.01.2021 - 11:22
![]() Lola wrote:
Lola wrote:
Hallo, Reihe 15 endet also nicht so, wie es angefangen hat? So wie ich es verstanden habe, fängt Reihe 15 mit 2 Ma rechts an, endet (laut Diagramm A2) allerdings mit 3 Ma: [1 Ma Zunahme, 1 Ma rechts, 1 Ma Zunahme]. Das wäre ja nicht mehr symmetrisch. Danke im Voraus für Ihre Hilfe.
05.01.2021 - 21:57Lola answered:
Hallo, meine Frage hat sich erübrigt. Jetzt durch die 15. Reihe erst habe ich verstanden, dass ich A1 auch in der ganzen Reihe mit A2 stricken muss (also A1 + A2 die ganze Reihe wiederholen), ich hatte nämlich A1 nur 1x nach den ersten 5 Krausmaschen gestrickt und danach bis zu den letzten 5 Krausmaschen nur noch A2 wiederholt, was bis zur 15. Reihe eigentlich kein Problem war.
11.01.2021 - 06:18
![]() Helene Kraayvanger wrote:
Helene Kraayvanger wrote:
T hank you for your reply. I did figure it out. Just need to learn how to read :) Sweater is almost finished. Thanks again
04.01.2021 - 16:04
![]() Helene Kraayvanger wrote:
Helene Kraayvanger wrote:
Can you please tell me how to increase the sts. over the yoke. I'm omitting the "bubbles" cause of the type of yarn I'm using.
26.12.2020 - 20:47DROPS Design answered:
Dear Mrs Kraayvanger, we are unfortunately not able to adjust every pattern to every single request - thanks for your comprehension - you might try to use your favorite increase technique andn increase on row marked with an increase in diagrams. For any further individual assistance please contact the store where you bought the yarn, even per mail or telephone. Happy knitting!
04.01.2021 - 08:56
![]() Louizanne wrote:
Louizanne wrote:
Bonjour, Je m’arrache les cheveux sur les diagrammes du point fantaisie. Comment réaliser ce modèle en remplaçant le point de noeud par du jersey. D’avance merci pour votre retour.
30.11.2020 - 15:52DROPS Design answered:
Bonjour Louizanne, il vous faudra simplement augmenter aux rangs avec des augmentations comme indiqué dans les diagrammes - n'hésitez pas à exposer votre question sur les diagrammes si vous avez besoin. Votre magasin DROPS saura probablement également vous aider, même par mail ou téléphone. Bon tricot!
30.11.2020 - 16:19
![]() Corinne BORSOTTO wrote:
Corinne BORSOTTO wrote:
Merci beaucoup pour vos conseils J’ai Tout redéfait et j’ai mis des marqueurs comme conseillé C’est le rang 15 qui ne va pas 5 mailles mousse 2 mailles endroit [un point noeud (3 mailles) une augmentation une maille endroit une augmentation ] […] J’arrive à plus de 31 groupes de 8 mailles..... Merci si vous pouvez m’aider je n’arrrive pas à comprendre pourquoi
07.10.2020 - 19:54DROPS Design answered:
Bonjour Mme Borsotto, au rang 15 vous tricotez: 2 m de A.1, la maille de A.1 se tricote 3 fois pour le noeud (= la 1ère des 3 nouvelles mailles est la dernière m de A.1, les 2 autres sont les 2 premières m de A.2 = comme avant). vous augmentez 1 m dans la m suivante, tricotez 1 m, augmentez 1 m dans la m suivante, vous avez ainsi maintenant 2 m dans A.1 mais vous avez augmenté 2 mailles dans A.2; tricotez maintenant la dernière m de A.2 avec les 2 premières m du A.2 suivant et continuez ainsi. Vous aurez augmenté ainsi 2 m dans chaque A.2 à la fin de ce rang. Replacez vos marqueurs si besoin au rang suivant sur l'envers. Bon tricot!
08.10.2020 - 10:05
|
|||||||||||||
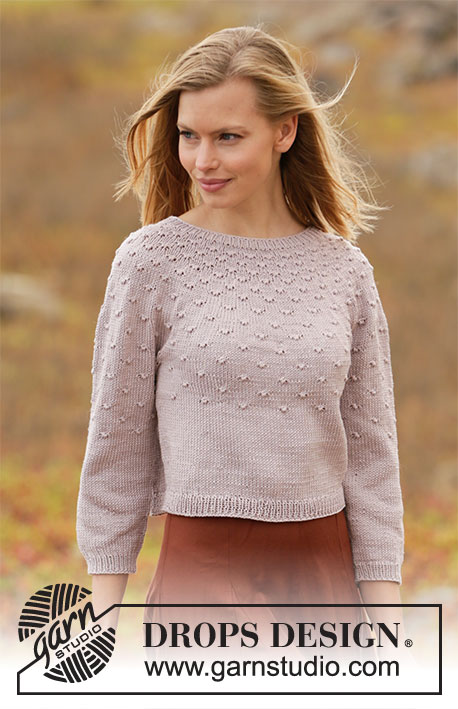
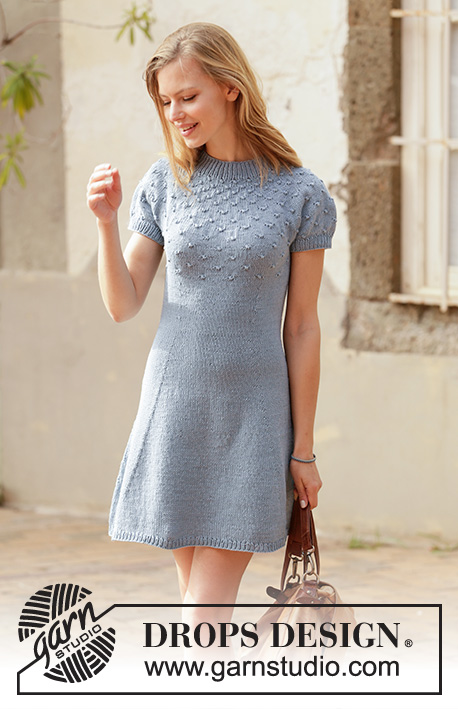
Dots and Drops Jacket#dotsanddropsjacket |
|||||||||||||
 |
 |
||||||||||||
Knitted jacket in DROPS Muskat. The piece is worked top down with round yoke, knotted pattern and ¾-length sleeves. Sizes XS - XXL.
DROPS 213-10 |
|||||||||||||
|
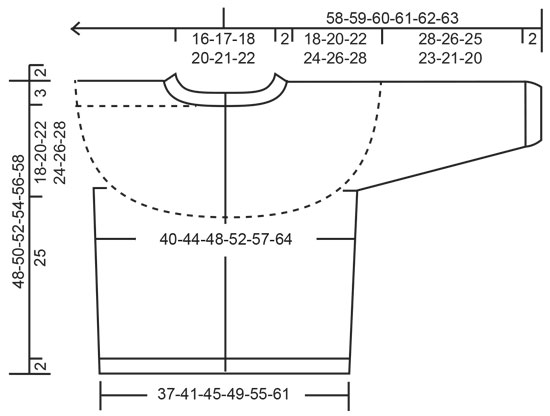
------------------------------------------------------- EXPLANATIONS FOR THE PATTERN: ------------------------------------------------------- RIDGE/GARTER STITCH (worked back and forth): Knit all rows. 1 ridge in height = Knit 2 rows. PATTERN: See diagrams A.1 to A.4. Choose diagram for your size (applies to A.1 and A.2). The diagrams show all the rows in the pattern seen from the right side. INCREASE TIP (evenly spaced): To work out how to increase evenly, count the total number of stitches on the needle (e.g. 103 stitches) minus the bands (i.e. 10 stitches) and divide the remaining stitches by the number of increases to be made (e.g. 20) = 4.7. In this example, increase from the right side by making 1 yarn over after alternatively each 4th and 5th stitch (approx.). Do not increase over the bands. On the next row (wrong side) purl the yarn overs twisted to avoid holes. DECREASE TIP (for sides of body and mid under sleeves): Decrease 1 stitch on each side of the marker thread as follows: Work until there are 3 stitches left before the marker thread, knit 2 together, knit 2 (marker thread sits between these 2 stitches) slip 1 stitch as if to knit, knit 1 and pass the slipped stitch over the knitted stitch (= 2 stitches decreased). BUTTONHOLES: Work buttonholes on right band (when garment is worn). Work from the right side when there are 3 stitches left on row as follows: Make 1 yarn over, knit 2 together and knit the last stitch. On the next row (wrong side) knit the yarn over to leave a hole. The first buttonhole is worked when the neck measures approx. 2 cm = ¾". Then work the other 5-5-6-6-6-6 buttonholes with approx. 8½-9-8-8½-8½-9 cm = 3¼"-3½"-3⅛"-3¼"-3¼"-3½" between each one. BINDING-OFF TIP: To avoid the bind-off edge being tight you can bind off with a larger size needle. If the edge is still tight, make 1 yarn over after approx. each 8th stitch at the same time as binding off and the yarn overs are bind off as normal stitches. ------------------------------------------------------- START THE PIECE HERE: ------------------------------------------------------- JACKET – SHORT OVERVIEW OF THE PIECE: The neck and yoke are worked back and forth with circular needle from mid front and top down. The yoke is divided for body and sleeves and the body continue back and forth with circular needle. The sleeves are worked in the round with double pointed needles/short circular needle, top down. NECK: Cast on 103-107-111-119-123-127 stitches (including 5 band stitches on each side towards mid front) with circular needle size 3 mm = US 2,5 and Muskat. Purl 1 row (= wrong side). The next row is worked as follows from the right side: 5 band stitches in GARTER STITCH – read description above, * knit 1, purl 1 *, work from *-* until there are 6 stitches left on the row, knit 1 and finish with 5 band stitches in garter stitch. Continue this rib for 2 cm = ¾" – remember BUTTONHOLES on right band – read description above. When the rib is finished, knit 1 row from the right side where you increase 20-26-32-34-45-56 stitches evenly spaced – read INCREASE TIP = 123-133-143-153-168-183 stitches. Purl 1 row from the wrong side (yarn overs purled twisted and bands worked in garter stitch). Insert 1 marker after the band at the beginning of the next row; the yoke will be measured from this marker! Then work the yoke as described below. YOKE: Change to circular needle size 4 mm = US 6 and work the first row from the right side as follows: 5 band stitches in garter stitch, work A.1 (= 3 stitches), A.2 until there are 5 stitches left on the row (= 22-24-26-28-31-34 repeats of 5 stitches) and finish with 5 band stitches in garter stitch. Continue this pattern and increase as shown in A.2. REMEMBER THE KNITTING GAUGE! When A.1 and A.2 have been completed there are 233-253-273-293-323-353 stitches on the needle. The next row is worked as follows from the right side: 5 band stitches in garter stitch, work A.3 (= 3 stitches), A.4 until there are 5 stitches left on the row (= 22-24-26-28-31-34 repeats of 10 stitches) and finish with 5 band stitches in garter stitch. Continue this pattern and increase as shown in A.4. After the last increase in A.4 there are 277-301-325-349-385-421 stitches on the needle. Continue working until the piece measures 18-20-22-24-26-28 cm = 7"-8"-8¾"-9½"-10¼"-11" from the marker on the neck – NOTE: In the smallest size, A.3 and A.4 are not finished at this point and in the other sizes, A.x and A.y need to be repeated to the correct length (the patterns will continue on the body and sleeves). Now divide the piece for the body and sleeves on the next row as follows: Work 43-47-52-55-61-68 stitches in garter stitch and pattern as before (= front piece), place the next 57-61-64-70-77-81 stitches on 1 thread for sleeve, cast on 8-8-8-10-10-10 new stitches on the needle (= in side under the sleeve), work 77-85-93-99-109-123 stitches in pattern as before (= back piece), place the next 57-61-64-70-77-81 stitches on 1 thread for sleeve, cast on 8-8-8-10-10-10 new stitches on the needle (= in side under the sleeve) and work the remaining 43-47-52-55-61-68 stitches in pattern and garter stitch as before (= front piece). Body and sleeves are finished separately. THE PIECE IS NOW MEASURED FROM HERE! BODY: = 179-195-213-229-251-279 stitches. Insert 1 marker thread 47-51-56-60-65-72 stitches in from each side (= 85-93-101-109-121-135 stitches between marker threads on the back piece). Allow the threads to follow your work onwards; they will be used when decreasing on each side of the body. Now continue the pattern AT THE SAME TIME as decreasing in the sides of the body as described below: Work A.x and A.y back and forth as before with 5 band stitches in garter stitch on each side towards mid front making sure you continue on the right row in the diagram after the yoke and make sure the knots are worked above the knots on the yoke. The 8-8-8-10-10-10 stitches cast on under each sleeve are worked in stockinette stitch. When the piece measures approx. 6 cm = 2⅜" from the division in all sizes, finish A.x and A.y after 1 row of knots. Then continue with stockinette stitch with 5 band stitches in garter stitch on each side. AT THE SAME TIME when the piece measures 6 cm = 2⅜" from the division in all sizes decrease 1 stitch on each side of both marker threads – read DECREASE TIP (= 4 stitches decreased). Decrease like this every 6 cm = 2⅜" a total of 3 times on each side = 167-183-201-217-239-267 stitches. Continue working until the piece measures 25 cm = 9¾" from the division in all sizes (there are 2 cm = ¾" left to finished length; you can try the jacket on and work to desired length). Knit 1 row from the right side where you increase 16-18-20-20-24-26 stitches evenly spaced – remember INCREASE TIP = 183-201-221-237-263-293 stitches (this increase prevents the rib being tight). Change to circular needle size 3 mm = US 2,5. The next row is worked as follows from the wrong side: 5 band stitches in garter stitch, * purl 1, knit 1 *, work from *-* until there are 6 stitches left on the row, purl 1 and finish with 5 band stitches in garter stitch. Continue this rib for 2 cm = ¾". Bind off with garter stitch over garter stitch, knit over knit and purl over purl – read BINDING-OFF TIP! The jacket measures approx. 48-50-52-54-56-58 cm = 19"-19¾"-20½"-21¼"-22"-22¾" from the shoulder down. SLEEVE: Place the 57-61-64-70-77-81 stitches from the thread on the one side of the piece on double pointed needles/short circular needle size 4 mm = US 6 and knit up 1 stitch in each of the 8-8-8-10-10-10 stitches cast on under the sleeve = 65-69-72-80-87-91 stitches. Insert a marker thread in the middle of the 8-8-8-10-10-10 stitches under the sleeve and allow the thread to follow your work onwards; it will be used when decreasing mid under sleeve. Now continue with pattern AT THE SAME TIME as you decrease mid under sleeve as follows: Start the round at the marker thread and work A.y in the round making sure you continue on the right row in the diagram after the yoke and that the knots are worked above the knots on the yoke. The 8-8-8-10-10-10 stitches cast on under the sleeve are worked in stockinette stitch. When the sleeve measures 12 cm = 4¾" from the division in all sizes, finish A.y after a round of knots. Continue with stockinette stitch in the round over all stitches. AT THE SAME TIME when the piece measures 2-2-2-2-3-3 cm = ¾"-¾"-¾"-¾"-1⅛"-1⅛" from the division decrease 2 stitches mid under the sleeve – read DECREASE TIP. Decrease like this every 3½-3-2½-1½-1-1 cm = 1¼"-1⅛"-⅞"-½"-⅜"-⅜" a total of 7-8-9-12-14-15 times = 51-53-54-56-59-61 stitches. Continue working until the piece measures 28-26-25-23-21-20 cm = 11"-11¼"-9¾"-9"-8¼"-8" from the division (there are 2 cm = ¾" left to finished length; you can try the jacket on and work to desired length). NOTE: Shorter measurements in larger sizes due to wider neck and longer yoke. Change to double pointed needles size 3 mm = US 2,5 and knit 1 round where you decrease 1-1-0-0-1-1 stitches = 50-52-54-56-58-60 stitches. Then work rib in the round (= knit 1 / purl 1) for 2 cm = ¾". Bind off with knit over knit and purl over purl – remember BINDING-OFF TIP. The sleeve measures approx. 30-28-27-25-23-22 cm = 11¾"-11"-10⅝"-9¾"-9"-8¾" from the division. Work the other sleeve in the same way. ASSEMBLY: Sew the buttons onto the left band. |
|||||||||||||
Diagram explanations |
|||||||||||||
|
|||||||||||||
 |
|||||||||||||
 |
|||||||||||||
Have you finished this pattern?Tag your pictures with #dropspattern #dotsanddropsjacket or submit them to the #dropsfan gallery. Do you need help with this pattern?You'll find 28 tutorial videos, a Comments/Questions area and more by visiting the pattern on garnstudio.com. © 1982-2026 DROPS Design A/S. We reserve all rights. This document, including all its sub-sections, has copyrights. Read more about what you can do with our patterns at the bottom of each pattern on our site. |
|||||||||||||


With over 40 years in knitting and crochet design, DROPS Design offers one of the most extensive collections of free patterns on the internet - translated to 17 languages. As of today we count 324 catalogs and 12290 patterns - 12280 of which are translated into English (US/in).
We work hard to bring you the best knitting and crochet have to offer, inspiration and advice as well as great quality yarns at incredible prices! Would you like to use our patterns for other than personal use? You can read what you are allowed to do in the Copyright text at the bottom of all our patterns. Happy crafting!
Post a comment to pattern DROPS 213-10
We would love to hear what you have to say about this pattern!
If you want to leave a question, please make sure you select the correct category in the form below, to speed up the answering process. Required fields are marked *.